Skip to content
When those first truly warm days hit and the farmers market stalls overflow with ruby-red berries, you know exactly what time it is: time for perfect Strawberry Shortcake! I’m Anna Kowalska, and here I share tried-and-true homemade recipes that you and your family will love. Everything I share is made with heart and flavor, designed to taste just like you remember but maybe even a little better.
There’s something about the combination of tender, slightly crisp biscuits, fresh sweet fruit, and billowy cream that just screams summer celebration. Forget those dry, crumbly store-bought things; we’re making the real deal today. This recipe for classic Strawberry Shortcake is so fast, you’ll have dessert ready in about 30 minutes flat. It’s the kind of easy baking that makes me feel totally connected to tradition, and I just know it’s going to be a huge hit at your next gathering!
Jump to:
Why You’ll Love This Strawberry Shortcake
Honestly, this recipe is a weeknight winner because it’s just so ridiculously simple, but the flavor payoff is huge. You don’t need complicated techniques, just a few minutes of focus to get that incredible homemade taste. I keep coming back to it all spring and summer long!
- It comes together in under 30 minutes total—that’s faster than ordering takeout!
- The biscuits are tender and flaky, not dense or dry like some versions.
- It highlights the bright, fresh flavor of real strawberries.
- It requires almost no special equipment, just what you likely have in your drawers right now.
Gathering Everything for Your Strawberry Shortcake
Before we even think about mixing, we need to make sure we have all our players lined up! Making biscuits is fast, so you don’t want to be hunting for the measuring cups once the butter starts getting warm. This whole process moves quickly, so having everything measured and ready—what we bakers call *mise en place*—is key to getting those light, fluffy biscuits.
Don’t worry, you won’t need anything fancy. Most of this is just standard kitchen gear. Trust me, the magic is in the ingredients, not the gadgets here!
Equipment Needed for Perfect Strawberry Shortcake
- Large mixing bowl
- Small bowl for fruit
- Baking sheet
- Parchment paper
- Pastry blender or two forks (for cutting in butter)
Ingredient List for Classic Strawberry Shortcake
The quality of your ingredients really shows through in a simple dessert like this. Make sure that butter is rock solid cold—that’s non-negotiable for flaky layers!
| Ingredient | Amount | Notes on Preparation |
|---|---|---|
| All-Purpose Flour | 2 cups (240g) | For the biscuits |
| Granulated Sugar | 1/4 cup (50g) | For the biscuits |
| Baking Powder | 1 tablespoon | This is what makes them rise! |
| Salt | 1/2 teaspoon | To balance the sweetness |
| Cold Butter | 1/2 cup (115g) | Cut into small cubes and kept very cold |
| Milk | 2/3 cup (160ml) | Use cold whole milk if you can |
| Fresh Strawberries | 2 cups | Washed and sliced |
| Whipped Cream | 1 cup | Sweetened, ready to go |
Mastering the Strawberry Shortcake Biscuit
If you want a truly stellar Strawberry Shortcake experience, the biscuit is where you win or lose the game. We aren’t making scones here; we want something light, almost cloud-like inside, with a slightly crisp, golden exterior. The secret? Keeping everything cold and mixing as little as humanly possible. Seriously, don’t be tempted to knead this dough like bread dough. Overworking it develops the gluten, and that gives you a tough, chewy result instead of a tender shortcake biscuit.
I know it feels counterintuitive when you’re used to mixing things until they are perfectly smooth, but for this recipe, less is absolutely more. Think of it like a gentle coaxing rather than a forceful mixing session. When you get this part right, the rest of the assembly is a breeze!
Mixing the Dry Ingredients and Cutting in Butter
First things first: get your oven preheated to 425℉. That high heat helps the biscuits puff up fast before the butter melts out completely. Now, grab your big bowl. Whisk together the flour, sugar, baking powder, and salt until they look uniform. This is important so you don’t end up with a bite that’s just baking powder!
Next comes the cold butter. You need to cut this in until your mixture resembles coarse crumbs, maybe like little peas or maybe even some flat flakes if you’re lucky. I usually use my pastry blender, but two forks work just fine if you don’t have one. You want to see distinct pieces of butter coated in flour. Those butter pieces are what create steam in the oven, which gives us those lovely, flaky layers in our shortcake.
Bringing the Biscuit Dough Together and Shaping
Once the butter looks right, pour in your cold milk all at once. Now, use a rubber spatula or a wooden spoon and stir it just until the dough starts to barely hold together. It will look shaggy and messy—it’s supposed to! If you see dry flour spots, that’s okay. Stop stirring the second you can’t stir anymore easily.
Tip the dough out onto a lightly floured surface. Don’t knead it! Just gently press it together into a rough circle, maybe about an inch thick. Use a biscuit cutter or even the rim of a glass to cut out your rounds. Place these right onto your parchment-lined baking sheet, leaving a little space between them so they can expand happily while baking. They need room to breathe!
Baking the Strawberry Shortcake Biscuits to Golden Perfection
Pop that tray right into the hot oven—425℉ is the magic number. They bake fast because they are relatively small and the oven is hot. You are looking for about 12 to 15 minutes. How do you know they are done? They should be beautifully golden brown on top, and if you peek underneath, the bottoms should be golden too.
When you take them out, they’ll smell incredible—that mix of cooked butter and sugar is just the best. Let them cool just enough so you can handle them without burning your fingers, but don’t wait too long! These biscuits are absolutely best when they are still slightly warm when you assemble the final Strawberry Shortcake.
Preparing the Sweet Strawberry Shortcake Toppings
While those gorgeous biscuits are cooling down just a smidge, we need to focus on the stars of the show: the strawberries and the cream! This is where the fresh, vibrant flavor of your Strawberry Shortcake really shines through. Since this recipe is designed to be fast and easy, we aren’t making any fancy macerated fruit syrups or complicated stabilized toppings. We want simple, bright flavor!
The secret here is letting the strawberries do the heavy lifting. They need a little bit of sugar to pull out their natural juices, but that’s it. Don’t rush this step, because those juices mix beautifully with the biscuit crumbs later—it’s like nature’s syrup! If you are interested in learning more about how sugar interacts with fruit to draw out moisture, you can read about osmosis.
Slicing and Sweetening Fresh Strawberries
Take your two cups of fresh strawberries and wash them well. Hull them and then slice them up. I usually aim for medium-thick slices—not too thin, or they turn to mush, but not too thick that they slide right off the biscuit when you take a bite.
Toss those slices gently with maybe a teaspoon or two of extra granulated sugar—just enough to coat them lightly. Now, set them aside in a small bowl for about 10 minutes while you get the cream ready. You’ll notice the sugar starts pulling out the most amazing, naturally sweet juice at the bottom of the bowl. That’s exactly what we want for maximum flavor in our shortcake!
Assembling Your Ultimate Strawberry Shortcake
Okay, this is the moment we’ve been waiting for! The biscuits are warm, the strawberries are juicy, and the cream is waiting. Putting together the perfect Strawberry Shortcake is all about immediate gratification. I’m telling you, do not wait to assemble these. The second that warm biscuit meets the cold cream and the juicy fruit, magic happens, and you need to be there for it!
Because these are quick, tender biscuits, they soak up moisture incredibly fast. That’s why this dessert is best enjoyed the moment you make it. If you try to store a fully assembled shortcake, you’ll end up with a soggy situation, and nobody wants that. It’s worth the extra minute to build each one right before serving! If you are looking for other quick dessert ideas, check out my recipe for quick and simple fairy cakes.
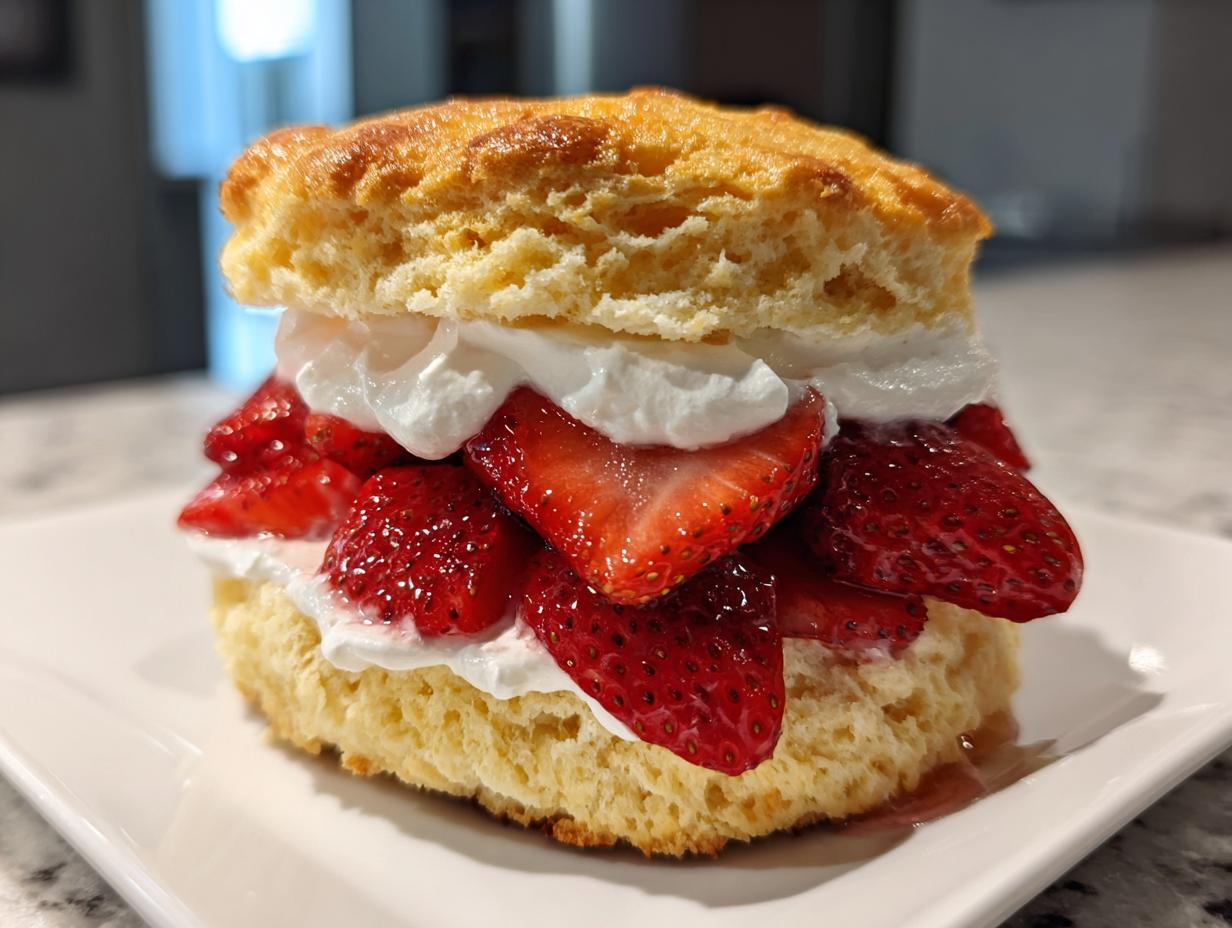
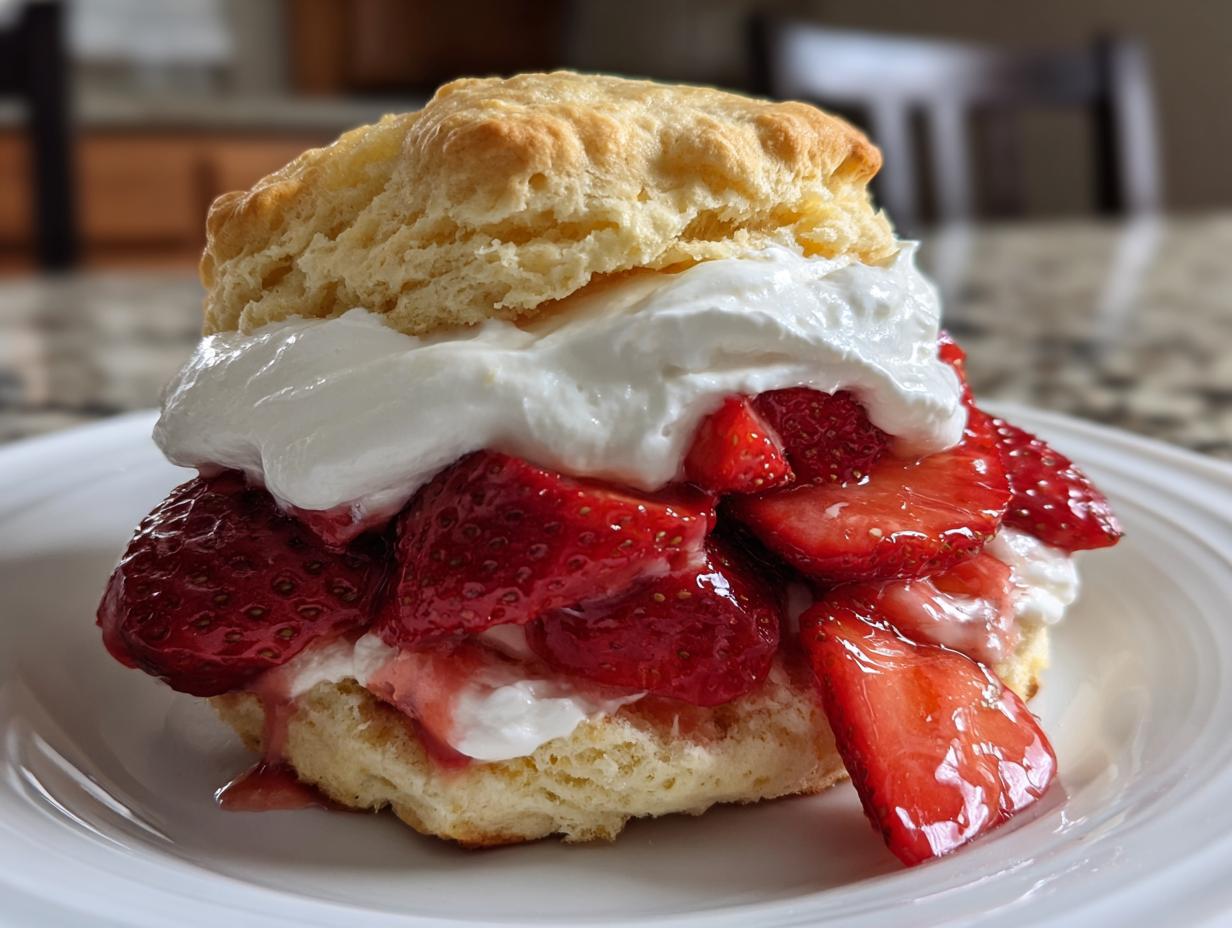
Layering the Strawberry Shortcake Components
First, take one of your beautiful golden biscuits and slice it right in half horizontally. Don’t use a serrated knife if you can avoid it; a regular sharp knife works best to keep the sides from crushing. Place the bottom half on your serving plate.
Next, spoon a generous amount of those sweetened, sliced strawberries over the bottom biscuit. Make sure you get some of that beautiful juice that collected in the bottom of the bowl! Then, dollop a big cloud of fresh whipped cream right on top of the fruit. It should look generous and fluffy.
Finally, gently place the top half of your biscuit on the cream. You can stop there, but I never do! I usually add a little more cream right on top of the lid and maybe a few extra strawberry slices for decoration. Seriously, eat it right away. That contrast between the warm, buttery biscuit and the cold, sweet toppings is what makes this Strawberry Shortcake legendary.
Since these are best served immediately, we don’t really have leftovers to worry about, but just in case you made too many biscuits, here’s what you need to know about keeping components separate:
| Component | Storage Method | Reheating/Serving Note |
|---|---|---|
| Biscuits | Airtight container at room temperature for up to 2 days | Warm briefly in the oven (350℉ for 5 minutes) before serving |
| Strawberries (Sliced) | Airtight container in the refrigerator for up to 3 days | Serve chilled |
| Whipped Cream | Airtight container in the refrigerator for up to 1 day | Use immediately; it deflates quickly |
Tips for Success with Strawberry Shortcake
Even though this Strawberry Shortcake recipe is quick, there are just a couple of places where home bakers often stumble. Nail these three things, and you’ll have biscuits that rival any bakery!
- Keep that butter ice cold! If you feel the butter softening while you’re cutting it in, just pop the bowl in the freezer for five minutes. Warm butter means flat biscuits.
- Don’t fuss with the dough once the milk goes in. Stir only until *just* combined. We want a shaggy mess, remember? Overmixing is the enemy of a tender shortcake.
- Give your biscuits space on the baking sheet. If they are touching, they steam instead of browning, and you lose that beautiful crisp edge we worked so hard to create.
- Serve immediately! This is the golden rule for any shortcake assembly. It ensures the best textural contrast.
Frequently Asked Questions About Strawberry Shortcake
It’s natural to have questions when you’re trying a new recipe, even a simple one! People always ask me about make-ahead plans or what happens if they don’t have exactly what the recipe calls for. Don’t worry, I’ve got the answers to keep your homemade Strawberry Shortcake perfect!
Can I make the biscuits ahead of time for my Strawberry Shortcake?
Yes, you absolutely can bake the biscuits ahead of time! They are actually better the next day, provided you store them correctly. Keep the cooled biscuits in an airtight container at room temperature for up to two days. When you are ready to serve your Strawberry Shortcake, just slice them open and warm them up for about five minutes in a 350℉ oven. They’ll taste almost freshly baked! For more great baking tips, you might want to check out this guide on baking science.
What is the best type of milk to use in this Strawberry Shortcake recipe?
I always recommend using cold whole milk if you have it because the higher fat content helps keep the biscuits tender. But if you’re out or need a substitute, you can use 2% milk just fine. If you need a non-dairy option, try an unsweetened, plain soy milk or oat milk. Avoid coconut milk unless it’s the refrigerated carton kind, as the canned stuff is too thick and might change the texture of your shortcake dough.
How should I store leftover Strawberry Shortcake components?
If you find yourself with extra components after assembling, the key is separation! Never store the assembled dessert; it will get soggy fast. Keep the baked biscuits in a sealed container on the counter. Store your sliced, sugared strawberries in an airtight container in the fridge—they’ll keep making juice, which is great! And keep your whipped cream container tightly sealed in the fridge. Assemble each individual Strawberry Shortcake right before you plan to eat it to maintain that perfect texture contrast. If you are interested in learning more about proper food storage safety, check out resources from the FDA.
Sharing Your Homemade Strawberry Shortcake
That’s it—a truly fantastic, homemade Strawberry Shortcake ready to go! I really hope you and your family enjoy the brightness of these fresh berries and the tenderness of those quick biscuits. If this recipe brought a little bit of summer sunshine to your kitchen, please take a second to leave a star rating below. I always love hearing how you customized your shortcakes! If you enjoy quick desserts, you might also like my recipe for baked pears.
Print
Divine 30-Min Strawberry Shortcake Joy
- Total Time: 30 minutes
- Yield: 6 servings 1x
- Diet: Vegetarian
Description
This is a simple recipe for classic Strawberry Shortcake. You will make light, tender biscuits layered with fresh strawberries and whipped cream for a delightful dessert.
Ingredients
- 2 cups (240g) all-purpose flour
- 1/4 cup (50g) granulated sugar
- 1 tablespoon baking powder
- 1/2 teaspoon salt
- 1/2 cup (115g) cold butter, cubed
- 2/3 cup (160ml) milk
- 2 cups fresh strawberries, sliced
- 1 cup whipped cream
Instructions
- Preheat your oven to 425℉ (218℃). Line a baking sheet with parchment paper.
- In a bowl, mix the flour, sugar, baking powder, and salt. Cut in the cold butter until the mixture looks like coarse crumbs.
- Stir in the milk until the dough just comes together. Drop spoonfuls of the dough onto your prepared baking sheet.
- Bake for 12 to 15 minutes, or until the biscuits turn golden brown. Let them cool a little.
- Split the baked biscuits. Layer the halves with sliced strawberries and whipped cream.
Notes
- Serve immediately for the best texture.
- Prep Time: 15 minutes
- Cook Time: 15 minutes
- Category: Dessert
- Method: Baking
- Cuisine: American
Nutrition
- Serving Size: 1 shortcake
- Calories: 350
- Sugar: 18g
- Sodium: 300mg
- Fat: 18g
- Saturated Fat: 11g
- Unsaturated Fat: 7g
- Trans Fat: 0g
- Carbohydrates: 42g
- Fiber: 2g
- Protein: 6g
- Cholesterol: 40mg