Skip to content
If you’re anything like me, you’re always hunting for that perfect snack that tastes incredibly indulgent but doesn’t come loaded with refined sugar. Well, I’m Anna Kowalska, and I share tried-and-true homemade recipes that you and your family will love, everything made with heart and flavor. Today, we are diving headfirst into the absolute best Peanut Butter Date Bars you will ever make. Seriously, these bars transform simple ingredients into something magical without ever needing to turn on the oven. I developed this version because I needed a quick, naturally sweet fix for my afternoon slump, and wow, did it deliver.

Why These Peanut Butter Date Bars Are Your New Favorite Treat
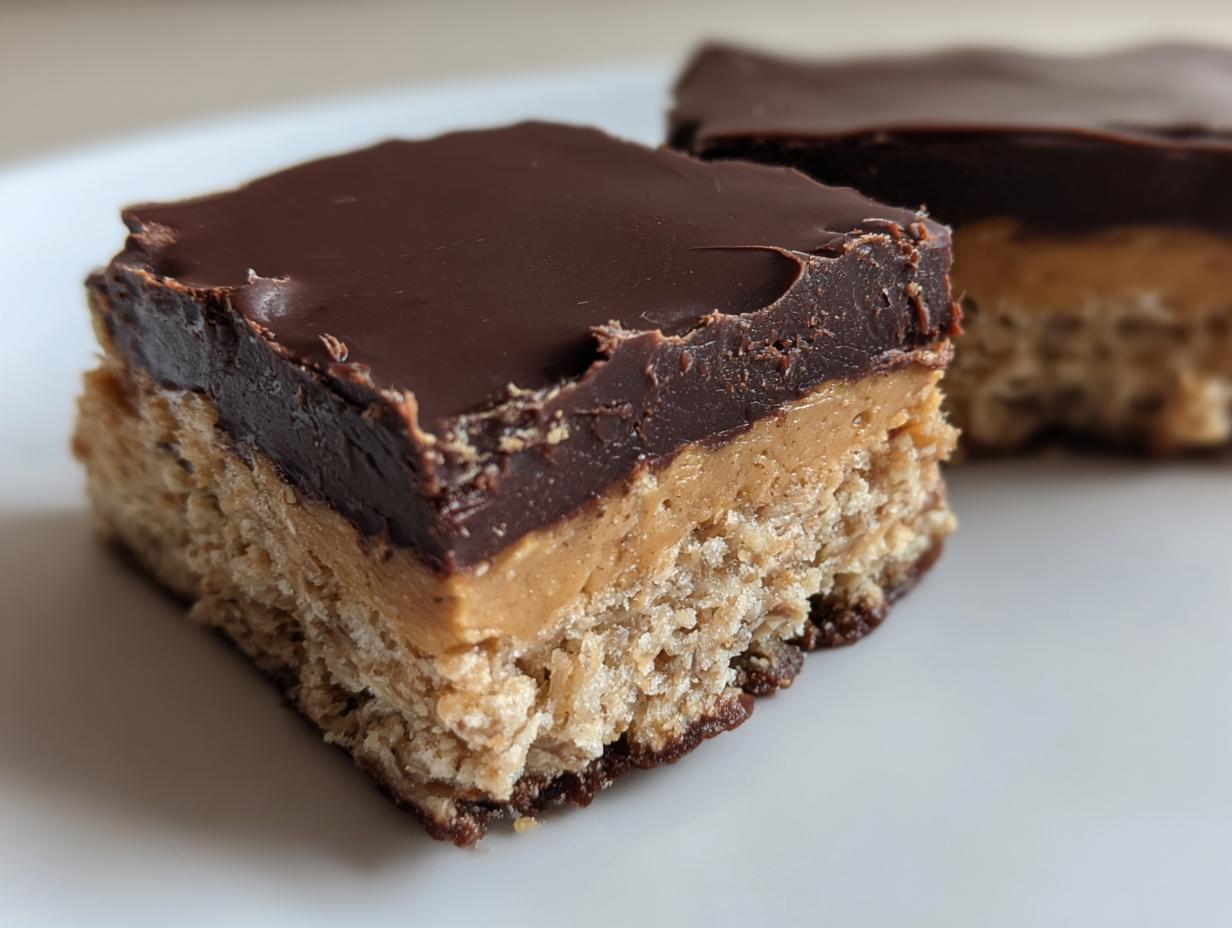
These aren’t just any snack bars; they are the solution to your healthy-snacking prayers! The magic lies in the texture—that chewy oat base meeting that sticky, rich date caramel is just heavenly. Trust me when I say these easy peanut butter bars are going to disappear fast from your counter.
- Prep is lightning fast—we’re talking 15 minutes of active work!
- Naturally sweetened by dates, so you feel good about eating them.
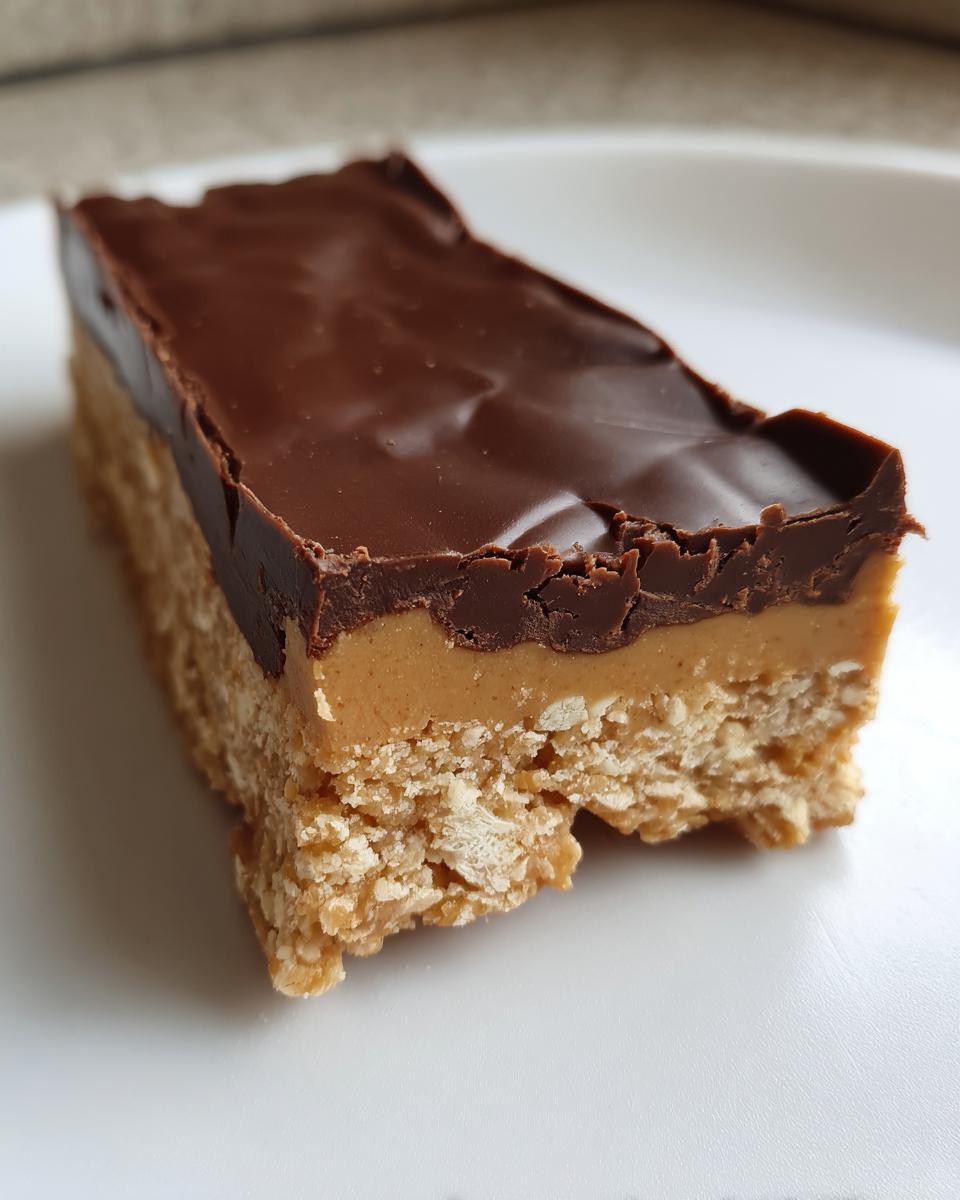
- The texture is unbeatable: chewy, creamy, and crunchy all at once.
- They hold up perfectly in the fridge for quick grab-and-go snacks.
- That chocolate coating just makes everything better, right?
Jump to:
Gathering Everything for Your Peanut Butter Date Bars
Before we get into the fun mixing part, let’s make sure we have everything ready to go. A good setup is half the battle won when you’re making no-bake treats like these! You don’t want to stop halfway through because you forgot the parchment paper—that’s how messes happen, trust me.
Essential Equipment List
Since we aren’t baking, our tools are really about prepping and setting the layers perfectly. You’ll need just a few trusty items:
- An 8×8 inch baking pan—this is key for getting the right thickness on your bars.
- Lots of parchment paper. You need enough to line the pan with overhang so we can lift the whole block out later!
- A food processor or a really high-speed blender for that date filling.
- Mixing bowls for the base and the chocolate topping.
- A rubber spatula for smoothing everything out.
Detailed Ingredients for Peanut Butter Date Bars
The ingredient list is short, but every component plays a huge role in the final texture. We break it down into three simple parts: the base, the date caramel filling, and the chocolate coating. Make sure your dates are nice and soft—if they feel hard, soak them for a few minutes in warm water first!
| Component | Ingredient | Amount |
|---|---|---|
| Base | Ground Oats | 1\u00bd cups |
| Base | Peanut Butter | \u2153 cup |
| Base | Maple Syrup | \u00bc cup |
| Filling | Soft Dates | 1 cup |
| Filling | Warm Water | 2 tbsp |
| Filling | Coconut Oil | 1 tbsp |
| Coating | Dairy Free Chocolate Chips | 1\u00bd cups |
| Coating | Coconut Oil | 2 tbsp |
Crafting the Perfect Base for Your Peanut Butter Date Bars
Okay, now for the fun part—building the foundation! This base is what gives our peanut butter date bars that satisfying chewiness that holds everything together. It’s super simple, but the technique here matters for texture. Grab your mixing bowl and throw in your ground oats, that lovely thick peanut butter, and the maple syrup. That maple syrup is what gives it just enough sweetness without being cloying.
Preparing the Oat Base Mixture
You want to mix this until it just comes together. I mean it—just combined! If you start over-mixing, the oats can get a little gummy, and we want chewy, not tough, right? Use a sturdy spoon or your hands if you want to feel the texture as you go. It should look kind of crumbly but hold together when you squeeze a bit between your fingers.
Once it’s mixed, transfer that entire mixture into your parchment-lined 8×8 pan. Now, this is where you need some muscle! Press the base down firmly and evenly across the bottom of the pan. I like to use the bottom of a flat measuring cup to really compact it down. You want a solid, tight layer because this has to support that rich date filling we’re making next. Don’t skimp on the pressing; a loose base means crumbly bars later on. Get it nice and flat, and you’re ready for the next step!
Creating the Smooth Date Filling for Peanut Butter Date Bars
This date filling is pure magic—it’s our natural caramel layer, and it’s what elevates these from simple peanut butter squares to something truly special. We’re taking those soft dates, a little bit of coconut oil for richness, and just a splash of warm water. The warmth helps everything get happy and blend beautifully together.
Toss those ingredients into your food processor or high-speed blender. Now, this is where you need to be patient for just a minute. You aren’t just stirring; you are blending until it transforms. We are aiming for that smooth, almost taffy-like texture that spreads like butter.
Achieving a Silky Date Caramel Consistency
Keep blending until you don’t see any chunks of date skin anymore. If your mixture is struggling to move around in the processor, that’s your cue to add a tiny bit more warm water—and I mean tiny! A teaspoon at a time, max. Too much water, and your date caramel will be runny, and we need that thickness to hold up against the base layer.
Once it looks like thick, glossy peanut butter or soft caramel, stop blending. Scrape down the sides and give it one final pulse to be sure. Taste it—wow, right? This silky coating is going to spread perfectly over that compacted oat layer. Make sure the layer is even; a nice, smooth surface means your chocolate topping will look professional later on. Don’t worry if it’s sticky; it’s supposed to be!
Assembling and Setting the Peanut Butter Date Bars
We’ve got our sturdy oat base all pressed down, and that gorgeous date caramel is sitting right on top. Now comes the layering, which is almost as easy as the mixing! Take that smooth date filling you just made and gently spread it evenly over the oat layer. Use your offset spatula or the back of a spoon to make sure you get nice, even coverage right to the edges. You want every bite to have that perfect ratio of chewy oats to sticky caramel.
Once that filling is spread perfectly, we have to let it firm up before we even think about chocolate. This is the most important waiting game in making these peanut butter date bars! If you try to cut them now, the filling will just squish everywhere, and you’ll end up with a sticky mess instead of neat bars.
Freezing Time and Structure Setting
Pop the entire pan into the freezer. Yes, the freezer! We need this structure to set hard. You are going to let it chill there for a full hour. This isn’t just a quick chill; this hour is crucial because it hardens the date layer so much that when you go to slice the whole slab, the knife goes right through cleanly. It’s the secret to getting those beautiful, sharp edges on your final chocolate-coated bars.
Once that hour is up, you’ll be able to lift the entire block out of the pan using the parchment paper sling. It’s like magic! Then, you can slice it into your 12 perfect bars before we move on to the decadent chocolate dip. Don’t rush this freezing time—patience pays off big time here!
The Chocolate Finish: Coating Your Peanut Butter Date Bars
Alright, the base is set, the caramel is firm—now it’s time for the grand finale! We are melting down our dairy-free chocolate chips with a little bit of coconut oil. That little bit of extra oil is absolutely key here; it keeps the chocolate from seizing up and makes the final coating thin, glossy, and easy to work with. Don’t skip the oil, or you’ll end up fighting with thick, clumpy chocolate!
You’ll melt these together slowly. I usually do this over a double boiler, or if I’m being lazy, using short 30-second bursts in the microwave, stirring really well in between each burst. We don’t want scorched chocolate, so keep the heat low and steady. Once it’s smooth and glossy, take it off the heat immediately. For more information on tempering chocolate safely, check out this guide on tempering chocolate.
Tips for a Flawless Chocolate Shell
Now we dip! Take those chilled bars—they should be rock hard from the freezer—and lift them out using the parchment paper sling. Have your fresh sheet of parchment paper ready on the counter. Hold the bar gently (a fork works great for this) and dip it right into that melted chocolate. You want to completely submerge it if you can!
Lift it out, let the excess drip off for just a second, and place it on the clean parchment. Because the bar is ice cold, the chocolate starts setting almost instantly. If you notice the chocolate getting too thick while you work, just pop the bowl back over the warm water for a quick stir. A quick five-minute trip back into the freezer after dipping is all you need to make that shell firm up perfectly. That’s how you get a professional-looking chocolate coating on your peanut butter date bars!
Frequently Asked Questions About Peanut Butter Date Bars
I always get a ton of questions when people first try these no-bake bars because they seem almost too good to be true! People wonder about substitutions, or how long they last, since they are so naturally sweet and rich. I’ve gathered the most common things folks ask me about making these perfect chocolate peanut bars.
How Should I Store Homemade Peanut Butter Date Bars
This is the most important question! Because of the soft date filling, these bars really need to stay cold to maintain that perfect, firm texture we worked so hard to achieve. You absolutely must store them in an airtight container in the refrigerator. My note says to keep them chilled, and I mean it! They’ll last beautifully for about a week this way, but honestly, they rarely make it past day four in my house. If you want them extra firm, pop them in the freezer for 15 minutes before serving. If you are looking for other great no-bake ideas, check out my recipe for Buckeye Balls.
Can I Substitute the Peanut Butter in These Bars
Yes, you totally can substitute the peanut butter, but you have to pick your replacement carefully to keep the integrity of the base layer. If you have a nut allergy, sunflower seed butter works wonderfully and keeps that salty-sweet flavor profile. Almond butter is a great swap too, though it might make the base a touch stiffer. Just make sure whatever nut or seed butter you use is naturally sweetened and relatively creamy so it incorporates well with the maple syrup. Don’t try to use a runny butter, or your base will be too crumbly! For other naturally sweet treats, you might enjoy my Baked Pears.
Storing and Enjoying Your Peanut Butter Date Bars
Since these are no-bake and rely on the chill to stay firm, storage is everything! We want those layers to stay perfectly defined until you’re ready to snack. Trust me, they taste a million times better when they are nice and cold. You won’t need to reheat these at all; they are designed to be eaten straight from the fridge.
Best Practices for Keeping Peanut Butter Date Bars Fresh
The key to keeping these fresh is keeping them cold and protected from air. If they sit out too long, the chocolate can get soft, and the base might get a little too chewy.
| Storage Method | Duration | Notes |
|---|---|---|
| Refrigerator | Up to 1 Week | Store in an airtight container. This is the best way to maintain texture. |
| Freezer | Up to 1 Month | Wrap individually before freezing for easy grab-and-go snacks. |
Share Your Delicious Peanut Butter Date Bars Experience
I truly hope you loved making these peanut butter date bars as much as I love sharing them with you! They are my go-to when I need a quick, satisfying treat. If you whip up a batch for your family or friends, please come back and let me know what you thought! Drop your rating below and tell me if you added any fun sprinkles to the chocolate top!
Print
Amazing 15-min Peanut Butter Date Bars
- Total Time: 65 minutes
- Yield: 12 bars
- Diet: Vegetarian
Description
These Peanut Butter Date Bars offer a satisfying, naturally sweetened treat. A chewy oat base is topped with a smooth date caramel and finished with a chocolate coating. They are easy to make and perfect for a quick snack.
Ingredients
- Base Layer: 1½ cups ground oats
- Base Layer: ⅓ cup peanut butter
- Base Layer: ¼ cup maple syrup
- Date Filling: 1 cup soft dates
- Date Filling: 2 tbsp warm water
- Date Filling: 1 tbsp coconut oil
- Top Coating: 1½ cups dairy free chocolate chips
- Top Coating: 2 tbsp coconut oil
Instructions
- Line an 8×8 pan with parchment paper.
- Mix base ingredients until combined.
- Press the base mixture firmly into the prepared pan.
- Blend dates, water, and coconut oil until the mixture is smooth.
- Spread the date filling evenly over the base layer.
- Freeze the pan for 1 hour.
- Melt the chocolate chips and coconut oil together.
- Remove the mixture from the freezer, lift it out using the parchment paper, and cut it into bars.
- Dip each bar into the melted chocolate, coating it completely.
- Place the chocolate-coated bars on fresh parchment paper.
- Freeze for 5 minutes until the chocolate coating is firm.
Notes
- Keep chilled for best texture.
- Prep Time: 15 minutes
- Cook Time: 0 minutes
- Category: Dessert/Snack Bar
- Method: No-Bake/Freezing
- Cuisine: American
Nutrition
- Serving Size: 1 bar
- Calories: Estimate based on ingredients
- Sugar: Estimate based on ingredients
- Sodium: Estimate based on ingredients
- Fat: Estimate based on ingredients
- Saturated Fat: Estimate based on ingredients
- Unsaturated Fat: Estimate based on ingredients
- Trans Fat: 0g
- Carbohydrates: Estimate based on ingredients
- Fiber: Estimate based on ingredients
- Protein: Estimate based on ingredients
- Cholesterol: 0mg