Skip to content
No heading needs to be written for the introduction.
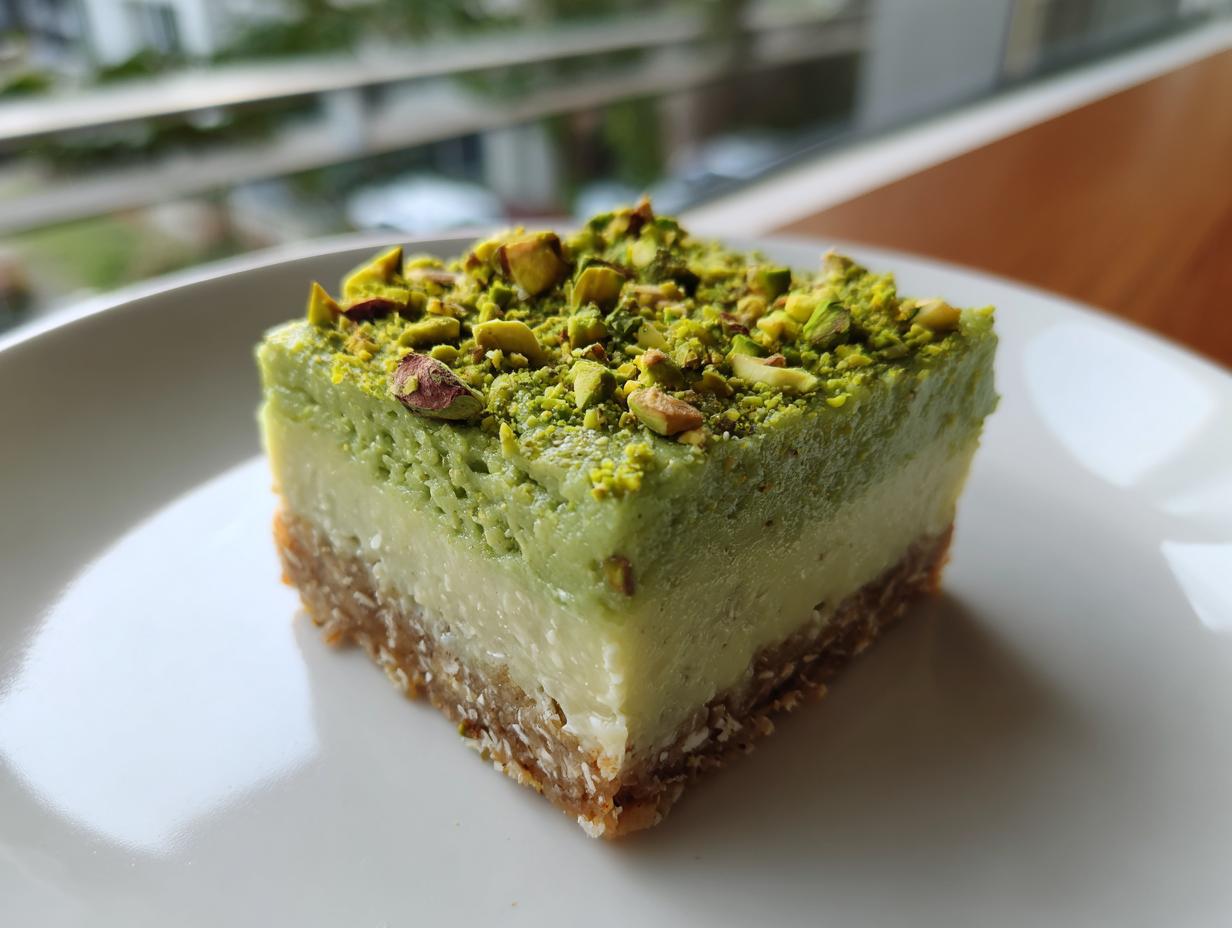
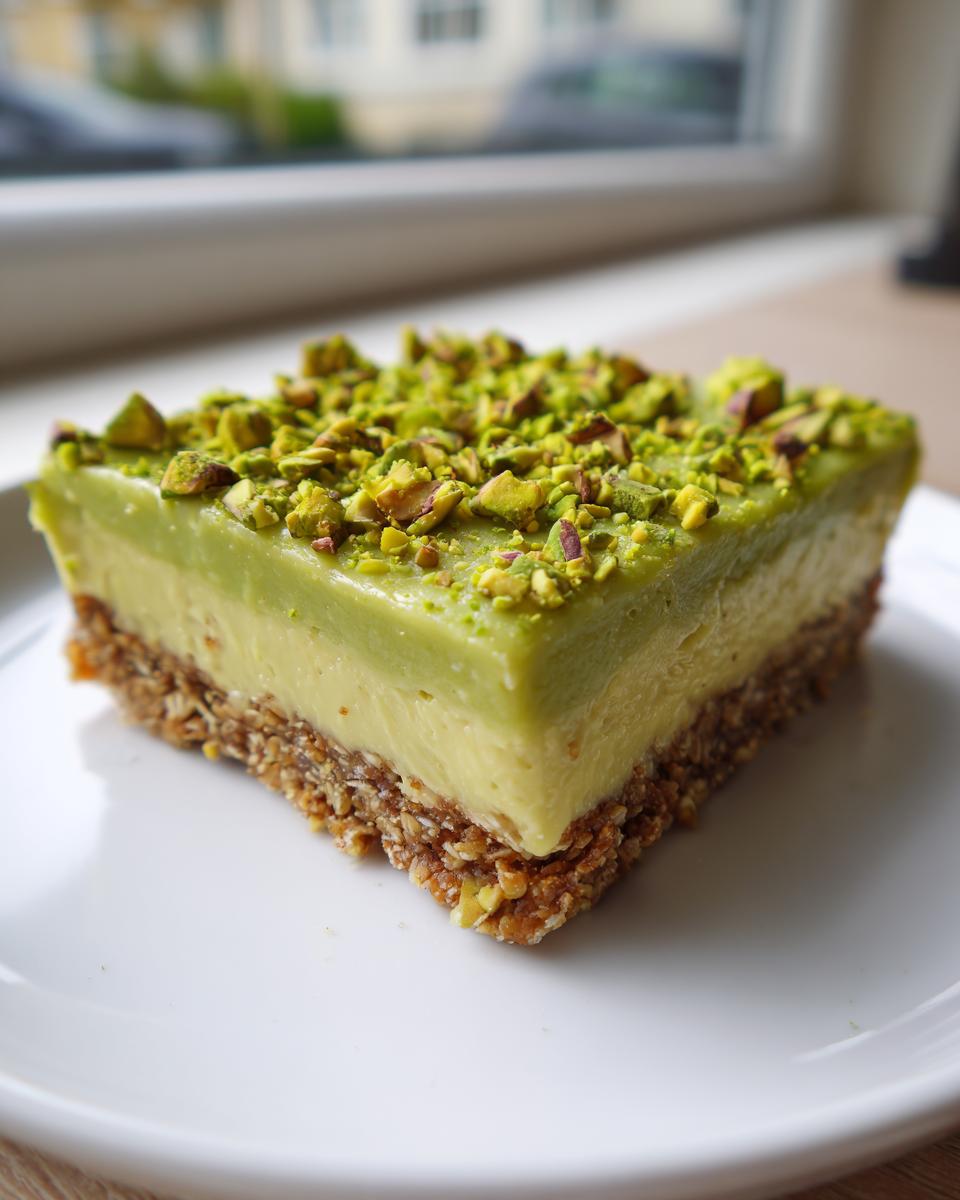
When I picture the perfect summertime treat, I think of these **Pistachio Cream Bars**. Seriously, you won’t believe how little effort these take! I’m Anna Kowalska, and here I share tried-and-true homemade recipes that you and your family will love. Everything I post, like these creamy bars, is made with heart and flavor, and I always test things until they are absolutely foolproof.
I grew up watching my aunties make these rich, nutty desserts for potlucks, but they always seemed so complicated. It took me ages to figure out the secret to getting that perfect creamy texture without turning on the oven, but I finally cracked the code! These **Pistachio Cream Bars** are my current obsession because they deliver huge flavor with minimal fuss. If you need a dessert that looks fancy but comes together faster than you can decide what to watch on TV, you’ve found your winner.
Why These Pistachio Cream Bars Are Your New Favorite No-Bake Treat
Let’s be real—sometimes you just don’t want to deal with the oven, especially when it’s hot out! That’s why I champion no-bake recipes like these. These **Pistachio Cream Bars** are proof that simple baking can still be spectacular. You get this wonderful, slightly chewy oat base that’s just sturdy enough to hold the filling.
And oh, that filling! It’s so incredibly creamy, almost like a decadent cheesecake filling but made with natural coconut cream. My expertise comes in balancing those rich flavors. I make sure the blended pistachios are perfectly smooth so you don’t get any weird chunks in your mouthfeel—just pure, nutty bliss. Trust me, once you taste how easy and delicious these **pistachio bars** are, they’ll become a staple in your rotation! Here are more dessert ideas.
Jump to:
Gathering Everything for Your Pistachio Cream Bars
Before we even think about mixing, let’s pull everything out onto the counter. When I make these **Pistachio Cream Bars**, I treat it like a little assembly line. Having all your components ready makes the whole process feel super relaxed, which is key for a no-bake recipe! You don’t want to be frantically searching for coconut oil while your oat base is melting everywhere.
Ingredients for the Oat Base
The base is simple, but it needs to be solid so it can support that glorious filling. You’ll need 1\u00bd cups of oat flour. If you don’t have oat flour, don’t panic! Just take 1\u00bd cups of regular rolled oats and blitz them in your food processor until they look like fine powder. Then grab \u2153 cup of coconut oil—make sure it’s melted but not hot—and 2 tablespoons of maple syrup for just a hint of sweetness.
Components for the Creamy Filling
This is where the magic happens for our creamy center. For the very best **Pistachio Cream Bars**, you need \u00bd cup of pistachios that you have already blended until they are almost a butter consistency. Then, take \u2153 cup of solid coconut cream—that’s the thick part you scoop off the top of a can of full-fat coconut milk that’s been chilled overnight. That creaminess is what makes this filling so luxurious! If you love pistachio, you might enjoy this cheesecake recipe too.
Topping and Final Touches
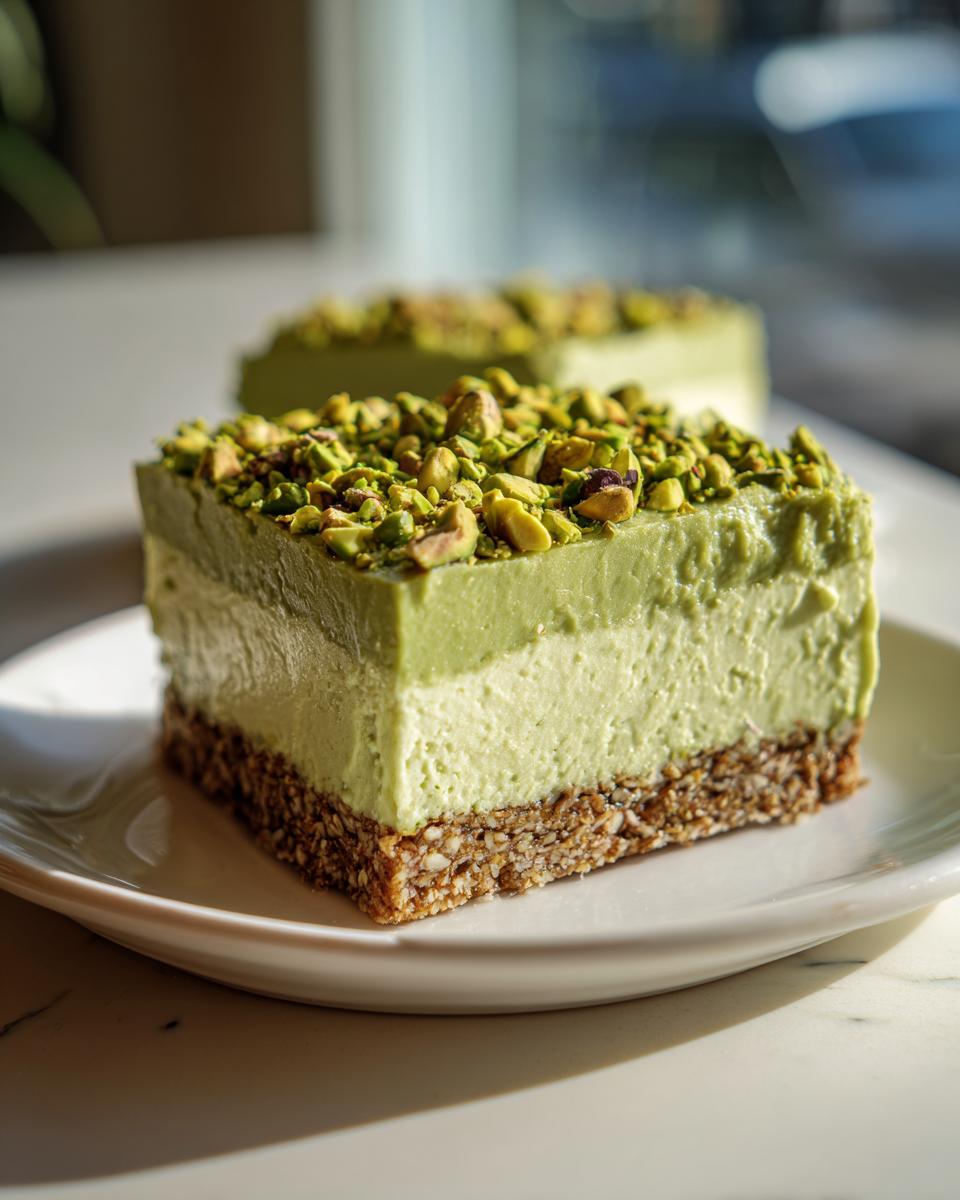
For the top, keep it textural! You only need \u00bd cup of pistachios that are roughly chopped. I mean chunky, not finely ground. You want those little pops of crunch when you bite into the bar. That’s all you need to get started!
Essential Equipment for Perfect Pistachio Cream Bars
Since we aren’t baking, our equipment needs to focus on structure and easy removal. You absolutely must have an 8×8 inch square pan. Don’t try to eyeball this size; it affects the thickness of the base and the cream layer too much! My biggest tip is using parchment paper. Line that pan so the paper hangs over two opposite sides like little handles.
This parchment sling is going to save you so much stress when it’s time to lift these beautiful **Pistachio Cream Bars** out for slicing later. You’ll also need a good food processor or high-powered blender to make that smooth oat flour and the blended pistachio paste. No stand mixers needed here! Learning proper pan lining techniques can be very helpful.
Step-by-Step Instructions for Making Pistachio Cream Bars
Alright, let’s get messy! Making these bars is so straightforward, but the technique matters, especially when you’re building layers that need to hold up in the freezer. Follow these steps carefully, and you’ll have gorgeous, perfectly structured **Pistachio Cream Bars** every single time. Remember, precision in the prep means perfection in the eating!
Building the Base Layer
First things first, grab that 8×8 pan and line it with parchment paper, making sure those handles stick up over the sides. This is non-negotiable for easy removal later! Now, in a medium bowl, combine your oat flour, melted coconut oil, and maple syrup. It’s going to look crumbly at first, maybe a little sandy, but keep mixing until it starts to clump together when you squeeze a bit in your palm. That’s the sign the oil has coated everything nicely.
Transfer that mixture right into your prepared pan. This is the crucial part: you have to press this base down firmly. I mean *firmly*. Use the bottom of a flat measuring cup or even the back of a sturdy glass to really compact those crumbs against the bottom of the pan. You want a solid foundation for our creamy filling. If the base is too loose, the whole bar will crumble when you try to slice it. Once it looks flat and dense, set the pan aside while we whip up the star of the show.
Creating and Spreading the Cream Layer
Now for the creamy part! Take your pre-blended pistachios and mix them thoroughly with the chilled, thick coconut cream. You might need to use a whisk or a spatula to really work them together. If your cream is too cold, it might seize up a little, so let it sit on the counter for maybe five minutes if it feels too hard. You are aiming for a thick, spreadable paste—smooth, smooth, smooth!
Gently pour this gorgeous pistachio mixture right over your packed oat base. Try to pour it in the middle first and then use an offset spatula, or even the back of a spoon, to gently coax it out to the edges. Don’t press down hard, or you’ll disturb that perfect base layer underneath! Just spread it evenly so you have a consistent thickness across the entire pan. This even layer is what guarantees uniform **Pistachio Cream Bars**.
Freezing and Slicing Your Pistachio Cream Bars
Once that cream layer is perfectly smooth, it’s time for the sprinkle! Take your roughly chopped pistachios and scatter them evenly over the top. Give the pan a gentle tap on the counter to help them settle slightly into the cream, but don’t press them in deeply. Now, cover the pan loosely with plastic wrap and slide it into the freezer. We need these to set up completely, so plan on at least two hours. Don’t rush this part—if they aren’t fully firm, slicing will be a disaster.
When two hours have passed, take the pan out. Use those parchment paper handles to carefully lift the entire block of frozen dessert out onto a cutting board. For the cleanest cuts, use a large, sharp knife that you’ve warmed slightly under hot water and wiped dry. Wiping the knife clean between cuts prevents dragging crumbs or cream into the next slice. Cut into 8 equal squares. These are your ultimate **Pistachio Cream Bars**!
Tips for Making the Best Pistachio Cream Bars
I’ve made these creamy bars more times than I can count, and I’ve learned a few little tricks that take these **Pistachio Cream Bars** from good to absolutely unforgettable. The biggest thing you need to remember is that we are dealing with coconut oil and coconut cream, which are temperature sensitive. Don’t work in a hot kitchen if you can help it!
If your blended pistachios feel too oily or warm when you mix them into the coconut cream, the cream layer might separate or become runny. If that happens, pop the mixture in the fridge for about 15 minutes to firm up slightly before spreading it over the base. That slight chill helps everything stay together beautifully.
Another pro tip for presentation: when slicing, use a very sharp, thin knife, and wipe it clean between every single cut. I run mine under hot water for a second, dry it completely, and then slice. This keeps those edges crisp and clean, making your **pistachio bars** look professional. Also, if you want an even richer flavor, try lightly toasting your chopped pistachios for the topping before sprinkling them on. It really wakes up that nutty flavor!
Storage and Serving Suggestions for Pistachio Cream Bars
Since these **Pistachio Cream Bars** rely on coconut oil and cream to set up, how you store them is crucial for maintaining that perfect texture. Remember that little note I put in the recipe? It said to store them chilled, and I stand by that! If you leave them out on the counter, they’ll get soft pretty quickly, especially in the summer.
I always keep mine in the freezer if I’m making a big batch for later, but for everyday snacking, the fridge is better. When they are frozen solid, they are almost like ice cream bars, which is delicious, but for that intended creamy-but-firm texture, the refrigerator is your friend. These **pistachio bars** are wonderful make-aheads for parties! Check out my quick and easy recipes for more fast treats.
Storing Your Homemade Pistachio Cream Bars
When storing, you need to make sure they don’t absorb any funky smells from other things in your fridge. I always put them in an airtight container, and here’s my trick: I place a small piece of parchment paper between the layers of bars if I stack them. This keeps them from sticking together, which is a lifesaver! Here’s the breakdown of how I keep my **Pistachio Cream Bars** perfect:
- Item | Storage Method | Duration
- Pistachio Cream Bars | Airtight Container (Chilled) | Up to 5 days
- Pistachio Cream Bars | Airtight Container (Frozen) | Up to 1 month
Pairing Suggestions
Because these bars are so rich and nutty, they pair beautifully with something bright and simple. I love serving them with a cup of strong black coffee—the bitterness really cuts through the sweetness of the coconut cream. If you’re serving them as a dessert after a big meal, a small side of fresh raspberries or sliced strawberries is perfect.
The tartness of fresh berries is a wonderful contrast to the earthy pistachio flavor. You could also drizzle a tiny bit of honey over the plate just before serving if you want to amp up the sweetness slightly, but honestly, they are fantastic all on their own!
Frequently Asked Questions About Pistachio Cream Bars
I know you’re going to have questions once you start making these! I always do when I try a new no-bake recipe. Don’t worry, I’ve answered the most common things I hear about getting these **Pistachio Cream Bars** absolutely perfect, especially around setting and swaps.
Can I use something other than oat flour in the base?
That’s a great question about substitutions! Oat flour gives us that perfect chewiness and structure without having to bake anything. If you absolutely can’t find it or don’t want to blend your own oats, you can try using almond flour. It will work, but it might make the base slightly softer or oilier since almond flour is higher in fat. You might need to chill the base for an extra 15 minutes before adding the cream layer if you use almond flour.
How do I know if my Pistachio Cream Bars are fully frozen?
You’ll know they are done when you can easily lift the entire dessert out using those parchment paper handles without the base bending or cracking under its own weight. Also, when you press lightly on the top of the cream layer, it shouldn’t give way at all. If you poke it and it feels hard and solid, you’re good to go for slicing! If it feels squishy, give it another 30 minutes.
Can I make these ahead of time?
Yes, please do! These **pistachio bars** are fantastic make-aheads. Since they are no-bake and rely on being cold to hold their shape, making them a day or two ahead is ideal. Store them tightly wrapped in the freezer, and then just pull them out about 20 to 30 minutes before you plan to serve them. That gives them just enough time to soften up to that perfect creamy texture we love!
Nutritional Estimation for Pistachio Cream Bars
I always like to give you a ballpark idea of what you’re eating when you whip up a batch of these lovely **Pistachio Cream Bars**. Since these are no-bake treats relying on natural fats from nuts and coconut, they pack a little punch but are full of good stuff! Remember these numbers are just estimates based on the ingredients listed, but they give you a great starting point for tracking.
| Nutrient | Amount |
|---|---|
| Serving Size | 1 bar |
| Calories | 250 |
| Fat | 18g |
| Carbs | 20g |
| Protein | 6g |
Share Your Pistachio Cream Bars Experience
I absolutely love hearing from you when you try my recipes! Did these **Pistachio Cream Bars** turn out perfectly creamy for you? Don’t be shy—drop a comment below and let me know how the oat base held up, or give this recipe a star rating if you loved this simple, nutty treat. Sharing your results encourages me to keep testing and sharing more flavor-packed recipes! Contact me with any questions!
Print
Amazing 8 Pistachio Cream Bars Magic
- Total Time: 2 hours 15 minutes
- Yield: 8 servings
- Diet: Vegetarian
Description
These Pistachio Cream Bars offer a delicious, creamy center nestled between a simple oat base and a crunchy pistachio topping. You get rich flavor without complicated steps.
Ingredients
- Base Layer: 1½ cups oat flour
- Base Layer: ⅓ cup coconut oil
- Base Layer: 2 tbsp maple syrup
- Cream Layer: ½ cup blended pistachios
- Cream Layer: ⅓ cup coconut cream
- Top Layer: ½ cup chopped pistachios
Instructions
- Line an 8×8 pan with parchment paper.
- Combine base layer ingredients and press firmly into the bottom of the prepared pan.
- Mix blended pistachios and coconut cream to make the cream layer.
- Spread the pistachio cream evenly over the base.
- Sprinkle the chopped pistachios over the cream layer.
- Freeze the bars for 2 hours until firm.
- Remove from the pan and slice into individual bars.
Notes
- Store chilled for best texture.
- Prep Time: 15 minutes
- Cook Time: 0 minutes
- Category: Dessert
- Method: No-Bake/Freezing
- Cuisine: American
Nutrition
- Serving Size: 1 bar
- Calories: 250
- Sugar: 8g
- Sodium: 30mg
- Fat: 18g
- Saturated Fat: 9g
- Unsaturated Fat: 9g
- Trans Fat: 0g
- Carbohydrates: 20g
- Fiber: 3g
- Protein: 6g
- Cholesterol: 0mg