Skip to content
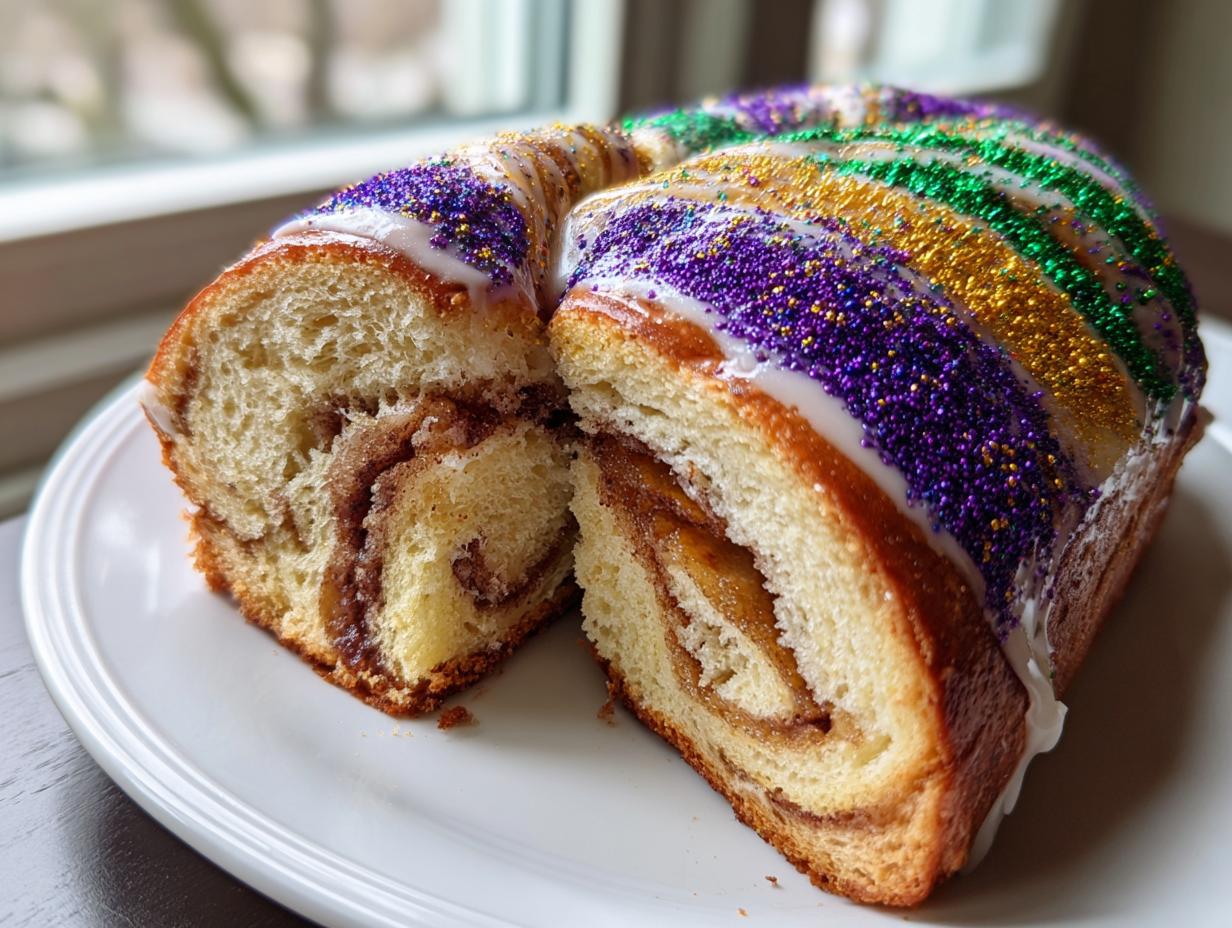
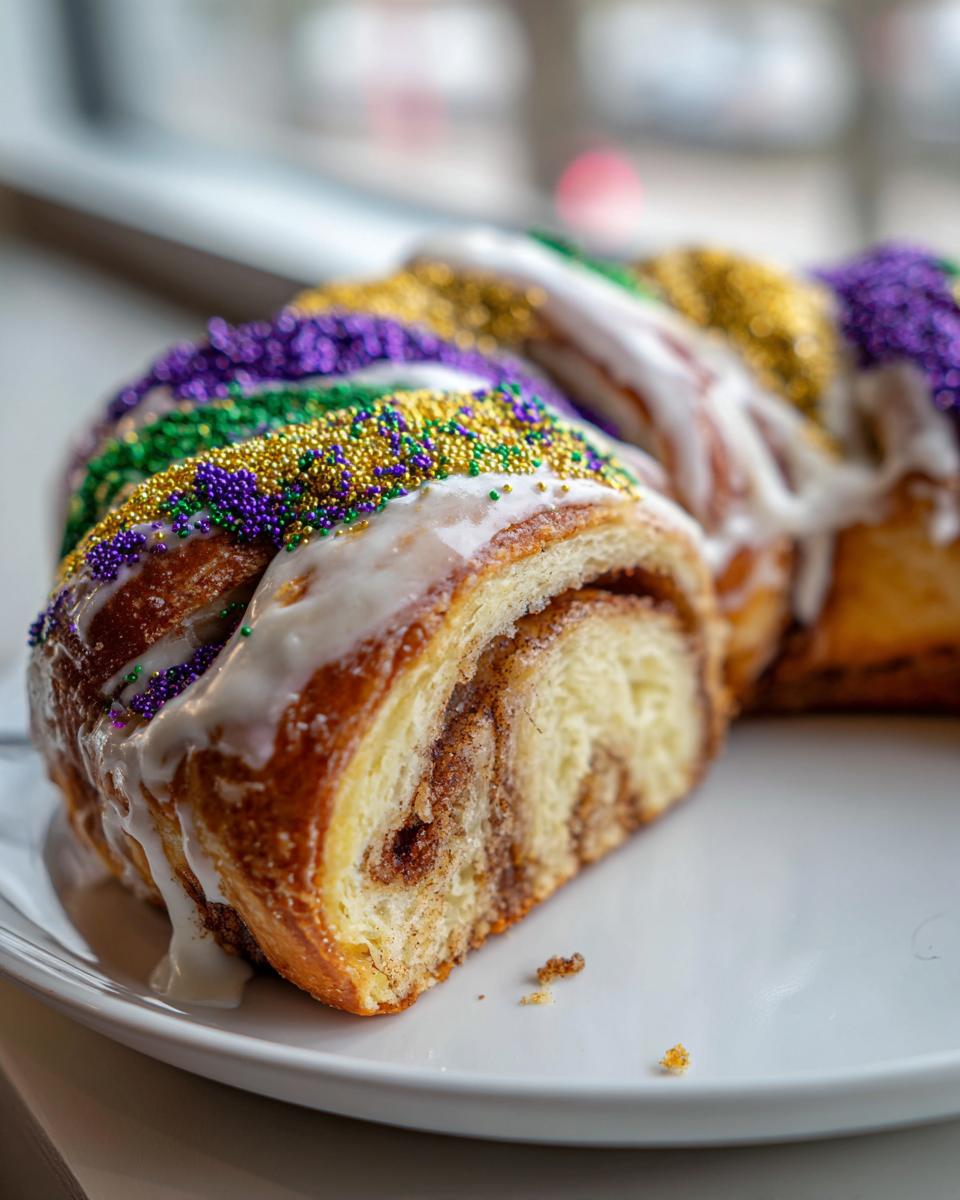
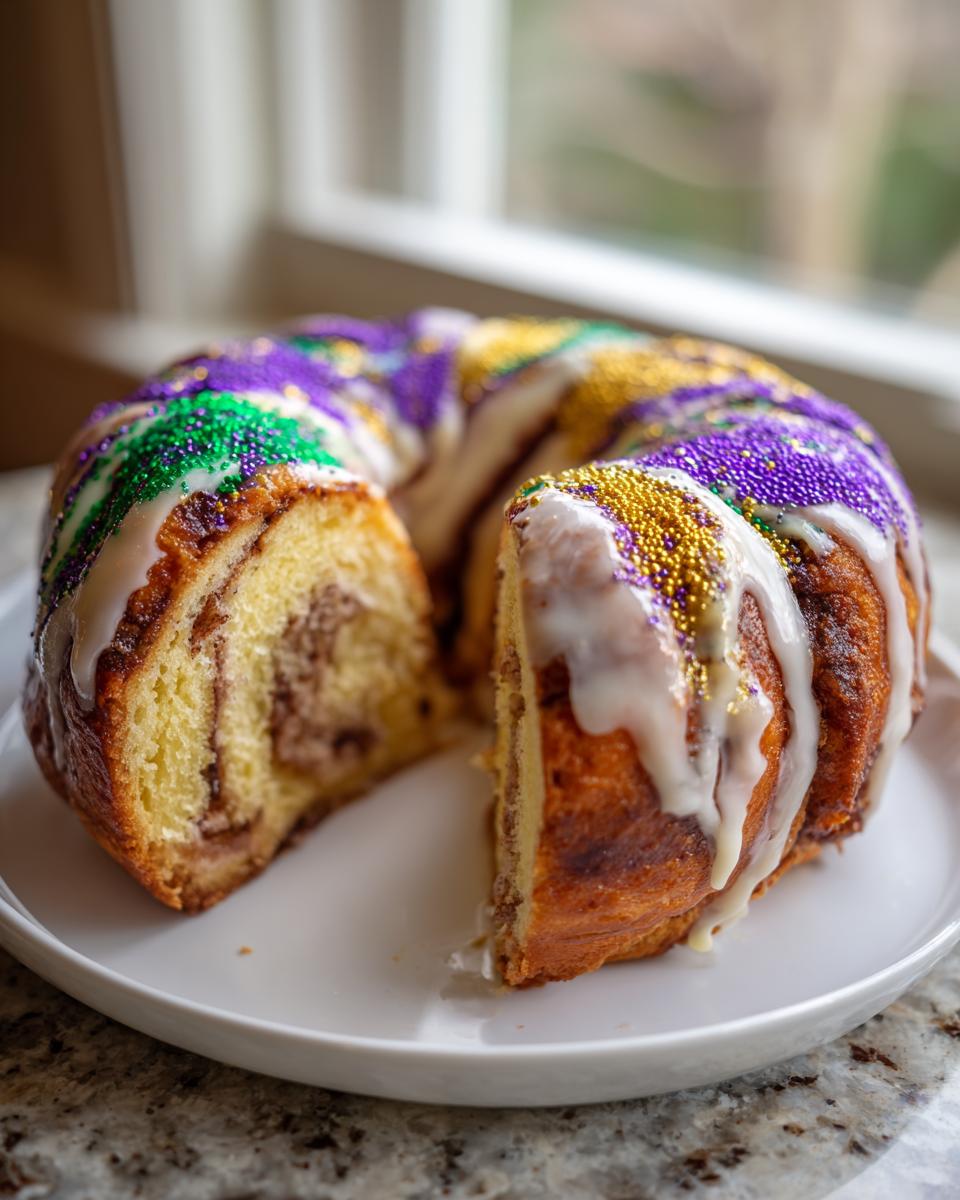
When those first hints of purple, green, and gold start appearing around town, you know it’s time for something special! Nothing captures the spirit of the season like a beautiful, braided Traditional King Cake. Forget the store-bought stuff; this recipe is my scratch-made version, and honestly, it’s unbelievably rich and soft—it tastes like a giant, glorious cinnamon roll shaped into a crown.
I’m Anna Kowalska, and here I share tried-and-true homemade recipes that you and your family will love. Everything I post here is made with heart and flavor, and this King Cake is truly a labor of love that’s worth every single minute spent kneading!
Jump to:
Why You Will Love This Traditional King Cake
Making this pastry from scratch might sound intimidating, but trust me, the payoff is huge! You get that authentic Mardi Gras bread experience right in your own kitchen. Here’s why this recipe is going straight into your favorites file:
- The dough is incredibly rich, thanks to the sour cream and butter, giving it that melt-in-your-mouth texture.
- That cinnamon-butter filling is generous, ensuring every twist has a burst of warm spice.
- It has that perfect, slightly dense, yet soft texture, just like the best cinnamon rolls you’ve ever had.
- The steps might look long, but they are broken down simply so you can master the classic braid!
Equipment Required for Your Traditional King Cake
You don’t need a million fancy gadgets, but a few key items really help make this rich dough manageable. Having these things ready means less fuss when it’s time to mix!
- Stand mixer with a dough hook attachment
- Small saucepan or microwave-safe cup
- Glass measuring cup (for proofing yeast)
- Parchment-lined baking sheet
- Silicone spatula
Ingredients for the Traditional King Cake
Gathering your ingredients for this rich dough is the first big step! Please pay close attention to the temperatures and states—they really matter when working with yeasted dough and butter. We are making one cake, so remember to double everything if you want two glorious rings!
Dough Components for the Traditional King Cake
| Item | Amount | Notes |
|---|---|---|
| Active dry yeast | 1/4 oz (or 2 1/4 tsp/1 packet) | Must be fresh! |
| Water | 1/4 cup | Must be warm, 100° to 110°F |
| Granulated sugar (for yeast) | 1/2 Tbsp | For activating the yeast |
| Full fat sour cream | 8 oz | Room temperature is best |
| Granulated sugar (for dough) | 2 Tbsp | For richness |
| Unsalted butter (for dough) | 2 Tbsp | Melted, then cooled |
| Salt | 1/2 teaspoon | Don’t skip this! |
| Large egg | 1 | Lightly beaten |
| Flour | 3 to 3 1/2 cups | Bread flour is preferred, but AP works! |
Filling Ingredients
| Item | Amount | Notes |
|---|---|---|
| Unsalted butter | 1/3 cup | Must be fully softened |
| Granulated sugar | 1/2 cup | For the sweet swirl |
| Ground cinnamon | 1 1/2 teaspoons | The heart of the filling! |
Glaze and Decoration Supplies
| Item | Amount | Notes |
|---|---|---|
| Powdered sugar | 3 cups | For the smooth icing |
| Cream cheese | 3 Tbsp | Must be softened; can sub butter |
| Milk | 2-4 Tbsp | Use just enough to reach pourable consistency |
| Fresh lemon juice | 2 Tbsp | Adds a nice tang |
| Vanilla extract | 1/4 tsp | For depth of flavor |
| Colored sugars | Purple, green, and gold | For decorating only! |
Step-by-Step Instructions for Making Traditional King Cake
Activating the Yeast and Preparing the Base
Okay, let’s get this dough going! First things first: we need happy yeast. Grab a small bowl or a glass measuring cup and stir together your yeast, the 1/4 cup of water, and that tiny bit of sugar. The water absolutely has to be warm—we’re aiming right between 100° and 110°F. If it’s too cold, the yeast sleeps; if it’s too hot, you kill it! Let that sit for about five minutes until it looks foamy and bubbly on top. That means your yeast is ready to work its magic.
Next up is getting the sour cream mixture ready. In a small saucepan over low heat, or even just in a microwave-safe cup, combine the sour cream, the two tablespoons of sugar, the two tablespoons of butter, and the salt. You just need to heat this gently until that butter melts completely. Once it’s melted, take it off the heat and let it cool down until it hits that same sweet spot: 100° to 110°F. We don’t want to shock the yeast mixture we just activated!
Mixing and Kneading the Traditional King Cake Dough
Time to bring it all together in your stand mixer. Attach that dough hook—you’ll be relying on it! Dump in your cooled sour cream mixture, your bubbly yeast mixture, and your beaten egg. Now, start adding about half of your flour. Give it a quick stir with a spatula just to get everything incorporated roughly.
Once it looks like a shaggy mess, turn the mixer speed down low. Gradually add the rest of the flour, just a little bit at a time. You’re looking for a soft dough to form. Once it starts pulling away from the sides of the bowl, that’s a good sign! Keep the speed low and let that hook work for up to 10 minutes. You want the dough to be smooth, elastic, and it should release cleanly from the sides of the bowl without sticking too much. If it’s too dry, add a teaspoon of water; if it’s too sticky, add a tiny bit more flour. Don’t overdo the flour, though; this dough should stay quite soft.
First Rise and Dough Division
Once you’ve got that beautiful, smooth dough, lightly grease a nice big bowl and place the dough ball inside. Cover it up with a clean cloth or plastic wrap. Now, find a warm spot! The dough likes it cozy, ideally around 75° to 78°F. Let it rise for a full hour, or until it’s doubled in size. Don’t peek too often!
When it’s beautifully puffed up, punch it down gently to release the air. This recipe makes one big cake, so divide that risen dough right in half. You’ll be working with two separate pieces for your braid.
Creating the Cinnamon Butter Filling and Shaping
Take one half of the dough and roll it out into a long rectangle—aim for about 16 inches long and 8 or 9 inches wide. It needs to be wide enough to give you a good swirl inside. Now, take HALF of your softened butter and spread it edge-to-edge, but leave a 1-inch border empty around the edges. This border is important so the filling doesn’t ooze out everywhere!
In a small bowl, mix up HALF of your sugar and cinnamon filling. Sprinkle this mixture evenly right over the butter layer. Now, here’s the trick for that amazing cinnamon roll texture: roll the dough up tightly from the bottom edge, like you’re rolling a jelly roll. Make sure it’s snug! Once it’s rolled, pinch that long seam closed as tightly as you can. Repeat this entire process with the second half of the dough.
Braiding and Second Rise for the Traditional King Cake Ring
Take both of your filled dough logs and place them seam-side down on a baking sheet lined with parchment paper. Now, pinch one end of the first log to one end of the second log. Then, you’re going to twist them over each other—one piece over the other—to create a beautiful, rustic braid. Once you’ve twisted them, bring the two loose ends around to meet up and seal them together really well to form one continuous ring. Make sure that final seam is completely sealed so it doesn’t pop open while baking!
Cover the braided ring again and let it have its second rise in that warm spot for about 20 to 30 minutes, or until it looks nicely puffed up again, almost doubling again. While that’s happening, go ahead and preheat your oven to 350°F.
Baking and Cooling the Traditional King Cake
Carefully place your risen cake into the preheated 350°F oven. Bake it for 25 to 35 minutes. You’ll know it’s done when it’s beautifully golden brown all over. You can always test it with a skewer, but honestly, the color is usually the best indicator for this rich dough.
Once it’s baked, take it out and let it cool down *mostly*. Don’t let it get cold, but it shouldn’t be scorching hot either. This is important for how the glaze sets!
Glazing and Decorating Your Traditional King Cake
While the cake is cooling slightly, whip up that gorgeous glaze! In a large bowl, beat the powdered sugar, softened cream cheese, lemon juice, and vanilla extract together. Add the milk one tablespoon at a time until you get a smooth, creamy, and pourable consistency. A hand mixer works wonders here.
Pour that thick, sweet glaze evenly over the warm cake. Don’t wait until it’s cold! Then, right away, sprinkle on your purple, green, and gold sugars. I like to do bands of color around the ring. Let the whole thing cool completely before you try to slice it. If you cut it too soon, that lovely glaze will slide right off!
Tips for Achieving the Best Traditional King Cake Results
This rich dough is a little different from a standard bread dough because of all that sour cream and butter, so a few tricks can make your life much easier! First, please, please don’t rush the rises. If your kitchen is chilly, turn on your oven for just one minute, turn it off, and then put the covered dough inside to rise. That little bit of residual warmth makes a huge difference in getting that classic, soft texture.
When you’re rolling out the dough for the filling, try to work quickly once the butter is spread. If the butter gets too warm, it’ll soak into the dough instead of creating distinct layers. Also, be generous when pinching those seams closed—that’s what keeps all that delicious cinnamon filling locked inside during baking!
Finally, remember the note about eating it fresh! This cake is truly at its peak the day you make it. If you have leftovers, just keep it tightly covered at room temperature. It’s still good for a couple of days, but that first-day softness is unbeatable.
Storing and Reheating Your Traditional King Cake
This Traditional King Cake is truly best enjoyed the very same day it’s made—that’s when the bread is at its softest and the glaze is perfectly set. If you do have leftovers, it keeps surprisingly well at room temperature. Just make sure it’s covered tightly so it doesn’t dry out!
| Storage Method | Duration | Notes |
|---|---|---|
| Room Temperature | 2 to 3 days | Keep tightly covered to prevent drying. |
| Freezing | Not recommended | The rich dough texture suffers after thawing. |
Frequently Asked Questions About Traditional King Cake
I get so many great questions about this recipe because it’s such a classic! Here are the things I hear most often when folks are tackling their first scratch-made Mardi Gras bread.
Can I substitute the flour type in this Traditional King Cake recipe?
You absolutely can! The recipe calls for bread flour because its higher protein content helps develop a really strong, elastic dough, which is great for holding all that filling. However, if you only have all-purpose flour on hand, don’t sweat it! It will still turn out delicious, though maybe slightly less chewy than the bread flour version. Just watch the kneading time; you might need a minute or two less.
How do I ensure my Traditional King Cake dough rises properly?
The key to a great rise is happy yeast, which means temperature control is everything! Make sure that water for activating the yeast is between 100° and 110°F—test it with a thermometer if you can! Also, when you cover the dough for its rise, place it somewhere truly warm, away from any drafts. A slightly warmed, turned-off oven is my secret spot to guarantee that beautiful doubling.
Is this Traditional King Cake suitable for making ahead of time?
Honestly, no, not really. This is one of those deeply enriched breads where the texture is absolutely perfect on day one. Because of the high fat and sugar content, it tends to dry out faster than a standard loaf. I always recommend planning to eat this marvelous cinnamon roll texture creation the same day you bake it for the best experience!
What is the significance of the colored sugars on the Traditional King Cake?
The colors aren’t just for looking pretty, though they certainly do that! Traditionally, the purple, green, and gold sugars represent justice, faith, and power, respectively. When you decorate your cake, try to alternate the bands of color to honor that tradition. It makes the whole presentation feel extra special for your Mardi Gras celebration! For more on the history of Mardi Gras traditions, check out this History.com article on Mardi Gras.
Estimated Nutritional Data for Traditional King Cake
Because this Traditional King Cake is made completely from scratch with rich ingredients like sour cream and butter, the exact numbers will vary based on how much glaze you use! Please remember that the following details are only an estimate based on the quantities listed in the recipe. I haven’t sent this off to a lab, so take these numbers as a fun guideline rather than strict dietary facts!
| Component | Value (Per Slice Estimate) |
|---|---|
| Serving Size | 1 slice |
| Calories | Estimate |
| Sugar | Estimate |
| Sodium | Estimate |
| Fat | Estimate |
| Saturated Fat | Estimate |
| Unsaturated Fat | Estimate |
| Trans Fat | Estimate |
| Carbohydrates | Estimate |
| Fiber | Estimate |
| Protein | Estimate |
| Cholesterol | Estimate |
Share Your Homemade Traditional King Cake Experience
I truly hope you love making this Traditional King Cake as much as I do! If you give this recipe a try, please come back, leave a rating, and tell me how your braid turned out in the comments below. I can’t wait to hear about your Mardi Gras masterpiece!
Print
Amazing Traditional King Cake 1 Bite Now
- Total Time: 2 hours 30 minutes
- Yield: 1 cake 1x
- Diet: Vegetarian
Description
Traditional King Cake is a classic pastry enjoyed during the Mardi Gras season. This recipe guides you through making a rich, yeasted dough filled with cinnamon butter and topped with a sweet glaze and festive colored sugars.
Ingredients
- For the Dough: 1/4 oz active dry yeast (2 1/4 teaspoon OR 1 packet)
- 1/4 cup warm water (100° to 110°F)
- 1/2 Tbsp granulated sugar
- 8 oz full fat sour cream
- 2 Tbsp granulated sugar
- 2 Tbsp unsalted butter
- 1/2 teaspoon salt
- 1 large egg (lightly beaten)
- 3 to 3 1/2 c bread flour (all purpose can also be used!)
- For the Filling: 1/3 cup unsalted butter (softened)
- 1/2 cup granulated sugar
- 1 1/2 teaspoons ground cinnamon
- Glaze: 3 c powdered sugar
- 3 Tbsp cream cheese, softened (butter can also be used)
- 2–4 tablespoon milk
- 2 Tbsp fresh lemon juice
- 1/4 tsp vanilla extract
- Purple, green and gold sprinkles to decorate
Instructions
- Stir together yeast, warm water, and sugar in a glass measuring cup or small bowl. Let stand for 5 minutes until the yeast is foamy and activated.
- In a medium saucepan over low heat OR microwave safe cup, combine the first 4 ingredients (sour cream, 2 Tbsp sugar, 2 Tbsp butter, salt). Heat, stirring often, until the butter melts. Remove from heat and cool the mixture to 100° to 110°F.
- In the bowl of a stand mixer with a dough hook attachment, add the sour cream mixture, yeast mixture, egg, and half of the flour.
- Stir quickly with a spatula, then turn the mixer to medium speed. As ingredients combine, reduce speed to low and gradually add the remaining flour until a soft dough forms.
- Lower the mixer speed and knead until the dough is smooth and elastic, up to 10 minutes. The dough should not stick or be too dry; it should release from the bowl sides.
- Place the dough in a lightly greased bowl, cover with a cloth or plastic wrap, and let rise in a warm place (75-78°F ideal) for 1 hour, or until doubled.
- Divide the proofed dough in half.
- Roll one dough portion into a long rectangle (about 16″ long and 8-9″ wide).
- Spread HALF of the 1/3 cup softened butter evenly on the rectangle, leaving a 1-inch border.
- Combine HALF of the sugar and cinnamon in a small bowl and sprinkle evenly over the butter.
- Roll the dough tightly from the bottom up, like a cinnamon roll.
- Pinch the seam closed tightly.
- Repeat steps 8 through 12 with the second dough portion.
- Place both dough rolls seam side down on parchment-lined sheet. Pinch one end of each log together, then twist the logs over each other for a braided look. Bring the other ends around to form a ring, sealing the seam well.
- Cover and let rise in a warm place for 20 to 30 minutes, or until doubled.
- Preheat the oven to 350°F.
- Bake for 25 to 35 minutes, or until golden brown.
- Allow the cake to cool mostly down.
- Meanwhile, mix the glaze ingredients in a large bowl until smooth and creamy using a hand mixer.
- Pour the glaze evenly over the warm cake. Sprinkle with colored sugars, alternating colors to form bands.
- Let the cake cool completely before serving.
Notes
- Recipe adapted from: MyRecipes.com
- This recipe was halved from an original two-cake batch, keeping filling amounts the same for better flavor.
- Double all ingredient amounts to make 2 cakes.
- Best eaten the same day; it stores 2-3 days at room temperature.
- Sprinkle colors may bleed into the icing over time.
- Prep Time: 45 minutes
- Cook Time: 35 minutes
- Category: Dessert
- Method: Baking
- Cuisine: American (New Orleans)
Nutrition
- Serving Size: 1 slice
- Calories: Estimate based on ingredients
- Sugar: Estimate based on ingredients
- Sodium: Estimate based on ingredients
- Fat: Estimate based on ingredients
- Saturated Fat: Estimate based on ingredients
- Unsaturated Fat: Estimate based on ingredients
- Trans Fat: Estimate based on ingredients
- Carbohydrates: Estimate based on ingredients
- Fiber: Estimate based on ingredients
- Protein: Estimate based on ingredients
- Cholesterol: Estimate based on ingredients