Skip to content
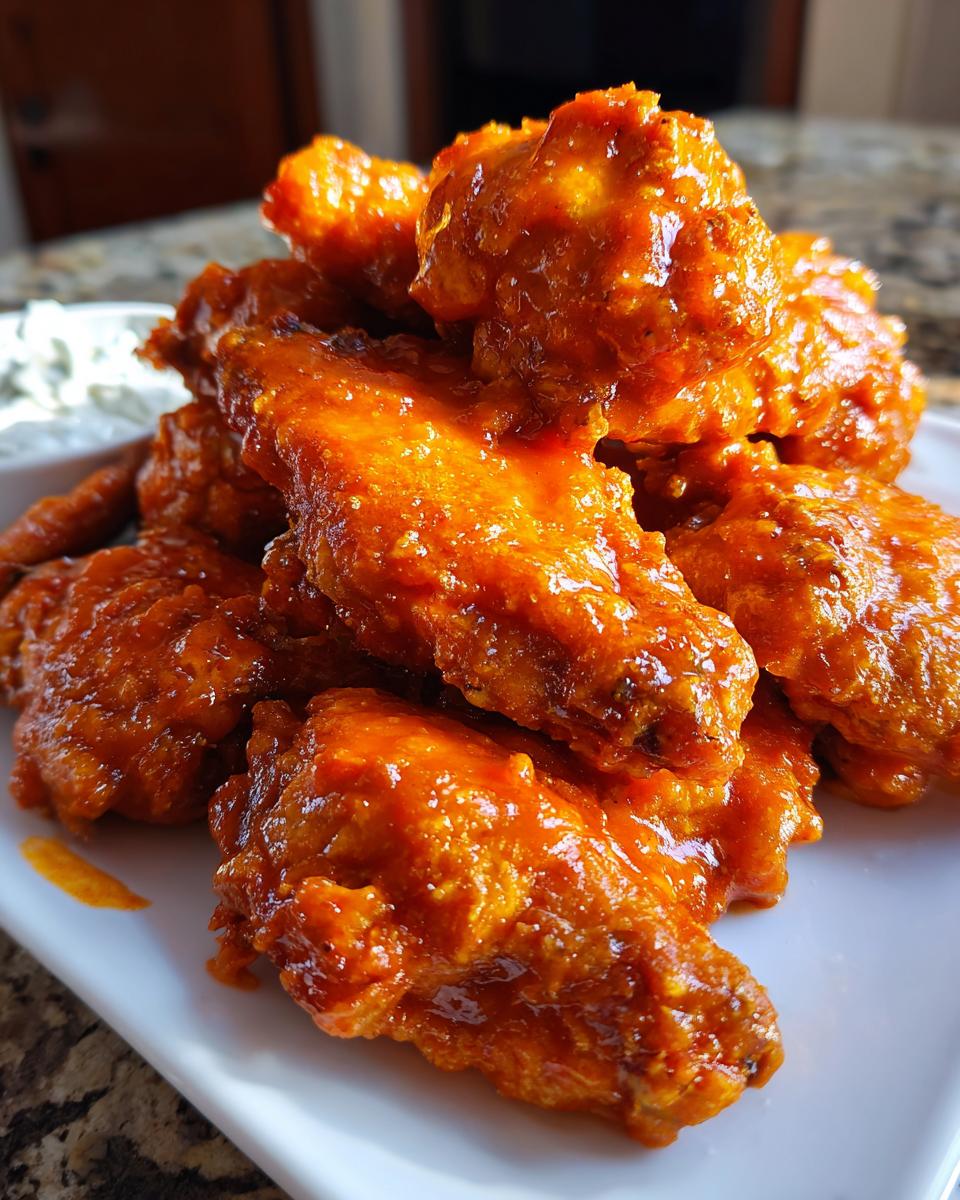
Buffalo Wings that actually stay crispy without deep frying? Yes, you absolutely can do it, and I’m here to show you how! I’m Anna Kowalska, and here I share tried-and-true homemade recipes that you and your family will love. For me, everything is made with heart and flavor, and that’s exactly what these wings have. We all know the struggle: you bake wings hoping for that satisfying crunch, only to end up with soft, disappointing chicken.
My Southern roots taught me that gatherings revolve around good food, and nothing says game day or party kickoff like perfect wings. That’s why I spent ages perfecting this baked method. We skip the messy oil but keep all the golden, crackly texture you crave. Trust me, once you try this combination of a low-and-slow start followed by a high-heat finish, you won’t look back. Get ready for the best homemade Buffalo wings experience!
Jump to:
Essential Ingredients for Authentic Buffalo Wings
Getting the right ingredients ready before you even turn on the oven is half the battle won for truly great Buffalo Wings. I’ve broken down the list so you know exactly what goes where. Don’t skip the prep here; it’s what separates a good wing from a spectacular one!
The secret to that baked crispiness starts before the heat, and the sauce has to sing—it needs that perfect tang and just a touch of sweet heat. And please, don’t even think about using store-bought ranch instead of homemade blue cheese dip. It just isn’t the same!
| Component | Quantity | Notes |
|---|---|---|
| Chicken Wings | 2.2 lbs | Cut at the joints, please! |
| Baking Powder | 2 tbsp | Aluminum-free is important here. |
| Hot Sauce | 2/3 cup | Your favorite spicy brand works. |
| Butter | ½ cup | Must be unsalted for sauce control. |
| Blue Cheese | ¼ cup | Make sure it’s soft and crumbly. |
| Sour Cream/Mayo | ½ cup / 3 tbsp | For the dip base. |
| Veggies | Carrots & Celery | Cut into sticks, ready for dipping! |
Chicken and Coating Components
This is where the magic starts for texture. You need about 2.2 pounds of wings, cut right at the joints—no one wants to fight the bone structure while eating! The real trick is the coating: 2 tablespoons of aluminum-free baking powder, plus salt and pepper. The baking powder is crucial because it raises the skin’s pH level, helping it dry out beautifully in the oven. Remember to pat those wings completely dry with paper towels before you toss them in this mixture. Any surface moisture will fight against getting that perfect golden crust.
Homemade Buffalo Sauce Ingredients
This sauce is my signature blend. You need 2/3 cup of your favorite hot sauce—I usually go for one with good vinegar bite. Melt that with a half cup of unsalted butter; using unsalted means I control the final salt level. Then we add the complexity: 1 tablespoon of cider vinegar for tang, 1 teaspoon of Worcestershire sauce for depth, 2 cloves of minced garlic, and 1 tablespoon of honey to balance the burn. A final quarter teaspoon of salt just ties everything together. This simmers up into the most beautiful, glossy coating imaginable!
Creamy Blue Cheese Dip Ingredients
The dip needs to be sharp and cool to cut through the heat of the wings. Start with a half cup of sour cream and 3 tablespoons of mayonnaise—this gives it the perfect body. Then, crumble in a quarter cup of soft blue cheese. We add another half tablespoon of cider vinegar and half a teaspoon of Worcestershire sauce for that savory kick that makes blue cheese dip so addictive. Finish it with a pinch of dried parsley just for color. Mix it until it’s perfectly smooth and set it aside in the fridge—it needs to chill!
Fresh Vegetable Accompaniments
You absolutely must have something cool and crunchy to balance the spice. I grab two medium carrots and two celery sticks. I just cut them straight into 2-inch sticks. No fancy cutting required here, just nice, sturdy sticks that can handle scooping up that thick blue cheese dip. Have these ready to go right next to your serving platter!
Step-by-Step Instructions for Perfect Buffalo Wings
Okay, now for the fun part—turning those prepared wings into golden, crispy perfection! The method here is slightly unusual, but trust me, this two-stage baking process is the key to making sure your Buffalo Wings rival any deep-fried version. We need patience for the first stage, so make sure you have something good on TV!
Prepping and Initial Low-Temperature Bake
First things first, get your oven ready. We start low! Preheat the oven to 250°F and make sure you have a rack set up on a large baking tray. Remember those coated wings? Place them on that rack in a single layer, making sure the skin side is facing up. They shouldn’t be touching at all; overcrowding leads to steaming, and we want crispness!
Pop them in for 30 minutes at this low temperature. This slow bake is essential because it gently renders out the fat under the skin without burning the coating. It’s the secret handshake for crispy baked wings!
Achieving Maximum Crispiness
Once that first 30 minutes is up, it’s time to ramp up the heat! Increase your oven temperature to 425°F. If you can, rotate the tray halfway through this second phase so the wings brown evenly. We bake them for another 45 to 50 minutes now. You are looking for deep golden-brown color, and you must check that they reach an internal temperature of 165°F for safety. I use my instant-read thermometer right near the bone!
Preparing the Signature Buffalo Sauce
While the wings are finishing their high-heat bake, whip up the sauce. In a small saucepan, combine your hot sauce, the butter, cider vinegar, Worcestershire sauce, minced garlic, honey, and that small pinch of salt. Set it over medium heat and let it simmer gently for about 3 to 4 minutes. You have to stir it constantly so the butter doesn’t separate. As soon as it looks glossy and slightly thickened, pull the pan right off the heat.
Crafting the Blue Cheese Dip
This is quick work. In a separate bowl, just combine the sour cream, mayonnaise, soft blue cheese, cider vinegar, Worcestershire sauce, and dried parsley. Whisk it all together until it’s smooth and creamy—no lumps allowed! Cover this bowl tightly and get it into the refrigerator right away. It tastes so much better when it’s thoroughly chilled.
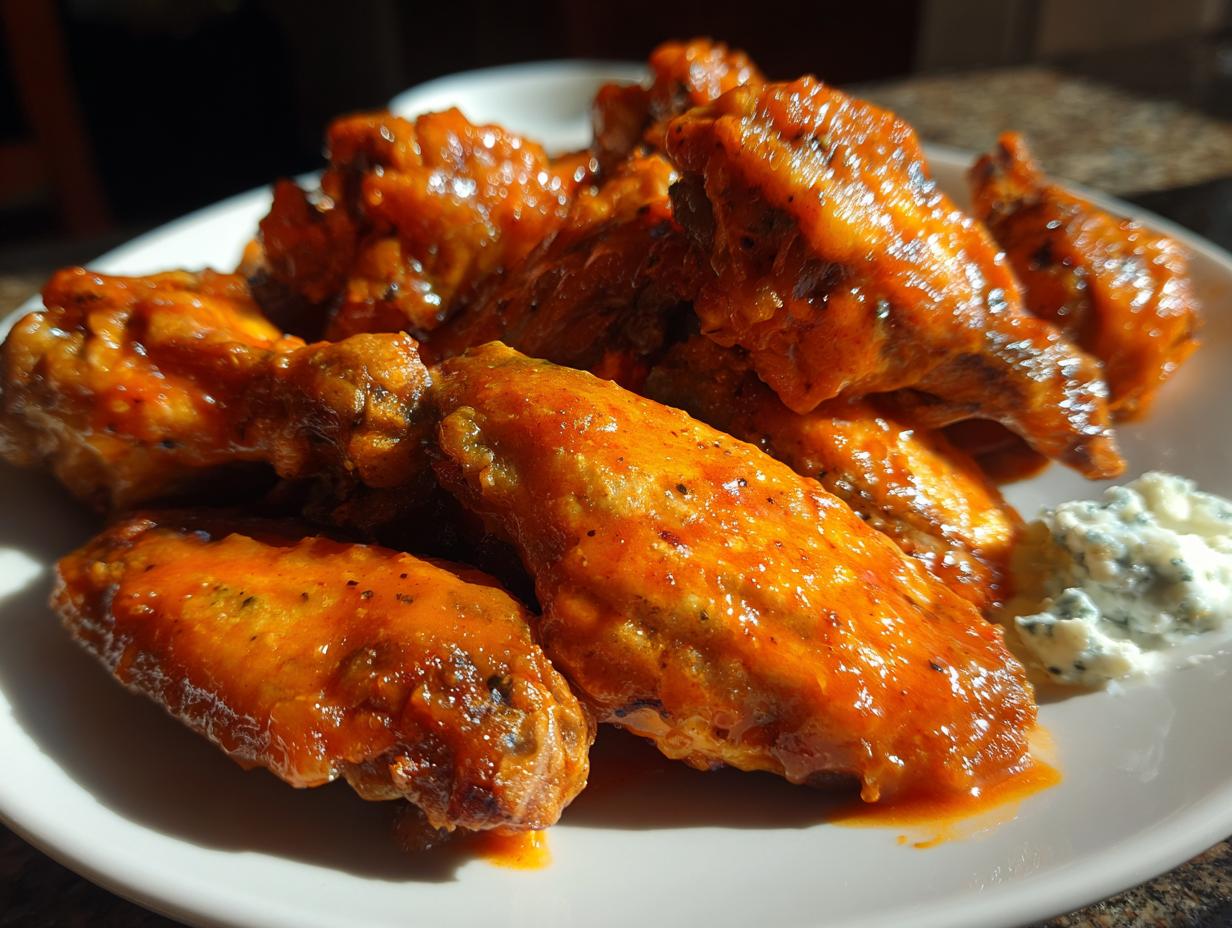
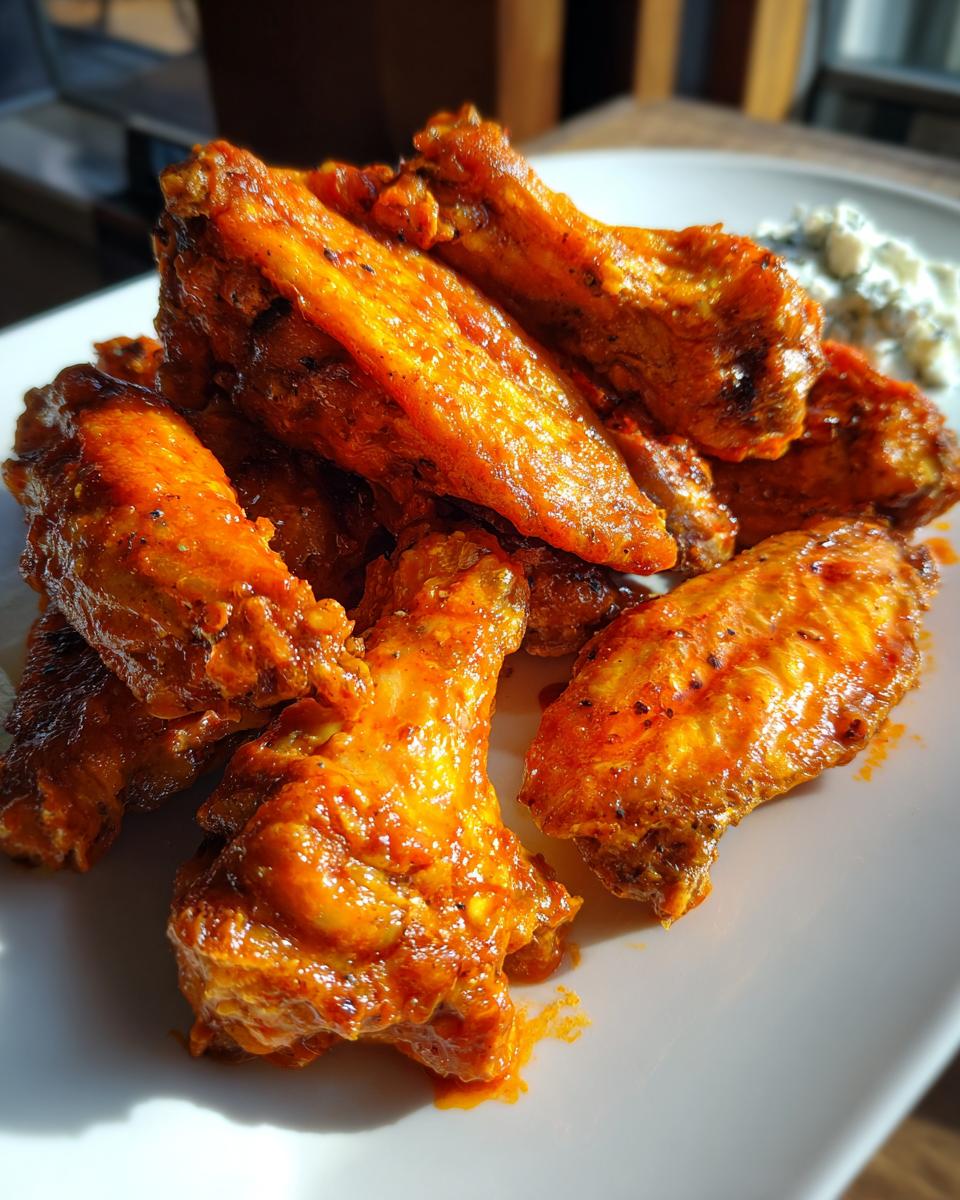
Finishing and Serving Your Buffalo Wings
The moment of truth! Take your beautifully crispy wings out of the oven. Place them immediately into a large, clean bowl. Pour about half of your warm Buffalo sauce over them and toss gently but quickly until every single wing is glistening and coated. Serve them piping hot right away with that cold blue cheese dip and those fresh carrot and celery sticks on the side. Don’t let them sit!
Tips for Making the Best Crispy Buffalo Wings
I’ve shared the recipe, but now I want to give you the little secrets I learned after burning batches early in my wing-making career. These tips are what guarantee that satisfying crunch, even when you’re slathering them in sauce. It’s all about managing moisture!
The Secret to Dry Skin
I can’t stress this enough: dry skin equals crispy wings. When you take those chicken wings out of the package, grab a big stack of paper towels. I mean it—pat, pat, pat until you think they are dry, and then pat them one more time! If there’s any moisture left clinging to the skin when you add the baking powder mixture, you end up steaming the wings instead of crisping them in the oven. Think of it like drying a cast-iron pan; you want zero water residue!
Avoiding Soggy Wings During Sauce Coating
The moment you toss the hot wings in the sauce, the countdown to sogginess begins, so we have to be quick! My trick is to use only enough sauce to lightly coat the wings, not drown them. If you feel like you want extra sauce, serve the extra on the side for dipping. Also, after the wings come out of that 425°F blast, let them sit on the rack for literally one minute while you pour the sauce into the bowl. That tiny bit of resting time lets the surface temperature stabilize just enough so the sauce adheres without immediately softening the crunch you just worked so hard to achieve.
Frequently Asked Questions About Buffalo Wings
I get so many questions when folks try this recipe for the first time, especially because baking wings is a little different than frying them. Don’t worry, these simple tweaks will make sure your homemade Buffalo Wings turn out fantastic every time!
Can I make these Buffalo Wings ahead of time?
You absolutely can prep ahead, which is great for parties! You should cook the wings fully first, then let them cool completely. Store the cooled wings, the sauce, and the dip all separately in airtight containers in the fridge. When you’re ready to serve, just reheat the wings to get them crispy again before tossing them in the sauce. Never sauce them ahead of time, or they will definitely get soft!
What if I do not have blue cheese for the dip?
Oh, that happens! If you have someone who just isn’t a fan of that sharp blue cheese funk, you can still make a wonderful, cool dip. Just skip the blue cheese entirely! Use the sour cream and mayo base, but then add a little extra cider vinegar, a pinch of garlic powder, and a generous amount of dried dill or chives. It makes a lovely, tangy ranch-style dip that pairs just as nicely with the spicy wings.
How do I adjust the heat level of these Buffalo Wings?
The heat is entirely up to your taste buds! The recipe calls for 2/3 cup of hot sauce, which gives a nice medium kick. If you want mild wings, cut that down to just 1/3 cup and maybe add a tiny bit of melted butter to make up the volume. If you like serious fire, use your favorite very spicy sauce—like a habanero blend—or add a dash of cayenne pepper right into the simmering sauce mixture. A little goes a long way!
Storing and Reheating Leftover Buffalo Wings
Don’t you hate when leftovers lose their crunch? I’ve figured out the best way to keep these baked wings tasting almost as good the next day. The key is keeping everything separate until the very last minute!
Best Practices for Storage
If you have any leftover wings, sauce, or dip, get them into airtight containers immediately. Keep the wings in one container, the Buffalo sauce in another, and the blue cheese dip in a third container in the fridge. They should last happily for about three days this way. Keeping the sauce off the wings prevents them from getting soggy while they chill.
Reheating for Crispness
Never, ever use the microwave if you care about crispiness! The microwave just steam-cooks everything. For the best results when reviving your leftover wings, you have two great options. Pop them on a baking sheet in a 375°F oven for about 8 minutes until they are hot all the way through. Even better? Use an air fryer at 380°F for 4 minutes. That blast of dry heat brings back almost all the original crunch!
Estimated Nutritional Snapshot for Buffalo Wings
Now, I know none of us are making these amazing, crispy Buffalo Wings for their health benefits, right? They are party food, pure and simple! But I always like to give you a general idea of what’s in a serving, just so you know what you’re getting into. These figures are just estimates based on the ingredients I used, especially since hot sauce sodium levels can vary wildly. Enjoy them responsibly!
| Nutrient | Amount (Estimate) |
|---|---|
| Calories | 72 kcal |
| Fat | 6 g |
| Carbohydrates | 1 g |
| Protein | 3 g |
Share Your Homemade Buffalo Wings Experience
I put my heart into sharing this recipe, and now I want to see what you create! Did these baked wings turn out perfectly crispy? Did your family devour the blue cheese dip? I absolutely love hearing your successes and seeing your flavor variations. Drop a comment below and tell me how your game day turned out, or share a picture of your platter!
Print
Perfect 45 Minute Crispy Buffalo Wings
- Total Time: 1 hr 40 mins
- Yield: 40 wings 1x
- Diet: Low Fat
Description
Make crispy baked Buffalo wings with a spicy homemade sauce and creamy blue cheese dip, perfect for parties or casual gatherings. These baked Buffalo wings are golden, crispy, and full of flavor, coated in a tangy, slightly sweet homemade sauce. Ideal for game day, parties, or a family snack, they’re easy to prepare and serve with a creamy blue cheese dip.
Ingredients
- 2.2 lbs chicken wings, cut at the joints
- 2 tbsp aluminum-free baking powder
- ½ tsp salt
- ½ tsp black pepper
- 2/3 cup hot sauce
- ½ cup unsalted butter
- 1 tbsp cider vinegar
- 1 tsp Worcestershire sauce
- 2 cloves garlic, minced
- 1 tbsp honey
- ¼ tsp salt
- ½ cup sour cream
- 3 tbsp mayonnaise
- ¼ cup soft blue cheese
- ½ tbsp cider vinegar
- ½ tsp Worcestershire sauce
- pinch dried parsley
- 2 medium carrots, cut into 2-inch sticks
- 2 celery sticks, cut into 2-inch sticks
Instructions
- Preheat oven to 250°F and position a rack on a large baking tray.
- Pat chicken wings dry with paper towels, then place in a large bowl. Sprinkle with baking powder, salt, and pepper, toss lightly to coat. Discard any excess powder.
- Arrange wings in a single layer on the rack, skin side up. Bake at 250°F for 30 minutes.
- Increase oven temperature to 425°F and rotate the tray for even cooking. Bake an additional 45-50 minutes until wings are golden brown and crispy. Check that internal temperature reaches 165°F.
- While wings bake, combine hot sauce, butter, cider vinegar, Worcestershire sauce, garlic, honey, and salt in a small saucepan. Simmer over medium heat for 3-4 minutes, stirring constantly, then remove from heat.
- In a separate bowl, mix sour cream, mayonnaise, blue cheese, cider vinegar, Worcestershire sauce, and parsley until smooth. Refrigerate until ready to serve.
- Toss baked wings in the Buffalo sauce until evenly coated.
- Serve wings hot with blue cheese dip and carrot and celery sticks on the side.
Notes
- Make sure wings are fully cooked to 165°F for safety.
- Wings can be prepared ahead, sauce and dip refrigerated separately, and reheated before serving.
- Prep Time: 10 mins
- Cook Time: 1 hr 30 mins
- Category: Appetizer
- Method: Baking
- Cuisine: American
Nutrition
- Serving Size: 1 serving (approx)
- Calories: 72 kcal
- Sugar: Not specified
- Sodium: Not specified
- Fat: 6 g
- Saturated Fat: Not specified
- Unsaturated Fat: Not specified
- Trans Fat: Not specified
- Carbohydrates: 1 g
- Fiber: Not specified
- Protein: 3 g
- Cholesterol: Not specified