Skip to content

If you are tired of boring weeknight meals and need something that tastes like it simmered all day but actually takes less than 40 minutes, then you’ve landed in the right spot! I’m Anna Kowalska, and here I share tried-and-true homemade recipes that you and your family will love. Everything I put here is made with heart and flavor, I promise. This recipe for Chicken Chili is going to be your new secret weapon against takeout menus because it’s creamy, comforting, and packed with savory goodness.
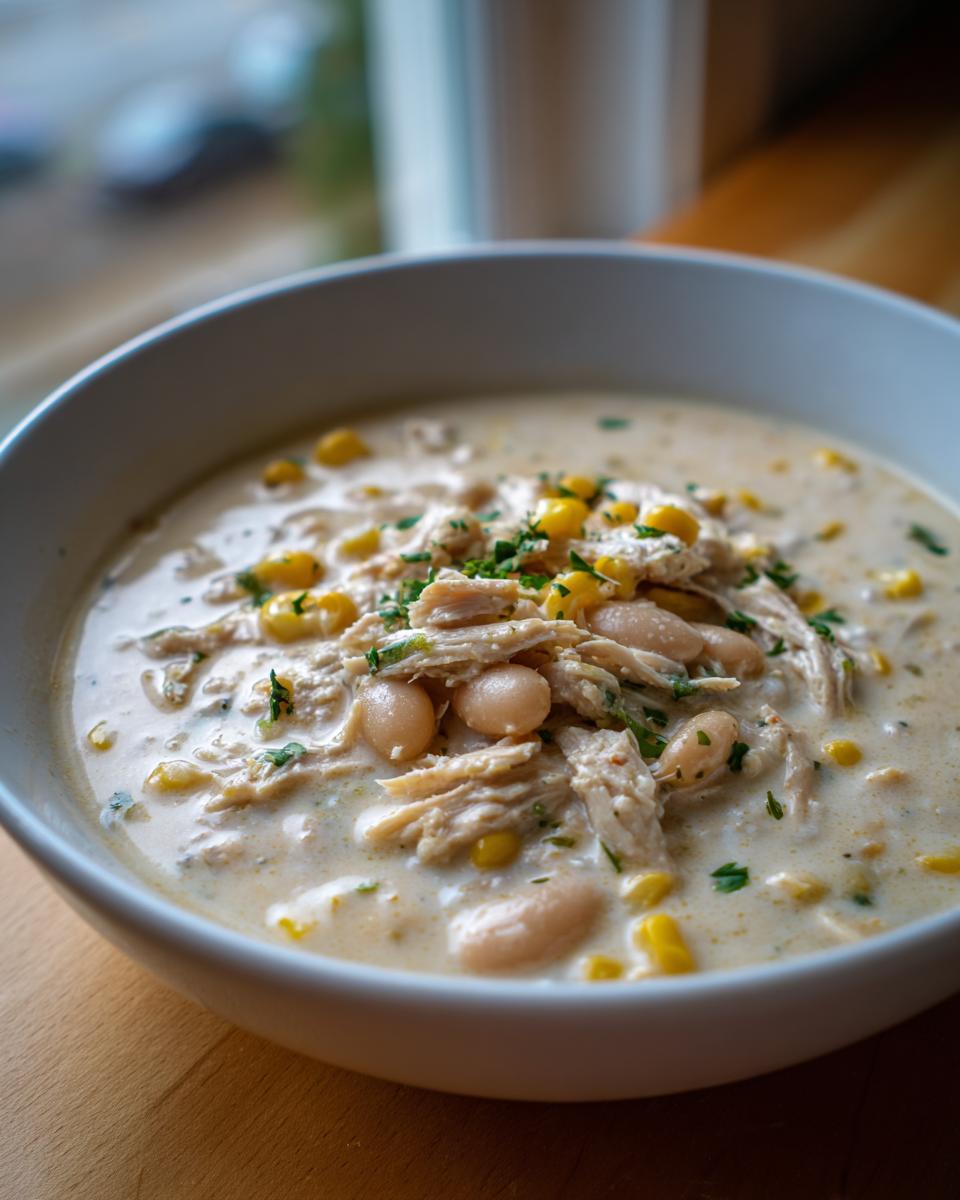
We’re diving deep into my incredibly easy and satisfying Creamy White Chicken Chili today. Forget those thin, watery versions you might have tried before. This one has body, incredible depth from simple spices, and it’s ready before soccer practice starts! It’s the perfect dish when you need a hug in a bowl but don’t have hours to stand over the stove.
Jump to:
Why You’ll Love This Creamy Chicken Chili
I’m not kidding when I say this is my go-to recipe when I’m slammed after work. It’s truly cooking with training wheels on, but the flavor payoff is huge. Honestly, this batch of Chicken Chili tastes like it simmered for hours, but we know the secret is just a little bit of focused time on the stovetop. You need this in your rotation!
Quick Prep and Cook Times
You seriously can’t beat the timing here. We’re looking at just 10 minutes of actual prep work—chopping the onion and mincing garlic, that’s it! Then it’s only about 25 minutes on the heat until it’s ready to serve. This makes it a genuine weeknight miracle.
Flavorful Ingredients in Your Chicken Chili
What makes this Chicken Chili shine is how those simple spices—cumin, oregano, paprika—meld perfectly with the creamy base. The texture is everything; it’s rich and velvety thanks to pureeing some of those white beans right into the broth. It’s savory, slightly tangy from the lime, and just warms you right up to your toes.
Assembling Your Chicken Chili Ingredients
Okay, now for the fun part: gathering our arsenal! Don’t let this list intimidate you; most of this is pantry-stable stuff you probably already have, which is why this recipe is so great for those last-minute dinner scrambles. We want to make sure we have everything ready to go before we even turn on the burner. Trust me, pre-measuring saves so much stress when you’re trying to get dinner on the table fast!
Let’s look at what we need for this creamy, dreamy pot of goodness.
| Ingredient | Quantity |
|---|---|
| Olive Oil | 1 tablespoon |
| Yellow Onion, chopped | 1 small (about ½ cup) |
| Garlic Cloves, minced | 2 |
| Low-Sodium Chicken Broth | 2 ½ cups |
| Diced Green Chilies | 2 4-ounce cans |
| Ground Cumin | 1 ½ teaspoons |
| Paprika | ½ teaspoon |
| Dried Oregano | ½ teaspoon |
| Cayenne Pepper | ¼ teaspoon |
| Lime Juice | Juice of ½ small lime |
| Salt and Pepper | To taste |
| Great Northern Beans, drained and rinsed | 2 15-ounce cans |
| Corn (frozen or fresh) | 1 cup |
| Cooked Chicken, shredded | 2 heaping cups (about 12 ounces) |
| Sour Cream or Greek Yogurt | 1 cup |
Essential Components for This Chicken Chili
The quality of your main components really impacts the final flavor here. Make sure your chicken is already cooked—I often use leftover shredded chicken or grab a rotisserie bird to speed things up! When it comes to the beans, you must drain and rinse them well; that gets rid of that starchy liquid that can make your chili taste cloudy. And don’t skip pureeing one can of those beans later; that’s our secret weapon for that luscious, thick texture we’re aiming for.
Optional Toppings for Your Chicken Chili
This is where you let everyone customize their bowl! We aren’t making this Chicken Chili complicated, so the toppings are totally up to you. I always have these on hand because they elevate the whole meal. You’ll want fresh cilantro, some shredded cheese (Monterey Jack melts beautifully), sliced avocado for creaminess, chopped green onions for a little bite, and definitely some crunchy tortilla chips for dipping!
Step-by-Step Guide: Making Perfect Chicken Chili
This is where the magic happens, folks! We’re moving fast, but we’re not cutting corners on flavor. Following these steps exactly will ensure your Chicken Chili tastes perfectly balanced and creamy every single time. It’s all about layering those flavors correctly.
Sautéing Aromatics for Your Chicken Chili Base
First things first, get your largest pot—we need space for all this goodness—over medium-high heat. Drop in that tablespoon of olive oil. Once it shimmers slightly, toss in your chopped yellow onion. You want to cook those onions until they get soft and translucent, which usually takes about four minutes. Don’t rush this part; soft onions equal sweet flavor! As soon as they look happy, add your minced garlic. Garlic burns fast, so you only need about 30 seconds until you can really smell that amazing aroma. That sweet onion and garlic base is the foundation of everything good in this chili.
Building the Flavorful Liquid for Your Chicken Chili
Now we build the broth! Stir in your chicken broth, those cans of diced green chilies, and all those dry spices: the cumin, paprika, oregano, and that little kick of cayenne. Give it a good stir and bring it up to a gentle simmer. Here comes the texture secret for this Chicken Chili: take one full ladle of those rinsed beans and splash in a bit of that simmering broth. Pop that into your blender and blend it until it’s completely smooth and creamy. Pour that bean puree right back into the pot along with the rest of the whole beans and your cup of corn. This puree is what gives us that thick, velvety mouthfeel without needing any flour!
Simmering and Thickening the Chicken Chili
Once everything is combined, let it simmer uncovered for about 15 minutes. I always stir it every few minutes just to make sure nothing sticks to the bottom, but mostly, this time lets the corn soften up and the spices really bloom. You’ll notice the chili thickening up naturally as some of the liquid evaporates. You are looking for a slight coating on the back of a spoon—it should look richer than soup but definitely not gluey yet.
Finishing Touches for Your Creamy Chicken Chili
Once it’s nice and thick, take the whole pot OFF the heat. This is important! If you add the sour cream while it’s boiling, it can sometimes curdle, and we definitely don’t want sad, lumpy chili. Stir in your cup of sour cream or Greek yogurt until everything is smooth and beautifully creamy. Now, gently fold in your two heaping cups of shredded chicken, making sure it’s heated all the way through (it just needs to warm up, since it’s already cooked). Give it one final taste test. Does it need more salt? A tiny squeeze more lime juice for brightness? Adjust those seasonings now. That’s it—the best creamy Chicken Chili you’ll ever make!

Tips for Making the Best Chicken Chili Every Time
Even with a simple recipe like this, a few insider tips can take your Chicken Chili from great to absolutely unforgettable. I’ve made this dozens of times, sometimes when I was rushing and sometimes when I had all afternoon, and I’ve learned a few tricks to troubleshoot common issues. These little adjustments are what make the difference between a good meal and a family favorite.
Achieving the Ideal Consistency in Your Chicken Chili
So, maybe you followed the steps, but your chili is still a little thinner than you hoped? Don’t panic! That’s why we have that 15-minute uncovered simmer time. If it’s still too soupy after that, just keep it simmering gently, stirring often, for another 5 to 10 minutes. You’ll see it reduce beautifully. If you’re still short on thickness, you can make a quick slurry—just mix one tablespoon of cornstarch with two tablespoons of cold water until smooth, stir it into the simmering chili, and cook for one minute until it thickens right up. It’s my emergency fix for a perfect final consistency in any batch of Chicken Chili.
Ingredient Clarity and Substitutions for Chicken Chili
Remember, the bean puree is key, so don’t skip that step! If you don’t have Great Northern beans on hand, cannellini beans work just as well, or even chickpeas in a pinch, as long as you rinse them thoroughly. For the chicken, if you’re using a store-bought rotisserie chicken, make sure to pull off only the white meat unless you prefer a darker chili, and scrape off any skin or heavy seasoning first. Keeping the ingredients clean ensures the spice blend shines through in your final Chicken Chili.
Storing and Reheating Your Delicious Chicken Chili
This recipe is practically designed for meal preppers! Since it cooks up so quickly, making a double batch is barely any extra effort, and leftovers are even better the next day once those spices have really settled in. I always make sure to portion mine out right away so I have lunches ready for the week.
You want to cool the chili completely before you put it away, though! Don’t leave a huge hot pot sitting on the counter; move it to the fridge relatively quickly for safety. Here’s how I handle storage:
| Storage Method | Duration |
|---|---|
| Refrigerator (Airtight Container) | Up to 4 days |
| Freezer (Freezer-Safe Container) | Up to 3 months |
Reheating is super easy. On the stovetop, just use medium-low heat and stir often until it’s warmed through. If you’re using the microwave, use short bursts and stir between each one to ensure even heating. If it seems a little thick after freezing, just stir in a splash of extra chicken broth or water until it loosens up perfectly.
Frequently Asked Questions About Chicken Chili
I always get a few questions whenever I post this recipe because everyone wants to make sure they get that perfect creamy texture. It’s amazing how versatile this dish is, but knowing a few little secrets helps immensely when you’re planning ahead or making swaps. Here are the things I hear most often about this wonderful white chili version.
How long does this white chili keep in the refrigerator?
This is a great question for meal preppers! Because we use low-sodium broth and fresh ingredients, this white chili keeps beautifully in the refrigerator for up to four full days when stored in a tightly sealed, airtight container. I always notice the flavors actually deepen on day two, which is a huge bonus. If you need to keep it longer, freezing works even better, as I mentioned earlier.
Can I make this recipe without dairy?
Absolutely, you can make this dairy-free! The sour cream or Greek yogurt is mostly for that final creamy finish and tang. You have a couple of great options. You can use a plain, unsweetened coconut yogurt or cashew cream as a direct substitute for the texture. If you want to skip the dairy entirely but still want thickness, just omit the sour cream and use the bean puree technique (Step 3) to thicken it even more, maybe even adding an extra splash of lime juice at the end to mimic that slight tang.
What kind of chicken works best for this recipe?
Honestly, the best chicken is the fastest chicken! I usually rely on a pre-cooked rotisserie chicken—it’s already seasoned and super tender, which is perfect for quick shredding. If you are starting from scratch, poaching a couple of boneless, skinless chicken breasts in water or broth until they reach 165°F internally and then shredding them works perfectly. Just make sure whatever chicken you use is fully cooked before you add it in Step 5 so you aren’t overcooking it while heating it through.
Nutritional Estimates for Your Chicken Chili Serving
Now, I’m not a nutritionist, so please take these numbers with a grain of salt! I always tell people that when you’re cooking at home with whole ingredients, the real magic is in the taste, not the exact calorie count. But for those of you keeping track, I ran the numbers based on the standard recipe layout. This is just an estimate, so your actual counts might vary based on the sodium content of your broth or how much cheese you pile on top!
| Nutrient | Estimate Per Serving |
|---|---|
| Calories | 320 |
| Fat | 12g |
| Carbohydrates | 25g |
| Protein | 28g |
See? It’s a fantastic balance of protein and fiber, which is why this Chicken Chili keeps you feeling full for hours. It’s a satisfying meal that doesn’t weigh you down, which is exactly what I want on a busy night!
Share Your Experience with This Chicken Chili
I truly hope this recipe brings as much warmth to your table as it does mine! Once you try this creamy version, I’d love to hear what you think. Did you rate it five stars? Tell me in the comments below what your absolute favorite topping combination was—I’m always looking for new ideas to try next time I make a big pot!
Print
Superb 30-Minute Chicken Chili
- Total Time: 35 minutes
- Yield: 5 servings 1x
- Diet: Vegetarian
Description
Warm up with this creamy white chicken chili loaded with shredded chicken, white beans, corn, and spices, perfect for quick weeknight dinners. This recipe is ideal for families and meal prep enthusiasts.
Ingredients
- 1 tablespoon olive oil
- 1 small yellow onion, chopped (about ½ cup)
- 2 garlic cloves, finely minced
- 2 ½ cups low-sodium chicken broth
- 2 4-ounce cans diced green chilies
- 1 ½ teaspoons ground cumin
- ½ teaspoon paprika
- ½ teaspoon dried oregano
- ¼ teaspoon cayenne pepper
- Juice of ½ small lime
- Salt and freshly ground black pepper, to taste
- 2 15-ounce cans great northern beans, drained and rinsed
- 1 cup corn, frozen or fresh
- 2 heaping cups cooked chicken, shredded (about 12 ounces)
- 1 cup sour cream or plain Greek yogurt
- Fresh cilantro (optional topping)
- Shredded cheese (optional topping)
- Sliced avocado (optional topping)
- Chopped green onions (optional topping)
- Tortilla chips (optional topping)
Instructions
- Heat olive oil in a large 5-6 quart pot over medium-high heat. Add onion and sauté until softened, about 4 minutes. Add garlic and cook for 30 seconds.
- Stir in chicken broth, diced green chilies, cumin, paprika, oregano, cayenne, lime juice, salt, and pepper. Bring to a gentle simmer.
- In a blender, puree one ladleful of drained beans with a splash of broth until smooth. Add pureed beans, remaining whole beans, and corn to the pot.
- Simmer the chili uncovered for 15 minutes, stirring occasionally until slightly thickened.
- Add shredded chicken and stir until fully incorporated and heated through. Chicken should reach 165°F internal temperature.
- Remove from heat and stir in sour cream until creamy and smooth.
- Taste and adjust seasoning with additional salt, pepper, or lime juice if needed.
- Serve warm, garnished with cilantro, cheese, avocado, green onions, and tortilla chips as desired.
Notes
- For a thicker chili, simmer an additional 5-10 minutes.
- The chili can be made in a slow cooker or Instant Pot using similar steps and cooking times.
- Prep Time: 10 minutes
- Cook Time: 25 minutes
- Category: Main Dish
- Method: Stovetop
- Cuisine: American
Nutrition
- Serving Size: 1 serving
- Calories: 320
- Sugar: Unknown
- Sodium: Unknown
- Fat: 12g
- Saturated Fat: Unknown
- Unsaturated Fat: Unknown
- Trans Fat: Unknown
- Carbohydrates: 25g
- Fiber: Unknown
- Protein: 28g
- Cholesterol: Unknown