Skip to content
Hey there, foodie friends! Anna Kowalska here, and welcome back to my kitchen where everything is made with heart and flavor! You know, I’ve always loved hosting. There’s just something so special about bringing people together, sharing good food, and making memories. But let’s be real, sometimes the thought of making a huge spread can feel a little overwhelming, right? That’s where I come in, sharing my tried-and-true homemade recipes that you and your family will absolutely adore. Over the years, I’ve perfected the art of the easy, impressive appetizer. And today, I’m SO excited to share my absolute go-to for any party: these incredible Meatball Parmesan Sliders. Seriously, they’re a game-changer! They’re ridiculously tasty, super simple to whip up, and always disappear faster than you can say “more, please!”
Jump to:
Gathering the Essentials for Your Meatball Parmesan Sliders
The beauty of these Meatball Parmesan Sliders is how simple they are to make. You probably have most of the ingredients already! It’s all about grabbing a few key players that come together to make something truly amazing. No fancy stuff needed here, just good, honest ingredients that deliver big on flavor. Trust me, your grocery run for these will be a breeze, and the payoff is HUGE!
Ingredients for Delicious Meatball Parmesan Sliders
Alright, let’s talk about what you’ll need to make these little bites of heaven. First up, grab a package of those wonderfully soft 12-count Kings Hawaiian Rolls. They’re the perfect sweet and fluffy base. Then you’ll need about 12 pre-cooked cocktail meatballs – just pop them in the microwave or a quick sauté to warm them up. For that classic Italian flavor, we’ve got 1/4 cup of smooth tomato sauce and a generous 1/4 cup of shredded mozzarella cheese, divided, plus another 1/4 cup of grated Parmesan cheese for that salty kick. For the garlic butter that makes everything magical, melt 4 tablespoons of unsalted butter and stir in 1 tablespoon of dried Italian seasoning and 1 teaspoon of garlic powder. Oh, and if you’re feeling fancy, a little fresh parsley for garnish, optional, adds a pop of color!
Essential Equipment for Making Meatball Parmesan Sliders
To make these Meatball Parmesan Sliders without a hitch, you’ll want a few trusty kitchen tools. Having these ready means your assembly process will be super smooth and quick. It’s all about being prepared so you can focus on the fun part – eating!
Baking Sheet
This is where all the magic happens! You’ll need a baking sheet to toast those rolls and melt all that gooey cheese to perfection.
Small Bowl
Perfect for whisking together that irresistible garlic butter mixture. Easy peasy!
Spoon or Piping Bag
You’ll use this to carefully fill those little hollowed-out rolls with the sauce, meatballs, and cheese. A spoon works just fine, but a piping bag gives you a bit more control!
Measuring Cups and Spoons
Accuracy is key for that perfect flavor balance, so make sure you have your trusty measuring tools handy!
Crafting the Perfect Meatball Parmesan Sliders Step-by-Step
Alright, let’s get these amazing Meatball Parmesan Sliders assembled! It’s honestly a pretty straightforward process, but paying attention to a few little details will make all the difference. You’ll be amazed at how quickly these come together, and the result is pure gooey, savory perfection.
Preparing the Rolls for Flavor
First things first, we need to get our Hawaiian rolls ready for all that delicious filling. Grab a sharp knife – a serrated one works wonders here! Carefully cut small, deep circles into the very center of each roll. The key is to go deep, but *don’t* cut all the way through to the bottom. We want to create a nice little pocket. Once you’ve made the cuts, gently push down the center with your finger or the back of a small glass. This makes that space even bigger, ready to hold all the goodies. It sounds a little fiddly, but trust me, this step is crucial for getting that perfect slider structure!
Infusing Flavor with Garlic Butter Glaze
Now for the flavor boost! Take that glorious garlic butter mixture we made and brush it all over the tops and, importantly, inside the hollowed-out part of each roll. Get it in there! Then, pop these beauties onto your baking sheet and into a preheated oven at 400°F (200°C) for about 4 minutes. You just want them to get lightly toasted and golden. Keep an eye on them, though! Because of that yummy butter, they can go from toasted to burnt pretty quickly. We’re just looking for a nice, light crispness here.

Assembling the Savory Layers
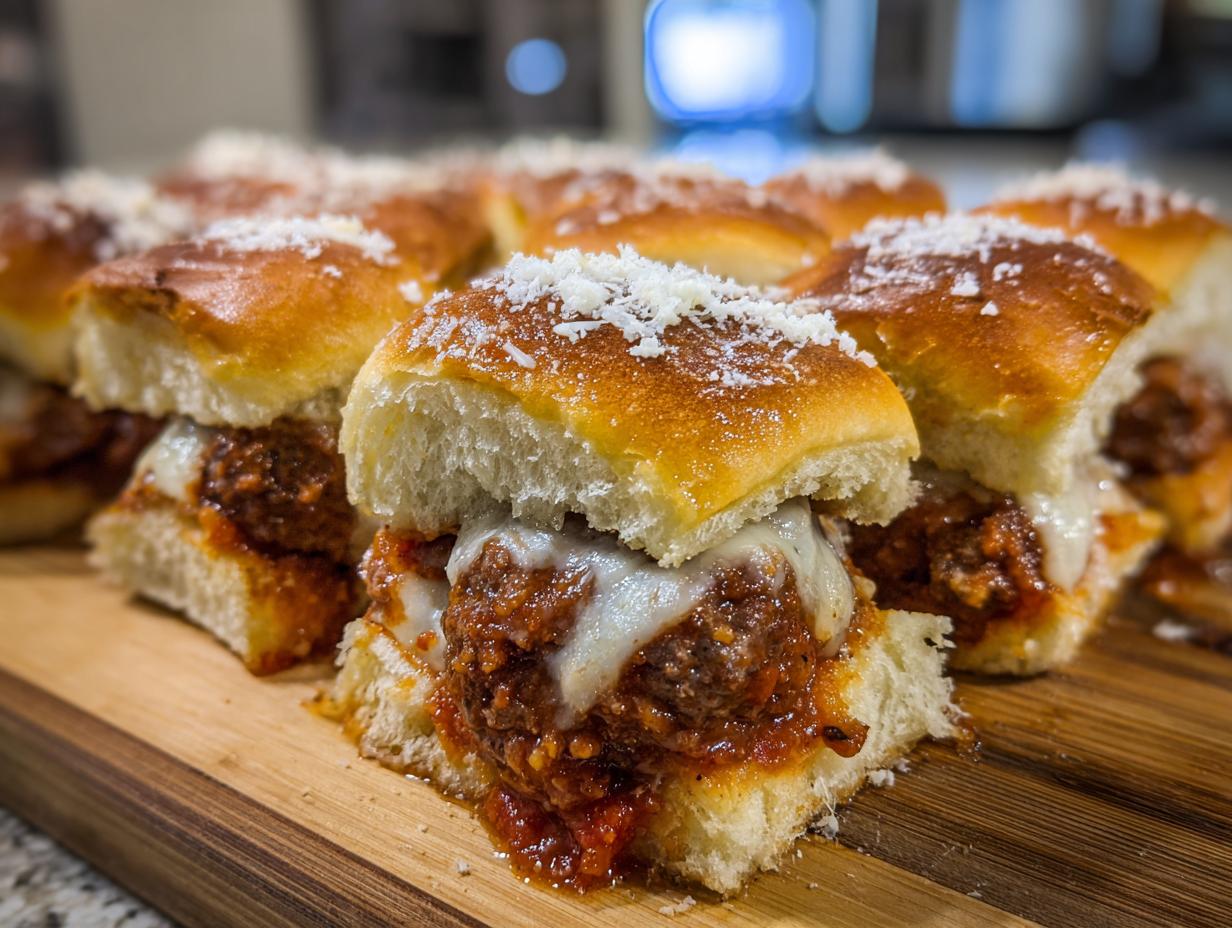
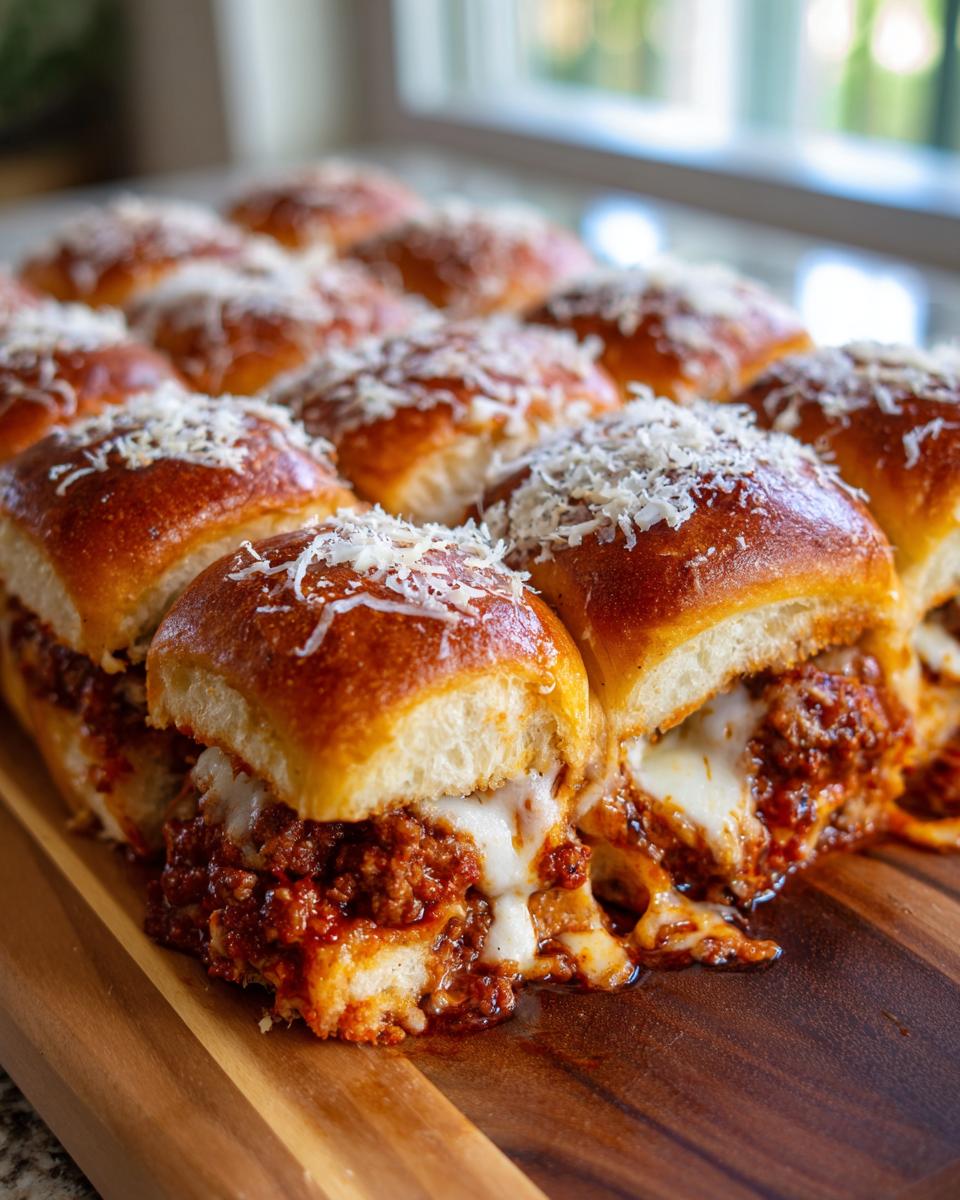
Now for the fun part – building our Meatball Parmesan Sliders! Once those rolls are lightly toasted, carefully spoon a little bit of that smooth tomato sauce right into the center of each little hole you created. Then, tuck a small piece of mozzarella cheese into each one. Next, it’s time for the star: add your warmed-up cocktail meatball into each roll. Don’t be shy! Give them a good sprinkle of that sharp Parmesan cheese. This is where all those classic Italian flavors really start to meld together. It’s starting to look and smell amazing already, right?
Melting the Cheesy Topping
We’re almost there! Now, take the rest of that shredded mozzarella cheese and sprinkle it generously over the meatballs and rolls. This is the gooey, melty crown jewel. Pop the sliders back into the 400°F (200°C) oven for about 5 more minutes, or until the cheese is completely melted and bubbly and maybe just starting to get a little golden brown. Again, watch them super closely during these last few minutes because that butter can make them brown fast. You want that perfect melted cheese, not a burnt offering!
Tips for Unforgettable Meatball Parmesan Sliders
Okay, so you’ve made the Meatball Parmesan Sliders, and they look fantastic! But how do we take them from “really good” to “absolutely unforgettable”? It’s all about a few little tricks I’ve picked up over the years of hosting and, let’s be honest, taste-testing a LOT. These aren’t complicated, but they really do make a difference in the final bite.
Achieving the Best Meatball Parmesan Sliders Texture
The absolute best way to enjoy these sliders is when they’re warm, not piping hot, but just warm enough that the cheese is perfectly gooey and the rolls are still soft. Letting them cool for just a few minutes after they come out of the oven is key. If they’re too hot, you’ll burn your mouth, and if they sit too long, they can get a little dense. That sweet spot is where the magic happens – melty cheese, tender meatballs, and soft, slightly toasted rolls. It’s pure bliss!
Flavor Boosts for Your Meatball Parmesan Sliders
Want to kick these Meatball Parmesan Sliders up another notch? It’s easy! First, try using a really good quality tomato sauce – a marinara with great depth of flavor makes a noticeable difference. Also, don’t be afraid to add a tiny pinch of red pepper flakes to your tomato sauce or even to the garlic butter mixture for a little bit of heat. It really wakes everything up! Sometimes I even add a little extra sprinkle of dried oregano to the top with the Parmesan cheese for an extra herbaceous punch. Simple tweaks, huge flavor payoff!
Frequently Asked Questions About Meatball Parmesan Sliders
Got questions about whipping up these amazing Meatball Parmesan Sliders? I’ve got you covered! It’s always helpful to know a few tricks to make sure your party appetizers are a total hit. Here are some common things folks ask:
Can I make Meatball Parmesan Sliders ahead of time?
You can definitely prep some parts ahead! I like to mix the garlic butter and have my meatballs warmed and ready. You can even hollow out the rolls a few weeks in advance and store them in an airtight container at room temperature. Just don’t add the sauce, meatballs, or cheese until you’re ready to bake them. They’re truly best served warm right out of the oven, so assembling and baking them just before serving is ideal for that perfect gooey texture!
What kind of meatballs work best for these sliders?
For these Meatball Parmesan Sliders, the pre-cooked cocktail meatballs are a lifesaver. They’re perfectly bite-sized and save so much time! You can find them in the freezer section of most grocery stores. Just make sure to warm them up either in the microwave or a quick sauté before tucking them into the rolls. If you’re feeling ambitious, you could certainly make your own homemade meatballs, just make sure they’re small and fully cooked before you start assembling!
How do I prevent the Hawaiian rolls from getting soggy?
This is a super common concern! The trick to avoiding soggy sliders is twofold. First, don’t overdo the tomato sauce. Just a little bit in the bottom is perfect. Second, that initial toasting of the rolls with the garlic butter is crucial! It creates a slight barrier. Also, serving them relatively soon after baking helps keep them from getting soggy. They’re meant to be enjoyed fresh!
Can I use a different type of bread for these sliders?
While Hawaiian rolls are my absolute favorite for these Meatball Parmesan Sliders because of their perfect soft texture and hint of sweetness that balances the savory filling, you *could* use other slider buns. Just make sure they’re soft and not too dense. You might need to adjust the cutting and hollowing method a bit depending on the bun. But honestly, the Hawaiian rolls really are special here!
Nutritional Insights for Your Meatball Parmesan Sliders
Now, I know some of you are curious about the nitty-gritty details, so here’s a little peek at the estimated nutritional info for these delightful Meatball Parmesan Sliders. Remember, these are just estimates per slider, and they can vary a bit based on the exact brands and ingredients you use. But it’s good to have a general idea, right?
| Nutrient | Amount (per slider) |
|---|---|
| Calories | 200 |
| Fat | 12g |
| Saturated Fat | 6g |
| Unsaturated Fat | 6g |
| Trans Fat | 0g |
| Carbohydrates | 15g |
| Fiber | 1g |
| Protein | 8g |
| Cholesterol | 30mg |
| Sodium | 300mg |
| Sugar | 5g |
Storing and Reheating Your Delicious Meatball Parmesan Sliders
So, you’ve got some leftover Meatball Parmesan Sliders? Lucky you! While they’re definitely best enjoyed fresh and warm, they store pretty well for a day or two. The trick is to keep them from getting soggy. Once they’ve cooled down a bit, pop any leftovers into an airtight container. You can pop them in the fridge for up to two days. When you’re ready for round two, the best way to reheat them is in the oven or a toaster oven. This helps crisp them back up a bit and remelt that cheese beautifully. A quick zap in the microwave works in a pinch, but be careful not to overheat them, or they might get a little chewy. Just a short burst should do the trick!
| Storage Method | Reheating Method | Best Served Within |
|---|---|---|
| Airtight Container (Refrigerator) | Oven or Toaster Oven (preferred), or Microwave (briefly) | 1-2 days |

Amazing 12 Meatball Parmesan Sliders
- Total Time: 19 minutes
- Yield: 12 sliders 1x
- Diet: Vegetarian
Description
Meatball Parmesan Sliders are a delicious and easy appetizer perfect for any gathering. These sliders combine savory meatballs, rich tomato sauce, melted mozzarella, and sharp parmesan cheese, all nestled in soft Hawaiian rolls. A garlic butter glaze adds an extra layer of flavor.
Ingredients
- 1 pkg Kings Hawaiian Rolls
- 12 cocktail meatballs (cooked)
- ¼ cup tomato sauce
- ¼–½ cup mozzarella cheese (divided)
- ¼ cup parmesan cheese
- Parsley for garnish (optional)
- Garlic Butter:
- 4 tbsp butter
- 1 tbsp Italian seasoning
- 1 tsp garlic powder
Instructions
- Cut small, deep circles into the center of each Hawaiian roll without cutting through to the bottom.
- Push down the center to create a larger space using your fingers or the bottom of a small glass.
- Brush the top and inside of the rolls with the garlic butter. Bake at 400°F for about 4 minutes, or until lightly toasted.
- Add a little tomato sauce to the center of each hole and place a small piece of mozzarella cheese into each one.
- Add the warmed/cooked meatballs and sprinkle them with parmesan cheese.
- Add the rest of the mozzarella cheese. Place in a 400°F oven for about 5 minutes, or until the cheese is melted. Watch them closely as they can burn easily due to the butter.
- Let them cool slightly before garnishing with parsley (optional) and serving.
Notes
- These sliders are best served warm.
- They make a great snack or party appetizer.
- Prep Time: 10 minutes
- Cook Time: 9 minutes
- Category: Appetizer
- Method: Baking
- Cuisine: American
Nutrition
- Serving Size: 1 slider
- Calories: 200
- Sugar: 5g
- Sodium: 300mg
- Fat: 12g
- Saturated Fat: 6g
- Unsaturated Fat: 6g
- Trans Fat: 0g
- Carbohydrates: 15g
- Fiber: 1g
- Protein: 8g
- Cholesterol: 30mg