Skip to content

There’s just something so incredibly cozy about a warm bowl of baked pears, isn’t there? It feels like a hug from the inside out. Here at my little corner of the internet, I’m Anna Kowalska, and I’m all about sharing those tried-and-true homemade recipes that just make your soul happy. You know, the kind that fill your kitchen with the most wonderful aromas and bring smiles to everyone at your table. Everything I share is made with a whole lot of heart and, of course, tons of flavor, just like these simple baked pears. They’re a perfect example of how a few humble ingredients can create something truly special and comforting.
Jump to:
Why You’ll Love These Baked Pears
Seriously, these baked pears are a winner for so many reasons! They’re ridiculously quick to put together, which is a lifesaver on busy weeknights. You just toss them in the dish and let the oven do the work. Plus, they’re naturally sweet and feel so comforting without being heavy. The best part? They’re made with just a few wholesome ingredients you probably already have. It’s a wonderfully delightful fruit-focused dessert that feels like a real treat!
- Quick and easy to assemble
- Naturally sweet and comforting
- Uses simple, wholesome ingredients
- A delightful fruit-focused dessert
Ingredients for Baked Pears
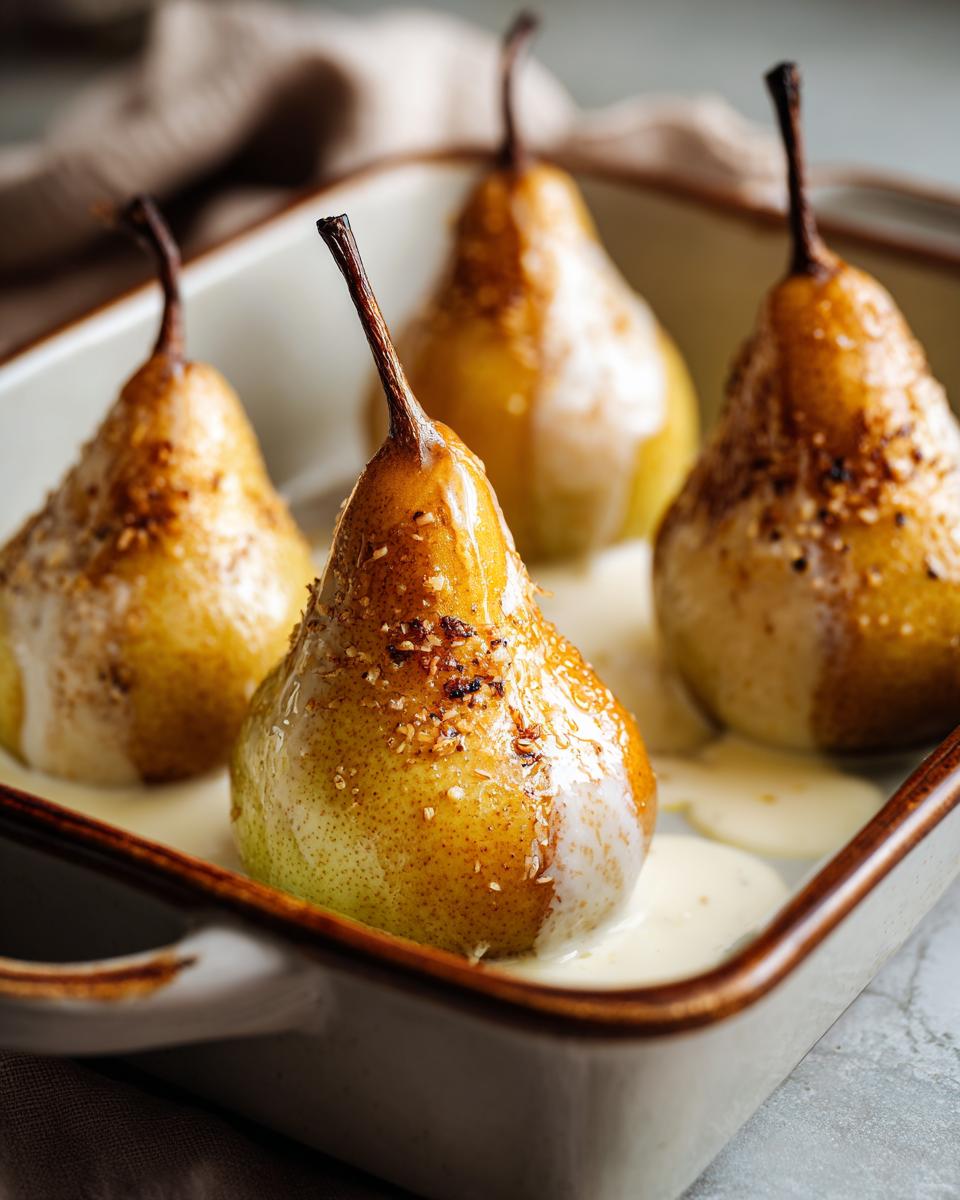
Gathering your ingredients is the first step to making these lovely baked pears. It’s so simple, you’ll be amazed at how quickly you can whip this up! You’ll need just a few things from your pantry and fridge. Make sure you have two tablespoons of butter, divided, and two tablespoons of white sugar, also divided. The stars of the show are two ripe Bosc pears, which you’ll want to halve and carefully core. Finally, you’ll need about half a cup of heavy whipping cream to pour over them before the final bake. That’s it! Easy peasy, right?
Ingredient Notes and Substitutions
When it comes to pears, Bosc are my absolute favorite for baking. They hold their shape beautifully and have a lovely subtle sweetness that just gets better when it’s baked. But hey, if you can’t find Bosc pears, don’t fret! Anjou pears are a great substitute; just make sure they’re ripe but still firm. You want them to give just a little when you gently squeeze them. For the butter, feel free to use salted or unsalted – just adjust the sugar slightly if you use salted. And if you’re looking for a slightly less rich finish, you could try using half-and-half instead of heavy cream, though it won’t be quite as decadent. For a touch more sweetness without extra sugar, a tiny drizzle of honey before serving is also divine!
How to Prepare Baked Pears
Getting these delicious baked pears ready is so straightforward, you’ll wonder why you haven’t made them more often! First things first, let’s get that oven preheated to 375 degrees F (that’s 190 degrees C). While it’s warming up, grab a nice 9-inch baking dish. We’re going to grease it up with about 1 tablespoon of butter, making sure to get the sides too. Then, sprinkle 1 tablespoon of sugar right into that buttered dish. This creates a lovely little base for our pears to bake in!
Now, for the pears themselves. Take your remaining 1 tablespoon of butter and gently rub it all over the cut sides of your halved and cored pears. This gives them a little extra richness and helps them get that beautiful golden color. Arrange your buttered pears cut-side down in that prepared baking dish. It looks so pretty already! Sprinkle the remaining 1 tablespoon of sugar evenly over the top of the pears. They’re almost ready for their spa treatment in the oven!
Pop that baking dish into your preheated oven and let them bake for about 10 minutes. This gives them a nice head start. After those 10 minutes, carefully take the dish out and pour the heavy whipping cream all around the pears. It’s going to bubble and mingle with the butter and sugar, creating this divine sauce. Then, pop them back into the oven and continue baking for about 20 minutes more, or until they are wonderfully tender when you poke them with a fork. You want them soft, but not falling apart mushy. And voilà! Your perfect batch of baked pears is ready to be enjoyed.
Essential Equipment for Baked Pears
You don’t need a whole lot of fancy gadgets for this recipe, which is part of its charm! You’ll definitely need a baking dish, about 9 inches across, to hold everything. Make sure you have your measuring spoons handy for the butter and sugar, and some measuring cups for the cream. That’s really all you need to get these simple baked pears made!
Tips for Perfect Baked Pears
Making these baked pears is pretty foolproof, but a few little tricks can make them absolutely divine! First off, choosing the right pears is key. You want them ripe but firm – think Bosc or Anjou that yield just slightly to gentle pressure. Avoid pears that are too soft, or they’ll turn to mush in the oven. Speaking of mushy pears, to prevent that, don’t overbake them! The recipe gives you a good guideline, but always test for tenderness with a fork. They should be soft enough to pierce easily but still hold their shape. For really uniform baking, try to pick pear halves that are roughly the same size. This helps them cook evenly, so you don’t have one pear done before the others. And if you want to kick it up a notch, a tiny pinch of cinnamon or nutmeg with the sugar before baking adds an extra layer of cozy flavor!
Serving Suggestions for Baked Pears
These baked pears are lovely just as they are, but they also play so well with other flavors and textures! For a little something extra, try serving them with a generous dollop of cool Greek yogurt – the tanginess is just divine against the warm, sweet pear. If you want to amp up the natural sweetness just a touch, a little drizzle of honey right before serving is pure magic. And for when you’re feeling a bit more indulgent, a light crumble topping, maybe with some chopped nuts or oats, adds a wonderful crunch that contrasts beautifully with the soft, tender fruit. Honestly, they’re perfect any way you serve them!
- With a dollop of Greek yogurt
- Drizzled with honey
- Alongside a light crumble topping
Storing and Reheating Baked Pears
Got some delicious baked pears leftover? Lucky you! They store wonderfully. Let them cool down completely, then pop them into an airtight container. They’ll keep nicely in the refrigerator for about 2-3 days. Just make sure they’re sealed up tight to keep them fresh and prevent them from absorbing any fridge odors.
When you’re ready to enjoy them again, reheating is super easy! You can gently warm them up in the microwave for about 30-60 seconds, just until they’re nice and toasty. If you prefer, you can also pop them back into a low oven (around 300°F or 150°C) for about 5-10 minutes. This method is great for warming them through without making them too soft. They’ll be almost as good as the first time!
Frequently Asked Questions About Baked Pears
Got some questions about making these delightful baked pears? I’ve got you covered! It’s always good to know the little details.
Q: Can I use different types of pears for baked pears?
Absolutely! While I adore Bosc pears for their lovely texture, Anjou pears are a fantastic substitute. Just make sure they’re ripe but still firm to the touch so they don’t get too mushy. Other firm pears like Forelle or even Bartlett can work, but keep an eye on their baking time as they might soften a bit quicker.
Q: How do I know when the baked pears are done?
The best way is to use a fork! When the pears are tender enough to be easily pierced with a fork but still hold their shape, they’re just right. They shouldn’t be falling apart. You’ll also notice the cream they’re baked in will have thickened slightly and maybe even started to caramelize a bit around the edges.
Q: Can I make baked pears ahead of time?
You can definitely prepare them ahead of time! Once they’ve cooled, store them in an airtight container in the fridge for up to 2 days. Reheat them gently in the oven or microwave until warmed through. They’re still delicious, though they might be a tad softer than when freshly baked.
Q: Are there any healthier alternatives to the cream?
For a lighter option, you can try using half-and-half instead of heavy cream. It won’t be quite as rich, but it still adds a lovely creamy element. You could also experiment with a swirl of plain Greek yogurt or even a splash of milk, though these might not create the same decadent sauce. For a dairy-free version, a good quality unsweetened coconut cream could work!
Nutritional Information for Baked Pears
Just a little note on the numbers: the nutritional info for these yummy baked pears is an estimate, of course. It can change a bit depending on the exact brands you use and even how ripe your pears are! This recipe doesn’t give super precise data, but it gives you a good idea of what you’re working with. Enjoy every bite!
Print
Amazing Baked Pears: Simple, Sweet Comfort
- Total Time: 40 minutes
- Yield: 4 servings 1x
- Diet: Vegetarian
Description
Enjoy these simple baked pears, a comforting dessert with a touch of sweetness. This recipe comes from Anna Kowalska, who shares homemade recipes made with heart and flavor for you and your family to love.
Ingredients
- 2 tablespoons butter, divided
- 2 tablespoons white sugar, divided
- 2 Bosc pears, halved and cored
- ½ cup heavy whipping cream
Instructions
- Preheat oven to 375 degrees F (190 degrees C). Grease a 9-inch baking dish with 1 tablespoon butter. Sprinkle 1 tablespoon sugar into the buttered dish.
- Rub the remaining 1 tablespoon butter over the pear halves. Arrange pears cut sides down in the prepared baking dish and sprinkle with the remaining 1 tablespoon sugar.
- Bake for 10 minutes. Pour cream over the pears and continue baking until tender, about 20 minutes more.
- Prep Time: 10 minutes
- Cook Time: 30 minutes
- Category: Dessert
- Method: Baking
- Cuisine: American
Nutrition
- Serving Size: 1 serving
- Calories: 175
- Sugar: 14g
- Sodium: 47mg
- Fat: 11g
- Saturated Fat: 7g
- Carbohydrates: 20g
- Fiber: 3g
- Protein: 1g
- Cholesterol: 36mg