Skip to content

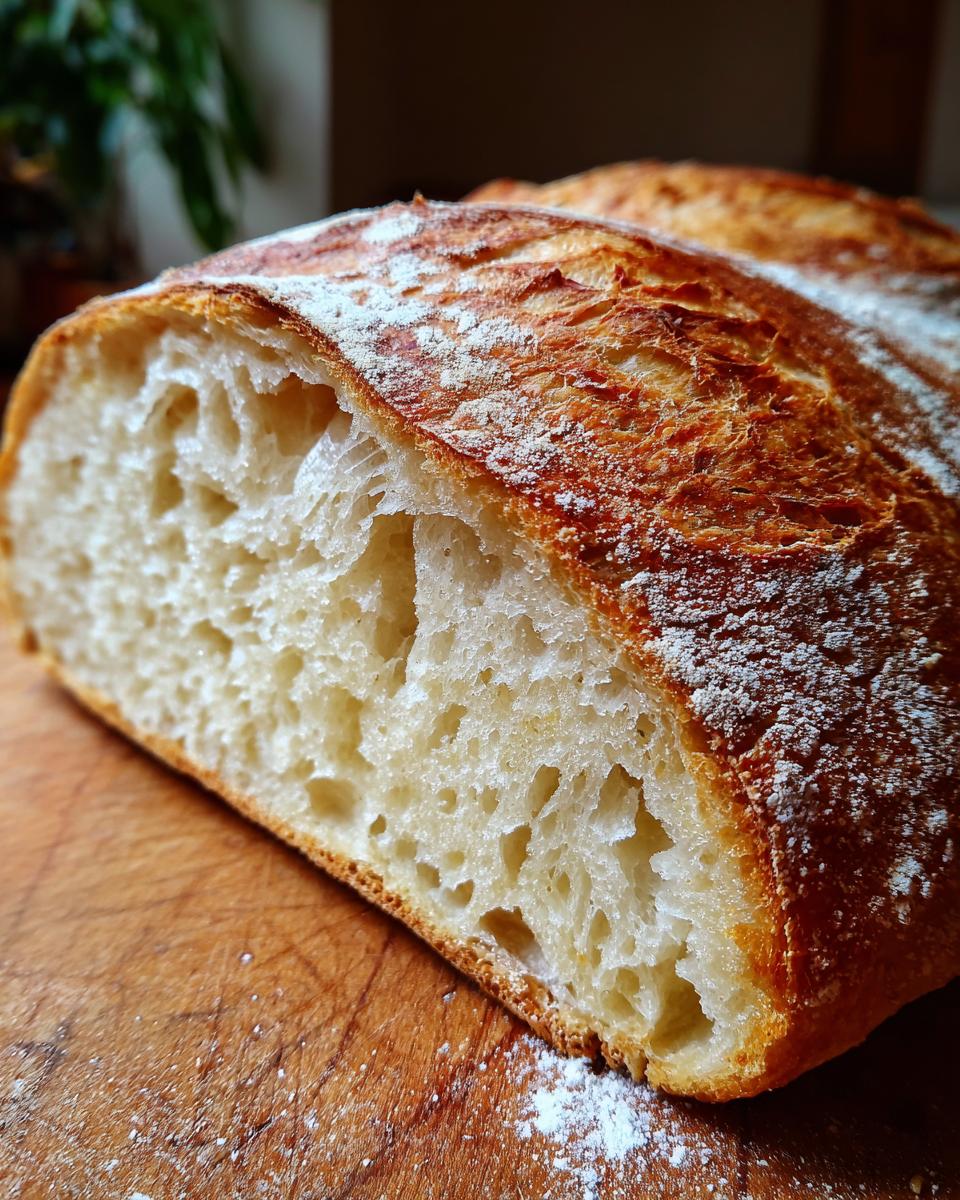
The challenge of making truly great Ciabatta Bread at home often comes down to those huge, beautiful, irregular air pockets. You see pictures of Italian loaves with holes bigger than your thumb, and you wonder, “How do I get that?” Well, you stop doubting yourself and start trusting the process! I’m Anna Kowalska, and here I share tried-and-true homemade recipes that you and your family will love. Everything I put on this site is made with heart and flavor, because I believe food tastes better when you put a little bit of yourself into the mixing bowl.
This specific recipe for Ciabatta Bread is a game-changer because it demands patience. That long sponge time isn’t just for show; it develops the flavor complexity you can’t get any other way. We’re going for an open, airy interior and a crust that crackles when you slice it. Don’t worry about the sticky dough—that’s actually the magic ingredient working! Stick with me, and I promise you’ll pull out loaves that look just like they came from a small Italian bakery.
Jump to:
Essential Equipment for Perfect Ciabatta Bread
You can’t fake artisan bread, especially when you’re dealing with high hydration dough like this. Forget trying to mix this by hand; you need a machine to handle the liquid! The right tools make all the difference between a dense brick and incredible Ciabatta Bread. We need equipment that can handle serious stickiness and deliver intense heat.
Tools for Handling High Hydration Dough
First up, you absolutely must have a stand mixer with a dough hook. This dough is so wet, trying to develop the gluten manually is just asking for a sticky mess all over your kitchen. The mixer does the heavy lifting for those 10 minutes of kneading. Also, grab a good quality rubber spatula, but make sure you spray it down before you start folding!
Gathering Your Ingredients for Ciabatta Bread
Okay, let’s talk ingredients. This isn’t a quick throw-together bread; it relies on a two-stage process, which means we split our ingredients up into two groups: the Sponge and the final Dough. This separation is key to developing that classic, tangy flavor in your Ciabatta Bread.
The most important thing to remember here is temperature. Yeast hates being shocked! Make sure both your water and your milk are at room temperature. If they are too cold, the yeast won’t wake up properly during that long sponge rest. If they’re too hot, well, you know what happens—dead yeast, flat bread!
Ingredients for the Starter Sponge
This first part is simple, but it starts the clock on flavor development. You need:
- 1 cup (130 g) all-purpose flour
- ⅓ teaspoon instant yeast
- ½ cup (120 ml) water, at room temperature
Ingredients for the Final Dough
Once that sponge is ready, we mix in the rest of our essentials. Don’t skimp on the salt; it controls the rise and adds necessary flavor.
- 2 cups (260 g) all-purpose flour
- 1½ teaspoons salt
- ½ teaspoon instant yeast
- ¾ cup (180 ml) water, at room temperature
- ¼ cup (60 ml) whole or 2% milk, at room temperature
Step-by-Step Instructions for Homemade Ciabatta Bread
This is where the fun—and the patience—really begins! We are going to take this wet, shaggy mess and turn it into glorious, hole-filled loaves. Follow these steps exactly; the timing is just as important as the mixing itself.
Stage One: Developing the Flavorful Sponge
First things first: the sponge. In a medium bowl, just mix that initial cup of flour, the tiny bit of yeast, and the water until it looks like a thick, uniform batter. Don’t overthink it! Cover that bowl tightly with plastic wrap—I mean *tightly*—and let it sit. This needs to rest at room temperature for anywhere from 8 hours up to a full 24 hours. Seriously, don’t rush this. This long rest is what gives your Ciabatta Bread that incredible, slightly tangy flavor profile.
Stage Two: Mixing and Kneading the Ciabatta Bread Dough
When your sponge is bubbly and ready, dump it right into your stand mixer bowl along with all the remaining dough ingredients: the rest of the flour, the salt, the other half teaspoon of yeast, the remaining water, and the milk. Attach the paddle attachment first. Mix it on low speed for just about a minute until everything looks shaggy. Stop and scrape down the sides—you’ll have wet bits clinging everywhere.
Now, switch to the dough hook. Turn the speed up to medium-low. You need to mix this for a solid 4 to 6 minutes. You’ll watch the dough start to pull together and collect itself onto the hook, pulling away from the sides of the bowl. It will still look very sticky, and that’s exactly what we want. Keep going! Change the speed to medium and knead for another 10 minutes. At the end of this, the dough should look smooth and shiny, even though it’s still extremely tacky. That shine tells you the gluten is developed.
Building Strength with Folds
Take that sticky mass out and put it into a large, lightly oiled bowl. Cover it well and let it rise until it doubles, which usually takes about an hour at room temperature. Once it’s doubled, grab your rubber spatula—remember to spray it first so the dough doesn’t stick! Gently lift one edge of the dough, stretch it up, and fold it over toward the middle. Turn the bowl 90 degrees and do it again. You repeat this folding action 8 times total. This is gentle gluten work!
Cover it back up and let it rest for 30 minutes. Then, you do the exact same 8-fold sequence again. After that second set of folds, cover it again and let it rest for about 30 more minutes until it’s doubled in size again.
Final Shaping and Preparing for the Oven
About an hour before you plan to bake, get your oven ready—this is critical! Put your baking stone on the lower-middle rack and preheat the oven to 450 degrees F. While that heats up, take two large sheets of parchment paper, dust them heavily with flour, and set them aside.
Gently turn the dough out onto a heavily floured surface; try not to squeeze out all the air! Flour the top, and use your bench scraper to divide it into two equal pieces. Take one piece, flip it so the cut side is up, and gently press it into a rough 12×6 inch rectangle. Now, fold the short ends toward the center, overlapping them like you’re folding a business letter. Do this again with the second piece.
Carefully transfer each loaf, seam-side down, onto its prepared parchment sheet. Dust the tops with a little more flour, cover them loosely, and let them rest for 30 minutes. You’ll start seeing little bubbles pop up on the surface—that’s good!
Just before they go in, use floured fingertips to poke the entire surface of each loaf evenly, flattening them into a 10×6 inch rectangle. Spray the tops lightly with water.
Baking Your Artisan Ciabatta Bread
Using a pizza peel or a flat cutting board, slide those loaves, parchment and all, directly onto your preheated baking stone. Now, listen closely: for the first 5 minutes of baking, spray the loaves with water two more times. This steam is what sets that beautiful, shattering crust characteristic of excellent Ciabatta Bread.
Bake for a total of 22 to 27 minutes, or until the internal temperature hits 210 degrees F and the crust is a deep, gorgeous golden brown. Once they’re done, pull them out immediately, ditch the parchment paper, and let them cool completely on a wire rack for at least an hour before you even think about slicing them!
Tips for Success When Making Ciabatta Bread
Making beautiful, hole-filled loaves isn’t hard, but it does require you to trust the dough, even when it feels wrong! My biggest hurdle when I first started making this Ciabatta Bread was fighting the stickiness. You have to remember that this is a high hydration recipe, which means it has a lot more water than a standard sandwich loaf. If you panic and dump in more flour, you’ll end up with a dense, chewy bread, and we definitely don’t want that!
Understanding High Hydration Dough
This dough is supposed to be ridiculously sticky—it’s supposed to cling to everything! When you are working it, use your bench scraper or your hands only after coating them heavily with flour. Think of the flour as a temporary shield, not an ingredient to be fully incorporated. The goal is to handle it quickly and gently, especially during those final shaping steps, so you don’t knock out all the air we worked so hard to create during the long proofing.
Oven Setup for Maximum Crust
If you want that crackly, thin crust that screams “artisan,” you need intense heat right from the start. If you don’t have a baking stone, don’t worry! Just flip a upside down and preheat it in the oven along with the rack. That surface needs to be screaming hot when the dough hits it. And those water sprays during the first five minutes? They are non-negotiable for authentic Ciabatta Bread. That blast of steam keeps the surface soft long enough for the loaf to expand fully before the crust sets firm.
Answering Common Questions About Ciabatta Bread
I get so many questions about this recipe, especially once people start seeing how wet this dough is! It’s totally normal to have questions about technique when you move into high hydration baking. Here are a few things I hear most often about achieving perfect Ciabatta Bread at home.
Can I Make Ciabatta Bread Without a Stand Mixer?
Honestly, it’s really tough. Because this dough is so high in water, the stand mixer is necessary to properly develop the gluten structure without you ending up exhausted and covered in dough! If you absolutely cannot use a mixer, you must commit to the fold method for a much longer time—maybe 15 or 20 minutes of vigorous folding by hand between the rest periods. You need to work fast and use lots of flour on your hands just to keep it manageable.
How Should I Store My Homemade Ciabatta Bread?
This bread is best the day it’s baked, period. But if you have leftovers, don’t refrigerate it—that dries it out fast! Wrap the loaves tightly in plastic wrap to keep the air out and store them at room temperature for up to three days. If you need to keep it longer than that, wrap it tightly in plastic and then foil and pop it in the freezer for up to a month. It freezes beautifully!
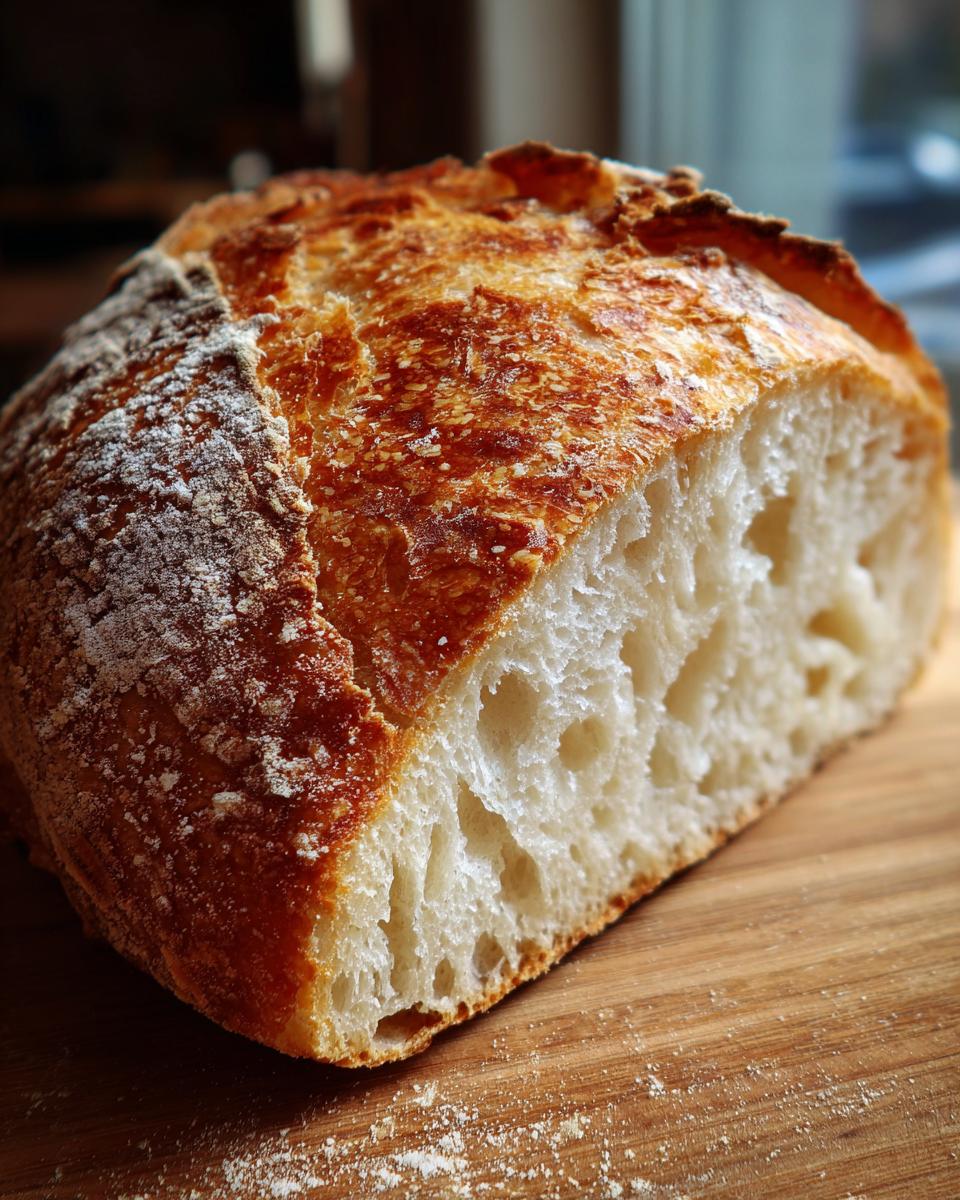
What If My Ciabatta Bread Doesn’t Have Big Holes?
This is usually down to one of two things. Either you didn’t knead it long enough in the mixer, so the gluten structure wasn’t strong enough to trap the gas, or you were too rough when you divided and shaped the dough at the end. Remember, we want to be gentle! If you press all the air out during shaping, you won’t get those beautiful, airy pockets in your final loaf.
Estimated Nutritional Data for Ciabatta Bread
Now, I always tell folks that when you bake from scratch, you skip a ton of the weird preservatives and extra junk you find in store-bought bread. That’s a win! But since I haven’t sent this exact batch to a lab, these numbers are just educated guesses based on the ingredients we used for two loaves. Remember, this is an estimate only, so take it with a grain of salt!
Here’s what you might expect per slice, assuming we cut each loaf into 12 slices:
| Nutrient | Estimate Per Serving |
|---|---|
| Calories | 150 |
| Carbohydrates | 30 g |
| Protein | 5 g |
Here are the other details we can ballpark:
| Nutrient | Estimate Per Serving |
|---|---|
| Fat | 1 g |
| Fiber | 1 g |
| Sodium | 250 mg |
Storing and Reheating Your Ciabatta Bread
Ciabatta is one of those breads that tastes heavenly fresh out of the oven, but it can get a little soft overnight. The key to keeping that amazing crust texture is making sure you wrap it properly to block out humidity. Don’t put it in the fridge, trust me on this one; it turns stale instantly!
Here’s a quick look at how I manage leftovers:
| Storage Method | Duration |
|---|---|
| Room Temp (Wrapped Tight) | Up to 3 Days |
| Frozen (Wrapped & Foiled) | Up to 1 Month |
Best Methods for Reheating Ciabatta Bread
If you froze a loaf or just have one that’s gone a little soft, the oven is your best friend. You need high heat to shock that crust back to life. Thaw it completely if it was frozen, then unwrap all the plastic. Pop the whole loaf directly onto a rack or a baking sheet. Bake it at 450 degrees F for about 6 to 8 minutes. It’ll be crispy and perfect again—you won’t believe it!
Share Your Homemade Ciabatta Bread Experience
Wow, we made it through the whole process! Now it’s your turn to bring that beautiful, hole-filled loaf into your kitchen. I’ve poured my heart into making sure this Ciabatta Bread recipe works perfectly for you, just like it does for my family. I’d absolutely love to see what you create!
Did you get those big air pockets? Was your crust nice and crackly? Head down to the comments below and give this recipe a rating. Tell me how it went and share a picture if you can!
Print
Ciabatta Bread: 9 Amazing Hole Secrets
- Total Time: 9 hours 55 minutes (includes 8-24 hour sponge time)
- Yield: 2 loaves
- Diet: Vegetarian
Description
Ciabatta Bread is a classic Italian white bread known for its airy, open crumb and crisp crust. This recipe yields delicious homemade ciabatta using a two-stage process involving a sponge and final dough development.
Ingredients
- For the Sponge: 1 cup (130 g) all-purpose flour
- For the Sponge: ⅒ teaspoon instant yeast
- For the Sponge: ½ cup (120 ml) water, at room temperature
- For the Dough: 2 cups (260 g) all-purpose flour
- For the Dough: 1½ teaspoons salt
- For the Dough: ½ teaspoon instant yeast
- For the Dough: ¾ cup (180 ml) water, at room temperature
- For the Dough: ¼ cup (60 ml) whole or 2% milk, at room temperature
Instructions
- Make the Sponge: Combine the 1 cup flour, ⅛ teaspoon yeast, and ½ cup water in a medium bowl. Stir until a uniform mass forms. Cover tightly and let stand at room temperature for 8 to 24 hours.
- Make the Dough: Place the sponge and all dough ingredients (flour, salt, yeast, water, milk) into a stand mixer bowl with the paddle attachment. Mix on low speed for about 1 minute until shaggy, scraping down as needed.
- Increase speed to medium-low. Mix for 4 to 6 minutes until the dough collects on the paddle and pulls from the sides.
- Change to the dough hook. Knead on medium speed for about 10 minutes until the dough is smooth and shiny; expect it to be very sticky.
- Transfer the dough to a large bowl, cover tightly, and let rise at room temperature until doubled, about 1 hour.
- Spray a rubber spatula with non-stick spray. Gently lift and fold the edge of the dough toward the middle. Turn the bowl 90 degrees and fold again. Repeat this folding action 6 more times (8 folds total).
- Cover and let rise for 30 minutes.
- Repeat the 8 folds from step #5. Replace the plastic wrap and let rise until doubled, about 30 minutes.
- One hour before baking, adjust an oven rack to the lower-middle position. Place a baking stone on the rack and preheat the oven to 450 degrees F.
- Cut two 12×6-inch pieces of parchment paper and dust them liberally with flour. Transfer the dough to a floured work surface without deflating it fully. Flour the top of the dough and divide it in half with a bench scraper.
- Turn one dough piece cut-side-up and dust with flour. With floured hands, press it into a rough 12×6-inch rectangle. Fold the shorter sides toward the center, overlapping them like folding a letter in thirds, forming a 7×4-inch rectangle. Repeat with the second piece.
- Gently transfer each loaf, seam-side-down, onto the prepared parchment sheets. Dust with flour and cover with plastic wrap. Let the loaves rest for 30 minutes; small bubbles will appear on the surface.
- Slide the parchment pieces with the loaves onto a pizza peel. Using floured fingertips, evenly poke the entire surface of each loaf to form a 10×6-inch rectangle. Spray the loaves lightly with water.
- Slide the loaves and parchment onto the baking stone. Bake, spraying the loaves with water twice more during the first 5 minutes, until the crust is deep golden brown and the internal temperature reaches 210 degrees F (22 to 27 minutes).
- Transfer the loaves to a wire rack. Discard the parchment and let cool completely for at least 1 hour before slicing.
Notes
- Equipment: stand mixer / bowl scraper / bench scraper / baking stone / parchment paper / pizza peel / spray bottle / digital instant-read thermometer / wire cooling rack
- Yeast: If you use active dry yeast instead of instant yeast, activate it in warm water first.
- Milk: Whole milk is best, but 2% or 1% works. You can substitute nonfat milk powder, adjusting the water amount to 1 cup total liquid.
- Stand Mixer: Necessary because of the high hydration and sticky dough.
- Handling the Dough: Work quickly and gently; over-handling results in flat, tough loaves. Use a well-floured scraper or hands.
- Baking Stone: If you do not have one, use an upside-down baking sheet on the lowest oven rack, preheated.
- Ciabatta Rolls: Divide each loaf into 6 or 8 portions and keep them slightly apart before the final proof.
- Storage: Wrap tightly in plastic wrap and store at room temperature for up to 3 days. For longer storage, wrap in plastic then foil and freeze up to 1 month.
- Reheating: Thaw if frozen. Place unwrapped bread in a 450-degree oven for 6 to 8 minutes to recrisp the crust.
- Prep Time: 30 minutes active preparation
- Cook Time: 25 minutes
- Category: Bread
- Method: Baking
- Cuisine: Italian
Nutrition
- Serving Size: 1 slice (assuming 12 slices per loaf)
- Calories: Estimate needed
- Sugar: Estimate needed
- Sodium: Estimate needed
- Fat: Estimate needed
- Saturated Fat: Estimate needed
- Unsaturated Fat: Estimate needed
- Trans Fat: Estimate needed
- Carbohydrates: Estimate needed
- Fiber: Estimate needed
- Protein: Estimate needed
- Cholesterol: Estimate needed