Skip to content

If you’ve ever dreamed of pulling a rustic, impossibly airy loaf of **Rosemary Focaccia Bread** straight from your own oven, you’re in the absolute right place. I’m Anna Kowalska, and here I share tried-and-true homemade recipes that you and your family will love. Everything I post here is made with heart and flavor, because I believe the best memories are made around a table full of delicious, honest food.
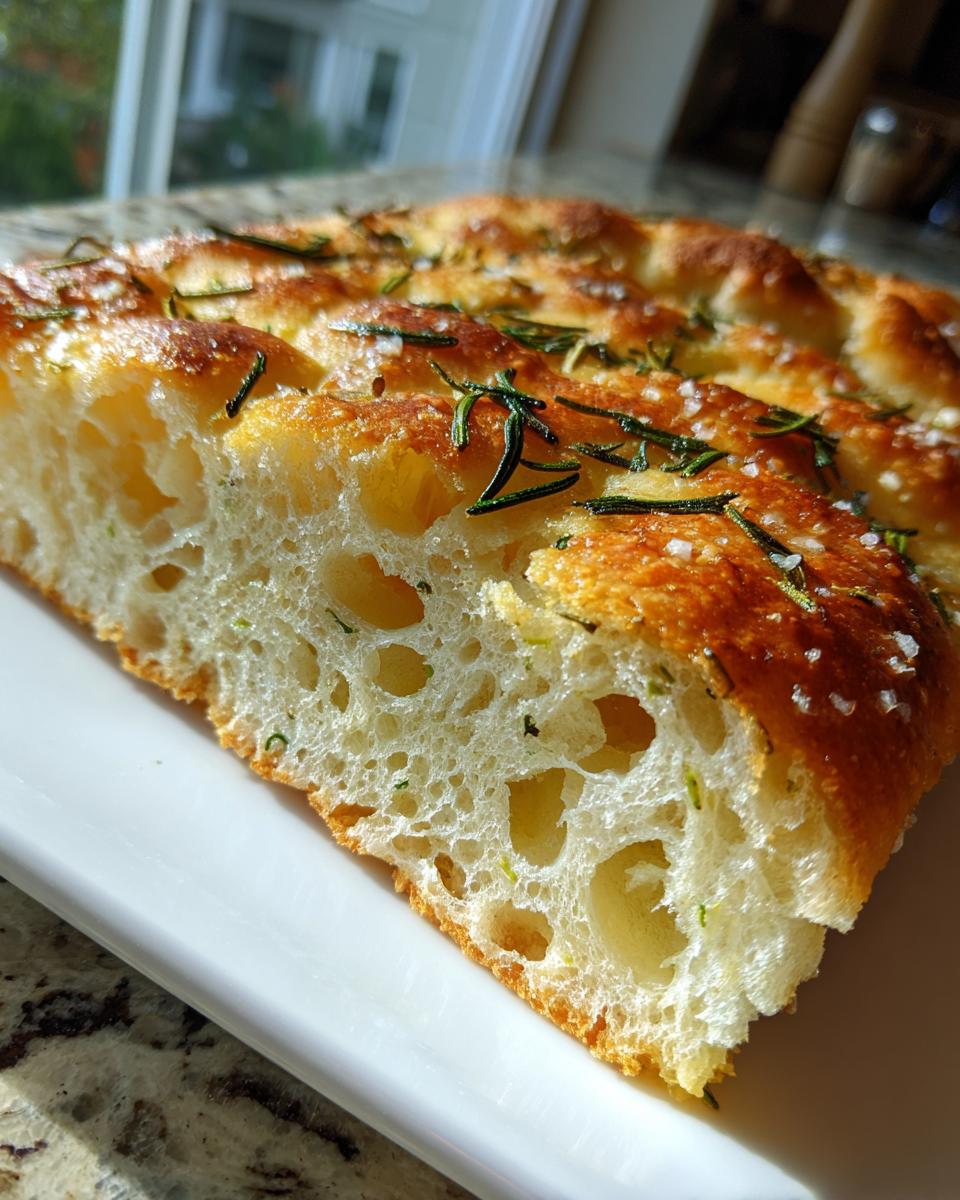
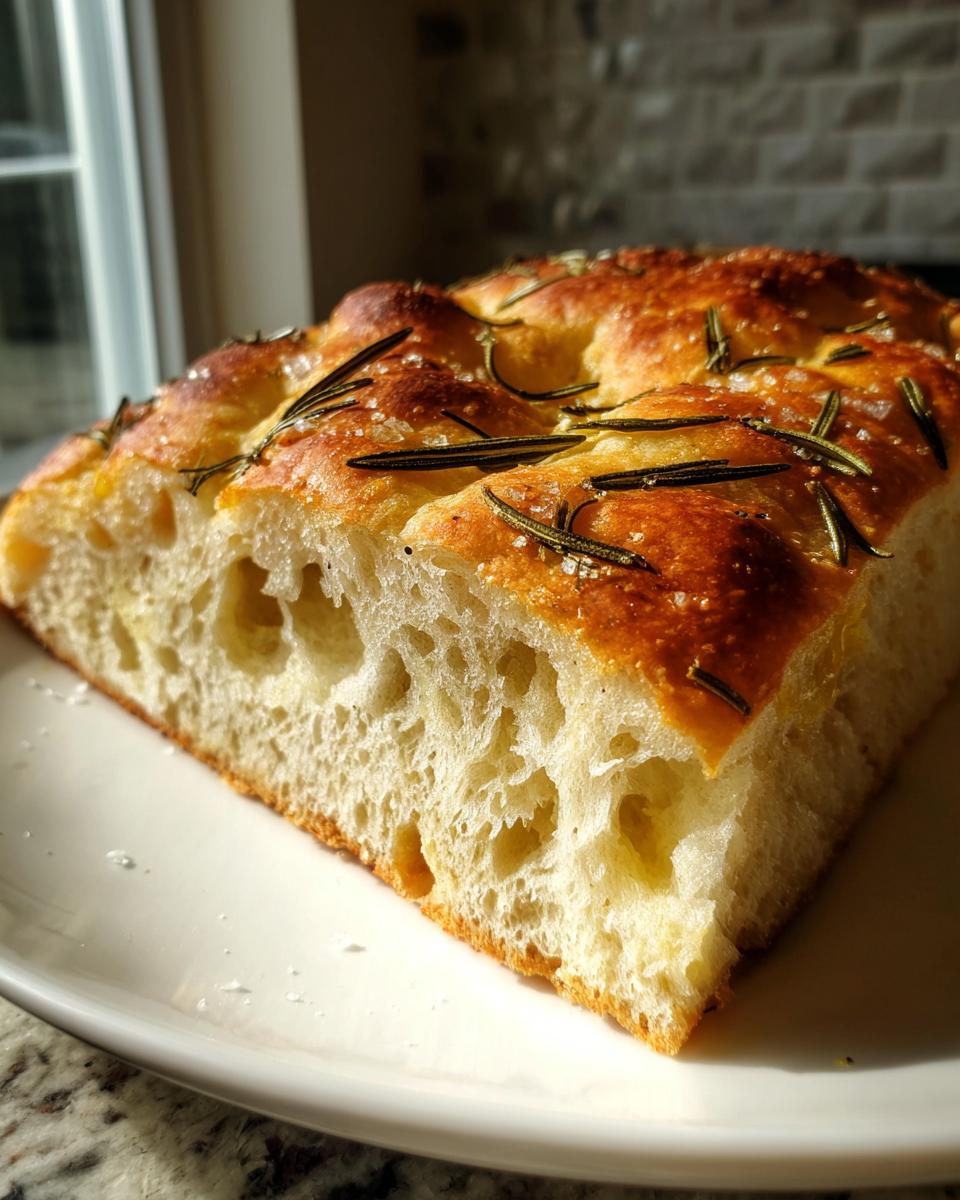
Forget those sad, flavorless grocery store breads! This recipe is your ticket to that perfect, dimpled Italian classic, bursting with the scent of fresh rosemary and that essential salty crunch. Trust me, once you master this technique, you’ll never look back. It’s easier than you think to achieve that beautiful, olive-oil soaked crumb!
Jump to:
Why You Will Love This Rosemary Focaccia Bread
You are going to obsess over this focaccia, I just know it! It’s rustic, it’s aromatic, and honestly, it feels like cheating because it’s so simple to make a truly great loaf of yeast bread at home. It’s the kind of bread that disappears the second it comes out of the oven.
- That incredible, airy texture that stays soft for days.
- The beautiful aroma of fresh rosemary permeating your whole house while it bakes!
- It uses simple pantry staples—olive oil and flour—to create something truly special.
- The salty crunch on top is just pure heaven.
Quick Preparation for Homemade Bread Success
I know what you’re thinking: yeast bread takes forever, right? Not this guy! While the rising times are non-negotiable for that airy texture, the actual hands-on time is lightning fast. We’re talking 15 minutes of prep work before it goes off to rest. You get to walk away, let the yeast do its magic, and come back to a dough ready for dimpling. It’s the perfect project for a slow Saturday morning when you want a big payoff for minimal effort.
Gathering What You Need for Rosemary Focaccia Bread
Before we get that gorgeous yeast bubbling, let’s make sure your kitchen is ready. Having everything measured out makes the mixing process so much smoother—no frantic searching mid-knead! This recipe comes together quickly once you have your gear lined up.
Equipment List for Perfect Rosemary Focaccia Bread
- Stand mixer with a dough hook attachment (or a big sturdy bowl for hand mixing!)
- Damp kitchen towel for covering the dough during rises
- A large baking sheet or a 9 x 13-inch baking dish
- Parchment paper (essential for easy transfer and cleanup)
Unambiguous Ingredients for Rosemary Focaccia Bread
Accuracy matters, especially when dealing with yeast, but don’t stress too much! For the best results with this olive oil bread, make sure your water is just warm, not hot. Remember that flaky sea salt is key for that signature crunch; if you use fine salt, we’ll adjust later.
[Note: Ingredient quantities and preparation details should be listed clearly here, referencing the recipe card.]
Step-by-Step Instructions for Rosemary Focaccia Bread
Alright, let’s get our hands dirty! This is where the magic truly starts happening, transforming simple flour and water into that gorgeous, chewy bread we’re aiming for. Don’t rush the waiting parts, though; those rises are non-negotiable for the airy texture!
Activating the Yeast and Initial Mixing
First things first, we need to wake up that yeast. Grab your stand mixer bowl—if you’re mixing by hand, just use any large bowl—and pour in your warm water. It needs to be warm, around 110 degrees Fahrenheit, which is usually just a little warmer than bath water. If it’s too hot, you’ll kill the yeast, and we’ll have a sad flatbread instead of focaccia. Stir in your sugar or honey until it dissolves. Then, sprinkle that packet of yeast right on top. Don’t stir it much, just let it sit there for about 5 to 10 minutes. You’re looking for foam—a bubbly, frothy layer on top means your yeast is happy and ready to work its magic!
Kneading the Dough for Tender Texture
Once you have that pretty foam, it’s time to build the dough structure. Attach your dough hook and set the mixer to low speed. You’re going to add the flour, the olive oil, and the salt slowly, letting each addition incorporate before adding the next. Once everything is in, bump the speed up just slightly to medium-low. You need to mix this for a solid 5 minutes. This develops the gluten, which gives the bread its chew. Now, here’s a pro tip: if the dough looks super sloppy and is sticking way up the sides of the bowl, add just a tiny bit more flour—maybe a tablespoon at a time—until it pulls away cleanly. If you’re kneading by hand, just turn the shaggy mass onto a floured surface and work it vigorously for about 5 minutes until it smooths out.
The Two Rises for Airy Rosemary Focaccia Bread
Once the dough is smooth, gently form it into a nice tight ball. Lightly grease the bowl you just used, pop the dough back in, and turn it over once so it gets a little coat of oil. Cover the whole thing with a damp towel—this keeps the surface from drying out and forming a crust. Find a warm, draft-free spot in your kitchen and let it chill out for 45 to 60 minutes, or until it’s almost doubled in size. After that first rise, gently turn the dough out onto a lightly floured counter. Gently pat or roll it into a big circle or rectangle, aiming for about a half-inch thickness. Cover it again and let it rest for just 20 more minutes. This second, shorter rise builds up those lovely air pockets!
Dimpling and Seasoning the Dough for Baking
While that second rise is happening, get your oven preheated to 400 degrees Fahrenheit. Grab your parchment-covered baking sheet or your 9×13 dish and gently transfer your dough onto it. Now for the fun part: dimpling! Using oiled fingertips—or just really oiled fingers—poke deep dents all over the surface of the dough. Don’t be shy; poke right down to the bottom of the pan! This keeps the bread from puffing up too much in the oven. Drizzle 1 to 2 tablespoons of that good olive oil evenly over the entire surface, making sure the oil settles into those little dimples. Finally, strip the needles off your fresh rosemary sprigs and sprinkle them, along with a generous pinch of flaky sea salt, all over the top.
Baking Your Homemade Bread Perfectly
Slide that beautiful, seasoned dough into your preheated 400-degree oven. It only needs about 20 minutes in there. You’re looking for a lovely golden color on top. It should look cooked through, not pale! When it’s done, take it out immediately. I always give it one last little drizzle of olive oil right when it comes out of the oven—it just amps up the flavor and shine. Let it cool on a rack for just a few minutes before slicing into that airy, herby interior. Enjoy!
Tips for Perfect Rosemary Focaccia Bread
Even the best recipes need a little tweaking based on your kitchen, your flour, and your taste buds! I’ve learned a few things over the years making this olive oil bread that help guarantee success every single time. Don’t worry if your dough feels a little different than mine did; we can adjust!
Salt Adjustment Guidance for Homemade Bread
This is super important, so listen up! The recipe calls for flaky sea salt, and that’s what gives you those wonderful little salty bursts on the crust. If you only have fine sea salt in your pantry, you must cut the amount down by half, seriously. Fine salt dissolves much faster and packs more intense saltiness into every grain. If you don’t adjust it, your gorgeous homemade bread might end up tasting like the ocean! I learned this the hard way once when I was rushing.
Achieving the Right Dough Consistency
Stickiness is the number one thing that throws new yeast bread bakers off. Remember when we were kneading? If your dough is so sticky that it’s just a wet mess clinging to your hands, add a little more flour, just a tablespoon at a time. However, resist the urge to add too much! Focaccia is supposed to be wetter than a standard sandwich loaf. It needs that extra moisture to become airy. If you’re kneading by hand and it feels like a heavy, slightly tacky play-doh, you’re perfect! If you’re using a mixer and it’s just clinging to the hook but not sloshing around the bowl, that’s also exactly right.
Serving Suggestions for Rosemary Focaccia Bread
This Rosemary Focaccia Bread is so flavorful on its own, it doesn’t need much company, but it certainly loves to be dipped! We usually serve it warm alongside simple, fresh vegetarian meals. It’s amazing dipped into a big bowl of creamy tomato soup—the olive oil soaks up the broth beautifully.
It’s also fantastic served simply with some high-quality balsamic vinegar and a little extra virgin olive oil for dipping. Or, try it alongside a fresh Caprese salad. The rosemary cuts right through the mozzarella and tomato perfectly. Honestly, I often just eat slices plain while it’s still warm; it’s that good!
Storing and Reheating Your Rosemary Focaccia Bread
This olive oil bread is definitely best eaten the day it’s made, right out of the oven, but leftovers are still wonderful! Because it’s so rich from the oil, it holds up better than some other breads. You want to store it at room temperature, never in the fridge, because the cold air makes it stale super fast. Store it loosely wrapped in a clean kitchen towel or in a paper bag on your counter for up to three days max.
When you want to bring it back to life, don’t even think about the microwave! That just makes it tough. Instead, pop a slice directly onto a baking sheet and warm it in a 350-degree oven for about 5 to 8 minutes. This brings back that crispy exterior and soft, airy interior we worked so hard for. It’s like baking it all over again!
[Note: A small table summarizing storage duration and method should be placed here for quick reference.]
Frequently Asked Questions About Rosemary Focaccia Bread
I get so many questions about this recipe, which just tells me how popular this homemade bread is becoming! Most questions come down to timing or ingredient swaps. Don’t worry if you need to make a little adjustment; that’s part of the fun of baking!
Can I use dried rosemary instead of fresh in this Rosemary Focaccia Bread?
Yes, you absolutely can, but you need to adjust the amount because dried herbs are much more concentrated than fresh ones. If you’re swapping out the fresh rosemary needles, use about 1 teaspoon of dried rosemary for every full sprig the recipe calls for. I’d suggest sprinkling it on with the salt during the dimpling stage, just like we do with the fresh kind. Dried rosemary tends to release its flavor faster during baking, so a little goes a long way!
What is the best way to check if my warm water is the correct temperature for the yeast?
This is a critical step for any yeast bread recipe! You want the water to be around 110 degrees Fahrenheit. If you don’t have a thermometer, the best way to test it is by touch. It should feel comfortably warm on the inside of your wrist—like a warm bath, but definitely not hot enough to make you pull your hand away quickly. If it feels hot, let it cool down for a few minutes before adding the yeast, or you risk killing those little guys before they can work their rising magic. For more information on yeast activation, you can check out general baking science resources here.
Can I make this olive oil bread dough ahead of time?
You totally can! This dough is fantastic for a slow, cold proof, which actually develops even deeper flavor. After you knead the dough (Step 2), instead of letting it rise at room temperature, lightly oil the bowl, cover it tightly with plastic wrap, and stick it in the refrigerator for up to 24 hours. When you’re ready to bake, take it out, let it warm up on the counter for about an hour, then gently shape it and let it have that second 20-minute rise before dimpling and baking as usual. It makes planning dinner so much easier!
Sharing Your Homemade Bread Experience
I poured my heart into making sure this Rosemary Focaccia Bread recipe works perfectly for you. Now it’s your turn! When you pull that golden, fragrant loaf out of the oven, come right back here and let me know how it turned out. Please take a moment to leave a rating and tell me what you loved most about your homemade bread!
Print
1 Amazing Rosemary Focaccia Bread Trick
- Total Time: 1 hour 40 minutes (including rises)
- Yield: 1 loaf 1x
- Diet: Vegetarian
Description
This Rosemary Focaccia Bread recipe delivers a flavorful, rustic loaf perfect for any meal. You will create a tender, airy bread with the aromatic punch of fresh rosemary and flaky sea salt. Follow these steps for homemade bread success.
Ingredients
- 1 1/3 cup warm water (about 110°F)
- 2 teaspoons sugar or honey
- 1 (0.25 ounce) package active-dry yeast
- 3 1/2 cups all purpose flour
- 1/4 cup extra virgin olive oil, plus more for drizzling
- 2 teaspoons flaky sea salt, plus extra for sprinkling
- 2 sprigs fresh rosemary
Instructions
- Proof the yeast. Add warm water and sugar to the bowl of a stand mixer with the dough attachment. Stir to combine. Sprinkle the yeast on top, stir quickly, and let sit for 5-10 minutes until foamy.
- Knead the dough. Set the mixer to low speed. Gradually add flour, olive oil, and salt. Increase speed to medium-low and mix for 5 minutes. Add up to 1/4 cup extra flour if the dough is too sticky.
- First dough rise. Shape the dough into a ball. Grease the mixing bowl, place the dough back inside, cover with a damp towel, and let rise in a warm spot for 45-60 minutes, or until nearly doubled.
- Second dough rise. Turn the dough onto a floured surface. Roll it out into a large circle or rectangle about 1/2-inch thick. Cover with the damp towel and let rise for another 20 minutes.
- Prepare the dough. Preheat your oven to 400°F. Transfer the dough to a large parchment-covered baking sheet or a 9 x 13-inch baking dish. Poke deep dents all over the surface. Drizzle 1 to 2 tablespoons of olive oil evenly over the top. Sprinkle evenly with fresh rosemary needles and sea salt.
- Bake for 20 minutes, or until the dough is slightly golden and cooked through.
- Serve warm. Remove from the oven. Drizzle with more olive oil if you like. Slice, and enjoy.
Notes
- If you use fine sea salt instead of flaky sea salt, use about half the amount to prevent the bread from being too salty.
- To knead by hand: Mix ingredients in a bowl until shaggy. Turn onto a floured surface and knead for 5 minutes until smooth, adding flour if too sticky. Proceed with the recipe.
- For a thinner focaccia, roll the dough out more before the second rise. The bread rises considerably during baking.
- Prep Time: 15 minutes
- Cook Time: 20 minutes
- Category: Bread
- Method: Baking
- Cuisine: Italian
Nutrition
- Serving Size: 1 slice
- Calories: Estimate based on ingredients
- Sugar: Estimate based on ingredients
- Sodium: Estimate based on ingredients
- Fat: Estimate based on ingredients
- Saturated Fat: Estimate based on ingredients
- Unsaturated Fat: Estimate based on ingredients
- Trans Fat: 0g (assumed)
- Carbohydrates: Estimate based on ingredients
- Fiber: Estimate based on ingredients
- Protein: Estimate based on ingredients
- Cholesterol: Estimate based on ingredients