Skip to content
When you’re looking for that perfect hug-in-a-bowl dessert, look no further than these Biscoff Cookie Butter Cookies. I’m Anna Kowalska, and here I share tried-and-true homemade recipes that you and your family will love—everything is made with heart and flavor, and these cookies are proof! I’ve always believed that the best baking starts with ingredients you can taste, and these cookies deliver that rich, spiced caramel flavor we all crave.
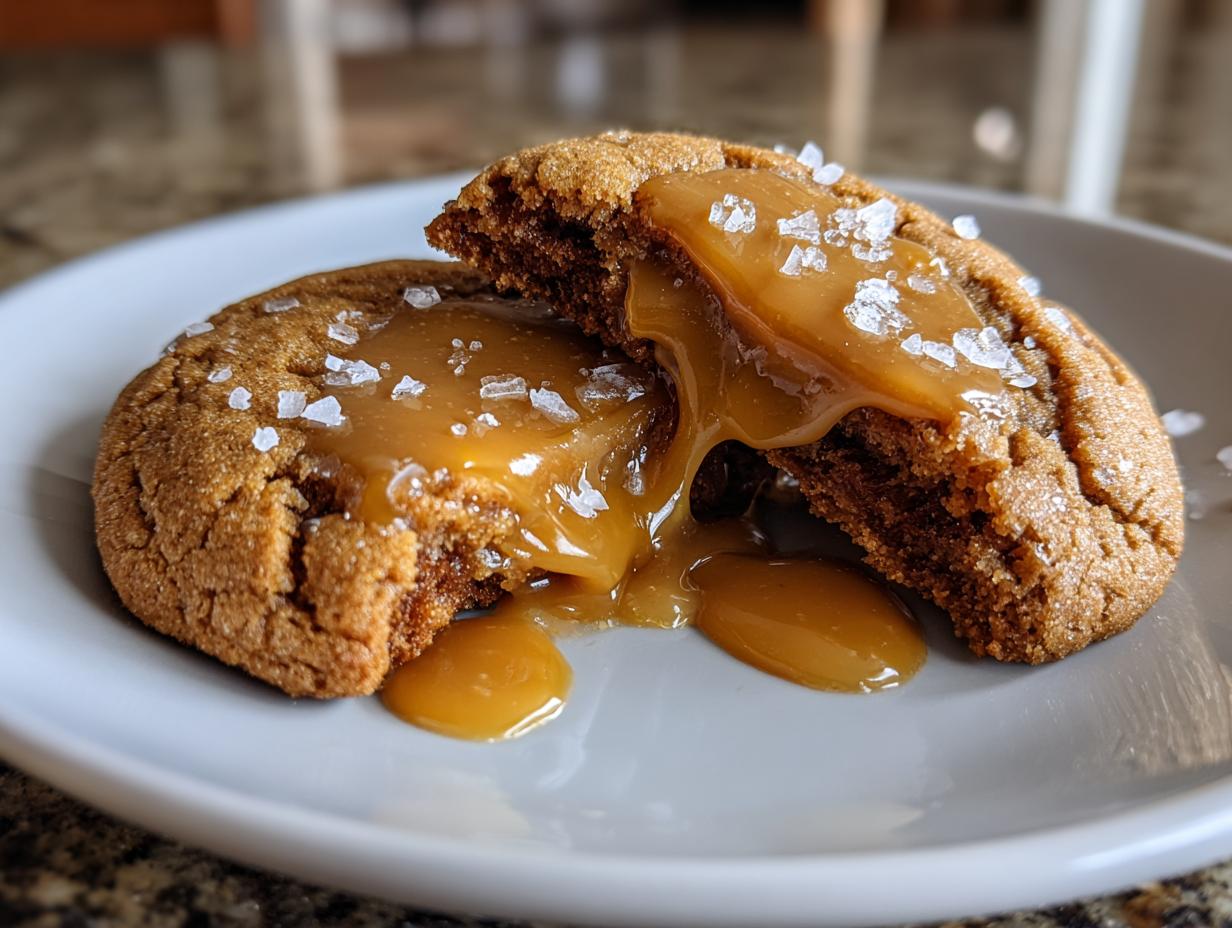
The real magic, the part that makes everyone ask for the recipe twice, is the center. We’re stuffing these soft, chewy cookies with a frozen core of cookie butter that melts into this glorious, molten pool right when you bite into it. It’s dramatic, delicious, and surprisingly simple to pull off!
Why You Will Love These Biscoff Cookie Butter Cookies
These aren’t just any cookies; they are an experience. If you’re tired of flat, crumbly cookies, this recipe is your answer. My family absolutely devours these every time I make them.
- The texture is unbeatable: perfectly soft edges surrounding a gooey, warm core.
- That deep, warm spice of cookie butter shines through the entire bite.
- Honestly, they look fancy, but the process for these Biscoff Cookie Butter Cookies is straightforward enough for a weeknight bake.

Essential Equipment for Perfect Biscoff Cookie Butter Cookies
You don’t need a commercial bakery, but a few key items make working with this soft dough much easier. Trust me, having these ready will save you a headache later when you’re assembling these amazing Biscoff Cookie Butter Cookies.
- A good rubber spatula or electric mixer for creaming.
- A standard 3-tablespoon cookie scoop—this keeps the size consistent.
- Two sheets of parchment paper for freezing and baking.
Jump to:
Gathering Your Ingredients for Biscoff Cookie Butter Cookies
When we talk about flavor intensity in our Biscoff Cookie Butter Cookies, it all starts right here, with the ingredients. You can’t fake that deep, spiced caramel flavor, so we need to treat everything with respect. My biggest piece of advice when you look at this list is to pay attention to temperature!
If your butter and egg aren’t at room temperature, your creaming process—which is crucial for the final texture—will fail. You’ll end up with a dense, flat cookie instead of the fluffy, soft one we want. Think about it: cold ingredients don’t blend well, and we need things to emulsify nicely before the flour goes in.
Clarifying Ingredient Measurements and Preparation
The most important preparation step happens before you even touch the mixing bowl. You absolutely must freeze those little dollops of cookie butter meant for the center. I scoop out exactly one teaspoon for each, place them on parchment paper, and stick them in the freezer until they are rock solid. This takes about 20 minutes, but it’s non-negotiable!
For the dry ingredients, remember what I always say about flour: spoon it lightly into your measuring cup, don’t pack it down! Packing flour throws off the entire ratio, and we want these Biscoff Cookie Butter Cookies light, not heavy. Also, make sure your butter is truly soft—it should yield easily to a gentle poke, not feel greasy or melted.

Step-by-Step Instructions for Baking Biscoff Cookie Butter Cookies
Okay, now for the fun part! This is where we bring those frozen centers together with the spiced dough. Pay close attention to the order here, because it really makes the difference between a perfect, gooey center and a melted mess on your baking sheet. We are making incredible Biscoff Cookie Butter Cookies, so let’s treat these steps like the important blueprint they are.
Preparing the Molten Cookie Butter Centers
This step is the secret weapon to getting that wonderful molten moment when you bite in. You need to get those teaspoons of cookie butter frozen solid. I use a small spoon or a melon baller to scoop out exactly one teaspoon of the spreadable cookie butter onto a piece of parchment or wax paper. Make sure they are spaced out so they don’t freeze together into one giant, delicious blob.
Into the freezer they go! They need to be completely hard—I mean, you should barely be able to dent them with your fingernail. This usually takes about 20 minutes, but honestly, sometimes I just leave them in there while I mix the dough. If they aren’t frozen, they will melt out into your dough and then seep out onto the pan before the cookie even starts setting up. We want the cookie to bake around the core, not merge with it!
Mixing the Biscoff Cookie Butter Cookies Dough Base
While those centers are chilling out, we start the base dough. Preheat your oven right now to 350 F and line two baking sheets with parchment paper. This step is critical for clean release later! Now, in your mixing bowl, you’re going to cream that room temperature butter with the half-cup of cookie butter until it’s smooth. Don’t rush this; we’re building structure! If you are interested in learning more about the science of creaming butter and sugar, check out this resource.
Next, slowly add your brown sugar and granulated sugar. Beat this mixture until it gets genuinely light and fluffy—it should look paler than when you started. Then, mix in your egg and vanilla until just combined. Now for the dry stuff: baking soda, salt, and all-purpose flour. Add these in slowly, mixing on low speed. Stop the mixer when you still see a little bit of flour dusting the sides of the bowl. If you mix until it’s perfectly smooth, you’ve overmixed! That develops gluten, and we want soft, not tough, Biscoff Cookie Butter Cookies.
Stuffing and Shaping Your Biscoff Cookie Butter Cookies
This takes a little finesse, but you’ll get the hang of it fast. Take your dough and use a 3-tablespoon cookie scoop to portion it out. You should get about 13 cookies total. Now, take one of those rock-hard frozen cookie butter balls and gently press it right into the middle of one dough portion. You need to carefully wrap the dough all the way around that frozen core. Pinch the seams closed really well!
It’s important that the dough completely encases the filling. If there are any cracks or thin spots, the molten center of your Biscoff Cookie Butter Cookies will escape during baking. Roll the dough gently between your palms to make a smooth ball, and place about 6 or 7 of them on your prepared sheets, making sure they have plenty of space to spread out.
Baking and Finishing Touches for Biscoff Cookie Butter Cookies
Bake these beauties for 11 to 13 minutes. You’re looking for the edges to turn a lovely golden brown, but the centers should still look a little soft. They will firm up as they cool. Don’t walk away during this time, because the difference between perfect and overdone is maybe 60 seconds! If you are looking for other great cookie recipes, check out my collection of desserts.
Once they come out, let them sit on the hot pan for about five minutes—this lets the cookie structure fully set up. While they are resting, quickly melt your two tablespoons of reserved cookie butter in the microwave for about 15 to 20 seconds until it’s perfectly drizzle-able. Drizzle that melted goodness right over the tops of your warm Biscoff Cookie Butter Cookies, and finish with a tiny sprinkle of flaked salt. That salt cuts the sweetness just right! Let them cool completely on a rack before you try to move them!
Tips for Achieving Perfect Biscoff Cookie Butter Cookies Texture
I know that sometimes, even when following the instructions perfectly, cookies can spread too much or the center might try to make a run for it. Don’t worry, we’ve all been there! The biggest culprit for spreading in these Biscoff Cookie Butter Cookies is usually warm dough.
If your dough feels too soft when you’re scooping and stuffing, put the entire bowl back in the fridge for 15 minutes. Chilled dough spreads less. If you notice leakage during baking, it means the frozen core wasn’t fully encased. Next time, really focus on pinching that dough seam tightly closed around the center!
Another pro tip for texture: the salt and baking soda need to be fresh. Old leaveners result in a flat, sad cookie, and we absolutely deserve fluffy, soft Biscoff Cookie Butter Cookies. Remember, the edges should look golden, but the middle should look slightly underdone when you pull them out—that’s how you guarantee that molten center! For more baking tips, you might enjoy my recipe for chewy big fat chocolate chip cookies.
Storing Your Homemade Biscoff Cookie Butter Cookies
These Biscoff Cookie Butter Cookies are honestly best eaten the day they are made, especially to enjoy that molten center. But if you have leftovers—and I hope you do!—storage is simple. You want to keep them in an airtight container at room temperature. I find they stay wonderfully soft for about three to four days this way.
If you stack them, put a small piece of parchment or wax paper between the layers. This stops them from sticking together, which can happen because of that lovely melted drizzle on top. Do not put them in the fridge! Cold temperatures dry cookies out faster, and we worked hard to keep these soft!
Simple Reheating Methods for Softness
If your Biscoff Cookie Butter Cookies have been sitting overnight and they’ve firmed up a bit, don’t worry, we can bring them right back to life! The microwave is your best friend here. Just pop one cookie on a microwave-safe plate for about 8 to 10 seconds.
This short blast of heat gently warms the cookie and melts that center just enough to bring back that fresh-out-of-the-oven gooeyness. If you’re feeling fancy, you can warm them in a toaster oven at a very low setting for just a couple of minutes, but watch them closely so the bottoms don’t burn! For more quick fixes, see my section on quick easy recipes.
Frequently Asked Questions About Biscoff Cookie Butter Cookies
I get so many messages about baking these cookies, and I love hearing what you all are trying! Here are the questions I get asked most often about making these incredible Biscoff Cookie Butter Cookies. If you have another burning question, drop it in the comments below!
Can I make Biscoff Cookie Butter Cookies ahead of time?
Yes, absolutely! I highly recommend making the dough balls ahead of time. You can scoop and stuff the cookies (with the frozen centers inside) and place them on a baking sheet. Cover the whole sheet tightly with plastic wrap and freeze them solid. When you want cookies, you can bake them straight from frozen! Just add about 2 to 3 extra minutes to the baking time. That way, you always have ready-to-bake Biscoff Cookie Butter Cookies on hand!
What is the best way to get soft Biscoff Cookie Butter Cookies?
If soft is your goal, temperature control is everything! First, make sure your dough isn’t too warm before it goes into the oven; cold dough spreads less. Second, pull them out when the edges are golden but the center still looks a *tiny* bit soft. They finish baking on the hot pan. Also, don’t forget that dark brown sugar we used—molasses helps keep baked goods soft much longer than white sugar does. Follow those steps, and you’ll have the softest Biscoff Cookie Butter Cookies!
Share Your Experience Making Biscoff Cookie Butter Cookies
I poured my heart into perfecting these Biscoff Cookie Butter Cookies, and now I can’t wait to hear how they turned out for you! Did that molten center surprise you? Please leave a rating below and tell me all about your results in the comments. Happy baking, everyone!
Print
Amazing 13 Biscoff Cookie Butter Cookies
- Total Time: 33 minutes
- Yield: About 13 cookies 1x
- Diet: Vegetarian
Description
Make these Biscoff Cookie Butter Cookies for a rich, flavorful treat. You get a soft cookie surrounding a molten cookie butter center, finished with a drizzle and flaked salt.
Ingredients
- 13 teaspoons Biscoff cookie butter (for freezing)
- ½ cup (113.5 g) butter, room temperature
- ½ cup (118.29 g) Biscoff cookie butter (for mixing)
- ½ cup (110 g) brown sugar
- ⅓ cup (66.67 g) granulated sugar
- 1 large egg, room temperature
- 2 teaspoons vanilla
- ½ teaspoon baking soda
- ½ teaspoon salt
- 1½ cups (210 g) all-purpose flour
- 2 tablespoons Biscoff cookie butter (for drizzling)
- Flaked salt (for sprinkling)
Instructions
- Scoop 13 one teaspoon size balls of Biscoff cookie butter onto parchment or wax paper. Freeze these balls.
- Preheat your oven to 350 F. Line two baking sheets with parchment paper.
- Place the room temperature butter and ½ cup of Biscoff cookie butter in a bowl. Mix until smooth.
- Add both sugars. Mix again until the mixture is light and fluffy.
- Mix in the egg and vanilla.
- Add the salt, baking soda, and flour to the bowl. Mix on low speed. Stop mixing when you still see flour remnants in the bowl; avoid over mixing.
- Scoop the dough into large balls, using a 3 tablespoon cookie scoop.
- Take the frozen cookie butter balls from the freezer. Push one frozen ball into the center of each cookie dough ball, completely covering it with dough.
- Place 6-7 cookies on each prepared baking sheet.
- Bake the cookies for 11-13 minutes, or until the edges are golden brown.
- Melt 2 tablespoons of cookie butter in the microwave for 15-20 seconds.
- Drizzle the melted cookie butter on the baked cookies. Sprinkle with flaked salt.
- Allow the cookies to cool and set before serving.
Notes
- You can skip the cookie butter center for a simple Biscoff flavored cookie.
- Using grams provides more precise measurements, especially for flour. If you measure flour, spoon it lightly into your cup; do not pack it down. Light and fluffy is the goal.
- Prep Time: 20 minutes
- Cook Time: 13 minutes
- Category: Dessert
- Method: Baking
- Cuisine: American
Nutrition
- Serving Size: 1 cookie
- Calories: 272kcal
- Sugar: 19g
- Sodium: 196mg
- Fat: 14g
- Saturated Fat: 6g
- Unsaturated Fat: 0.4g + 2g
- Trans Fat: 0.3g
- Carbohydrates: 33g
- Fiber: 0.4g
- Protein: 3g
- Cholesterol: 33mg