Skip to content
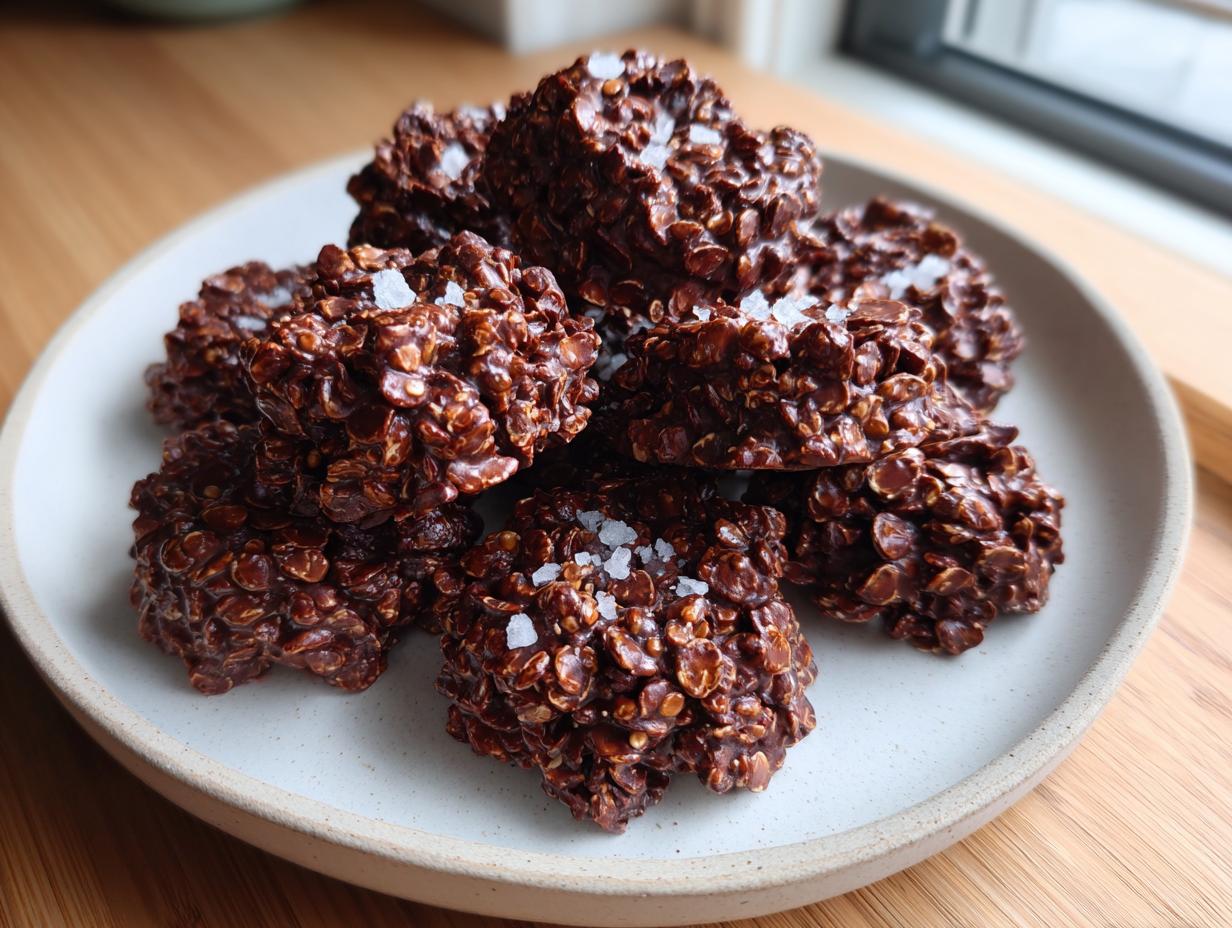
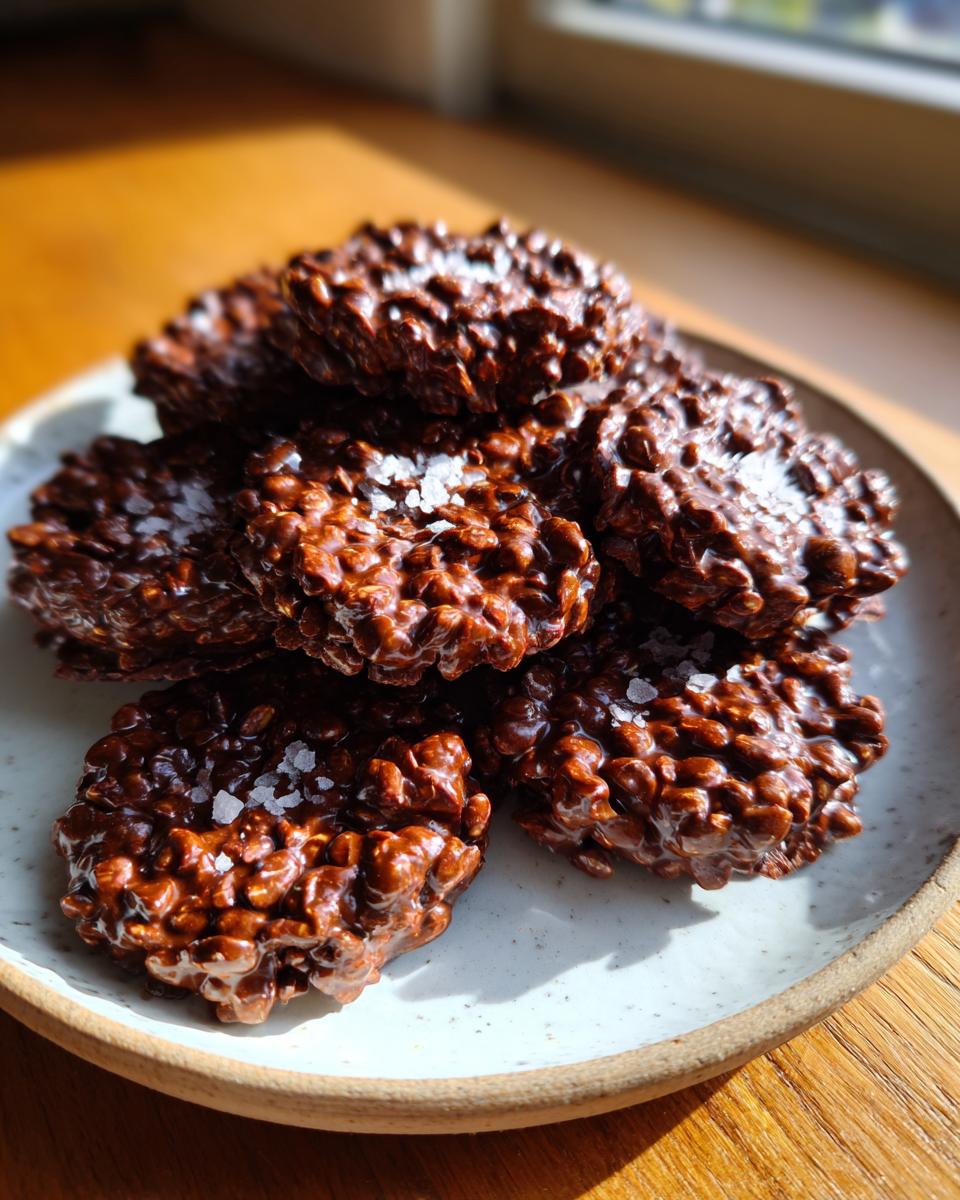
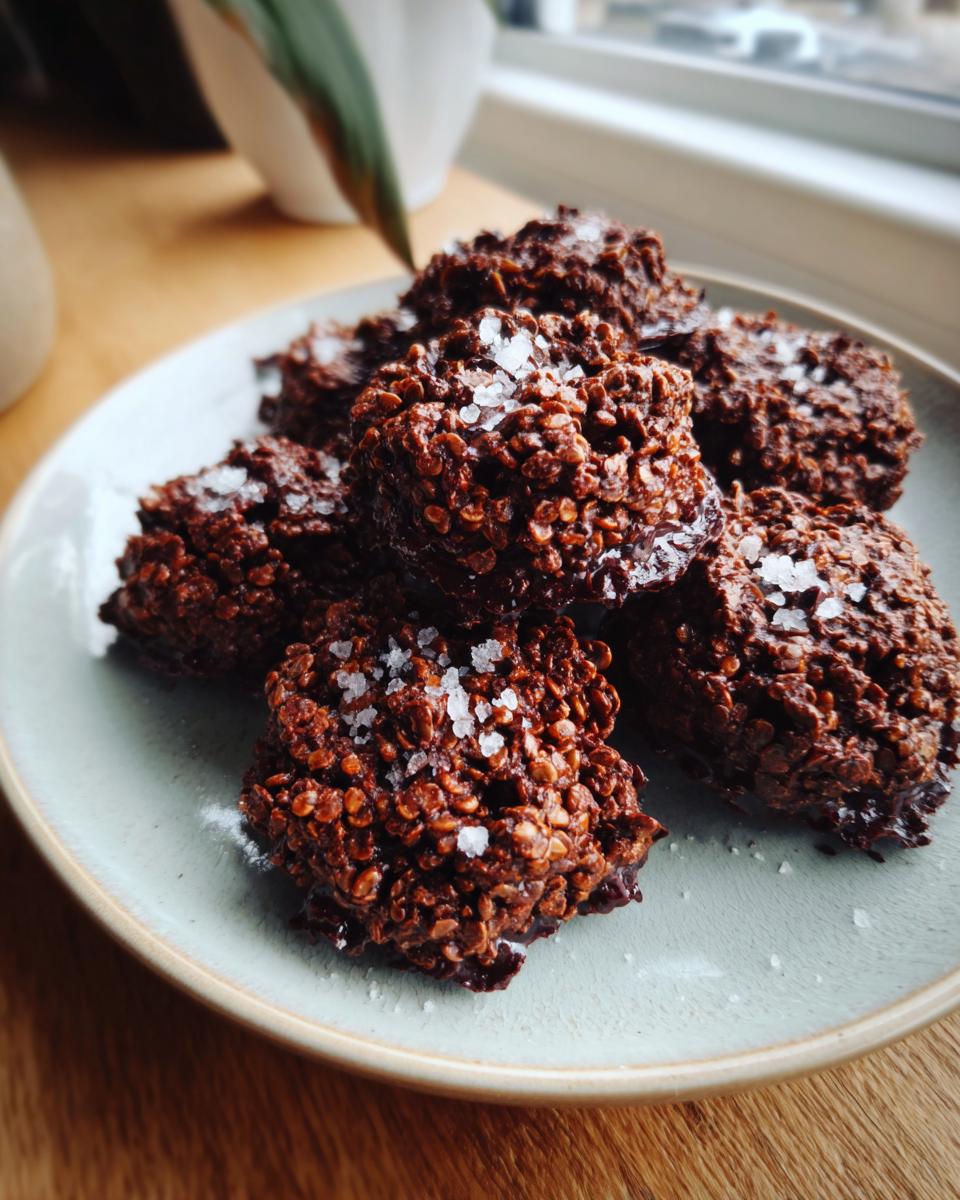
When the afternoon slump hits, or you just need something quick that satisfies that deep, dark chocolate craving, you need a secret weapon. And let me tell you, my Dark Chocolate Quinoa Crisps are the ultimate secret weapon! They come together faster than you can decide what to watch on TV. Hello! I’m Anna Kowalska, and here I share tried-and-true homemade recipes that you and your family will love. Everything I post here is made with heart and flavor, focusing on making your kitchen life easier, not harder.
I started developing these little bites because I needed something satisfying that didn’t require turning on the oven in the summer heat. These crisps are crunchy, rich, and they use ingredients I usually have on hand. Forget complicated baking; this is pure, delicious assembly. Trust me, once you make a batch of these, they disappear instantly!
Jump to:
Why You Will Love These Dark Chocolate Quinoa Crisps
Seriously, these Dark Chocolate Quinoa Crisps are little magic nuggets of joy. You don’t need an oven, and they taste way better than anything pre-packaged. They hit that perfect spot between healthy-ish and totally decadent. I promise you’ll be folding these into your regular rotation.
Quick Preparation Time
You are only looking at about 10 minutes of active work! That’s right, ten minutes! Since this is a no-bake treat, the hardest part is just waiting for them to get cold enough to eat. It saves so much time on a busy weeknight.
Simple Ingredient List
You probably have most of this stuff already. It’s just chocolate and puffed quinoa, mostly. There’s nothing fussy here—no weird flours or hard-to-find extracts. If you can melt chocolate, you can nail this recipe perfectly.
Perfect for Snacking
That crunch from the puffed quinoa against the snap of the rich dark chocolate? *Chef’s kiss.* They are perfectly portioned, so you don’t end up eating half the bowl standing over the counter. They satisfy that craving without weighing you down.
Essential Equipment for Making Dark Chocolate Quinoa Crisps
Okay, since this is a no-bake recipe, we aren’t pulling out the big stand mixer, thank goodness! But you still need the right tools to make these Dark Chocolate Quinoa Crisps turn out looking perfect and not like a melted mess on your counter. It’s all about setup, which is half the battle won!
Preparing Your Surface
You absolutely must line something first. I always grab a standard baking sheet and a big sheet of parchment paper. If you want those cute, neat little cups that don’t spread out like pancakes, use a mini muffin tin—just make sure you spray it really well or line it with those tiny paper liners. Don’t skip this step, or you’ll be chipping chocolate off your counter later!
Tools for Melting and Mixing
For melting that gorgeous dark chocolate, you need a microwave-safe bowl if you’re zapping it, or a dedicated double boiler setup if you prefer the stovetop—I usually go low and slow in the microwave. Once it’s smooth, grab a sturdy spatula for mixing. For portioning, a small cookie scoop or even just a regular tablespoon works like a charm to drop uniform little mounds.
Gathering Ingredients for Dark Chocolate Quinoa Crisps
Getting ready to make these Dark Chocolate Quinoa Crisps is half the fun because the ingredients are so straightforward! You don’t need to hunt down exotic items, but you do need to be precise with your chocolate measurement. When I make these, I lay everything out on the counter so I can see it all before I start melting. It keeps me honest about sticking to the amounts!
Core Components
You need a good amount of dark chocolate—we’re talking 12 ounces total. I really push for the 72% cacao variety because it gives you that deep, slightly bitter note that balances the sweetness perfectly. If you use anything less than 60%, the final crisp will taste too sweet for my liking. Then, you need 3 full cups of puffed quinoa. Make sure it’s puffed, not just cooked quinoa, or you’ll end up with a chocolate brick!
Optional Flavor Enhancements
The peanut butter is optional but highly recommended if you like that classic chocolate-peanut butter combo—that calls for a half cup. For the finishing touch, you absolutely must use flaky salt, like Maldon salt. Regular table salt just doesn’t have the same impact. You just sprinkle a few flakes on top of each portion right before they set. It makes the dark chocolate flavor pop, trust me on this one!
Step-by-Step Instructions for Perfect Dark Chocolate Quinoa Crisps
Now for the fun part—putting it all together! Making these Dark Chocolate Quinoa Crisps is really just a dance between melting, mixing, and chilling. Follow these steps closely, and you’ll have perfect, snappy treats ready in under an hour total. Don’t rush the cooling part, though; that’s where the magic happens!
Melting the Chocolate Base
First things first: we need smooth, liquid chocolate. If you’re using the microwave—and I usually do because I’m impatient—put your 12 ounces of dark chocolate and that optional half cup of peanut butter into a microwave-safe bowl. The trick here is to use low power, like 20% or 30%. Microwave it for 15-second bursts. After every 15 seconds, you must pull it out and stir it really well. If you just blast it, the chocolate will seize up on you, and nobody wants that! Keep stirring and zapping until it looks glossy and completely smooth. If you’re using a double boiler, just keep the heat low and stir constantly until everything melts beautifully.
Combining the Quinoa and Chocolate
Once that chocolate base is liquid velvet, it’s time for the crunch! Dump your 3 cups of puffed quinoa right into the bowl. Grab your spatula and start folding everything together. You need to mix until every single little puff of quinoa is coated in that rich dark chocolate. It takes a bit of gentle folding, but keep going until there are no dry pockets of quinoa hiding at the bottom of the bowl. Make sure it’s all evenly coated.
Shaping and Garnishing Your Crisps
Time to portion these out onto your prepared baking sheet lined with parchment, or into your mini muffin tin. I love using a small cookie scoop—the one- or two-tablespoon size—because it keeps everything uniform. Drop little mounds onto the sheet. If you’re doing the bark method, just spread the whole mixture thin onto the parchment. Right now, before the chocolate starts to stiffen, immediately sprinkle those flakes of flaky salt right on top of each portion. Just a few flakes per crisp is all you need to make that flavor sing!
Setting the Dark Chocolate Quinoa Crisps
These need to set completely hard. If you’re in a rush, pop the tray right into the freezer for about 30 minutes. If you aren’t in a huge hurry, the refrigerator works fine in about an hour. If you used the mini muffin tin, pull them out after about 15 minutes in the freezer and gently run a thin knife around the edge of each crisp to help release them before they freeze rock solid. Transfer them to a separate tray or plate to finish setting, making sure they aren’t touching if you want them to stay perfectly shaped!
Tips for Success with Your No-Bake Dark Chocolate Quinoa Crisps
Even though this is a no-bake recipe, there are a few little things I’ve learned over the years that make the difference between a good batch of Dark Chocolate Quinoa Crisps and a great one. It really comes down to treating that chocolate right and keeping your portions neat. These little tricks will save you headaches later!
Controlling the Chocolate Consistency
The biggest disaster in a recipe like this is seized chocolate, and it’s usually caused by overheating or getting a tiny drop of water in there. Remember what I said about microwaving? Use low power, 20% is your friend! If you see even a small chunk that hasn’t melted but the rest looks done, take it out and just keep stirring. The residual heat will melt that last bit without burning the whole batch. If you added peanut butter, that helps keep things creamy, too, so don’t skip it if you can help it!
Achieving Uniform Portions
If you want your crisps to look professional, you need consistent sizing. I highly recommend using a small cookie scoop—the kind that makes those little one-inch balls. This ensures every crisp sets at the same rate, so none are gooey while others are rock hard. If you don’t have one, just use a regular tablespoon, but try to scoop the exact same amount for every single portion. Consistency is key for a clean look!
Ingredient Variations for Dark Chocolate Quinoa Crisps
One of the best things about making Dark Chocolate Quinoa Crisps at home is that you can totally customize them to whatever you have in the pantry or whatever you’re craving that day. I like to keep mine simple, but if you want to bulk them up with extra goodness, I have a few suggestions that keep the recipe clean and delicious!
Adding Texture and Crunch
If you want more than just the crunch from the quinoa, throw in some extra bits! Sunflower seeds, pumpkin seeds, or slivered almonds are fantastic additions. You can even toss in some unsweetened coconut flakes—they toast up nicely when they hit the chocolate. The only thing you have to remember is that if you add a lot of extra stuff, you should pull back slightly on the puffed quinoa amount. If you add too much bulk, the chocolate won’t be able to coat everything evenly, and you’ll end up with dry pockets.
Adjusting Sweetness Levels
If you’re using that super dark 72% chocolate like I do, sometimes you might want just a tiny bit more sweetness, or maybe you just ran out of peanut butter. You can easily stir in a little bit of honey, maple syrup, or agave right along with the chocolate while it’s melting. Just a teaspoon or two usually does the trick! It blends right in and gives the final crisp a slightly richer flavor profile without making it taste like milk chocolate.
Storing and Keeping Your Dark Chocolate Quinoa Crisps Fresh
These little gems are best when they have that perfect snap, so storing them correctly is super important to keep that texture locked in. Since they are mostly chocolate, we don’t want them getting soft or sticky, especially if your kitchen is warm. I always make a big batch because they keep so well, which means I need a plan for leftovers—though there are rarely many!
Storage Requirements
You have two great options here: the fridge or the freezer. For short-term storage, the refrigerator is perfect for keeping them firm for a week or so. The trick, no matter which you choose, is separating them! You cannot just dump them in a container together. You have to place a layer of parchment paper between each layer of Dark Chocolate Quinoa Crisps, otherwise, they stick together into one giant chocolate block. If you want them to last longer, the freezer is the way to go.
| Storage Location | Duration | “Reheating” Advice |
|---|---|---|
| Refrigerator | Up to 1 week | Let sit on the counter for 5 minutes to lose the chill before eating. |
| Freezer | Up to 3 months | Enjoy straight from the freezer for an extra hard snap, or thaw for 10 minutes. |
Frequently Asked Questions About Dark Chocolate Quinoa Crisps
I get so many great questions about these little bites! People always want to know how to tweak them or if they can skip a step. Here are the common things I hear about making these Dark Chocolate Quinoa Crisps.
Can I substitute the puffed quinoa?
You really shouldn’t substitute the puffed quinoa if you want the same result. Puffed grains, whether it’s quinoa or maybe puffed rice cereal, are essential here because they are light and airy. If you use regular cooked quinoa, you’ll end up with a dense, heavy chocolate clump instead of a light, snappy crisp. The puffiness is what gives you that satisfying texture!
How do I make these dairy-free?
This is an easy one to make dairy-free, which is great! The only ingredient that might contain dairy is the dark chocolate. You just need to check the label to make sure the chocolate you buy doesn’t contain milk solids or butterfat. The peanut butter (if you use it) is usually fine, and the quinoa is naturally dairy-free, of course.
What is the best way to break the bark if I choose that method?
If you decide to spread the whole mixture out into a big bark instead of making individual portions, wait until it’s totally firm—maybe 15 minutes in the freezer. Then, take it out and use a heavy, sharp knife, pressing down firmly in straight lines to break it apart. Don’t try to saw at it; just firm, decisive downward pressure works best for clean breaks!
What is the total time commitment for Dark Chocolate Quinoa Crisps?
The best part is how fast they are! You only spend about 10 minutes on active prep work. The actual cooking time is zero since it’s no-bake, but you need that setting time. Total time, including chilling until they are firm enough to eat, is usually around 45 minutes, depending on if you freeze them or refrigerate them.
Share Your Dark Chocolate Quinoa Crisps Creations
I absolutely love seeing what you all whip up in your kitchens! If you made these super easy Dark Chocolate Quinoa Crisps, please snap a picture! Tag me, leave a comment below telling me if you added nuts or went with the pure chocolate route. Your feedback helps me keep making recipes that you and your family will truly enjoy!
Print
Amazing 10-Min Dark Chocolate Quinoa Crisps
- Total Time: 45 minutes
- Yield: Varies based on portion size
- Diet: Vegetarian
Description
Dark Chocolate Quinoa Crisps are easy-to-make, satisfying treats. You combine melted dark chocolate and optional peanut butter with puffed quinoa. Portion them into small shapes and chill until firm. This recipe yields a simple, flavorful snack.
Ingredients
- 12 ounces dark chocolate (72% cacao recommended)
- ½ cup peanut butter (optional)
- 3 cups puffed quinoa
- Flaky salt for garnish (optional, Maldon salt is a good choice)
Instructions
- Prepare your equipment: Line a baking sheet with parchment paper or spray a mini muffin tin with cooking spray.
- Melt the chocolate: Place the dark chocolate and peanut butter (if using) in a microwave-safe bowl. Microwave at 20% power for 15-second intervals, stirring after each interval until the chocolate is completely melted and smooth. Alternatively, melt the chocolate using a double boiler method on the stovetop, stirring until smooth.
- Mix ingredients: Add the puffed quinoa to the melted chocolate mixture. Mix well to coat the quinoa evenly.
- Portion the crisps: Use a 1-2 tablespoon cookie scoop, melon baller, or tablespoon measure to drop portions onto the prepared muffin pan or lined baking tray.
- Garnish: Sprinkle a few flakes of salt on top of each portion.
- Set the crisps: Place the crisps in the freezer for 30 minutes or in the refrigerator for one hour until they are set firm.
- Remove and store: If using a muffin pan, slide a knife around the edge to release the crisps after about 15 minutes in the freezer. Transfer them to a tray to finish setting if needed. Store the finished crisps in the refrigerator or freezer between layers of parchment paper.
Notes
- For a quick bark, spread the entire chocolate mixture onto a parchment-lined baking sheet, chill until solid, and then break it into pieces.
- Add texture by mixing in sunflower seeds, pumpkin seeds, almonds, coconut, or pretzels. If you add more ingredients, slightly reduce the puffed quinoa amount for better coating.
- Using a mini muffin pan creates neater, contained shapes compared to scooping onto a flat pan where they may spread more.
- If you desire a sweeter taste, add a small amount of honey, maple syrup, or agave to the chocolate mixture, or select a dark chocolate with a lower cacao percentage.
- Prep Time: 10 minutes
- Cook Time: 5 minutes
- Category: Snack
- Method: No-Bake/Melting
- Cuisine: American
Nutrition
- Serving Size: 1oz
- Calories: 97kcal
- Sugar: 3g
- Sodium: 56mg
- Fat: 7g
- Saturated Fat: 3g
- Unsaturated Fat: 4g
- Trans Fat: 0.003g
- Carbohydrates: 7g
- Fiber: 1g
- Protein: 2g
- Cholesterol: 0.3mg