Skip to content
Ever stare longingly at those pretty little spheres in the coffee shop case, wishing you could recreate that perfect bite without waiting in line? Well, friend, you are in the right place! I’m Anna Kowalska, and here I share tried-and-true homemade recipes that you and your family will love. I believe everything tastes better when it’s made with heart and flavor, and that absolutely includes these trendy treats. Forget the expensive coffee run; today, we are making a spectacular **Starbucks Cake Pop Recipe (Easy Copycat)** that tastes spot-on, right in your own kitchen!
I spent way too much time trying to get the texture right—you know, that dense, fudgy center they have? After several messy batches, I finally cracked the code using simple pantry staples. These aren’t just cute desserts; they are little bursts of joy wrapped in sweet, pink chocolate. Trust me, once you see how easy this assembly is, you’ll be making these for every single party you ever host.
Jump to:
Essential Ingredients for Your Starbucks Cake Pop Recipe (Easy Copycat)
Okay, listen up, because the success of this easy copycat hinges entirely on using the *right* stuff here. We aren’t making a fluffy layer cake, we are making that dense, almost truffle-like center, and the ingredients tell the story. Don’t try to substitute the frosting type—it’s crucial for binding! This **Starbucks Cake Pop Recipe (Easy Copycat)** relies on just four main players, but they have to be the right ones.
I put everything into a little list below so you can grab your items before you even turn on the oven. If you have all this ready to go, the assembly process feels like playing with edible clay, which is exactly what we want!
Gathering Your Starbucks Cake Pop Recipe (Easy Copycat) Components
Making these pops simple means sticking closely to the measurements here. You don’t need fancy specialty items, just the right basics! Here’s what you need to pull together:
Cake Base Ingredients
We start the whole process with a standard box of cake mix. You’ll just need the mix itself, plus the wet ingredients called for on the box—usually water, oil, and eggs. Don’t overthink it; the box does 90% of the heavy lifting for us! I always use a plain vanilla mix because it mimics that classic coffee shop flavor perfectly.
Frosting and Coating Ingredients
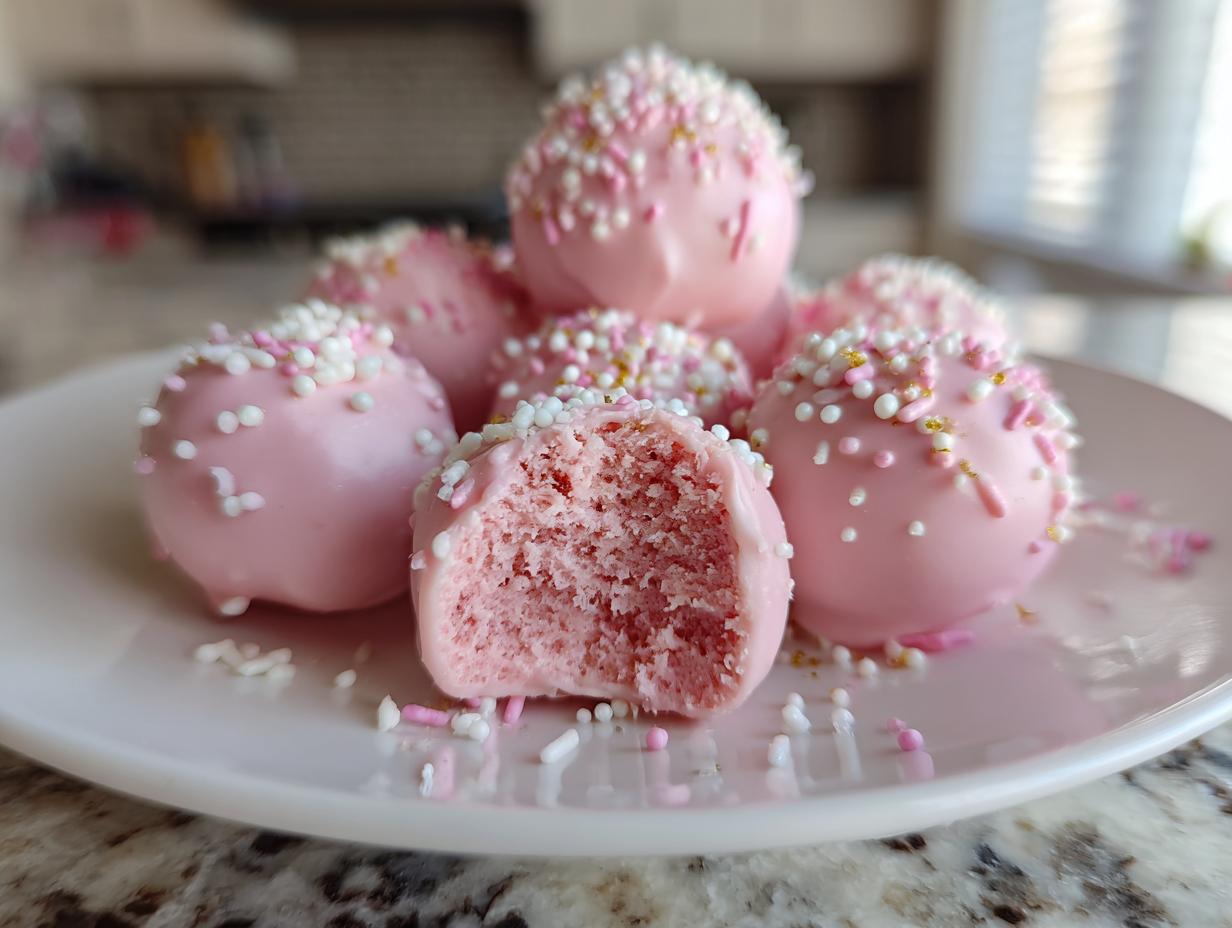
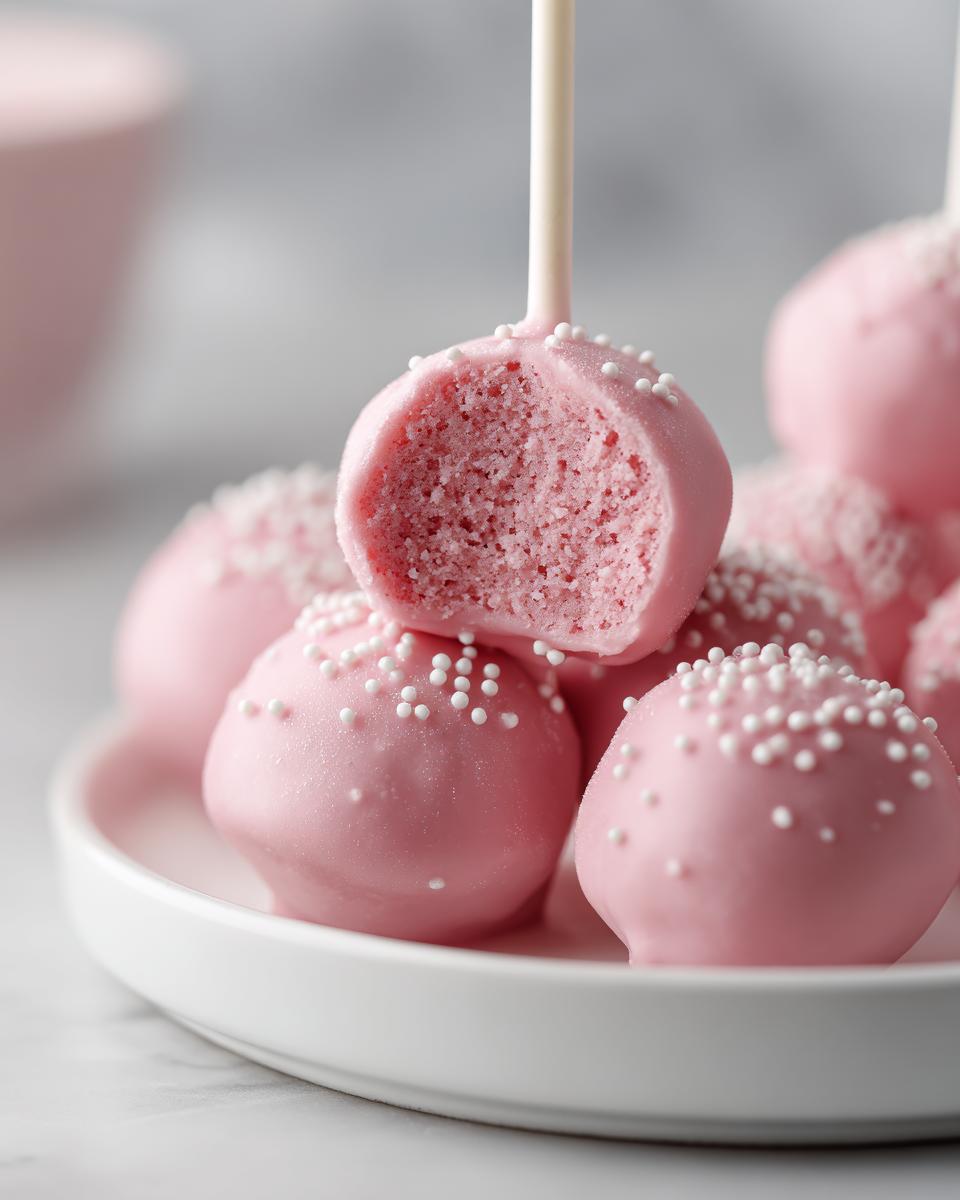
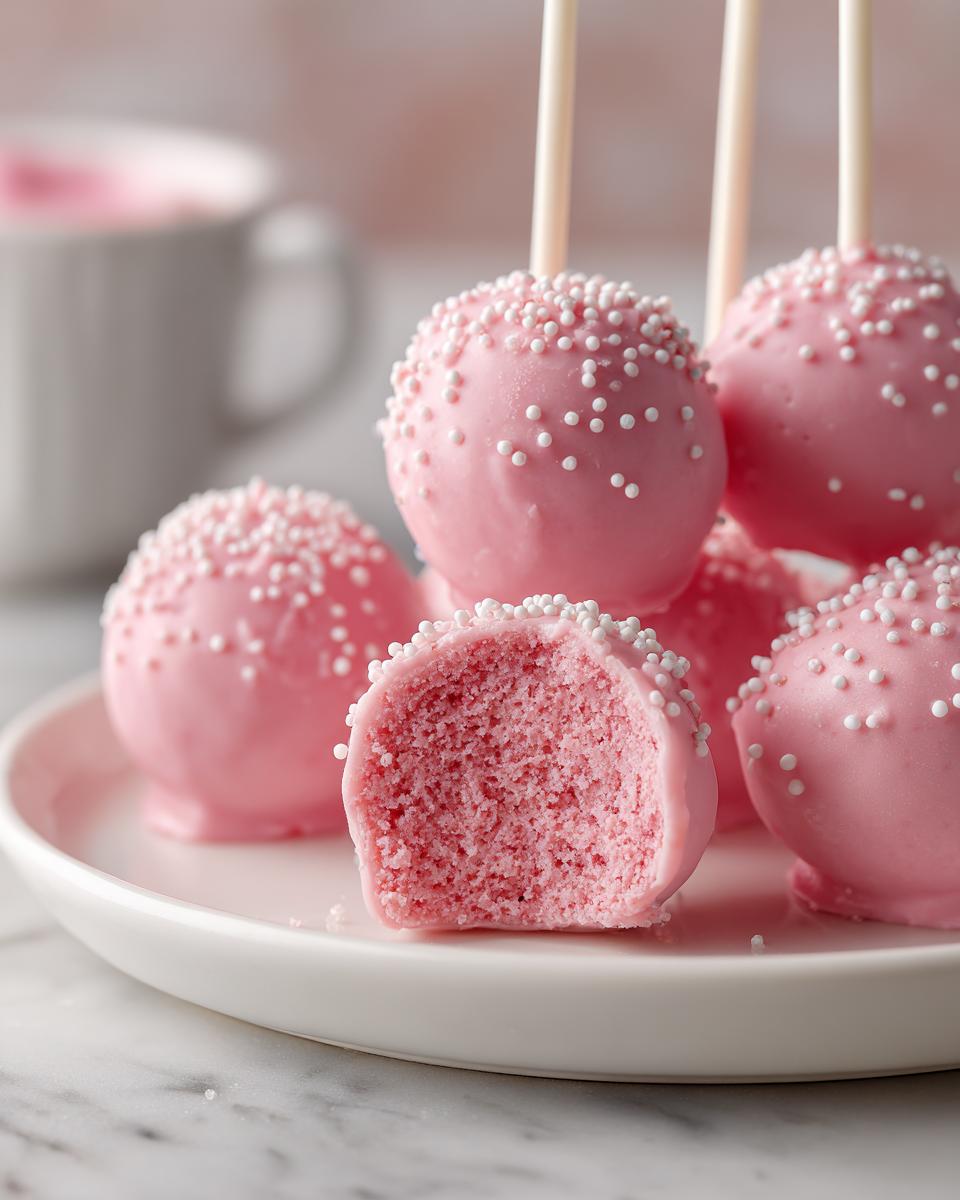
This is where the magic and the binding happen. You absolutely need French vanilla frosting; the flavor profile is specific and works better than plain vanilla or cream cheese frosting for this particular copycat. For the coating, make sure you grab the light pink candy melts, about 12 ounces worth. They melt beautifully and give you that iconic look without needing any extra coloring!
| Ingredient | Quantity | Notes |
|---|---|---|
| Vanilla Cake Mix | 1 Box | Standard size, any brand works! |
| French Vanilla Frosting | ⅓ cup | Crucial for that dense texture. |
| Light Pink Candy Melts | 12 oz bag | For the signature coating. |
| White Sprinkles | As desired | For decoration pre-harden. |
Baking the Base for Your Starbucks Cake Pop Recipe (Easy Copycat)
Now that we have our four essential ingredients, it’s time to get this party started! Before anything else, preheat your oven to 350 degrees F. We are baking a simple sheet cake here, which is much faster than cupcakes, giving us a huge head start on this **Starbucks Cake Pop Recipe (Easy Copycat)**. Grab that 9×13-inch baking dish or two smaller 8×8 pans and give them a good grease.
In a big bowl, mix up the cake batter exactly as the box tells you—the cake mix, the required water, oil, and eggs. Don’t try to make it fluffier than the box suggests! Pour that beautiful yellow batter into your prepared pan and pop it into the hot oven. It usually takes about 30 minutes, but you know the drill: test it with a toothpick inserted right in the center. If it comes out clean, you’re golden!
Mixing and Baking the Vanilla Cake
The biggest trap people fall into when making cake pops is trying to work with warm cake. You absolutely cannot rush this next step! Once the cake is baked and passes the toothpick test, you need to let it cool completely. I mean it—cool to room temperature, or better yet, pop the whole thing in the fridge for an hour once cooled. If you try to crumble warm cake, you end up with sticky, gooey mush that won’t roll into nice little balls later. Patience here is the secret sauce that keeps the structure sound!
Assembling the Cake Pop Mixture
This is the fun part, where the baked cake transforms into something truly special. Once that vanilla cake is completely cooled down—and I mean *totally* cool, no warm spots allowed—it’s time to crumble. Use your fingers or a fork and just break that cake up right in the pan or a big mixing bowl. You want fine crumbs, almost like coarse sand.
Now, take that ⅓ cup of French vanilla frosting and stir it right into those crumbs. Mix it thoroughly until everything is combined. It’s going to look super moist and a little messy at first, but keep stirring until it all comes together into a thick, uniform dough. If it feels too loose, don’t panic; that’s why we chill!
Creating the Perfect Cake Pop Dough Consistency
The chilling step is non-negotiable if you want perfect spheres! Cover that dough mixture and stick it in the refrigerator for at least 30 minutes. This firms up the frosting just enough so the dough becomes pliable, like playdough. When you take it out, use a small cookie scoop or just your hands to roll out balls. Try to make them all the same size—consistency matters for even dipping later on! If you are looking for other great baking tips, check out this zucchini bread recipe for inspiration.
Freezing for Stability Before Dipping
Once you have all your little balls rolled, place them on a baking sheet lined with parchment paper—don’t skip the parchment, or they’ll stick when they freeze! Back into the freezer they go for another good freeze, about 15 to 20 minutes. They need to be rock hard before they meet the warm candy coating. This second freeze is what prevents them from crumbling or falling apart when you dip them. If they are still squishy, the stick won’t stay put!
Mastering the Dip: Coating Your Starbucks Cake Pop Recipe (Easy Copycat)
Alright, the cake centers are frozen solid, the sticks are ready to go, and now we tackle the coating—the part that makes these look exactly like the ones from the coffee shop! We are using those light pink candy melts for our **Starbucks Cake Pop Recipe (Easy Copycat)**. Melting them correctly is absolutely everything. If they are too thick, they’ll tear your cake ball; if they are too thin, they won’t coat properly.
Remember, you are working with frozen balls, so you need your coating warm and flowing nicely. Take your time here; rushing the melt is the number one reason for lumpy, ugly cake pops. We want smooth, shiny perfection!
Melting Candy Melts Safely
I usually use the microwave because it’s fast, but you have to be careful not to scorch them! Put the candy melts in a microwave-safe bowl. Heat them in 30-second bursts, stirring well between each one. Seriously, stir even if it doesn’t look melted yet. Once they are mostly melted, keep stirring until the residual heat dissolves the last few lumps. If it still seems too thick after that, you can stir in just a teaspoon of coconut oil or vegetable shortening at a time until it flows like warm honey. Never add water, or it will seize up! For more general baking science tips, you can check out resources on food science principles.
Securing the Sticks in Your Starbucks Cake Pop Recipe (Easy Copycat)
This is the structural secret! Before you dip the whole ball, take one lollipop stick and dip just the very tip—maybe half an inch—into the melted pink coating. Then, carefully insert that dipped end about halfway into one of your rock-hard cake balls. You don’t want to shove it in too far or you’ll crack the ball! Once the stick is anchored, pop the whole tray back into the freezer for about 5 minutes. This step essentially glues the stick in place, so when you go for the big dip, the stick stays put. If you’re looking for other fun, easy treats, try this peanut butter cup cookies recipe.
Final Coating and Decoration
Once the stick is secure, it’s time for the main event. Take a ball out of the freezer, dip it straight down into the melted coating, making sure it’s fully submerged. Gently pull it out, letting the excess drip off as you twist it slightly. If you prefer not to dip, you can also just spoon the coating over the top, twirling it gently. As soon as it’s coated, before the chocolate sets, give it a light sprinkle of those white sprinkles. Place the finished pop upright into a block of styrofoam or even a sturdy cardboard box so it can harden without touching anything. Wow, these are coming along beautifully!
Tips for Perfect Starbucks Cake Pop Recipe (Easy Copycat) Results
Even with the best plan, sometimes the coating acts up! Don’t throw in the towel if your first few dips look a little messy. Troubleshooting is part of the fun when you’re mastering the **Starbucks Cake Pop Recipe (Easy Copycat)**. Remember, the key to professional-looking results is managing the temperature of your cake balls versus the temperature of your coating. If you need more ideas for easy desserts, check out my collection of desserts.
My biggest piece of advice, which I learned the hard way, is that you must work quickly once the dipped pop comes out of the coating. The frozen cake will immediately start cooling the chocolate, which is good, but if you hesitate, you’ll end up with thick drips pooling at the bottom.
Achieving Smooth Coating Texture
If you find your candy melts are just too thick—maybe they seized up slightly or you just didn’t thin them enough initially—you can gently thin them out right there in the bowl. Add just a tiny bit more vegetable shortening or coconut oil, stirring constantly. I mean a half-teaspoon at a time! This adds back the necessary fluidity so you can get a thin, even shell. A thin coat sets up quickly and looks so much cleaner than a thick, clumpy one.
Keeping Your Starbucks Cake Pop Recipe (Easy Copycat) Balls Uniform
If you are making these for a big event, consistency in size is everything for presentation. That’s why I highly recommend using a small, uniform cookie scoop—the kind that only holds about one tablespoon of dough. Scooping ensures every single ball is the same size, meaning they all dip to the same height and look fantastic lined up together. If you try to eyeball it, you’ll end up with some pops that are too big for the stick and others that look dwarfed! For another great recipe that requires precise shaping, see this guide on mohnnudeln.
Storing and Serving Your Starbucks Cake Pop Recipe (Easy Copycat)
After all that hard work, we need to make sure these beauties last! The great news about this **Starbucks Cake Pop Recipe (Easy Copycat)** is they store really well, thanks to the candy coating acting as a seal. Keeping them properly stored means they taste just as good on day three as they did right after dipping.
The coating is the deciding factor here. Since we used candy melts and no fresh dairy like cream cheese in the main pop structure, they hold up wonderfully at room temperature, provided your kitchen isn’t scorching hot. They are just so much better when they aren’t ice-cold!
Storing Leftover Cake Pops
If you have any leftover pops, keep them away from direct sunlight or heat. I find that if you store them in an airtight container, they are perfectly fine sitting out on the counter for a couple of days. If you need them to last longer than that, the fridge is your friend, but be warned: sometimes the coating can get a little cloudy or weep slightly when brought back to room temperature. Always bring them out about 30 minutes before serving so they soften up nicely.
| Storage Location | Maximum Time | Notes |
|---|---|---|
| Airtight Container (Room Temp) | 2-3 Days | Best texture for the center. |
| Airtight Container (Refrigerator) | Up to 1 Week | Bring to room temp before enjoying. |
Frequently Asked Questions About This Starbucks Cake Pop Recipe (Easy Copycat)
I always get so many questions after I post this recipe because everyone wants that perfect texture! It’s amazing how many ways you can tweak these little guys, but you have to respect the structure, especially when coating them. Here are the things I hear most often about the **Starbucks Cake Pop Recipe (Easy Copycat)**.
Don’t worry if you run into a little snag; most problems are easily fixed with a quick adjustment to temperature or consistency. Let’s troubleshoot! For more general baking help, feel free to check out my quick and easy recipes section.
Can I use a different flavor of cake mix for this Starbucks Cake Pop Recipe (Easy Copycat)?
Oh, absolutely! While the vanilla/French vanilla combo is the classic copycat flavor, you can definitely swap it out. If you use chocolate cake mix, you should swap the French vanilla frosting for chocolate frosting to keep the flavor profile cohesive. If you go with strawberry cake mix, use a vanilla or strawberry frosting. The key is that the frosting binder needs to match the cake flavor profile you choose!
Why are my cake pop balls falling apart when I dip them?
This is almost always a temperature issue, honey. If your cake balls aren’t frozen solid—and I mean *hard*—they will warm up too fast when they hit the melted coating and start to crumble under the pressure. Also, check your coating thickness. If the pink candy melts are too thick, they exert too much force on the ball as you pull it out. If you have to use a lot of pressure to pull the pop out of the coating, you need to thin your melts a bit more with shortening!
Nutritional Estimates for This Recipe
Just a little note before you dig in: these estimates are based on the basic recipe ingredients I listed. Since everyone’s scoop size is different, and you might use a different brand of cake mix, these numbers are a general guide. Think of them as a fun ballpark figure!
| Nutrient | Estimate Per Pop |
|---|---|
| Calories | 246kcal |
| Fat | 2g |
| Carbohydrates | 55g |
| Protein | 1g |

Divine Starbucks Cake Pop Recipe Secret 246
- Total Time: 1 hour 50 minutes
- Yield: Varies by size
- Diet: Vegetarian
Description
This is an easy copycat recipe for Starbucks Cake Pops. You can make these sweet treats at home with simple pantry staples. They are perfect for parties or a simple dessert.
Ingredients
- 1 box vanilla cake mix
- ⅓ cup french vanilla frosting
- 1 bag light pink candy melts 12oz
- white sprinkles
Instructions
- Prepare the cake according to the package directions. Beat the cake mix, water, oil, and eggs in a bowl.
- Pour the batter into a greased 9×13-inch baking dish or two 8×8-inch round cake dishes. Bake in a 350 degree F oven until a toothpick inserted into the center comes out clean.
- Let the cake cool completely. Crumble the cake with a fork in a large bowl or the baking dish.
- Stir the frosting into the crumbled cake. Cover and freeze until chilled.
- Use your hands to roll the mixture into evenly sized balls. Freeze again until the balls are hard.
- Once frozen, give the balls another small roll to smooth the sides. Place them on a baking sheet.
- Melt the candy melts in the microwave or a double boiler.
- Dip each lollipop stick into the pink chocolate. Stick the dipped stick into one of the cake pop balls. Repeat for all pops and return them to the freezer until solidified.
- Gently dip the balls into the melted candy melts or spoon the coating onto the balls and twirl to coat.
- Decorate with sprinkles if you wish. Place them upright in a styrofoam block or a box to harden.
Notes
- The cake and frosting mixture is very moist. Chilling it makes rolling the balls easier and helps them keep their shape.
- The nutrition information provided is a general guide and may vary based on specific ingredients and serving size.
- Prep Time: 20 minutes
- Cook Time: 30 minutes
- Category: Dessert
- Method: Baking and No-Bake Assembly
- Cuisine: American
Nutrition
- Serving Size: 1 gram
- Calories: 246kcal
- Sugar: 33g
- Sodium: 274mg
- Fat: 2g
- Saturated Fat: 1g
- Unsaturated Fat: 1g
- Trans Fat: 0g
- Carbohydrates: 55g
- Fiber: 0g
- Protein: 1g
- Cholesterol: 0mg