Skip to content
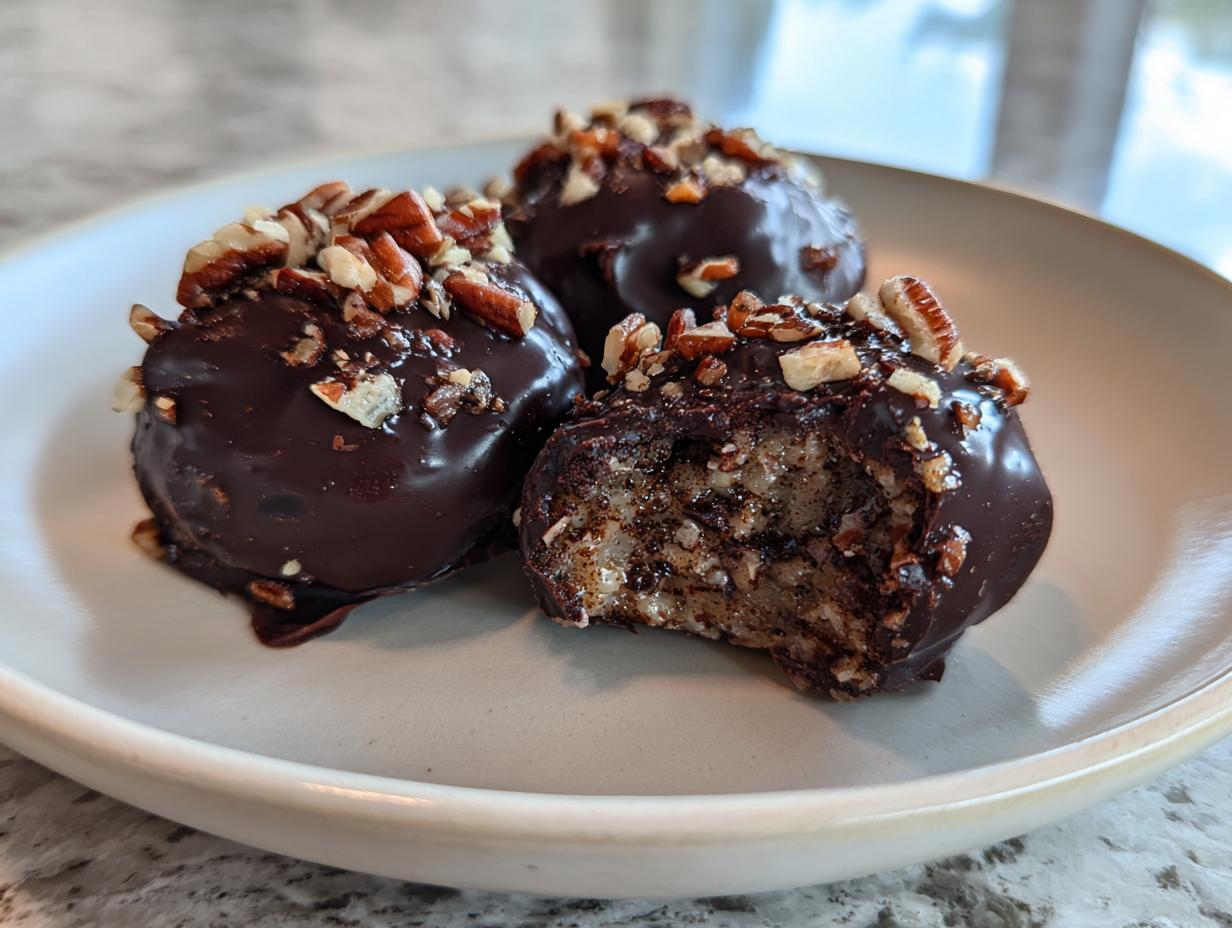
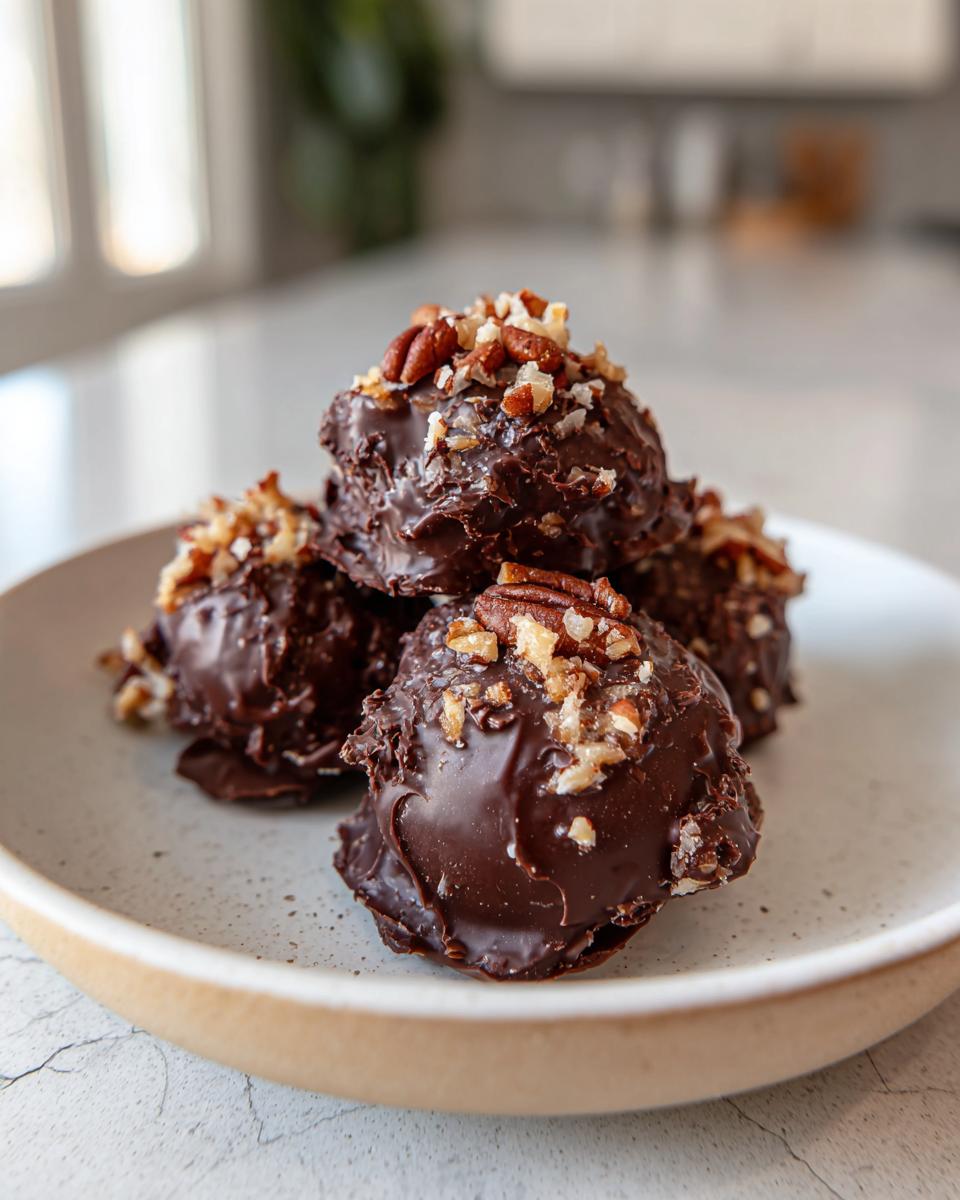
If you’ve ever visited the South around the holidays, you know that no candy platter is complete without those gorgeous, chocolate-dipped mounds of coconut and pecans: the legendary Martha Washington Candies. I’m Anna Kowalska, and here I share tried-and-true homemade recipes that you and your family will love. Everything I post here is made with heart and flavor, but these candies? They represent the very best of tradition.
My connection to these candies runs deep, stemming from my grandmother’s kitchen down in Georgia. She always said candy making was serious business, second only to Sunday dinner preparation! She insisted that the secret wasn’t in some fancy technique, but in using quality ingredients and never cutting corners. I’ve tested her original methods countless times over the years to make sure they work perfectly for you, even if you’re using a microwave instead of her old double boiler.
Forget those overly sweet store-bought versions. We are going to make the real deal—moist, perfectly balanced, and ready to impress everyone at your next gathering. Let’s get started on these classic coconut pecan candies!
Jump to:
Essential Components for Perfect Martha Washington Candies
Okay, let’s talk ingredients. For these Martha Washington Candies to live up to their famous name, we can’t skimp! Every single item on this list plays a role in getting that perfect melt-in-your-mouth texture we’re aiming for. Don’t worry about the quantities; I’ve made sure they are crystal clear so you don’t end up with a sticky mess.
Here is exactly what you’ll need to gather up before we start mixing this magic.
| Ingredient | Amount | Preparation Note |
|---|---|---|
| Butter | 1 cup | Melted until just bubbling (see my note below!) |
| Powdered Sugar | 1 pound | Sifted, please, to avoid lumps! |
| Vanilla Extract | 1 tablespoon | The real stuff makes a difference here. |
| Shredded Coconut | 14 ounces | Sweetened, unsweetened works too, but stick to sweetened if you can. |
| Sweetened Condensed Milk | 14 ounces | This is our binder, don’t grab evaporated milk by mistake! |
| Maraschino Cherries | 10 ounces | Drained very well and chopped roughly. Pat them dry! |
| Finely Chopped Pecans | 3 cups | Chopped small—we want texture, not big chunks. |
| Candy Coating | 16 ounces | Whatever chocolate or confectioner’s coating you love. |
Ingredient Clarity for Martha Washington Candies
Listen, the coconut is key. You absolutely want the standard shredded coconut, not the flakes. Flakes are too tough and don’t absorb the milk and butter properly, which messes up the final consistency of your coconut pecan candy. Also, please, measure your pecans finely!
My grandmother used to say that if the pecans were too big, they’d tear the soft candy base when you tried to roll it. We need them chopped small enough to blend in, giving you that satisfying little crunch in every bite without overpowering the sweet coconut. And for the butter? Make sure you melt it until it just starts to bubble slightly on the edges. That tiny bit of extra heating deepens the flavor profile immensely—it’s a small step that makes these homemade candies taste richer!
Equipment Needed for Your Martha Washington Candies Project
You don’t need a massive candy kitchen for these Martha Washington Candies, thankfully! We are keeping things simple, which is why this recipe is so great for beginners. You’ll want a couple of big bowls—one for mixing the base and another for chilling later.
The most important tools are things you probably already have. Make sure you have parchment paper ready to go for lining your trays; this prevents sticking like a dream. You’ll also need something to melt your candy coating in. If you don’t have a proper double boiler, a heatproof bowl set over a simmering pot of water works perfectly fine. If you’re feeling speedy, your microwave is your friend here, just remember to melt it slowly!
Step-by-Step Guide to Making Martha Washington Candies
Alright, deep breath! This is where the fun really starts. Making Martha Washington Candies is more about assembly and patience than actual cooking, but you have to follow the rhythm. Think of it like making a really rich, dense cookie dough that you shape by hand. We’re going to break this down into building the base and then the final chocolate dipping, which is the glamorous part!
Preparing the Coconut Pecan Base for Martha Washington Candies
First things first: get your butter melted until it’s just bubbling a tiny bit around the edges—remember, this deepens the flavor! In your largest bowl, toss in your shredded coconut, those finely chopped pecans, and the powdered sugar. Now, here is where you need to be careful with the sugar. Don’t just dump it all in, or you’ll have a white cloud taking over your kitchen! Incorporate it gradually while stirring.
Next, pour in your melted butter, vanilla extract, and the sweetened condensed milk. Now, put your hands in there! Seriously, you need to use your hands for this part. Knead the mixture together until everything is thoroughly incorporated and it feels thick and stiff. It shouldn’t be sticky or sloppy; it should hold its shape when you squeeze a bit.
Once you’ve got that perfect consistency, cover the bowl up—plastic wrap works great—and let it rest on the counter for about 30 minutes. This resting time is crucial! It lets the coconut and pecans truly absorb all that milky goodness, firming up the base so it won’t crumble when you try to roll it. After the rest, grab a small spoon or a tablespoon measure and start scooping out portions. Roll these gently between your palms into little balls or small logs, whatever shape you prefer. They should be about one tablespoon each.
Chilling and Coating Your Martha Washington Candies
Place all those lovely, uncoated candies onto a baking sheet lined with parchment paper. Make sure they have a little space between them so they don’t stick together once chilled. Pop the whole tray into the refrigerator for a solid 30 minutes. They need to be firm—almost hard—before they hit that warm chocolate coating, trust me!
While those are chilling, it’s time for the chocolate! Melt your candy coating using a double boiler or carefully in the microwave. If you use the microwave, do it in 30-second bursts, stirring well between each one. Once it’s smooth and glossy, take it off the heat and let it cool down just a little bit. If it’s too hot, it’ll melt your chilled candies instantly!
Now, using a fork or a dipping tool, gently submerge one chilled candy into the slightly cooled chocolate. Lift it out immediately, letting the excess chocolate drip back into the bowl. You can tap the fork gently against the side of the bowl to help that drip along. Place the dipped candy back onto your fresh parchment-lined sheet.
Here’s my favorite part: before that chocolate sets up, sprinkle a few extra chopped pecans or maybe a pinch of coconut right on top! That’s how you know they are handmade. Once they are all coated and decorated, back into the fridge they go for a final 30 minutes until that chocolate shell is totally firm. Perfect coconut pecan candy is just minutes away!

Tips for Achieving Expert Martha Washington Candies Results
Making these Martha Washington Candies can sometimes feel fussy, especially if the weather isn’t cooperating! My biggest piece of advice, learned through many batches of sticky failures, is to watch the humidity. If it’s a rainy day, your base mixture will feel softer, and the chocolate coating will set up slower because the air holds moisture. Humidity can affect candy making just as much as baking!
If your base feels too soft even after chilling, don’t panic! Just pop it back in the fridge for another 15 minutes before rolling. Texture control is everything here. When dipping the chilled candies, you want the chocolate to look smooth and shiny, not dull or grainy. If your chocolate starts looking thick or seizing up, it means it got too hot or maybe a tiny drop of water got in there. Just remove it from the heat, add a teaspoon of vegetable oil, and stir like crazy until it smooths out again.
Also, when you’re dipping, work quickly but deliberately. You want to get the candy coated and decorated before the chocolate starts to form that dull, chalky look—that means it’s starting to set up too fast or you’re overworking it. These little tricks make the difference between a good homemade candy and a batch worthy of a fancy holiday platter!
Frequently Asked Questions About Martha Washington Candies
I know you might have a few questions brewing once you look at this recipe. Candy making can sometimes seem mysterious, but these chocolate dipped candies are pretty straightforward once you know the ropes. Here are the things I get asked most often about making these treats perfectly at home!
Q1. Why is my Martha Washington Candy base too sticky to roll?
That usually means the mixture wasn’t chilled long enough, or maybe your proportions were slightly off. If it’s sticky after the first 30-minute chill, put it back in the fridge for another 15 to 20 minutes. If it’s still too soft, you can stir in one or two extra tablespoons of powdered sugar, but go slow so you don’t make it too stiff!
Q2. Can I use walnuts instead of pecans?
You absolutely can, but know that you are slightly changing the classic flavor profile. Walnuts are more earthy, while pecans are sweeter and richer. If you are making these for a traditional holiday platter, I always recommend sticking to pecans for that authentic Martha Washington Candies taste. If you use walnuts, make sure they are very finely chopped!
Q3. How long does it take to make Martha Washington Candies?
Overall, it’s about an hour of hands-on time spread out over a few hours, but the actual active work is pretty quick. Prep time is about 45 minutes—that’s mixing, kneading, and rolling everything out. The chilling and dipping takes about 15 minutes of active work, but you need about an hour total of chilling time built in for the base and the final chocolate coating to set up properly. It’s worth the wait!
Q4. Should I use real melted chocolate or candy coating?
Candy coating (sometimes called almond bark) is much easier for beginners because it doesn’t require tempering. It sets up beautifully shiny and hard in the fridge. If you use real chocolate chips, you must temper them correctly, or they will look dull and streaky. For reliable, beautiful coconut pecan candy every time, stick to a good quality candy coating. Understanding chocolate tempering is key if you choose real chocolate.
Can I Substitute the Pecans in Martha Washington Candies
As I mentioned above, you can swap out the pecans if you have an allergy or just don’t have them on hand. Almonds work okay, but they are crunchier than pecans. The integrity of the classic Martha Washington Candies relies on that specific buttery, slightly sweet crunch from the pecan, so if you substitute, just know you are making a delicious variation, not the exact original!
How Long Does It Take to Make Martha Washington Candies
Don’t let the chilling times worry you; that’s your downtime! The total time is about an hour, but only about 45 minutes of that is active prep work, like mixing and rolling your little balls. The rest is just waiting patiently while the fridge does the heavy lifting to make sure your chocolate coating sticks perfectly to the coconut pecan base.
Storing Your Beautifully Made Martha Washington Candies
Once you’ve got these beauties made, keeping them perfect is the final step! Since these Martha Washington Candies have a good amount of fat and condensed milk in the base, I always recommend keeping them cool. They are much happier in the refrigerator, especially if your kitchen runs warm or if you made them on a humid day.
You can store them in a single layer in an airtight container. If you stack them, use a small piece of wax paper between the layers so the chocolate doesn’t stick to the candy underneath. They last wonderfully for about ten days when stored this way. If you plan on making a huge batch for later, they actually freeze quite well, too!
Here’s a quick guide for storage:
| Storage Method | Duration | Serving Tip |
|---|---|---|
| Airtight Container (Fridge) | Up to 10 days | Let them sit on the counter for 15 minutes before serving so the chocolate softens just a bit. |
| Freezer | Up to 2 months | Wrap tightly in plastic wrap first, then place in a freezer bag. Thaw overnight in the fridge. |
Never try to reheat these, of course! But letting them come up slightly from fridge temperature makes the coconut pecan candy base softer and lets you really taste that rich butter and vanilla.
Share Your Homemade Martha Washington Candies Experience
I truly hope you loved making this classic recipe as much as I do. Now that you’ve got your own platter of perfect chocolate dipped candy, I’d love to hear how they turned out! Drop a rating below and tell me in the comments if you added any special twists to your coconut pecan candy. Seeing your results always makes my day!
Print
Amazing 1 Martha Washington Candies Secret
- Total Time: 1 hour 0 minutes
- Yield: About 3 dozen candies 1x
- Diet: Vegetarian
Description
Create classic Martha Washington Candies at home with this simple recipe. These sweet coconut and pecan delights are dipped in chocolate for a rich, satisfying treat.
Ingredients
- 1 cup butter
- 1 pound powdered sugar
- 1 tablespoon vanilla extract
- 14 ounces shredded coconut
- 14 ounces sweetened condensed milk
- 10 ounces maraschino cherries
- 3 cups finely chopped pecans
- 16 ounces candy coating
Instructions
- Combine shredded coconut, finely chopped pecans, powdered sugar, and sweetened condensed milk in a large bowl.
- Knead the mixture with your hands until it is well incorporated and thick.
- Cover the bowl and let the mixture rest for 30 minutes.
- Take small portions of the mixture, about 1 tablespoon each, and roll them into balls or logs.
- Place the shaped candies on a parchment-lined baking sheet, leaving space between them.
- Refrigerate the tray for 30 minutes to firm up the candies.
- Melt the candy coating in a heatproof bowl over a double boiler or microwave.
- Let the melted chocolate cool slightly before dipping the candies.
- Dip each chilled candy into the chocolate, allowing excess to drip off.
- Place coated candies back on the parchment-lined baking sheet.
- Sprinkle chopped pecans or coconut on top before the chocolate sets.
- Refrigerate again for 30 minutes to harden the chocolate completely.
Notes
- Melt the butter until just bubbling to deepen its rich flavor profile.
- Incorporate powdered sugar gradually to prevent a dust cloud; aim for a smooth, glossy mixture.
- Prep Time: 45 minutes
- Cook Time: 15 minutes
- Category: Candy
- Method: No-Bake/Dipping
- Cuisine: American
Nutrition
- Serving Size: 1 candy
- Calories: Estimate N/A
- Sugar: Estimate N/A
- Sodium: Estimate N/A
- Fat: Estimate N/A
- Saturated Fat: Estimate N/A
- Unsaturated Fat: Estimate N/A
- Trans Fat: Estimate N/A
- Carbohydrates: Estimate N/A
- Fiber: Estimate N/A
- Protein: Estimate N/A
- Cholesterol: Estimate N/A