Skip to content
When I think about the perfect holiday centerpiece, it’s not just about sparkle; it’s about that melt-in-your-mouth texture you can only get from a truly great soft-batch recipe. That’s why I’m so thrilled to share my secrets for making the most adorable **Polar Bear Cookies**! I’m Anna Kowalska, and here I share tried-and-true homemade recipes that you and your family will love. Everything I post is made with heart and flavor, and believe me, these cookies have both in spades.
I’ve spent years chasing that elusive soft cookie that doesn’t spread into a pancake, and the answer, my friends, is cream cheese. It’s the backbone of this recipe! These aren’t your stiff, roll-out sugar cookies; these are tender, cloud-like cookies that hold their shape beautifully. I promise, once you see how these little bears come together with their sweet vanilla buttercream and sparkly sugar coats, you’ll never look back. They are absolutely worth the little bit of extra decorating love.
Jump to:
Gathering Supplies for Your Polar Bear Cookies
Okay, before we get to the fun part—the decorating—we need to make sure our ingredients are prepped just right. Getting everything ready first makes the whole process of making **Polar Bear Cookies** so much smoother, especially since chilling the dough is a big step. Trust me, having your components measured out means no frantic searching mid-mix!
Essential Ingredients for the Polar Bear Cookies Dough
The base of these cookies is what makes them so soft, and that means paying attention to how we measure everything here. We are aiming for perfection for our little bears!
Dry Components Clarity
You’ll need 3 cups of all-purpose flour, 1 full tablespoon of cornstarch—that’s our secret for tenderness!—1/2 teaspoon of baking powder, and 1/2 teaspoon of fine salt. Whisk these together in a bowl first so they are ready to go when we need them.
Wet Components and Flavor Base
This is where the magic starts for that cream cheese softness. Make sure you have 3/4 cup (that’s one and a half sticks) of unsalted butter and 1/2 cup of full-fat cream cheese, and both absolutely *must* be at room temperature. We also need one large egg and 2 teaspoons of vanilla extract. Room temperature eggs and dairy mix so much better!
Ingredients for Vanilla Buttercream and Decoration
Once the cookies are cooled, we move on to making them look like actual polar bears. The frosting is a simple, fluffy vanilla buttercream that acts as our glue and our snow!
Frosting Components
For the frosting, grab 1 cup of unsalted butter, 3 1/2 cups of powdered sugar (that’s usually one full pound box), 1/4 cup of heavy whipping cream, 1 tablespoon of vanilla, and just a pinch—1/2 teaspoon—of salt.
Adorable Polar Bear Decorations
Now for the fun details on your **Polar Bear Cookies**! Have about 1 cup of coarse white sanding sugar ready for coating. You’ll need about 30 large chocolate chips for noses, black round sprinkles for eyes, and red or pink round sprinkles for the little ears.
Step-by-Step Instructions for Perfect Polar Bear Cookies
This is where we turn our ingredients into those cute, soft **Polar Bear Cookies**! Don’t rush the chilling; it’s honestly the most important part for keeping them thick and not spreading out into puddles. Follow these steps closely, and you’ll have a whole snowy batch!
Creating and Chilling the Soft Cookie Dough
First up, in a big bowl, beat that 3/4 cup of room-temperature butter with the 1/2 cup of cream cheese until everything looks smooth and happy. Then, turn the mixer up to medium-high and add your 1 1/2 cups of granulated sugar. Keep mixing until the whole thing lightens up in color—it gets fluffy! Next, mix in the egg and the vanilla extract until it’s just combined.
In a separate bowl, quickly whisk together your flour mixture (the dry stuff we talked about). Now, add that flour mix into the wet mixture in two separate batches. Mix on LOW speed, scraping down the sides between additions. Stop mixing the second you don’t see any more dry streaks. Seriously, don’t overmix! Divide that sticky dough right in half, flatten each piece into a half-inch thick rectangle, wrap it tight, and pop it in the fridge for about 2 hours, or the freezer for 30 minutes. Overnight is actually best if you have the patience!
Shaping and Baking Your Polar Bear Cookies
About 30 minutes before you want to bake, preheat your oven to 350°F (175°C) and line your sheets with silicone mats or parchment. Take one dough portion out—keep the other chilled! Dust your counter and rolling pin well with flour. Roll that dough out evenly to about 1/3 inch thick. Use your 2 1/2-inch circle cutter for the main cookie body, brushing off any extra flour.
Now, the ears! Use a 3/4-inch cutter to cut out small circles from the scraps. Trim a tiny bit off each small circle so they sit flat against the main cookie. Gently press two ear shapes onto the side of each large circle to adhere them. Pop the whole tray into the fridge for a quick 15-minute chill before they hit the heat. Bake one sheet at a time on the top rack for 12 to 14 minutes. You want them pale! Pull them out just before the edges turn brown. Let them cool on the pan for 15 minutes before moving them to a rack. Keep repeating the process with the rest of the dough!
Preparing the Sweet Vanilla Buttercream Frosting
While those cookies are cooling completely—and I mean completely!—let’s make that vanilla buttercream. Beat your 1 cup of room-temperature butter by itself for just 30 seconds until it’s creamy. Add the vanilla and salt on low speed. Now, slowly add in the powdered sugar and the heavy cream, scraping the bowl often. Beat it on low until it all comes together.
If it seems too thick to pipe, add heavy cream, one tablespoon at a time. If it’s too thin and runny, add powdered sugar, a quarter cup at a time. You want it smooth enough to pipe but stiff enough to hold its shape on your **Polar Bear Cookies**.
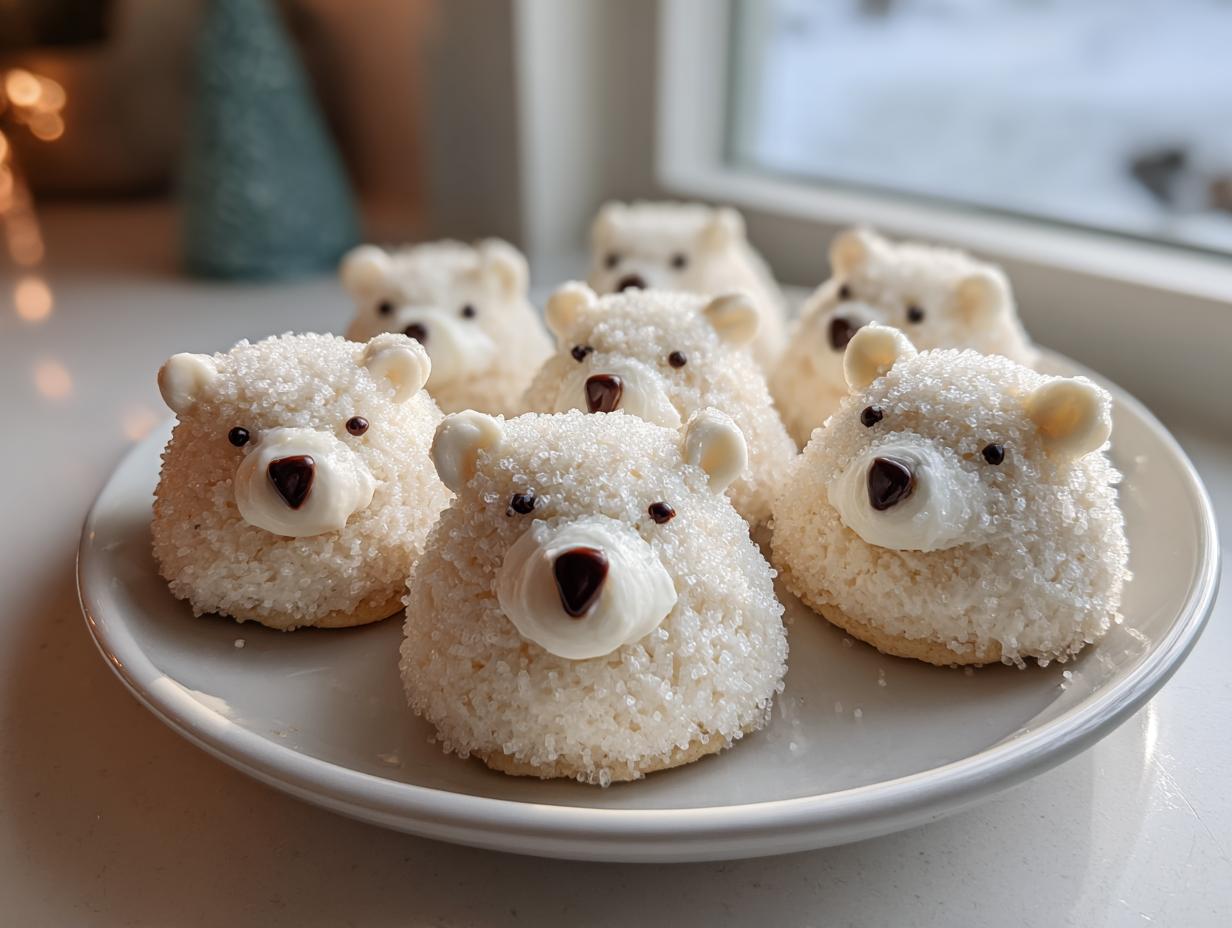
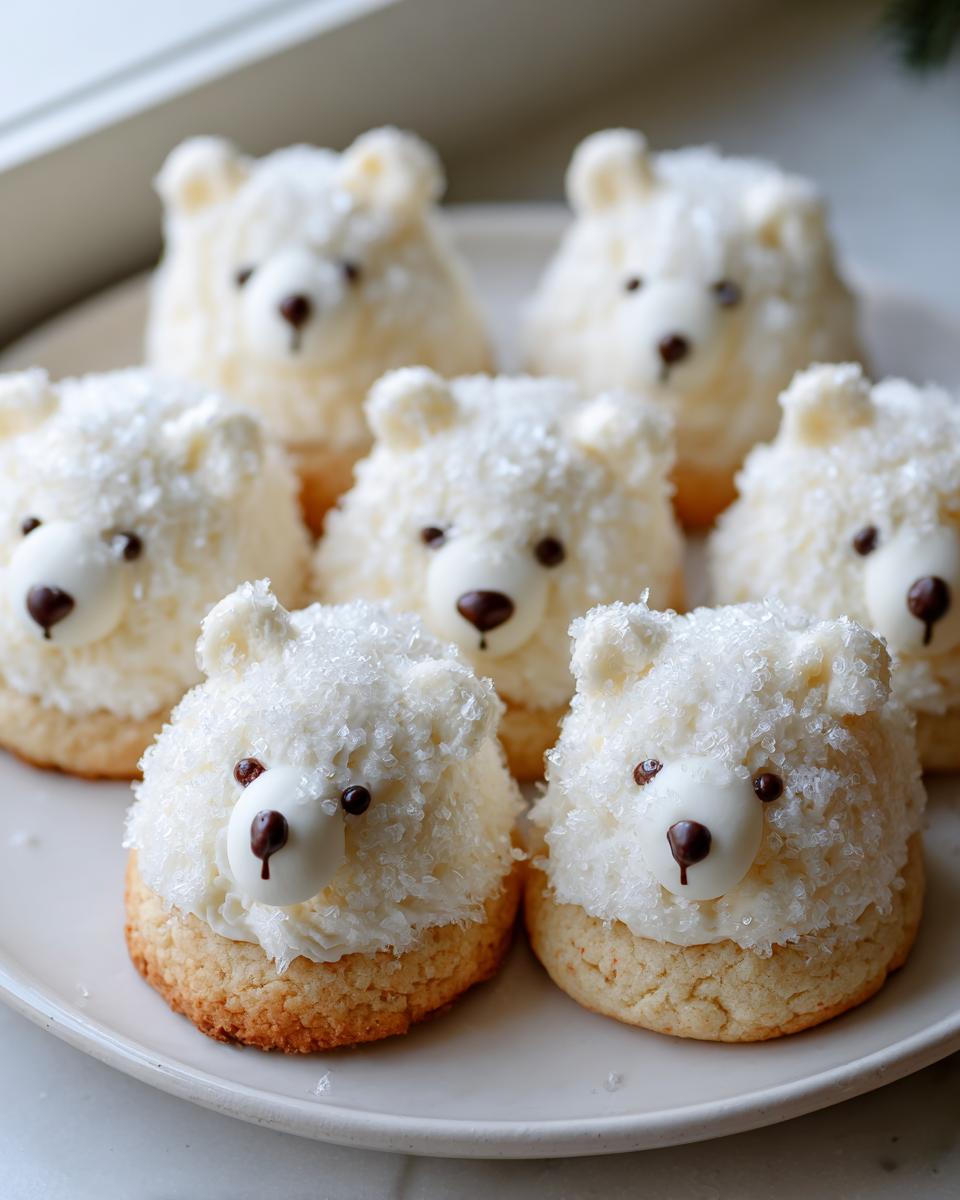
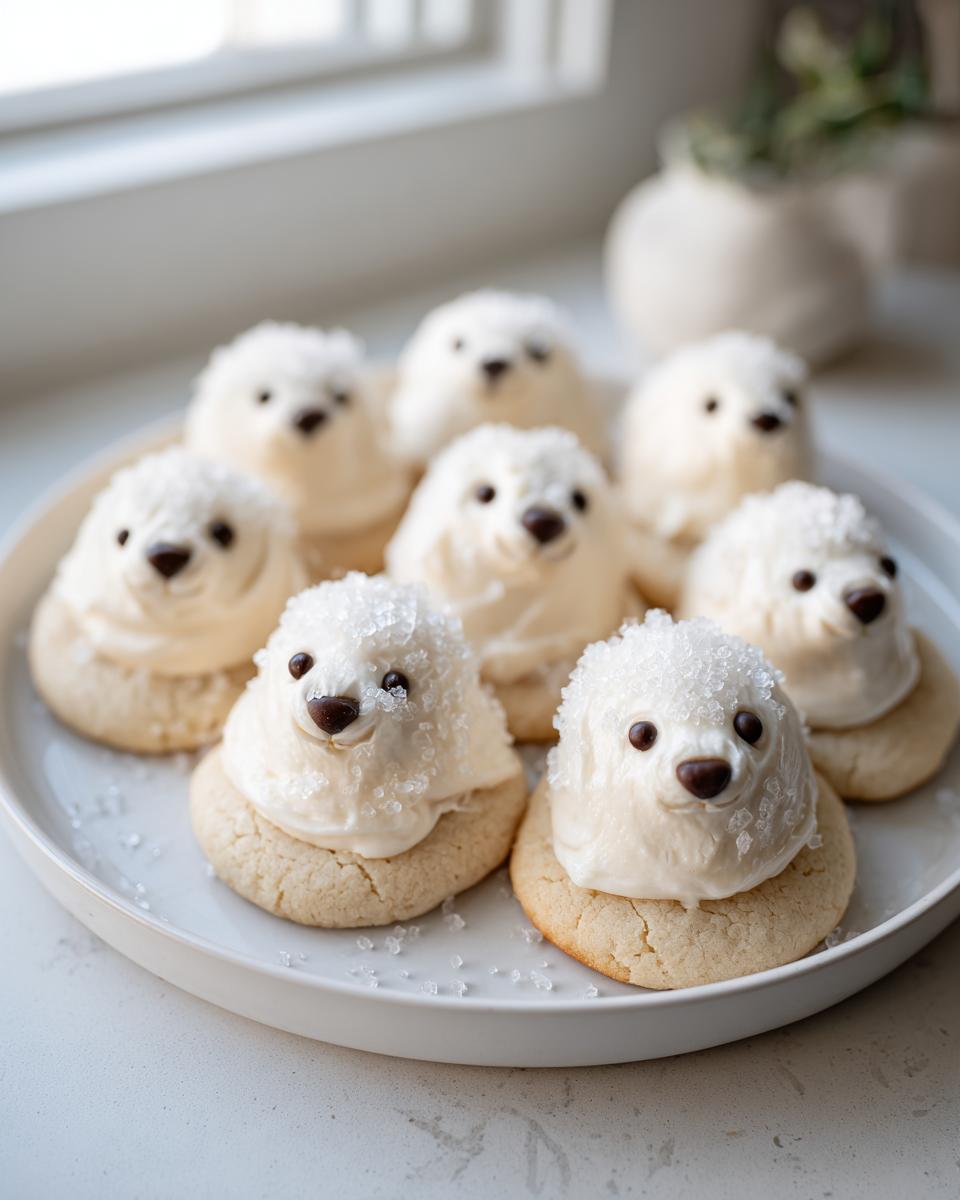
Decorating the Finished Polar Bear Cookies
Pour your white sanding sugar into a small bowl. Fit your piping bag with a medium round tip. Pipe a thin layer of frosting onto one fully cooled cookie. Then, gently press the frosted top right into that sanding sugar until it’s fully coated—this is your bear’s white fur!
Next, pipe a small oval shape near the bottom edge for the muzzle. Press one large chocolate chip right into the center of that muzzle for the nose. Finally, place two small black sprinkles for eyes and use those tiny red or pink sprinkles to represent the ears peeking out. Keep going until all your little bears are decorated!
Pro Tips for Making Exceptional Polar Bear Cookies
I’ve learned a few things over the years trying to get these soft-batch **Polar Bear Cookies** just right. The biggest challenge is keeping them soft and preventing them from spreading too much during baking. A little patience during the prep stage pays off huge in the final texture!
Dough Handling and Temperature Control
Remember how I said not to overwork the dough? That’s key! Over-mixing develops gluten, and gluten means tough cookies. Once the flour is incorporated, stop! Also, when you roll, move the dough around on your floured surface. If it sticks, lift it, dust underneath, and move it again. You need that consistent 1/3-inch thickness so the ears bake at the same rate as the body.
Baking Nuances for Softness
Always bake on the top rack if you are only using one sheet at a time. This gets them closer to the heating element for a quick set. More importantly, pull them out when they still look slightly underdone in the middle—maybe just a hint of pale color where you don’t want browning. They finish cooking on that hot baking sheet, and that’s how you guarantee that wonderful, tender bite in every **Polar Bear Cookie**.
Storing and Keeping Your Polar Bear Cookies Fresh
These cream cheese cookies really are best enjoyed within a couple of days, but luckily, they store beautifully, even with that lovely buttercream frosting on top of your **Polar Bear Cookies**. The key is keeping the air out so the frosting doesn’t get sticky or crack.
Optimal Storage Temperatures and Timelines
If you plan to eat them within two days, store them in an airtight container at room temperature—just make sure they are totally cool before you seal the lid! If you need them to last longer, the refrigerator is your friend; they should be good for up to five days in an airtight container there. For long-term storage, you can freeze the *decorated* cookies for up to a month. Always put a small piece of parchment paper between layers so the sanding sugar doesn’t stick to the frosting below it!
Answering Common Questions About Polar Bear Cookies
When I first shared this recipe, I got so many questions about the cream cheese and how to keep the little faces looking neat. Here are a few things that might help you troubleshoot or plan ahead for your next batch of **Polar Bear Cookies**.
Can I make these cookies without cream cheese?
Honestly, I wouldn’t recommend it if you want that signature soft-batch texture. The cream cheese is what keeps the cookie so tender and moist; it works with the butter to create a richer, less spread-prone base than a standard sugar cookie. If you skip it, you’ll end up with a flatter, crunchier cookie.
How far in advance can I prepare the dough?
The cookie dough base freezes like a dream! You can wrap the dough rectangles tightly in plastic wrap and freeze them for up to a month. Thaw it completely in the fridge the day before you plan to roll it out. Baked, unfrosted cookies are also fine to freeze for a month, just let them come to room temperature before you start frosting them.
What is the best way to get the sanding sugar to stick evenly?
The trick is to work quickly while the frosting is still wet and glossy—don’t let it dry out! After piping the frosting, gently press the top of the cookie straight down into the sanding sugar bowl. Don’t just sprinkle it on top. Lift it straight up, and you should have a nice, thick, even coat for your polar bear’s white fur.
Nutritional Estimate for Polar Bear Cookies
I always say that the best nutrition comes from making things with love, but for those tracking intake, here is a rough idea of what’s in one of these sugary treats. Remember, these are just estimates based on the ingredients listed. For more information on general baking science, check out resources on food science principles.
Estimated Nutritional Breakdown Table
| Nutrient | Estimated Amount |
|---|---|
| Serving Size | 1 cookie |
| Calories | Estimate 250-300 |
| Sugar | Estimate 30g |
| Fat | Estimate 15g |
| Carbohydrates | Estimate 35g |
| Protein | Estimate 3g |
Share Your Adorable Polar Bear Creations
I truly hope you love making these as much as I do! Once you finish decorating your cute little **Polar Bear Cookies**, please snap a picture and let me know how they turned out! Rate the recipe and share your decorating tips in the comments below!
Pro Tips for Making Exceptional Polar Bear Cookies
I’ve learned a few things over the years trying to get these soft-batch **Polar Bear Cookies** just right. The biggest challenge is keeping them soft and preventing them from spreading too much during baking. A little patience during the prep stage pays off huge in the final texture!
Dough Handling and Temperature Control
Remember how I said not to overwork the dough? That’s key! Over-mixing develops gluten, and gluten means tough cookies. Once the flour is incorporated, stop! Also, when you roll, move the dough around on your floured surface. If it sticks, lift it, dust underneath, and move it again. You need that consistent 1/3-inch thickness so the ears bake at the same rate as the body.
Baking Nuances for Softness
Always bake on the top rack if you are only using one sheet at a time. This gets them closer to the heating element for a quick set. More importantly, pull them out when they still look slightly underdone in the middle—maybe just a hint of pale color where you don’t want browning. They finish cooking on that hot baking sheet, and that’s how you guarantee that wonderful, tender bite in every **Polar Bear Cookie**.
Storing and Keeping Your Polar Bear Cookies Fresh
I truly hope you love making these as much as I do! Once you finish decorating your cute little **Polar Bear Cookies**, you want to keep that frosting looking perfect and the cookie soft underneath. The key here is keeping the air out so the frosting doesn’t get sticky or sink into the cookie.
Optimal Storage Temperatures and Timelines
If you plan to eat them within two days, store them in an airtight container at room temperature—just make sure they are totally cool before you seal the lid! If you need them to last longer, the refrigerator is your friend; they should be good for up to five days in an airtight container there. For long-term storage, you can freeze the *decorated* **Polar Bear Cookies** for up to a month. Always put a small piece of parchment paper between layers so the sanding sugar doesn’t stick to the frosting below it!
Answering Common Questions About Polar Bear Cookies
When I first shared this recipe, I got so many questions about the cream cheese and how to keep the little faces looking neat. Here are a few things that might help you troubleshoot or plan ahead for your next batch of **Polar Bear Cookies**.
Can I make these cookies without cream cheese?
Honestly, I wouldn’t recommend it if you want that signature soft-batch texture. The cream cheese is what keeps the cookie so tender and moist; it works with the butter to create a richer, less spread-prone base than a standard sugar cookie. If you skip it, you’ll end up with a flatter, crunchier cookie. It’s the secret to that cloud-like crumb!
How far in advance can I prepare the dough?
The cookie dough base freezes like a dream! You can wrap the dough rectangles tightly in plastic wrap and freeze them for up to a month. Thaw it completely in the fridge the day before you plan to roll it out. Baked, unfrosted cookies are also fine to freeze for a month, just let them come to room temperature before you start decorating them. That way you aren’t rushing the fun part! If you are looking for other great cookie recipes, check out my guide on Peanut Butter Cup Cookies.
What is the best way to get the sanding sugar to stick evenly?
The trick is to work quickly while the frosting is still wet and glossy—don’t let it dry out! After piping the frosting, gently press the top of the cookie straight down into the sanding sugar bowl. Don’t just sprinkle it on top. Lift it straight up, and you should have a nice, thick, even coat for your polar bear’s white fur. This gives you the best coverage for those adorable **Polar Bear Cookies**.
Nutritional Estimate for Polar Bear Cookies
I always say that the best nutrition comes from making things with love, but for those tracking things, here is a rough idea of what’s in one of these sweet, creamy **Polar Bear Cookies**. Please remember that these values are estimates only, based on the ingredients listed in the recipe. For general information on calculating nutritional values, you can consult resources like the FDA Nutrition Facts Label guidelines.
Estimated Nutritional Breakdown Table
| Nutrient | Estimate Per Cookie |
|---|---|
| Serving Size | 1 cookie |
| Calories | 250-300 |
| Sugar | 30g |
| Fat | 15g |
| Carbohydrates | 35g |
| Protein | 3g |
Share Your Adorable Polar Bear Creations
I truly hope you and your family have as much fun making these sweet, soft **Polar Bear Cookies** as I do! Once you finish decorating your cute little snowy friends, please come back and let me know how they turned out. Drop a rating below and share a picture if you can—I just love seeing your creations! If you are looking for another fun holiday treat, you might enjoy my recipe for White Chocolate Peppermint Bark Candy.
Print
Marvelous 3-Step Polar Bear Cookies Magic
- Total Time: 2 hours 59 minutes (includes chilling)
- Yield: About 30 cookies 1x
- Diet: Vegetarian
Description
Polar Bear Cookies. These soft-batch cream cheese cookies are topped with white sanding sugar frosting and decorated to look like adorable polar bears. You get a tender cookie base and sweet vanilla buttercream.
Ingredients
- 3/4 cup (1 1/2 sticks) unsalted butter, room temperature 170g
- 1/2 cup or 4 oz. full fat cream cheese, room temperature 113g
- 1 1/2 cups granulated sugar 300g
- 1 large egg, room temperature 56g
- 2 tsp vanilla extract or vanilla bean paste 8g
- 3 cups all-purpose flour 375g
- 1 Tbsp cornstarch 8g
- 1/2 tsp baking powder 2g
- 1/2 tsp fine salt 3g
- 1 cup unsalted butter, room temperature 226g (for frosting)
- 1 Tbsp vanilla extract or vanilla bean paste 12g (for frosting)
- 1/2 tsp fine salt 3g (for frosting)
- 3 1/2 cups powdered sugar 454g or 1 lb. box (for frosting)
- 1/4 cup heavy whipping cream, room temperature 60g (for frosting)
- 1 cup coarse sanding sugar (for decoration)
- 30 large chocolate chips (for nose)
- Round black sprinkles (for eyes)
- Round red or pink sprinkles (for ears)
Instructions
- Beat 3/4 cup butter and 1/2 cup cream cheese in a large bowl on medium speed until smooth.
- Add 1 1/2 cups granulated sugar. Mix on medium-high speed until the mixture lightens in color.
- Add 1 egg and 2 tsp vanilla extract. Mix on medium speed until incorporated.
- In a separate bowl, whisk together 3 cups flour, 1 Tbsp cornstarch, 1/2 tsp baking powder, and 1/2 tsp salt.
- Add the flour mixture into the butter mixture in two additions, mixing on low speed until JUST incorporated. Scrape the bowl sides between additions.
- Divide the sticky dough in half, flatten into 1/2 inch thick rectangles, and wrap in plastic wrap.
- Chill the dough for about 2 hours in the fridge or 30 minutes in the freezer, or overnight in the fridge.
- Preheat your oven to 350°F/175°C about 30 minutes before rolling. Line two baking sheets with silicone mats or parchment paper.
- Take one dough portion out. Dust the dough and rolling pin with flour. Roll out the dough on plastic wrap to 1/3 inch thick.
- Cut out 2 1/2 inch circles for the cookies, brushing off excess flour. Place cookies 1 inch apart on prepared sheets.
- Use a 3/4-inch circle cutter to cut out small circles for ears from the remaining dough. Cut a small bit off each small circle to help ears sit flush.
- Place two small ear shapes on the side of each larger circle cookie, gently pressing where they meet to adhere.
- Chill the cut-out cookies for 15 minutes in the fridge or 5 minutes in the freezer.
- Bake one sheet at a time on the top rack for 12-14 minutes. Pull them out before the edges brown.
- Let baked cookies cool on the pan for 15 minutes, then transfer to a wire rack to finish cooling.
- Knead dough scraps together, rewrap, and chill while the first batch bakes and cools. Repeat steps 9-12 with the second dough portion and scraps.
- For the frosting: Beat 1 cup of butter on medium speed for 30 seconds until smooth.
- Mix in 1 Tbsp vanilla and 1/2 tsp salt on low speed.
- Gradually mix in 3 1/2 cups powdered sugar and 1/4 cup heavy cream. Scrape the bowl as needed. Beat on low until incorporated and the desired consistency is reached.
- Adjust thickness with more cream (1 Tbsp at a time) if too thick, or more powdered sugar (1/4 cup at a time) if too thin.
- Place frosting into a piping bag fitted with a medium round tip (like Wilton 10) or cut a 1 cm opening. Set aside.
- Pour about 1 cup of white sanding sugar into a small bowl.
- Once cookies are fully cool, pipe a thin layer of frosting on top of one cookie.
- Gently press the cookie into the sanding sugar until the entire top is covered.
- Pipe a small oval muzzle toward the bottom. Gently press a large chocolate chip into the top of the muzzle for the nose.
- Use black sprinkles for the eyes and red or pink sprinkles for the ears.
- Repeat with remaining cookies.
Notes
- This recipe yields about 30, 2 1/2-inch circular cookies. Yield and bake time change based on cutter size.
- You can halve this recipe (use half an egg), but do not double it without a commercial mixer.
- Store frosted cookies airtight for up to 2 days at room temperature, 5 days in the fridge, or up to a month in the freezer.
- Chill frosted cookies thoroughly before stacking, placing parchment paper between layers.
- Cookie dough can freeze for up to 1 month tightly wrapped. Thaw in the fridge the day before rolling.
- Baked, unfrosted cookies also freeze up to a month airtight. Thaw to room temperature before decorating.
- Cream butter, cream cheese, and sugar well for fluffy, soft cookies.
- Do not overwork the dough to prevent tough cookies.
- Roll dough to a consistent 1/3 inch thickness for even baking.
- Chill dough to prevent spreading and keep cookies soft.
- Flour your counter liberally and move the dough as you roll and cut.
- Slightly underbake cookies; they continue to cook after removal from the oven.
- Feel free to improvise decorations using what you have or use fondant.
- Prep Time: 45 minutes
- Cook Time: 14 minutes
- Category: Dessert
- Method: Baking and Frosting
- Cuisine: American
Nutrition
- Serving Size: 1 cookie
- Calories: Estimate 250-300
- Sugar: Estimate 30g
- Sodium: Estimate 100mg
- Fat: Estimate 15g
- Saturated Fat: Estimate 9g
- Unsaturated Fat: Estimate 6g
- Trans Fat: Estimate 0g
- Carbohydrates: Estimate 35g
- Fiber: Estimate 0.5g
- Protein: Estimate 3g
- Cholesterol: Estimate 40mg