Skip to content

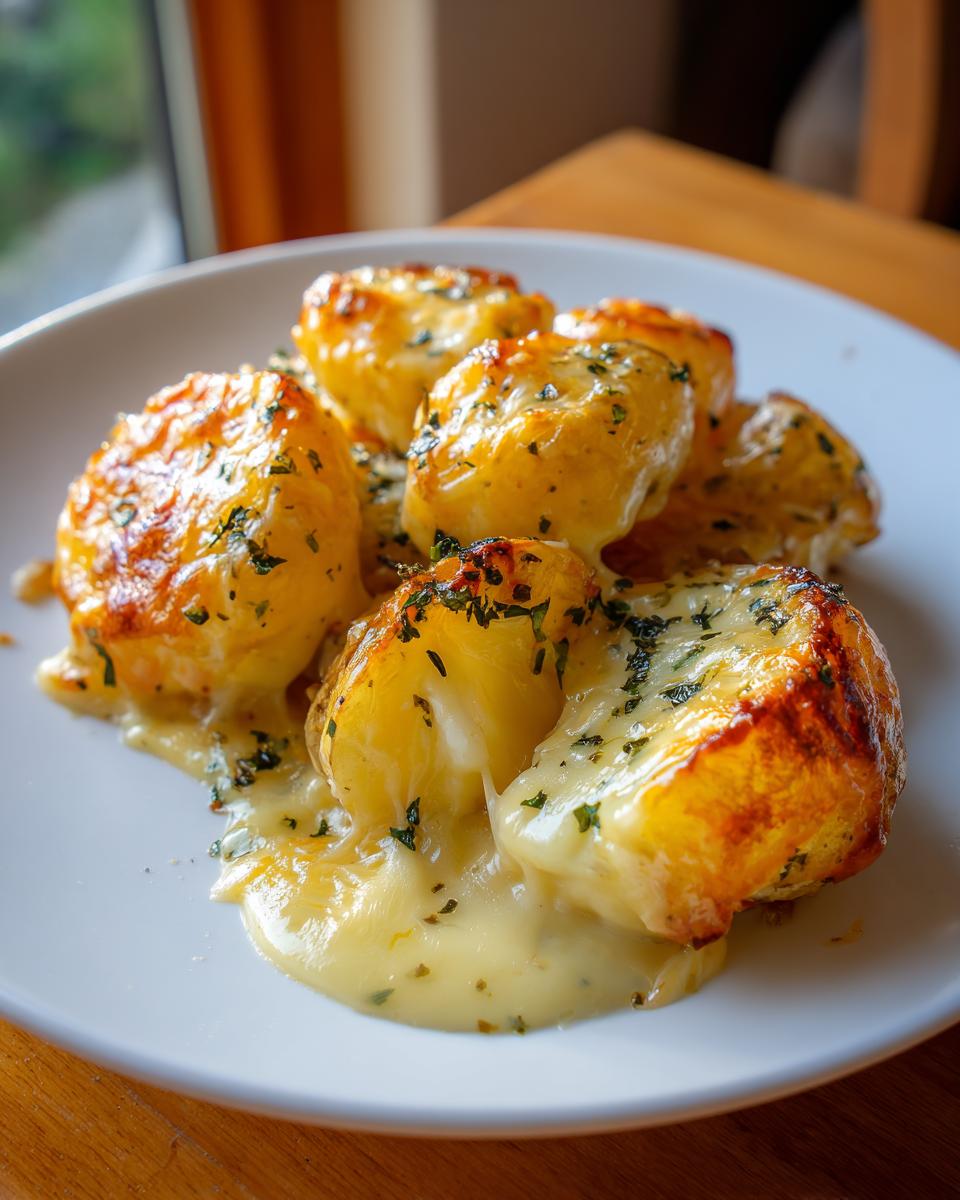
When I think about the perfect dinner centerpiece, it’s not just the roast meat that matters—it’s those supporting players. And honestly, nothing steals the show quite like a plate piled high with rich, bubbly Cheesy Garlic Potatoes. Hello there! I’m Anna Kowalska, and here I share tried-and-true homemade recipes that you and your family will love. Everything here is made with heart and flavor, built on years of cooking for crowds. I’ve learned that side dishes are where you can really let your personality shine through without the pressure of the main course. This creamy, garlicky bake is my go-to for making any Tuesday feel like a celebration.
Why I Developed This Cheesy Garlic Potatoes Recipe
You know how some side dishes are fine, but they never quite wow anyone? I got tired of those! For years, I kept trying different potato bakes for Sunday roasts, but they were always either too dry or too watery. I wanted that perfect, decadent texture—tender potatoes swimming in savory cream, topped with a crust that crunches just right when you dig in. It took me nearly six tries to nail the parboiling time and the cream-to-potato ratio just so. Now, when I pull this dish out of the oven, I know I have perfected the ultimate comfort food. Trust me, once you nail this technique, you’ll feel like the undisputed queen (or king!) of the creamy potato side dish. It’s all about precision, and I’ve done the hard work so you don’t have to!
Jump to:
Gather Your Ingredients for Cheesy Garlic Potatoes
Making these incredible Cheesy Garlic Potatoes is surprisingly quick once you have everything ready to go. Since the cooking time is short, you want to make sure your prep is spot on. Don’t skimp on the cheese sharpness here—it makes a huge difference in cutting through all that richness! Having everything measured out means we can get those potatoes into the oven fast.
Precise Ingredient List
| Ingredient | Amount/Specification |
|---|---|
| Blas y Tir Potatoes (or similar waxy type) | 1000 g |
| Double Cream (High fat content is key!) | 500 ml |
| Mature Welsh Cheddar Cheese | 250 g, freshly grated |
| Garlic | 2 tsp, finely chopped or paste |
Equipment Needed for Perfect Cheesy Garlic Potatoes
You don’t need a dozen fancy gadgets for this, thank goodness! Just the basics will do the trick. Make sure your saucepan is large enough for a quick boil. You will definitely need a sturdy colander for draining the hot potatoes, and of course, a good, oven-safe baking dish—I prefer one about 9×13 inches for this amount of mixture.
Step-by-Step Guide to Making Cheesy Garlic Potatoes
Alright, this is where the magic happens! Getting this sequence right is what separates a decent potato side from truly show-stopping Cheesy Garlic Potatoes. We’re moving fast, so have your oven mitts handy once we get to the baking part. Don’t rush the initial cook, though; that’s the secret to making sure the potatoes are tender inside before they get smothered in cheese!
Potatoes Preparation and Parboiling
First things first, let’s get those potatoes ready. I usually go for the Blas y Tir because they hold their shape nicely. Take your 1000g of potatoes—if they are small baby potatoes, just slice them right in half. If you’re using the bigger Rudolph ones, cut them into nice, even chunks, maybe about an inch thick. This ensures they all cook at the same speed. Now, bring a decent-sized saucepan of water to a good simmer. Drop the potatoes in and let them boil for about 10 minutes. You aren’t trying to make them mushy, mind you! They should be just starting to soften when you poke them with a fork—that’s parboiled. If you leave the skins on, give them a good scrub first, though I personally prefer peeling the larger ones for this recipe for that super-smooth texture.
Assembling the Cheesy Garlic Potatoes Base
While those are simmering, get your oven preheated to 180°C. That’s a steady medium heat. Once the 10 minutes are up, drain those hot potatoes really well in a colander—we don’t want watery potatoes! Dump them straight into your baking dish. Now, grab your cream and garlic. Pour that generous 500ml of double cream right over the potatoes. Then, sprinkle in your 2 teaspoons of chopped garlic. This is the part where you need to be patient for just a moment: use a large spoon and gently turn everything over. You need to make sure every single potato piece is coated in that heavenly garlic cream mixture. Don’t smash them up, just gently fold them until they look glossy.
Baking for a Golden Finish
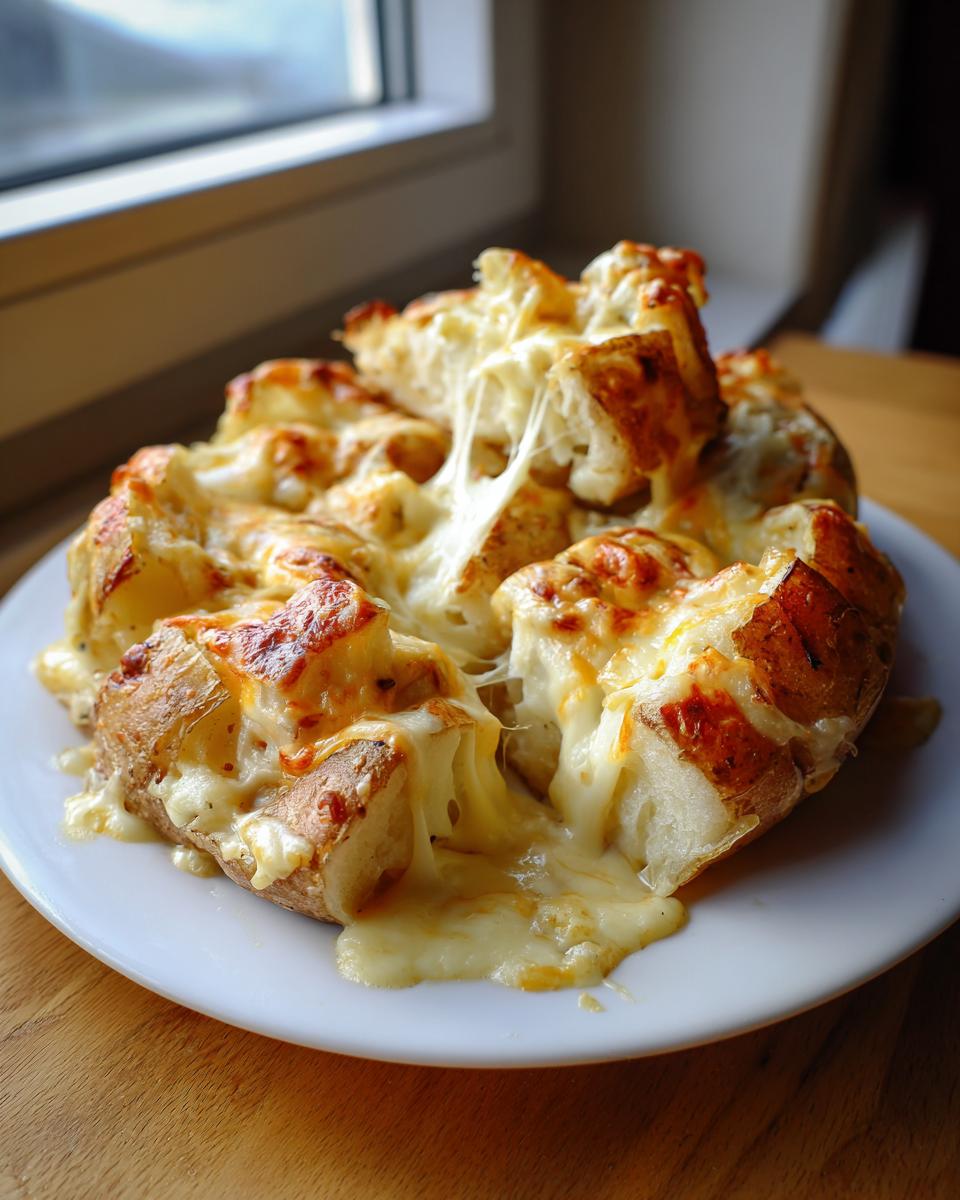
Once everything is coated, it’s time for the star ingredient! Sprinkle that 250g of sharp cheddar cheese evenly over the top. Don’t pile it all in one corner; spread it out so you get that perfect crust everywhere. Pop the dish into the preheated oven. You’re looking for about 15 to 20 minutes. Keep an eye on it after the 15-minute mark—you want that cheese to be bubbling, melted, and beautifully golden brown. If it looks like it’s browning too fast, just loosely tent it with some foil. When it comes out, the smell alone will tell you you’ve succeeded! Serve these creamy beauties right away while they are piping hot.
Tips for Achieving Creamy Cheesy Garlic Potatoes Success
Honestly, making great Cheesy Garlic Potatoes comes down to avoiding a few rookie mistakes that can ruin that perfect creaminess we’re aiming for. The absolute biggest tip I can give you revolves around that initial parboiling step. If you skip it or undercook them, the center of the potatoes will still be hard when the cheese burns on top. Don’t do it! Ten minutes is non-negotiable for those chunks to soften just enough.
Another thing people often mess up is draining the potatoes. Make sure they are really, really drained after boiling. Any excess water is just going to thin out your gorgeous double cream, and you’ll end up with soup instead of a sauce. Let them steam dry in the colander for a minute or two—it helps!
When you mix everything together, remember you’re coating, not mashing. Use a large spatula and fold gently. We want tender potatoes, not mashed potatoes! If you over-mix, you start breaking down the starch, and that can make the final dish gluey instead of luxuriously creamy. Follow these small steps, and your Cheesy Garlic Potatoes will be legendary at your next gathering.
Ingredient Clarity and Substitutions for Cheesy Garlic Potatoes
I get so many questions about what happens if someone doesn’t have Blas y Tir potatoes on hand or if they need to swap out the dairy. It’s important to know that while the recipe is written specifically for maximum flavor, you can make smart swaps without ruining your Cheesy Garlic Potatoes. Flexibility is key in a home kitchen, but we always want to protect that creamy texture!
The main thing to remember is that we are aiming for richness. If you try to cut back too much on the fat, the potatoes won’t absorb the flavor correctly, and the sauce will feel thin. Don’t worry if you need to adjust things slightly based on what you have tucked away in the fridge.
Handling Dairy Components
When it comes to the cream, double cream is my absolute favorite because it has the highest fat content, which equals the richest sauce. If you only have heavy cream, that’s a perfectly fine substitute—use the same amount. However, please avoid milk or half-and-half; they just won’t give you that luxurious mouthfeel we want in these Cheesy Garlic Potatoes. For the cheese, sharpness matters! Use a mature or extra-mature cheddar. If you use a mild cheddar, the cheese flavor gets completely lost under all that garlic and cream. If you can source a Red Leicester, it melts beautifully and adds a lovely color, too!
Potato Type Considerations
The recipe calls for waxy potatoes like Blas y Tir because they hold their structure well when boiled and baked. If you use starchy potatoes, like Russets, they break down too easily during the parboiling stage, which can lead to a slightly gluey texture in the final bake. If Russets are all you have, cut them larger than usual and only boil them for about 6 or 7 minutes max. Yukon Golds are another fantastic option if you can find them; they offer a great balance of waxy and creamy!
Serving Suggestions for Your Cheesy Garlic Potatoes
Honestly, these potatoes are so rich and satisfying, they practically demand a very simple main course alongside them. Since they are so heavy on dairy and garlic, you want something that cuts through that richness a little bit. My family usually pairs this dish with something roasted and lean.
They are absolutely perfect alongside a simple roast chicken or perhaps a slow-cooked pork loin. If you’re doing a vegetarian spread, try serving them with some bright, slightly bitter greens, like quickly sautéed kale or roasted asparagus tossed with lemon zest. The acidity from the lemon really wakes up the palate after a bite of the creamy cheese.
They also make a fantastic addition to a holiday table, standing up well next to ham or turkey. Just remember, they are decadent! You don’t need a lot of fuss with the rest of the plate when you’ve got these beauties on standby.
Storing and Reheating Your Cheesy Garlic Potatoes
Nobody wants to waste leftovers, especially not something this delicious! If you have any Cheesy Garlic Potatoes left over—which is rare in my house, trust me—you need to handle them right for reheating. The biggest challenge with creamy, cheesy bakes is that the sauce can separate or dry out when you try to warm them up again. The key is gentle heat.
Don’t just throw them in the microwave and blast them; that can make the cream rubbery. The best way is to add a splash of extra milk or cream before you reheat them. This helps bring back some of that initial moisture. Here’s my quick guide to keeping your leftovers perfect:
| Storage Method | Duration | Reheating Tip |
|---|---|---|
| Airtight Container (Fridge) | Up to 3 days | Bake at 160°C with a splash of cream until warmed through. |
| Freezer | Up to 1 month | Thaw overnight, then bake as above. May lose a little texture. |
Frequently Asked Questions About Cheesy Garlic Potatoes
I always get the same questions when people try this recipe for the first time, and that’s totally normal! It’s a rich dish, so people want to make sure they get that creamy texture just right. Here are a few things I hear most often about making these Cheesy Garlic Potatoes.
Q1. Can I make this ahead of time?
Yes, you absolutely can! I often parboil the potatoes and mix them with the cream and garlic mixture the day before. Keep that assembled dish covered tightly in the fridge. Then, when you’re ready to serve, just top with the cheese and bake as directed. You might need to add about five extra minutes to the baking time since the mixture starts cold.
Q2. What cheese works best if I don’t have mature cheddar?
While mature cheddar is my favorite for that sharp bite, Gruyère is a fantastic substitute if you want something a little nuttier. It melts like an absolute dream! Just make sure whatever cheese you choose is grated fresh; pre-grated cheese has anti-caking agents that stop it from getting that beautiful, bubbly crust on top of your Cheesy Garlic Potatoes.
Q3. Can I skip the parboiling step?
Oh, please don’t! That parboiling is crucial for ensuring the inside of the potato is tender before the outside gets scorched. If you skip it, you’ll end up with hard centers inside your creamy sauce. Just stick to that 10 minutes in simmering water; it’s worth the small effort.
Q4. Is there a way to make this dish lighter?
If you must! You can swap the double cream for a mix of half single cream and half whole milk, but I warn you, it won’t be nearly as decadent. For the best results in these Cheesy Garlic Potatoes, you really need that fat content! For a lighter potato side, you might consider a mashed potato alternative.
Share Your Cheesy Garlic Potatoes Experience
I put my heart and soul into making sure this recipe works perfectly for you every time. Now it’s your turn! If you whip up a batch of these incredible Cheesy Garlic Potatoes, please come back and let me know how they turned out. Drop a rating below or share your favorite main course pairing in the comments. I absolutely love hearing about your kitchen successes!
Print
Amazing 10 Cheesy Garlic Potatoes Secrets
- Total Time: 35 minutes
- Yield: 4 servings 1x
- Diet: Vegetarian
Description
This recipe for Cheesy Garlic Potatoes delivers a rich, creamy side dish perfect for any meal. Tender potatoes, fragrant garlic, and sharp cheddar cheese bake together under a golden crust.
Ingredients
- 1000 g Blas y Tir Potatoes
- 500 ml Double Cream
- 250 g Mature Welsh Cheddar Cheese, grated
- 2 tsp Garlic, chopped (or jarred paste)
Instructions
- Slice the baby potatoes in half or cut Rudolph potatoes into chunks. Leave skins on Rudolph potatoes if you prefer.
- Bring a saucepan of water to a simmer. Add the potatoes and cook for about 10 minutes until parboiled.
- Preheat your oven to 180°C.
- Drain the parboiled potatoes using a colander. Empty them into a large baking dish.
- Pour the double cream over the potatoes and sprinkle with the chopped garlic.
- Use a spoon to turn the potatoes, coating every piece with the cream and garlic mixture.
- Sprinkle the grated cheddar cheese evenly over the top layer.
- Place the dish in the oven for 15 to 20 minutes, or until the cheese topping is golden brown.
- Serve the potatoes right away.
Notes
- Ensure potatoes are par boiled for even cooking and a creamy, cheesy finish.
- Prep Time: 10 minutes
- Cook Time: 25 minutes
- Category: Side Dish
- Method: Baking
- Cuisine: British/European
Nutrition
- Serving Size: 1 serving
- Calories: N/A
- Sugar: N/A
- Sodium: N/A
- Fat: N/A
- Saturated Fat: N/A
- Unsaturated Fat: N/A
- Trans Fat: N/A
- Carbohydrates: N/A
- Fiber: N/A
- Protein: N/A
- Cholesterol: N/A