Skip to content

If you are tired of complicated recipes that take all day but still leave you hovering anxiously by the oven, then you are in the right place! My goal with every single recipe is to give you maximum flavor payoff for minimum effort. I’m Anna Kowalska, and here I share tried-and-true homemade recipes that you and your family will love. Everything here is made with heart and flavor, designed to bring joy back to your kitchen without stressing you out.
When game day rolls around, or we have unexpected guests drop by, I always reach for something that requires zero cooking time but tastes like I spent hours on it. That’s exactly what you get with this incredible Tex‑Mex Layered Dip. Seriously, it’s the appetizer everyone asks for! It’s vibrant, it’s creamy, and it’s ready faster than you can find the serving spoons.
Forget fancy techniques; this dip is all about layering fresh, bold Tex-Mex flavors into one perfect scoop. Let’s get this party started!
Jump to:
Why You Will Love This Tex‑Mex Layered Dip
This isn’t just another party snack; it’s the guaranteed crowd-pleaser that lets you actually enjoy your own party! I keep coming back to this recipe because it checks every box a busy host needs. It’s minimal effort for maximum impact, which is exactly what we all need sometimes.
- It’s shockingly fast—we’re talking 15 minutes, tops, before it hits the table.
- It’s vegetarian, so it pleases almost everyone in the crowd.
- The Tex‑Mex Layered Dip looks incredible sitting out, bright and colorful.
- Every chip scoop gets a little bit of everything: creamy, savory, and fresh!
Quick Assembly for Any Event
Seriously, 15 minutes. That’s the beauty of this dip. There’s no baking, no simmering, and no complicated whisking involved. You’re just spreading things out in order. If you can operate a spoon, you can make this dip perfectly. It’s my go-to when the doorbell rings unexpectedly!
Flavor and Texture Contrast
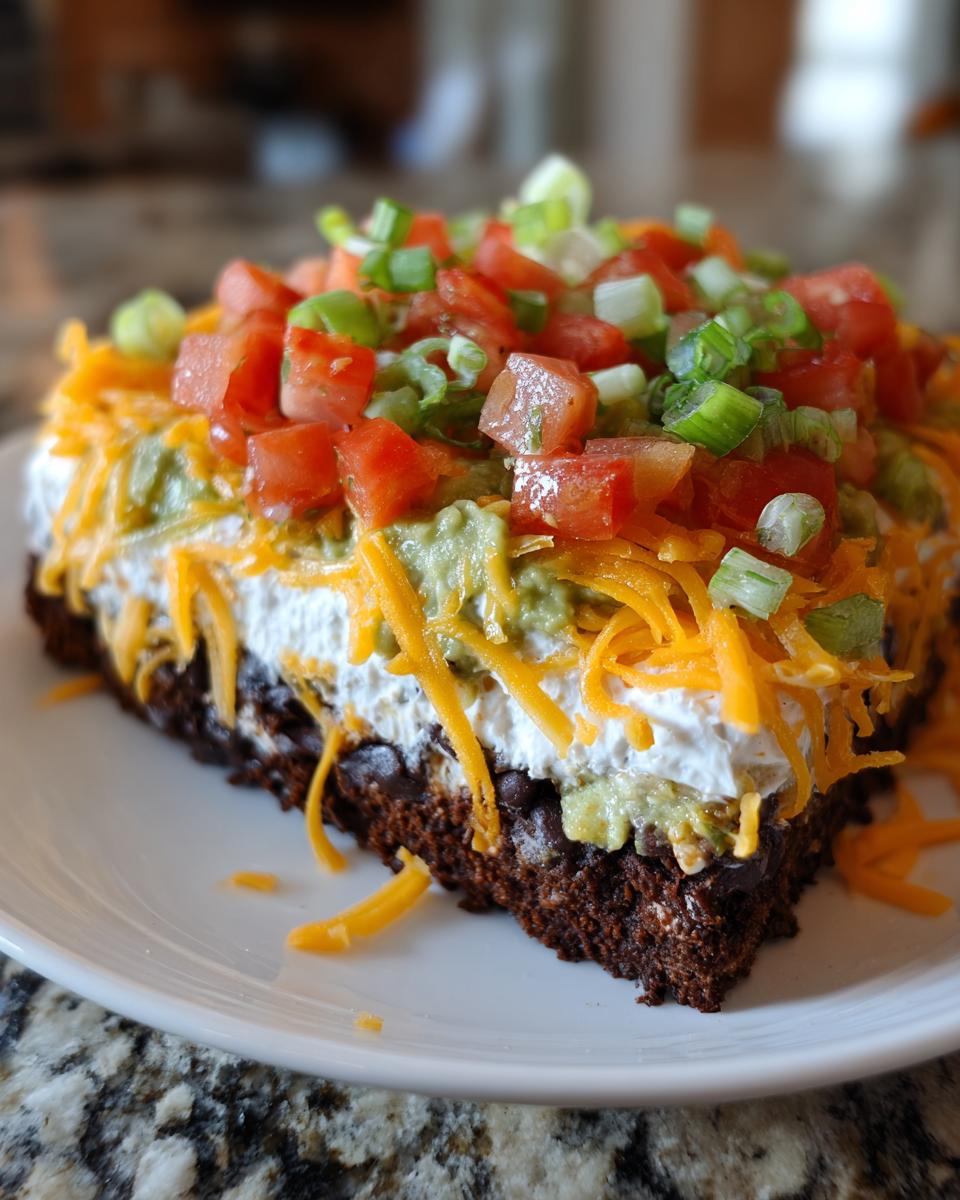
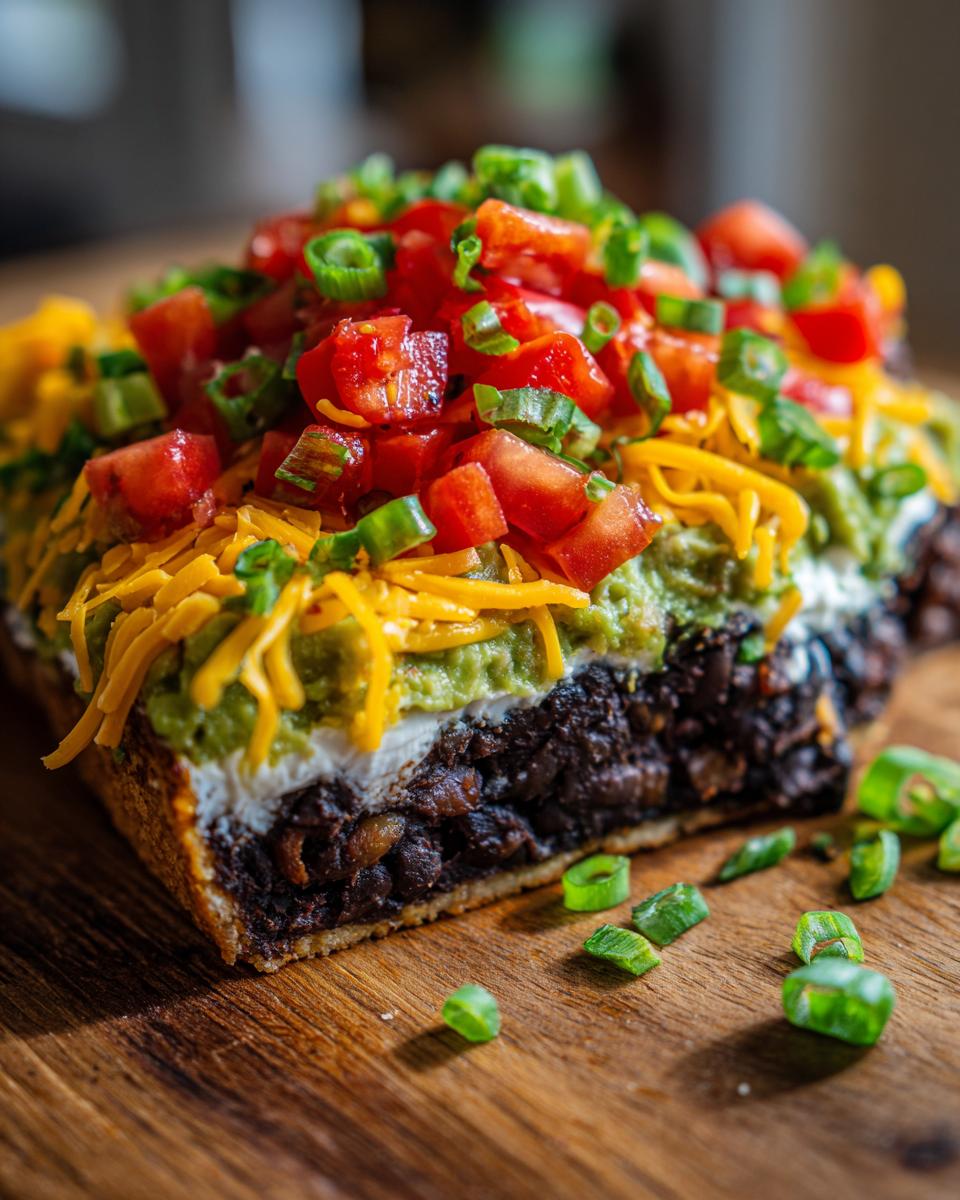
What makes this dip sing is how the textures play together. You get that hearty, slightly spicy base from the beans, followed by the cool, smooth blanket of sour cream. Then you hit the rich, buttery guacamole, and finally, that pop of fresh tomato and onion on top. It’s a textural masterpiece, honestly!
Gathering Everything for Your Tex‑Mex Layered Dip
Okay, before we start layering this amazing Tex‑Mex Layered Dip, we need to make sure our ingredients are ready to go. Since there’s no cooking involved, the quality of what you bring to the table really matters here. I always lay everything out on the counter first—it keeps me organized and prevents those frantic searches for the green onions when I’m supposed to be spreading the sour cream!
Prep work is key for this 15-minute wonder. Make sure your tomatoes and onions are chopped nice and small, and your cheese is already shredded. We want smooth assembly, not a choppy mess!
Essential Ingredients List
Here’s what you’ll need. Don’t be afraid to use your favorite brand for the salsa; that’s part of what makes it *your* dip!
| Component | Preparation Note |
|---|---|
| Refried Black Beans | Mix well with chunky salsa until combined. |
| Sour Cream | Use full-fat for the best texture. |
| Guacamole | Best if freshly made, but store-bought works in a pinch. |
| Shredded Cheddar Cheese | Make sure it’s fully shredded, not sliced. |
| Tomato | Finely chopped. |
| Green Onions (Scallions) | Thinly sliced. |
Necessary Kitchen Tools
You don’t need much fancy gear for this, thankfully! The most important thing is getting the right dish. I find a 9-inch pie plate or a shallow 8×8 square dish works best because it lets you keep the layers visible and easy to scoop.
- A sturdy serving dish (9-inch round or similar depth).
- Two offset spatulas or butter knives for spreading the layers smoothly.
- A medium mixing bowl for combining the beans and salsa.
Mastering the Steps for Your Tex‑Mex Layered Dip
This is where the magic happens! Because we aren’t cooking anything, the success of this Tex‑Mex Layered Dip relies entirely on how neatly and evenly you spread those layers. A sloppy base means a messy dip by the time people get to the bottom layer. Trust me, I learned this the hard way when I rushed spreading the sour cream once—it ended up looking like a muddy landslide!
Preparing the Base Layer
First things first: the beans. Take your refried black beans and scoop them into a bowl. Now, dump in your favorite chunky salsa. I try to use a salsa that has a good amount of liquid, but not so much that it makes the beans runny. Mix this together really well. You want a uniform, thick paste. If it seems too stiff, add a tiny splash of water or extra salsa until it spreads nicely. Then, spread this mixture directly into the bottom of your serving dish. Use the back of a spoon or a small offset spatula and press it down firmly and evenly across the entire bottom. This solid base is crucial for holding everything else up!
Building the Creamy Middle Layers
Next up is the sour cream. This layer needs to be smooth and completely cover the beans, sealing in that flavor. If you try to spread the sour cream straight out of the fridge, it tends to tear up the bean layer underneath. So, let it sit on the counter for maybe 10 minutes first. Gently spread it over the beans. Don’t press too hard here; we are just creating a smooth, white cushion. If you’re using the optional spice mix I mentioned earlier, this is the time to stir it right into the sour cream before it hits the dip!
Now for the guacamole. This is the layer where you need to be careful not to mix things up. Guacamole is delicate! Spread it gently over the sour cream. If your guac is a little chunky, that’s fine, but try to keep the layer relatively consistent in thickness. If you find your spatula dragging the sour cream up, just smooth it gently. The contrast between the cool white layer and the vibrant green layer is what makes the Tex‑Mex Layered Dip look so appealing.
Final Toppings and Presentation
We’re almost done! Sprinkle that shredded Cheddar cheese evenly over the guacamole. You don’t need a ton, just enough for that lovely salty, sharp bite when you hit it. Then, take your finely chopped tomatoes and green onions and scatter them lightly over the cheese. Don’t dump them all in one spot—take your time to distribute them so every chip gets a little bit of fresh crunch and color.
Here’s my presentation secret: I always try to keep the toppings slightly away from the very edge of the dish. This lets the colors of the layers underneath peek out, making the whole dip look more professional and tempting on the table. That’s it! Serve it immediately with a big stack of sturdy chips!
Tips for Perfect Tex‑Mex Layered Dip Assembly
Even though assembling this Tex‑Mex Layered Dip takes only a few minutes, paying attention to timing can make the difference between a beautiful appetizer and one that starts looking sad halfway through the party. Since there’s no baking involved, freshness is our number one priority. A little bit of planning goes a long way to keep those layers looking bright and distinct!
Timing the Guacamole Addition
I cannot stress this enough: the guacamole layer has to be the last one you put on before the cheese and veggies, especially if you’ve prepped the bottom layers ahead of time. Guacamole is notorious for browning quickly once exposed to air. If you’re making the dip an hour ahead, keep the bean, sour cream, and cheese layers ready in the fridge, covered tightly. Right before your guests arrive, whip up your guac or open the container, spread it on top of the cheese layer (yes, sometimes I layer it over the cheese if the sour cream is too soft, just to protect it!), and then top quickly with the tomatoes and onions. That fresh green color is what sells the dip!
Flavor Boosts for the Sour Cream
If you want to elevate this beyond just simple sour cream, I highly recommend giving it a little zing. You don’t need anything complicated! Grab a small packet of taco seasoning—you know, the kind you use for ground beef—and mix about one teaspoon of the powder right into your sour cream before you spread it. It gives that layer a little savory depth that complements the beans underneath without overpowering the fresh toppings. It’s a super easy trick that makes the whole Tex‑Mex Layered Dip taste like you spent way more time on it than you actually did. Just make sure it’s fully incorporated so you don’t get a salty clump!
Storing and Serving Your Tex‑Mex Layered Dip
This dip is definitely best when served within an hour or two of assembly, mostly because of that beautiful, bright green guacamole layer. If you have leftovers, or if you want to be super prepared, you can absolutely save some of the components. Just remember, this isn’t really a dip you reheat—it’s meant to be served cold and fresh!
If you need to store the finished dip, cover it tightly with plastic wrap, making sure the wrap touches the top layer of onions and tomatoes to slow down browning. It’ll keep okay in the fridge for about 24 hours, but the texture might soften up a bit after that first day.
Best Practices for Make-Ahead Preparation
The secret to make-ahead success is separating the ingredients that go bad first. The bean layer and the sour cream layer are totally fine to make the day before. Mix your beans and salsa, spread it out, and cover it. Do the same for the sour cream layer if you’re adding seasoning. But here’s the rule: keep the guacamole, cheese, tomatoes, and green onions separate!
You should only add the guacamole and the fresh toppings right before you serve the Tex‑Mex Layered Dip. If you absolutely have to prep the guac ahead, squeeze a little lime juice over it and press plastic wrap directly onto its surface to block the air. It’s much better if you just make it fresh, though!
| Component | Make-Ahead/Storage |
|---|---|
| Bean Layer | Make up to 1 day ahead; refrigerate tightly covered. |
| Sour Cream Layer | Make up to 1 day ahead; refrigerate tightly covered. |
| Guacamole/Toppings | Add immediately before serving for best color and texture. |
| Reheating | Do not reheat. Serve chilled or at cool room temperature. |
Frequently Asked Questions About This Tex‑Mex Layered Dip
I get so many questions about customizing this dip because everyone wants to make it fit their party perfectly. It’s truly adaptable! Here are some of the most common things people ask me when they are planning to serve this amazing Tex‑Mex Layered Dip.
Can I make this recipe vegan?
You absolutely can pivot this recipe to be plant-based! It takes just a few easy swaps. For the sour cream, use a store-bought vegan sour cream alternative—they are fantastic now. For the cheese, use your favorite shredded vegan cheddar blend. The bean layer, guacamole, tomatoes, and onions are already vegan friendly, so you’re mostly just swapping out the dairy. It still layers beautifully and tastes just as vibrant!
What chips work best for dipping?
This is important! Because this Tex‑Mex Layered Dip has substantial layers, you need a chip that can handle the weight without immediately snapping off. Skip the flimsy tortilla chips. I always go for thick, restaurant-style tortilla chips, or even better, scoop-shaped chips. If you’re serving blue corn chips, they tend to be sturdier too. You want a chip that can scoop right down to the bottom layer and bring up a bit of everything—bean, sour cream, and guac—in one go!
Can I prepare the entire dip ahead of time?
You can prep about 75% of it! As I mentioned before, the bean layer and the sour cream layer are perfect to make the night before. However, if you assemble the entire Tex‑Mex Layered Dip including the guacamole and fresh toppings, the guacamole will likely turn brown and the onions will get soggy overnight. For the best results, prep the base layers, cover them, and then add the guacamole, cheese, tomatoes, and onions right before your guests arrive.
Determining the Estimated Nutritional Breakdown
Now, I know many of you are tracking macros or just curious about what’s in your favorite party snacks. While this dip is designed for flavor and fun rather than strict nutrition counting, I always like to give you a starting point. Since every brand of refried beans and salsa varies, these numbers are just close estimates based on average ingredients.
Please keep in mind that these values assume you divide the entire dip into 8 equal servings. If you have a crowd that really digs in, your serving size might be smaller!
| Nutrient | Estimated Amount Per Serving |
|---|---|
| Calories | Estimate needed |
| Fat | Estimate needed |
| Protein | Estimate needed |
| Carbohydrates | Estimate needed |

15 Min Tex‑Mex Layered Dip Joy
- Total Time: 15 minutes
- Yield: 8 servings
- Diet: Vegetarian
Description
This Tex-Mex Layered Dip is a simple, crowd-pleasing appetizer perfect for any gathering. It features layers of creamy, savory, and fresh ingredients, ready in minutes.
Ingredients
- Refried black beans mixed with chunky salsa
- Sour cream
- Guacamole
- Shredded Cheddar cheese
- Chopped tomato
- Chopped green onions
Instructions
- Spread the bean and salsa mix evenly in a serving dish.
- Layer sour cream over the bean mixture.
- Spread guacamole on top of the sour cream layer.
- Sprinkle shredded Cheddar cheese over the guacamole.
- Top with chopped tomato and chopped green onions.
- Serve immediately with tortilla chips.
Notes
- You can prepare the layers (except the guacamole) ahead of time and refrigerate. Add the guacamole just before serving.
- Use your favorite brand of chunky salsa for the bean mix.
- For a spicier dip, mix a small amount of taco seasoning into the sour cream.
- Prep Time: 15 minutes
- Cook Time: 0 minutes
- Category: Appetizer
- Method: Layering
- Cuisine: Tex-Mex
Nutrition
- Serving Size: 1/8 of dip
- Calories: Estimate needed
- Sugar: Estimate needed
- Sodium: Estimate needed
- Fat: Estimate needed
- Saturated Fat: Estimate needed
- Unsaturated Fat: Estimate needed
- Trans Fat: Estimate needed
- Carbohydrates: Estimate needed
- Fiber: Estimate needed
- Protein: Estimate needed
- Cholesterol: Estimate needed