Skip to content
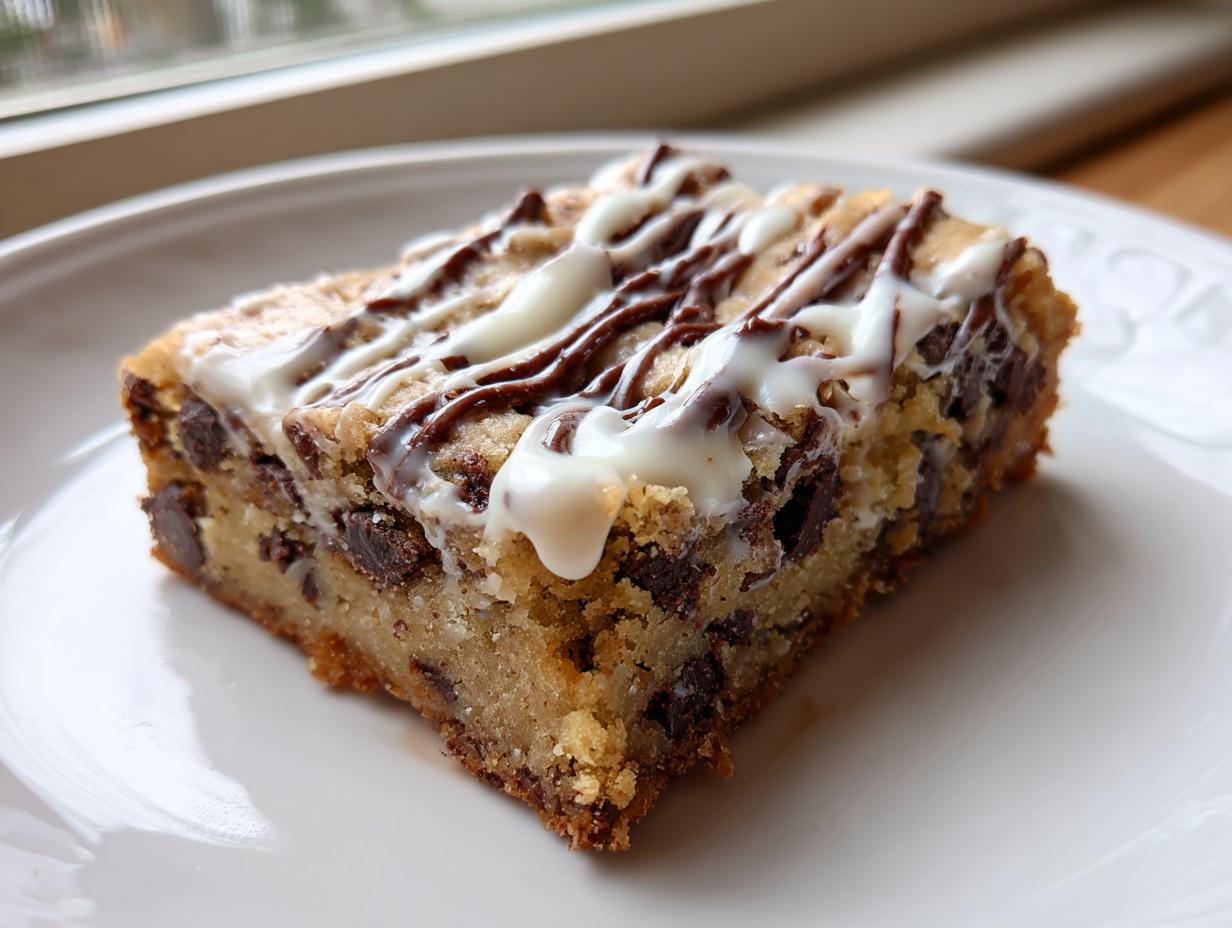
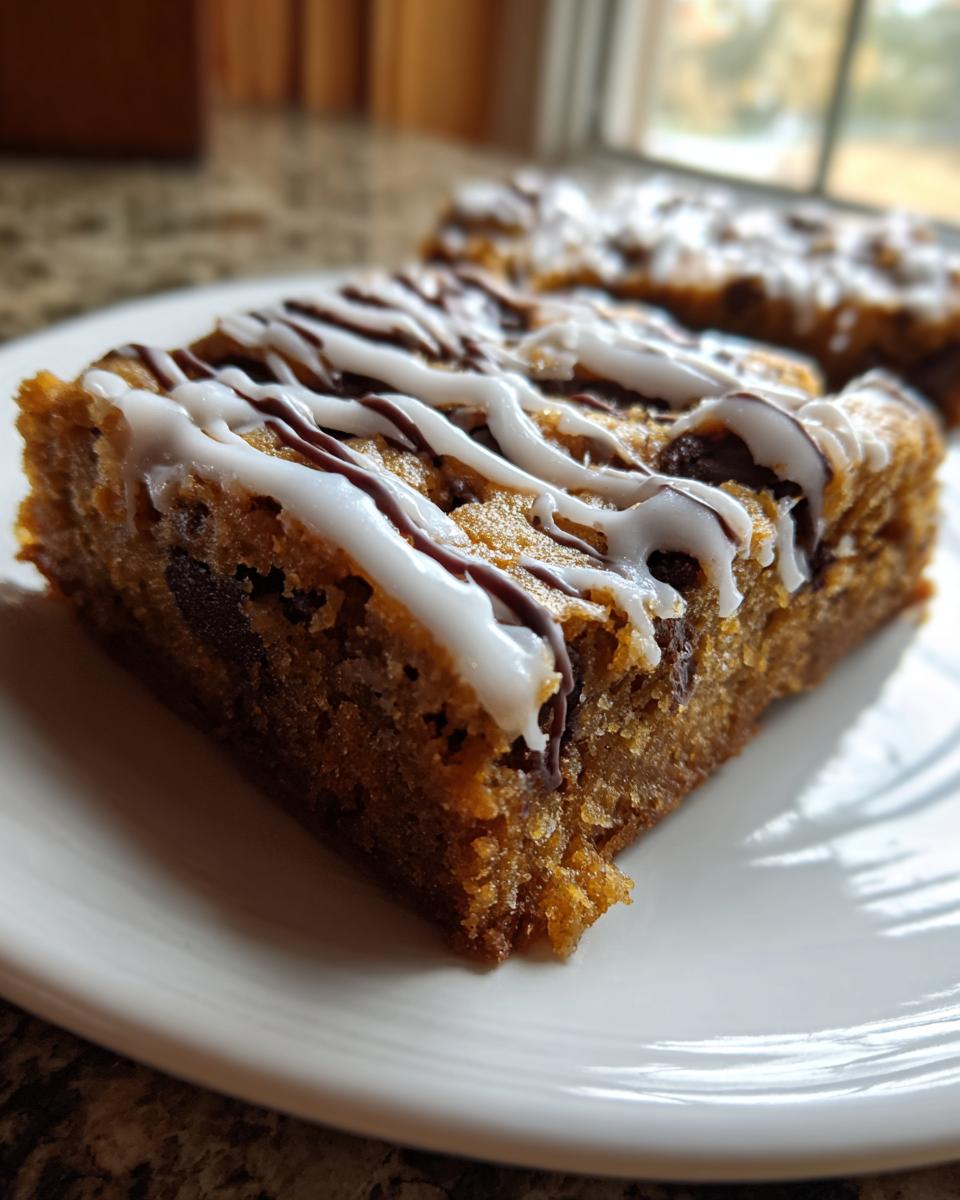
Chocolate Chip Cookie Bars are the ultimate weeknight treat because they give you all the gooey, buttery satisfaction of a perfect cookie without the hassle of scooping and spacing individual dough balls. Seriously, who has time for that sometimes? If you’re looking for that guaranteed chewy texture and rich chocolate payoff in under an hour, you’ve absolutely landed in the right spot!
Hi there, I’m Anna Kowalska, and here I share tried-and-true homemade recipes that you and your family will love. Everything I put up on this site is made with heart and flavor, tested until it’s perfect. My kitchen philosophy is simple: baking should bring joy, not stress. That means these recipes are straightforward, reliable, and packed with the flavor you crave.
Forget dry, crumbly edges! This particular recipe for Chocolate Chip Cookie Bars is my go-to when I need a crowd-pleaser fast. They bake up thick, stay delightfully chewy, and the simple glaze on top just takes them over the edge. Let’s get baking!
Jump to:
Necessary Ingredients for Perfect Chocolate Chip Cookie Bars
To nail the texture and flavor of these Chocolate Chip Cookie Bars, you really need to pay attention to what goes into the bowl. I learned early on that rushing ingredient prep leads to sad, flat bars. Don’t worry, it’s not complicated! We’re using standard pantry items, but the quality and temperature really matter here. Trust me, measuring these out carefully is your first step toward that perfect chewy center we all dream about.
I know you want to see the list right away, but let’s quickly talk about why these specific components work so well together before you grab your measuring cups. We need a solid backbone for the structure, the right kind of sweetness, and, of course, plenty of chocolate!
Foundation Dry Ingredients
We start simple here. You’ll need 1\u00bd cups of all-purpose flour to give the bars structure. For lift, we use \u00bd teaspoon of baking soda—it reacts beautifully with the brown sugar. And please, don’t forget the salt! Just \u00bc teaspoon keeps the sweetness from tasting flat. Whisk these together really well so everything is evenly distributed before it even thinks about meeting the wet stuff.
The Rich Wet Base
This is where the chew happens! We use \u00bd cup of unsalted butter, and this is crucial: it needs to be melted, but not scorching hot. If it’s too hot, it can cook the egg prematurely! Cream that melted butter with \u00be cup of brown sugar until it looks nice and smooth. Then, beat in one egg and a full teaspoon of vanilla extract. That brown sugar is key for that deep, molasses flavor and moisture. That brown sugar is key for that deep, molasses flavor and moisture.
Chocolate Components and Sweet Topping
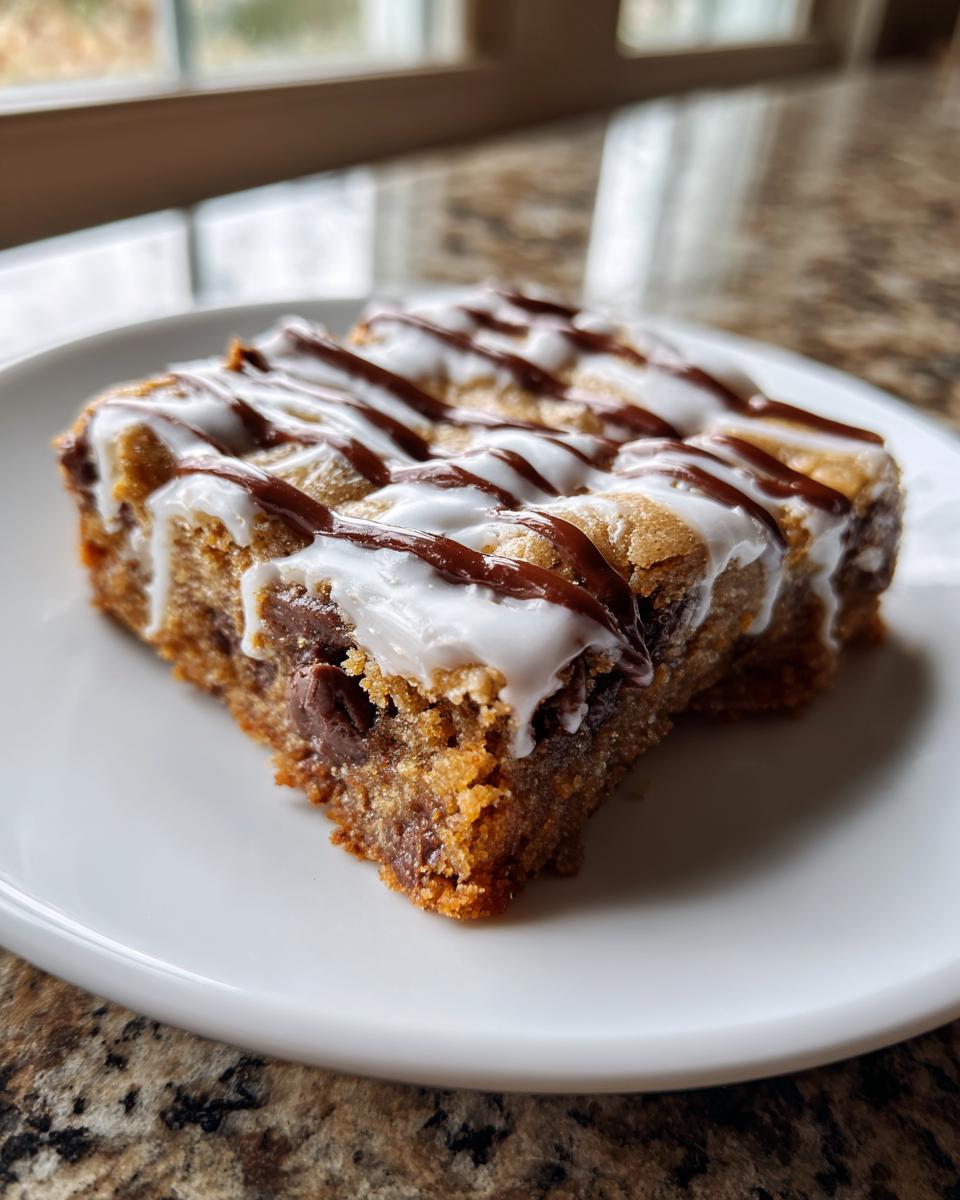
For the actual bar, we’re folding in 1 whole cup of chocolate chips—yes, a big cup! Then, for the finish, we use two other things: powdered sugar and milk for a simple glaze, and then a separate \u00bc cup of chocolate chips that we melt down just for drizzling. Having that extra drizzle on top makes them look like they came from a fancy bakery, even though they are so easy!
Equipment Required for Your Chocolate Chip Cookie Bars
You don’t need a million fancy gadgets for these beauties, thankfully! We’re keeping things simple, just like the recipe intends. You’ll definitely want an 8×8 inch baking dish—that size is perfect for getting those thick, satisfying squares. Make sure you have a couple of solid mixing bowls, one large and one medium, for separating the wet and dry ingredients like we talked about.
Grab your whisk for the dry stuff and a sturdy spoon or spatula for mixing the batter. Oh, and a small microwave-safe bowl or double boiler for melting those final chocolate chips for the drizzle. That’s really it! Easy cleanup is part of the fun here.
Step-by-Step Instructions for Chocolate Chip Cookie Bars
Alright, now for the fun part! We’re moving fast here, but remember, speed shouldn’t mean sloppiness. We want these Chocolate Chip Cookie Bars to have the best texture possible, so follow these steps closely. This whole process moves quickly because we’re skipping the chilling time cookies usually demand.
Preparing the Pan and Dry Mix
First things first: get that oven warmed up! Preheat your oven to 350\u00b0F (175\u00b0C). While it’s heating, get your 8×8 inch baking dish ready. I usually just spray mine really well with non-stick spray, but if you are nervous about sticking, line it with parchment paper, leaving an overhang on two sides—that way you can just lift the whole thing out later. That’s my little trick for easy removal!
Now, grab a medium bowl. We’re combining the dry stuff. Whisk together the 1\u00bd cups of flour, the \u00bd teaspoon of baking soda, and the \u00bc teaspoon of salt. Whisk it like you mean it! You want that baking soda totally dispersed, so we don’t end up with any weird salty or soapy bites later on. Set this bowl aside for now.
Creating the Flavorful Batter Base
Time for the big bowl! Take your melted butter and pour it in with the \u00be cup of brown sugar. Mix these two together until they look happy and combined. Don’t worry about creaming them until light and fluffy like you do with room-temperature butter; since this butter is melted, you just need them incorporated.
Next, beat in your single egg and the teaspoon of vanilla extract. Mix until it looks smooth and uniform. Now, slowly add those dry ingredients we set aside into this wet mixture. Mix it gently until you see just a few streaks of flour left. Stop mixing right there! Seriously, stop. If you keep going, you’ll develop the gluten too much, and that guarantees you a tough bar instead of a chewy one. We want tender, not tough! We want tender, not tough!
Baking and Cooling Your Chocolate Chip Cookie Bars
Once the dry stuff is *just* combined, grab that full cup of chocolate chips and gently fold them in with your spatula. You’re just trying to distribute them evenly throughout the batter. Pour this glorious batter into your prepared 8×8 pan and spread it out evenly. It’s going to be thick, so use the back of your spatula to smooth the top.
Slide that pan into your preheated oven for 25 to 30 minutes. Keep an eye on it around the 25-minute mark. You’re looking for the edges to turn that lovely golden brown color. Remember what I said earlier? Do not overbake these Chocolate Chip Cookie Bars! If you do, they lose that crucial chewiness. Once they look done, pull them out. Let them cool in the pan for about 15 minutes before we tackle the topping. Trying to frost them piping hot is a disaster; the glaze just melts right off!
Applying the Final Sweet Touches
While the bars cool down just a bit, let’s make the simple glaze. In a small bowl, whisk together the \u00bd cup of powdered sugar and 2 tablespoons of milk. Keep whisking until it’s completely smooth—it should pour nicely off your whisk, not clump. Spread this glaze evenly over the slightly cooled bars. It doesn’t have to be perfect; we’re covering it up anyway!
For that final bakery look, melt the remaining \u00bc cup of chocolate chips. You can do this carefully in the microwave in 20-second bursts, stirring in between so it doesn’t seize up on you. Once smooth, grab a fork or a small spoon and drizzle that melted chocolate haphazardly all over the white glaze. It looks so pretty! Now, the hardest part: let the topping set completely before you cut them into 16 squares. A quick trip to the fridge helps speed this up! A quick trip to the fridge helps speed this up!
Tips for Making Superior Chocolate Chip Cookie Bars
Even with a straightforward recipe like this, a few small tips can elevate your Chocolate Chip Cookie Bars from good to absolutely unforgettable. My biggest piece of advice, which I mentioned in the notes, is about that baking time. Those last five minutes in the oven are crucial for texture. If you bake them too long trying to get a fully dry toothpick, you end up with something closer to shortbread than the chewy delight we are aiming for. Pull them when the edges are set and the center still looks slightly underdone.
Also, when it comes to cutting, patience pays off! If you try slicing them while they are even slightly warm, that glaze will smear everywhere, and the bars might crumble apart. For those picture-perfect squares that look professional, use that parchment paper overhang we talked about to lift the entire slab out onto a cooling rack. Once the chocolate drizzle is totally firm, pop the whole thing in the fridge for about 30 minutes. Chilling makes slicing through these rich Chocolate Chip Cookie Bars unbelievably clean! If you are interested in other bar recipes, check out my Frosted Zucchini Spice Bars.
Frequently Asked Questions About Chocolate Chip Cookie Bars
I get so many questions about these bars because everyone wants them to turn out exactly right! They are so easy, but sometimes the texture can fool you. Here are the top things folks ask me when they are whipping up a batch of these delicious Chocolate Chip Cookie Bars.
How do I guarantee chewy Chocolate Chip Cookie Bars?
This comes down to two things we covered: sugar and time. First, make sure you use the full amount of brown sugar listed. Brown sugar has molasses, which keeps things moist and soft. Second, and this is huge, do not overbake! You want the edges set, but the center should still look slightly soft when you pull them out. They finish baking as they cool in the pan, so trust the process and pull them out a bit early for that perfect chewiness. Brown sugar has molasses, which keeps things moist and soft.
Can I use different types of chocolate chips in these bars?
Absolutely! The recipe calls for standard semi-sweet chips, but feel free to mix it up. If you use milk chocolate chips for the main batter, you’ll get a sweeter bar. For a richer, darker flavor that cuts through the sweetness of the glaze, try using dark chocolate chips instead. You can even use a mix of milk, dark, and white chips for a fun confetti look in your chewy chocolate chip bars!
What’s the best way to store these bars to keep them fresh?
Since these bars are so moist, they actually hold up really well! I find they are best kept tightly covered at room temperature for about three days. If you need them to last longer, pop them in an airtight container in the fridge. They taste amazing cold, too!
Storing and Reheating Your Delicious Chocolate Chip Cookie Bars
One of the best things about these Chocolate Chip Cookie Bars is that they taste even better the next day once the glaze and drizzle have fully set up. Unlike traditional cookies that can dry out quickly, these bars stay wonderfully moist because of that sugar ratio we used. You don’t have to worry about them going stale overnight, which is great for meal prep or having a treat on hand!
I always store mine tightly wrapped. If you cut them before chilling, wrap the individual squares tightly in plastic wrap, and then place them all into an airtight container. They are perfectly happy sitting on the counter for a few days. If you’re planning to keep them for a week or longer, the refrigerator is your best friend. They firm up nicely when chilled, which you might even prefer!
If you do chill them, let them sit on the counter for about 20 minutes before serving to take the chill off, though I personally love them straight from the fridge. Reheating isn’t really necessary, but if you absolutely must, a quick 10 seconds in the microwave softens the chocolate chips perfectly.
Here’s my quick guide for keeping your Chocolate Chip Cookie Bars at their peak:
| Storage Location | Duration | Best Practice |
|---|---|---|
| Room Temperature | 3-4 Days | Airtight container, tightly covered. |
| Refrigerator | Up to 1 Week | Airtight container; let warm slightly before eating. |
| Freezer | Up to 3 Months | Wrap individually before freezing for best results. |
Understanding the Nutrition in Your Chocolate Chip Cookie Bars
I always tell folks that these bars are a treat, not a health food, but it’s good to know what you’re working with! Since these Chocolate Chip Cookie Bars are rich with butter and sugar, they definitely hit the indulgence mark. That’s okay, because everything tastes better when you know exactly what’s in it, right?
Keep in mind that these numbers are just estimates based on the ingredients listed. If you swap out milk chocolate for bittersweet or use a different brand of flour, things will shift a little. But this gives you a great baseline for enjoying your dessert guilt-free!
Estimated Nutritional Breakdown Per Bar
| Nutrient | Amount (Estimated) |
|---|---|
| Calories | 220 |
| Fat | 12g |
| Carbohydrates | 28g |
| Protein | 3g |
| Sugar | 25g |
Share Your Experience Making These Chocolate Chip Cookie Bars
Now it’s your turn! I have poured my heart into making sure these Chocolate Chip Cookie Bars are the chewiest, gooiest things you’ve ever baked. Did they turn out perfectly for your family? Please hop down to the comments and give this recipe a rating!
I’d love to hear if you tried any simple variations—maybe you used a different sprinkle on the glaze or cut them into big rectangles instead of squares. Let me know how they tasted! If you’re looking for another simple baked treat, you might enjoy my recipe for Moist Rich Zucchini Brownies.
Print
Amazing 16 Chocolate Chip Cookie Bars
- Total Time: 45 minutes
- Yield: 16 bars 1x
- Diet: Vegetarian
Description
Create chewy and flavorful Chocolate Chip Cookie Bars perfect for any occasion. This recipe delivers a classic dessert with a satisfying texture.
Ingredients
- 1½ cups all-purpose flour
- ½ teaspoon baking soda
- ¼ teaspoon salt
- ½ cup unsalted butter (melted)
- ¾ cup brown sugar
- 1 egg
- 1 teaspoon vanilla extract
- 1 cup chocolate chips (for bars)
- ½ cup powdered sugar (for topping)
- 2 tablespoons milk (for topping)
- ¼ cup chocolate chips (melted for drizzle)
Instructions
- Preheat your oven to 350°F (175°C). Prepare an 8×8 inch baking dish by greasing or lining it.
- In a medium bowl, whisk together the all-purpose flour, baking soda, and salt. Set this mixture aside.
- In a separate large bowl, cream together the melted unsalted butter and brown sugar until well combined.
- Beat in the egg and vanilla extract into the butter mixture until smooth.
- Gradually add the dry ingredients to the wet ingredients, mixing until just combined. Do not overmix.
- Gently fold in 1 cup of chocolate chips.
- Spread the cookie bar batter evenly into your prepared baking dish.
- Bake for 25 to 30 minutes, or until the edges appear golden brown.
- Allow the bars to cool slightly before adding the topping.
- For the topping, whisk together the powdered sugar and milk until you have a smooth glaze.
- Spread the glaze lightly over the cooled bars.
- Melt the remaining ¼ cup of chocolate chips and drizzle them over the glaze.
- Let the topping set before cutting into squares.
Notes
- Ensure your butter is melted but not hot when mixing with the sugar.
- Do not bake longer than specified, or your bars will lose their chewiness.
- For cleaner cuts, chill the bars thoroughly after the topping has set.
- Prep Time: 15 minutes
- Cook Time: 30 minutes
- Category: Dessert
- Method: Baking
- Cuisine: American
Nutrition
- Serving Size: 1 bar
- Calories: 220
- Sugar: 25g
- Sodium: 75mg
- Fat: 12g
- Saturated Fat: 7g
- Unsaturated Fat: 5g
- Trans Fat: 0g
- Carbohydrates: 28g
- Fiber: 1g
- Protein: 3g
- Cholesterol: 30mg