Skip to content
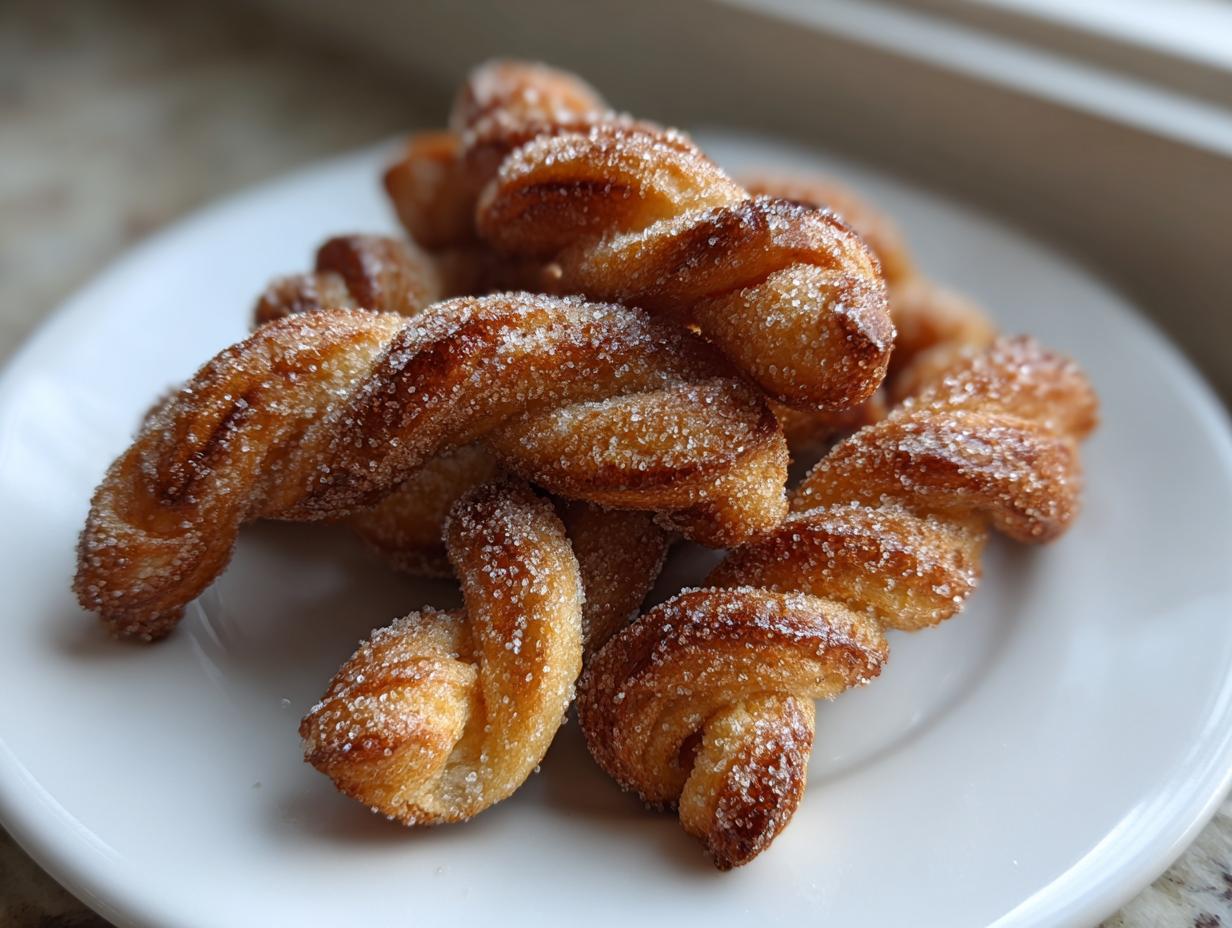
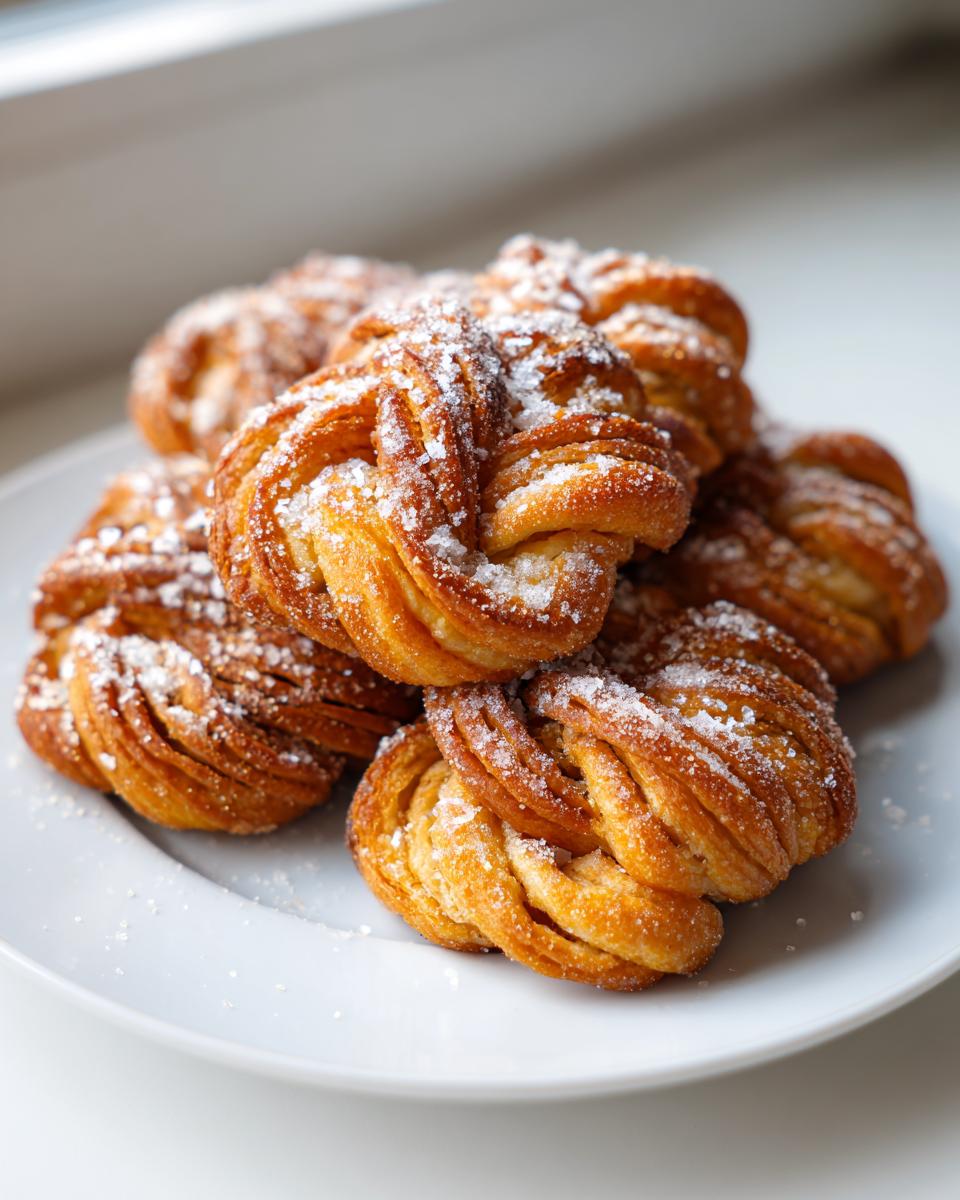
If you’re like me, you’re always looking for that perfect little something—a sweet bite that doesn’t require hours of fuss but still feels special. Well, stop looking right now! I’m Anna Kowalska, and here I share tried-and-true homemade recipes that you and your family will love. Everything I post here is made with heart and flavor, and that’s exactly what you get with these Mini Baked Sugar Twists.
These aren’t fussy cookies or heavy pastries; they are simple, delicious, and come together so fast you’ll wonder why you didn’t make them sooner. They are the perfect little snack for an afternoon tea or a last-minute treat!
Why These Mini Baked Sugar Twists Are Your New Favorite Snack
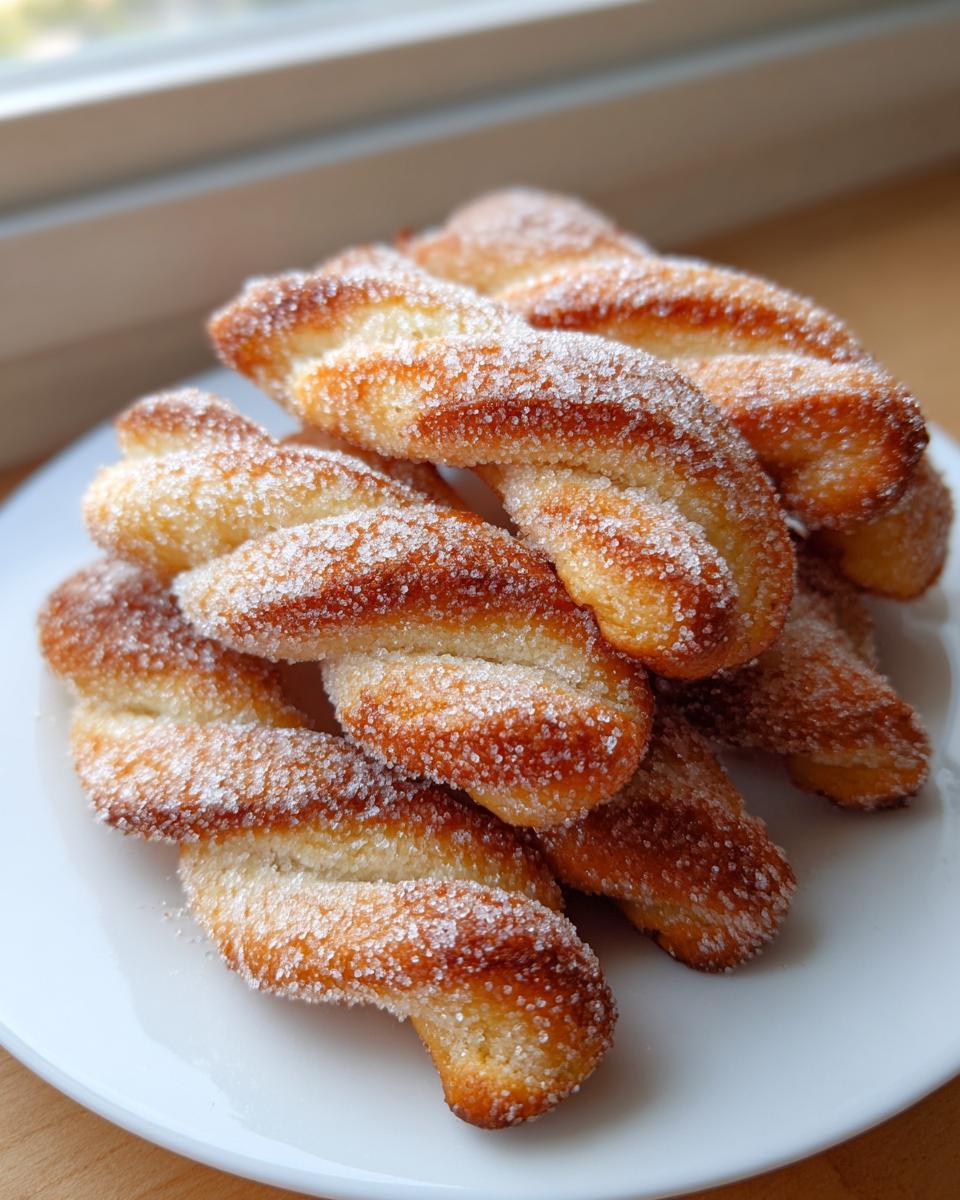
What makes these little beauties so addictive? It’s all about the texture, truly. When you bite into one of these Mini Baked Sugar Twists, you get that wonderful, slightly shattering light crunch on the outside, thanks to that quick roll in sugar right after they come out of the oven.
But don’t let the name fool you into thinking they are complicated! The beauty of this recipe is its simplicity. You don’t need fancy equipment or a whole afternoon. We mix the dough, twist it quickly, and bake them off while you clean up the counter. They are vegetarian-friendly and just melt in your mouth.
My family goes absolutely wild for these when I make a batch of two dozen. They vanish fast! They are just the right size—not too big, not too small—making them ideal for little hands or for sneaking just one more when you think no one is looking. Trust me, once you try this straightforward recipe for Mini Baked Sugar Twists, it’ll become a regular in your rotation.
Jump to:
Gathering Your Ingredients for Mini Baked Sugar Twists
You know, when a recipe is this simple, every single ingredient gets its moment to shine. We aren’t hiding anything behind thick frosting or heavy spices here. That’s why I insist on using good quality basics when I whip up these Mini Baked Sugar Twists. If you start with great stuff, you’re halfway to success before you even turn on the oven!
Since the prep time is only about 30 minutes, you probably already have most of this stuff in your pantry. But let’s talk about why we shouldn’t cheat on these core components. The texture of the final baked pastry depends entirely on the quality and temperature of what you put in that bowl. We are aiming for that perfect light crunch, remember?
Essential Components for Mini Baked Sugar Twists
When you pull out your ingredients, make sure everything is measured correctly. Here’s what you’ll need to make about two dozen of these wonderful Mini Baked Sugar Twists:
- Flour: Just your standard all-purpose flour works perfectly here. Don’t go grabbing specialty flours unless you really know what you’re doing; this dough needs that familiar protein structure.
- Butter: This is non-negotiable—use real butter, and make sure it’s softened to room temperature. If your butter is too cold, it won’t cream right with the sugar, and your twists will be tough instead of tender.
- Sugar: We use granulated sugar here, both in the dough and for coating later. Make sure you have plenty set aside for the post-baking roll!
- Eggs: These bind everything together and add richness. Make sure they are at room temperature too, they incorporate much better that way.
- Vanilla Extract: This is where you add that beautiful background warmth. Use the real stuff if you can. A good splash of vanilla makes all the difference in a simple sweet snack like this.
Equipment Needed for Perfectly Shaped Twists
You don’t need a fancy stand mixer or anything complicated for this recipe, which is another reason I love it so much! Since we are aiming for a simple baked pastry, the tools required are pretty basic kitchen gear.
First off, you’ll need a couple of sturdy mixing bowls—one for the dough and maybe a shallow one for the sugar coating later on. A good wooden spoon or a sturdy spatula works fine for mixing the dough, although an electric hand mixer can speed things up if you have one.
When it comes to shaping, you absolutely need a clean, lightly floured surface. A rolling pin is essential for getting the dough to an even thickness, maybe about a quarter of an inch thick. And of course, you need baking sheets! I usually line mine with parchment paper because it makes cleanup a breeze, even though these don’t tend to stick too badly.
Step-by-Step Instructions for Amazing Mini Baked Sugar Twists
Alright, let’s get baking! This whole process, from mixing to rolling them in sugar, takes less than an hour total, which is fantastic for a homemade treat. Remember, we are aiming for a light, slightly crisp baked pastry here, not a chewy cookie.
Mixing the Dough Base
First things first, get that oven preheating! Set it to 375 degrees Fahrenheit (about 190 Celsius). We want it hot and ready when the dough is done resting.
In your main mixing bowl, we start by creaming the softened butter and the sugar together. Use your spoon or mixer and beat them until they look light and fluffy—this traps the air we need for that nice, light texture. It should take about three good minutes.
Next, beat in the eggs one at a time, making sure each one is fully incorporated before adding the next. Then, stir in your vanilla extract until everything is combined smoothly. Don’t add too much air here, we aren’t making an angel food cake!
Now for the dry stuff. In a separate bowl, whisk your flour together gently. Then, add the flour mixture into your wet ingredients in two batches. Mix only until *just* combined. Seriously, stop mixing as soon as you don’t see any more dry streaks of flour. Overmixing will make these Mini Baked Sugar Twists tough, and we want tender crunch!
Wrap that dough up tightly in plastic wrap and let it rest in the fridge for about 15 minutes. This resting time is crucial; it lets the gluten relax so the dough is easier to roll out without snapping back at you.
Shaping and Preparing Your Mini Baked Sugar Twists
While the dough is chilling, get your sugar ready! Pour about a cup of granulated sugar into a shallow dish. This is what we’ll roll the warm twists in later.
Now, dust your countertop lightly with flour. Take the dough out and cut it in half so it’s easier to handle. Roll one half out until it’s about an eighth to a quarter of an inch thick—not too thin, or they’ll burn fast, but not too thick, or they won’t have that signature crunch.
Use a pizza cutter or sharp knife to cut the dough into long strips. I usually cut mine about half an inch wide and maybe four inches long. Now for the fun part: take one strip and gently twist it in the middle two or three times. Don’t over-twist! Then, carefully place them onto your parchment-lined baking sheet, leaving about an inch between each one.
Baking to Golden Perfection
Pop those trays into your preheated 375°F oven. They don’t take long at all! Keep an eye on them; they usually bake perfectly in about 12 to 15 minutes.
You are looking for a beautiful, pale golden brown color around the edges and the bottom. If they are looking pale but you think they need more time, just give them another minute or two. They should smell wonderfully sweet and buttery when they are done.
Finishing Your Sugar Coated Mini Baked Sugar Twists
This next step must happen fast if you want that perfect sugar coating to stick! As soon as you pull a sheet out of the oven, let them rest on the pan for just one minute—no more! If you wait too long, the sugar won’t adhere.
Using a thin spatula, gently transfer the warm Mini Baked Sugar Twists directly into the prepared sugar bowl. Roll them around gently until they are fully coated on all sides. The residual heat melts the sugar just enough to create that gorgeous, slightly crisp coating. Transfer the coated twists to a cooling rack to set completely. Repeat this process quickly with the rest of your dough!
Tips for Mastering Your Mini Baked Sugar Twists
I’ve made this recipe so many times that I know exactly where things can go wrong, so let me save you some trouble! The biggest issue people have with these Mini Baked Sugar Twists is ending up with something hard instead of crisp. That usually comes from two places: overmixing the dough or baking them for too long.
If the dough feels sticky after that 15-minute chill, don’t add more flour! Just flour your hands and your rolling surface lightly. Remember, we want these to be a light snack, not a dense cookie. If you roll them too thick—say, over a quarter inch—they won’t get that satisfying snap when you bite them.
Also, pay close attention to the sugar coating step. If you let them cool completely on the sheet before rolling them in sugar, the sugar will just fall right off. They need to be warm enough for that sugar to cling on for dear life! Follow these little pointers, and you’ll have those perfect two dozen sweet snacks every time.
Storing and Keeping Your Mini Baked Sugar Twists Fresh
Because these are meant to have a light crunch, storage is everything. If you store them next to anything moist, like fruit or cookies that might sweat, they will soften up quickly. We want to preserve that beautiful, delicate texture we worked so hard for!
The key to keeping your Mini Baked Sugar Twists fresh is airflow on the first day, followed by an airtight seal. Don’t stack them right out of the oven; let them cool completely on the rack until they are room temperature, which usually takes about 30 minutes.
Optimal Storage and Reheating Guidelines
Once fully cooled, you can store them in an airtight container. I find that lining the bottom of the container with a paper towel helps absorb any residual moisture. They should stay nice and crisp for about four or five days if stored correctly.
| Storage Method | Duration | Notes |
|---|---|---|
| Airtight Container at Room Temp | 4-5 Days | Best for maintaining the light crunch. |
| Freezer (Uncoated) | Up to 1 Month | Wrap tightly in plastic wrap first. |
| Reheating (If Softened) | 3-5 Minutes | Place on baking sheet at 300°F to crisp up. |
Frequently Asked Questions About Your Homemade Mini Baked Sugar Twists
It’s normal to have questions when trying a new recipe, especially one that relies on texture! I’ve gathered the most common things folks ask me about making these simple Mini Baked Sugar Twists at home.
Q1. Can I substitute the butter in the Mini Baked Sugar Twists recipe?
You really shouldn’t substitute the butter if you want the best texture. Butter provides a unique richness and structure that oil or margarine just can’t replicate for this specific baked pastry. If you absolutely must, use a high-quality vegetable shortening, but the flavor won’t be as good.
Q2. How long do Mini Baked Sugar Twists stay crisp?
If you store them properly in an airtight container immediately after they are cooled, they should stay nicely crisp for about four to five days. After that, they start to absorb ambient humidity, and that wonderful light crunch fades a bit.
Q3. Can I add cinnamon or other spices to the dough?
Yes, absolutely! If you want to turn this into a more spiced sweet snack, try whisking in about a teaspoon of ground cinnamon or a half-teaspoon of cardamom along with your flour. It adds a lovely warmth!
Q4. Why did my twists puff up instead of staying flat?
That usually means your butter wasn’t cold enough when you started mixing, or you overworked the dough after adding the flour. Overworking develops too much gluten, which causes puffing. Remember, mix until *just* combined!
Sharing Your Homemade Success
I just love seeing what you create in your kitchens! If you made these little treasures, please leave me a star rating below. Tell me how quickly your family devoured them, or if you tried adding any spice variations. Happy baking, everyone!
Tips for Mastering Your Mini Baked Sugar Twists
I’ve made this recipe so many times that I know exactly where things can go wrong, so let me save you some trouble! The biggest issue people have with these Mini Baked Sugar Twists is ending up with something hard instead of crisp. That usually comes from two places: overmixing the dough or baking them for too long.
If the dough feels sticky after that 15-minute chill, don’t add more flour! Just flour your hands and your rolling surface lightly. Remember, we want these to be a light snack, not a dense cookie. If you roll them too thick—say, over a quarter inch—they won’t get that satisfying snap when you bite them.
Also, pay close attention to the sugar coating step. If you let them cool completely on the sheet before rolling them in sugar, the sugar will just fall right off. They need to be warm enough for that sugar to cling on for dear life! Follow these little pointers, and you’ll have those perfect two dozen sweet snacks every time.
Storing and Keeping Your Mini Baked Sugar Twists Fresh
Because these are meant to have a light crunch, storage is everything. If you store them next to anything moist, like fruit or cookies that might sweat, they will soften up quickly. We want to preserve that beautiful, delicate texture we worked so hard for!
The key to keeping your Mini Baked Sugar Twists fresh is airflow on the first day, followed by an airtight seal. Don’t stack them right out of the oven; let them cool completely on the rack until they are room temperature, which usually takes about 30 minutes.
Optimal Storage and Reheating Guidelines
Once fully cooled, you can store them in an airtight container. I find that lining the bottom of the container with a paper towel helps absorb any residual moisture. They should stay nice and crisp for about four or five days if stored correctly.
| Storage Method | Duration | Notes |
|---|---|---|
| Airtight Container at Room Temp | 4-5 Days | Best for maintaining the light crunch. |
| Freezer (Uncoated) | Up to 1 Month | Wrap tightly in plastic wrap first. |
| Reheating (If Softened) | 3-5 Minutes | Place on baking sheet at 300°F to crisp up. |
Frequently Asked Questions About Your Homemade Mini Baked Sugar Twists
I love hearing from you all! It means the world that you’re trying out these recipes that I put so much love into. If you’re wondering about tweaks or storage for your batch of Mini Baked Sugar Twists, chances are someone else is wondering too! Here are a few things that pop up most often in my inbox.
We want these to be the best little sweet snack you’ve ever made, so let’s clear up any confusion about ingredients and texture retention!
Can I substitute the butter in the Mini Baked Sugar Twists recipe
Oh, this is a tough one for me, honestly. Since this is a simple baked pastry, the butter is crucial for flavor and texture. If you absolutely must, you can try using a high-quality vegetable shortening, but please know the flavor won’t be as rich. If you use oil, they will likely turn out soft instead of getting that light crunch we are looking for in these Mini Baked Sugar Twists.
How long do Mini Baked Sugar Twists stay crisp
That light crunch is the goal, right? If you store them correctly—in an airtight container, not stacked too tightly, and away from moisture—they should keep that delightful crisp exterior for about four full days. After that, they might start to soften up a bit, but that’s why we have the reheating trick!
Sharing Your Homemade Success
I just love seeing what you create in your kitchens! If you made these little treasures, please leave me a star rating below. Tell me how quickly your family devoured them, or if you tried adding any spice variations. Happy baking, everyone!
Print
Amazing 2 Dozen Mini Baked Sugar Twists
- Total Time: 45 minutes
- Yield: 2 dozen
- Diet: Vegetarian
Description
Mini Baked Sugar Twists. These simple treats offer a light crunch on the outside. Anna Kowalska shares tried-and-true homemade recipes that you and your family will love. Everything is made with heart and flavor.
Ingredients
- Flour
- Butter
- Sugar
- Eggs
- Vanilla extract
Instructions
- Mix the dough ingredients together.
- Shape the dough into short twists.
- Bake the twists until they turn golden brown.
- Roll the warm twists in sugar immediately after baking.
Notes
- The finished twists have a light crunch on the outside.
- Prep Time: 30 minutes
- Cook Time: 15 minutes
- Category: Dessert
- Method: Baking
- Cuisine: American
Nutrition
- Serving Size: 1 twist
- Calories: 90
- Sugar: 5g
- Sodium: 40mg
- Fat: 5g
- Saturated Fat: 3g
- Unsaturated Fat: 2g
- Trans Fat: 0g
- Carbohydrates: 10g
- Fiber: 0.5g
- Protein: 1.5g
- Cholesterol: 15mg