Skip to content
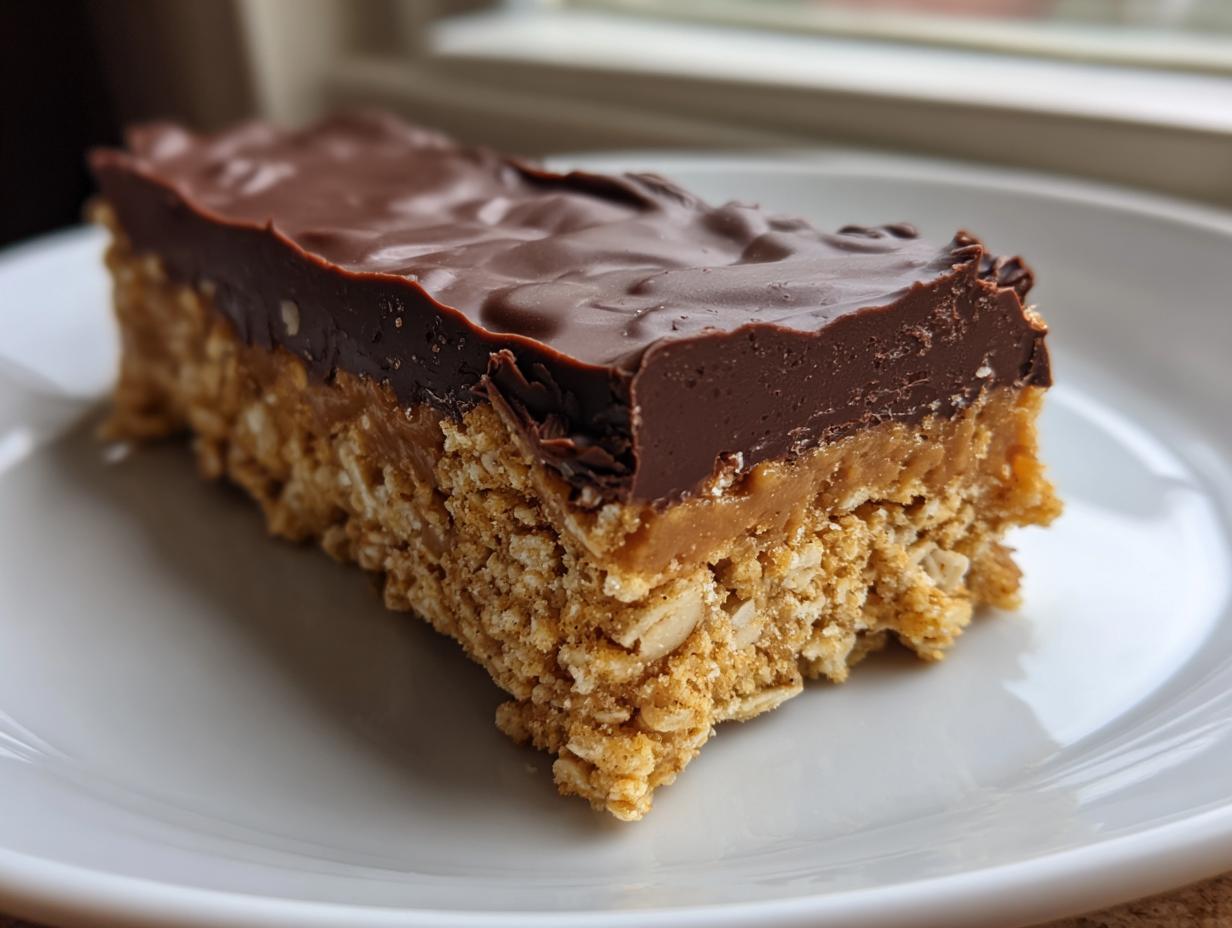
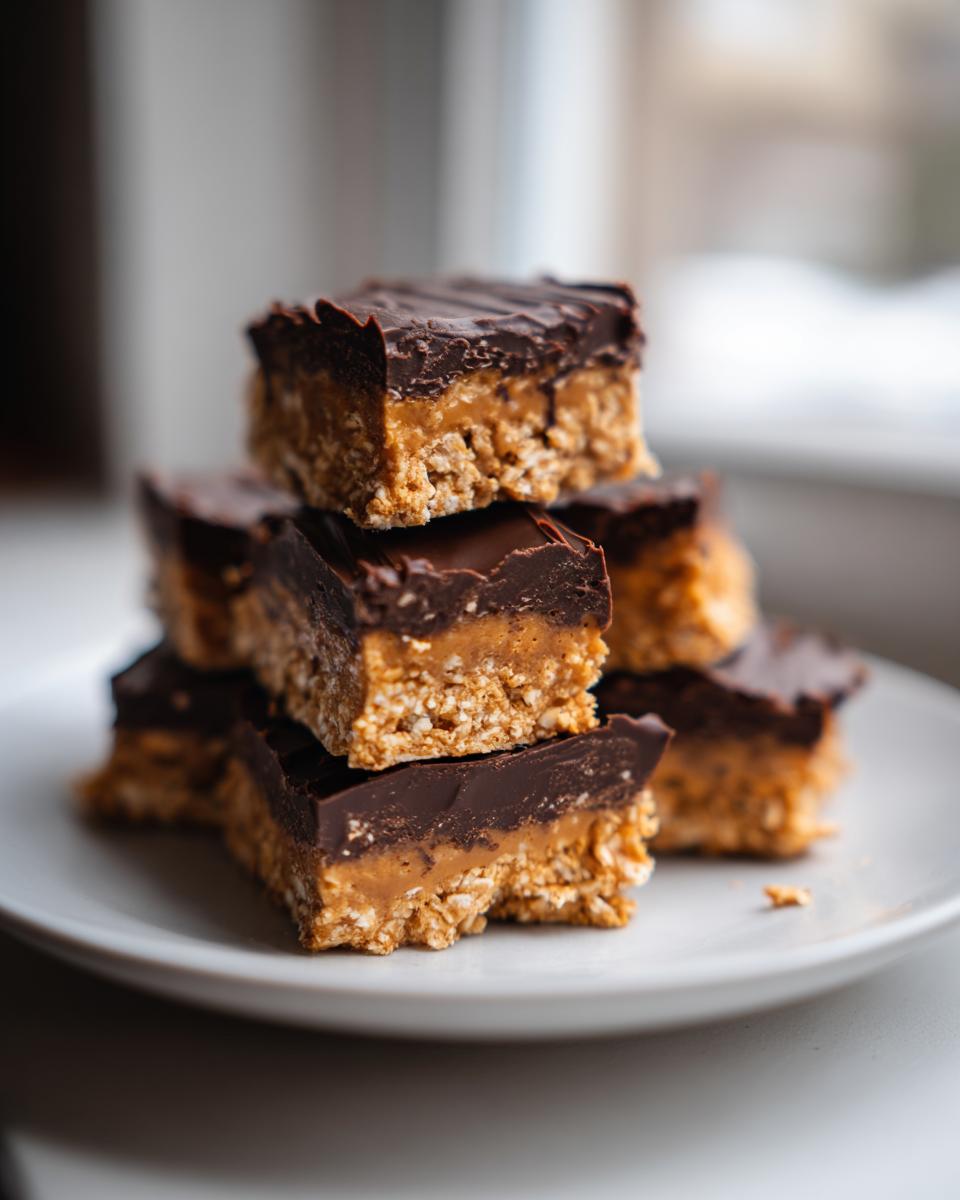
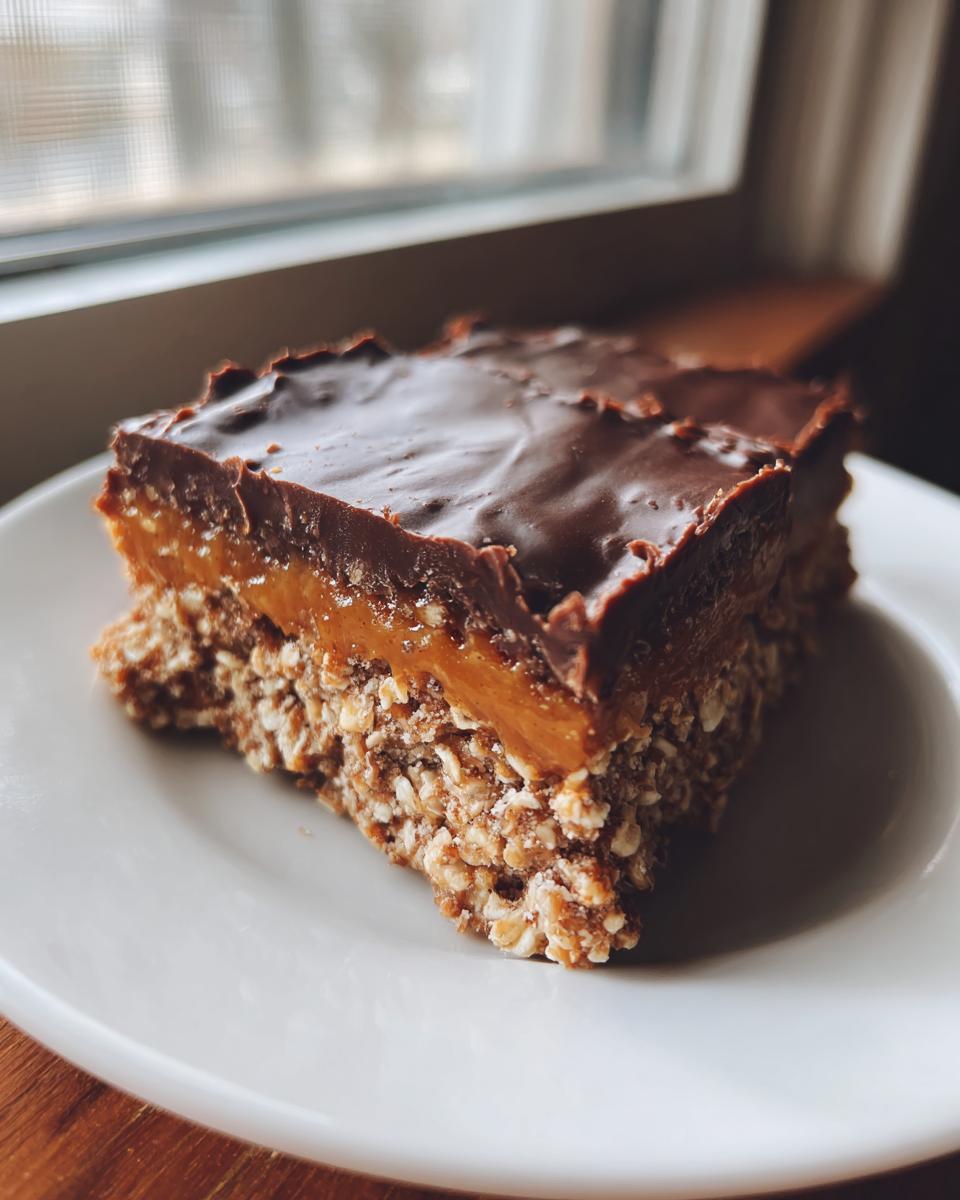
If you’re hunting for that perfect, satisfying snack that takes almost no real effort but tastes like you spent all day in the kitchen, then you need these Almond Butter Crunch Bars in your life right now. Seriously, these bars hit every single sweet spot: they’re crunchy, they’re creamy, and they’re topped with rich chocolate. Wow!
Hi, I’m Anna Kowalska, and here I share tried-and-true homemade recipes that you and your family will love. Everything I post here is made with heart and flavor, and these Almond Butter Crunch Bars are proof of that philosophy. I’ve tweaked the ratio of oat flour to almond butter probably five times just to make sure the base doesn’t crumble when you bite into it—that texture is everything!
I know you’re busy, so I focus on recipes that deliver maximum reward for minimum fuss. These bars are fantastic because they require just a tiny bit of baking for the base, and the rest is just assembly and chilling. They are the ultimate easy dessert when company shows up unexpectedly. Trust me, once you try this simple formula, these Almond Butter Crunch Bars will become a staple in your rotation.
Jump to:
Assembling the Ingredients for Almond Butter Crunch Bars
Getting ready to make these amazing Almond Butter Crunch Bars is half the fun! You don’t need a huge grocery run for this recipe; it uses pantry staples for that perfect three-layer experience. Before you start mixing, I always lay out everything I need. It keeps me organized and stops me from accidentally adding too much maple syrup later—oops!
We need three distinct groups of ingredients here: the sturdy base, the smooth middle, and the gorgeous chocolate hat on top. Having them separated makes the assembly process so much smoother. Here’s what you’ll need gathered up and ready to go.
This table shows you exactly what’s heading into the pan for these delicious bars.
| Layer | Ingredient | Amount |
|---|---|---|
| Base | Oat Flour | 1\u00bd cups |
| Base/Filling | Almond Butter | 1\u2153 cups total |
| Base/Filling | Maple Syrup | \u00bc cup total |
| Base/Filling/Topping | Coconut Oil | 7 tbsp total |
| Topping | Chocolate Chips (Dairy Free) | 1\u00bc cups |
Base Layer Components for Almond Butter Crunch Bars
For the foundation of these Almond Butter Crunch Bars, you need that oat flour to give it structure. Make sure you measure it carefully! We mix that flour with a good amount of almond butter, some maple syrup for sweetness, and softened coconut oil. This combination forms a dough that presses down beautifully into a firm, crunchy base after its short trip to the oven.
Creamy Filling Ingredients
The middle layer is where the magic happens—it’s pure, smooth, sweet almond bliss! You’ll need another half cup of almond butter, a couple of tablespoons of maple syrup, and two tablespoons of coconut oil. The trick here is making sure the coconut oil is soft enough that everything melts together into one silky mixture when heated. Don’t rush this part; a smooth filling makes for a beautiful middle layer!
Chocolate Topping Requirements
No crunch bar is complete without a chocolate shell, right? For the final, decadent layer of our Almond Butter Crunch Bars, grab your dairy-free chocolate chips—one and a quarter cups. You’ll also need two tablespoons of coconut oil. The oil is crucial because it keeps the chocolate glossy and ensures it sets up nice and firm when it chills, giving you that satisfying snap when you bite in.
Essential Equipment for Creating Almond Butter Crunch Bars
You don’t need a ton of fancy gadgets for these Almond Butter Crunch Bars, which is great news! The most important thing is having an 8×8 inch baking pan ready to go. You absolutely must line it with parchment paper—this is the secret to lifting the whole slab out later without breaking a single piece. Grab a couple of sturdy mixing bowls for your layers, and make sure you have a small, microwave-safe bowl handy for melting that chocolate topping smoothly.
Step-by-Step Instructions for Perfect Almond Butter Crunch Bars
Alright, deep breath! This is where we bring all those lovely ingredients together into one fantastic, layered treat. Don’t worry if the timing seems specific; it’s just to ensure everything sets up perfectly. We are moving fast, but we are being precise, especially with the cooling times. Following these steps will guarantee you get the best texture possible in your Almond Butter Crunch Bars.
First things first, get your oven warmed up to 350 degrees Fahrenheit. While that’s heating, line that 8×8 pan with parchment paper. Remember, we want those paper ‘slings’ hanging over the sides! That’s how we’ll lift the whole thing out later, clean as a whistle.
Preparing and Baking the Crunchy Base
Time to make the crunch! In a big bowl, mix up all your base layer ingredients—the oat flour, the almond butter, the maple syrup, and the softened coconut oil. You’re going to mix this until it really comes together into a cohesive dough. It shouldn’t be sticky, but it shouldn’t be dry and crumbly either. Once you have that dough, press it down firmly and evenly into the bottom of your prepared pan. I use the bottom of a flat measuring cup to really compact it. Then, pop that base into the preheated oven and bake it for exactly 10 minutes. When it comes out, let it cool right there in the pan for about 10 minutes. It needs that initial cool-down before we add the next layer.
Setting the Creamy Middle Layer
While the base is cooling down just a bit, let’s focus on that gorgeous middle filling. Melt the filling ingredients—the second portion of almond butter, maple syrup, and coconut oil—together until they are completely smooth. You can do this gently over low heat or in 15-second bursts in the microwave. Once it’s silky, pour that creamy mixture right over the cooled base. Spread it out so it covers everything evenly. Now, this layer needs to firm up properly, so into the freezer it goes for a solid 45 minutes. Don’t rush this freezing time; if this layer isn’t hard, the whole bar will get messy when you cut it later!
Finishing Your Almond Butter Crunch Bars with Chocolate
Once the filling is rock solid from the freezer, it’s time for the grand finale! Melt your chocolate chips and the final bit of coconut oil together until you have a smooth, dippable chocolate coating. Take your pan out of the freezer and use those parchment paper handles to lift the entire block out onto a cutting board. Slice it into 9 perfect bars. Now, dip each bar into the melted chocolate, letting any excess drip off. Place the chocolate-coated bars back onto a piece of parchment paper. A quick trip back to the freezer for just 5 minutes is all it takes for that chocolate shell to set beautifully. Then, they are ready to eat!
Tips for Making the Best Almond Butter Crunch Bars
Even though these Almond Butter Crunch Bars are super easy, a couple of little tricks can elevate them from good to absolutely unforgettable. It all comes down to managing those textures between the layers. I’ve made enough batches to know exactly what to look for when the dough feels a little off or the chocolate acts stubborn. A little attention now saves you from crumbly bars later!
Achieving the Perfect Base Texture
When you mix the base layer, pay attention to how it feels. If your dough seems too dry and crumbly when you try to press it into the pan, don’t panic! Just add another teaspoon of maple syrup or maybe a tiny drizzle of almond butter until it just holds together when you squeeze a bit in your hand. If it feels too wet and sticky, add a tablespoon of oat flour. We want firm, not gooey, for that satisfying crunch!
Preventing the Chocolate Coating from Seizing
When melting your chocolate chips and coconut oil for the top coat, the biggest mistake people make is using water or steam. Chocolate hates water! Make sure your bowl is completely dry. Melt the chocolate and oil slowly, stirring constantly. If you see even a tiny bit of steam, pull it off the heat immediately. Slow and steady wins the race for that glossy, smooth finish on your Almond Butter Crunch Bars.
Storing and Enjoying Your Almond Butter Crunch Bars
The best part about making these layered treats is knowing you have snacks ready for days! Since these Almond Butter Crunch Bars are full of healthy fats from the nut butter and coconut oil, they hold up really well. They taste amazing straight from the fridge, but you can also freeze them for later enjoyment. They freeze beautifully, which is great for meal prepping snacks! Desserts like this are perfect for batch cooking.
Storage Guidelines for Your Almond Butter Crunch Bars
You’ll want to keep these bars airtight so they stay fresh and don’t absorb any fridge smells. I usually stack them with a small piece of parchment paper between layers so the chocolate doesn’t stick to the next one. Here is the breakdown for keeping your Almond Butter Crunch Bars delicious.
| Location | Maximum Time |
|---|---|
| Refrigerator | Up to 10 days |
| Freezer | Up to 2 months |
Questions Readers Ask About Almond Butter Crunch Bars
I get so many emails asking about little tweaks to this recipe, which I absolutely love! It means you’re excited to make these Almond Butter Crunch Bars. Since they are such a simple recipe, people often wonder if they can swap out key ingredients. I’ve gathered the most common questions I hear about achieving that perfect texture in these crunchy bars.
Can I substitute the oat flour in these Almond Butter Crunch Bars?
That’s a great question! The oat flour is really important because it gives the base that slightly soft, yet sturdy, structure. If you don’t have oat flour, you can use regular all-purpose flour in a pinch, but you might need to add just a tiny bit more maple syrup because AP flour tends to absorb liquid differently. I haven’t tested nut flours like almond flour for the base yet, so stick to oat or regular flour for the best results in these almond butter bars. For other baking substitutions, checking out resources on baking substitutions can be helpful.
Are these truly no-bake Almond Butter Crunch Bars?
Well, sort of! I call them “nearly no-bake.” We do give that base layer a quick 10-minute bake just to help it firm up so it doesn’t crumble apart when you try to cut it. But honestly, compared to recipes that need hours of setting, this is lightning fast. The middle and top layers are completely no-bake—just melting and chilling. So yes, for all intents and purposes, they are your new favorite easy, crunchy bars! If you are looking for more quick easy recipes, check out my collection.
What is the best way to cut clean bars?
This is my number one tip for perfect presentation! You need that middle layer to be completely frozen before you try to slice through it. Once you lift the whole slab out of the pan using the parchment paper, use a large, sharp knife. Run the knife under hot water for a second, wipe it dry, and then make your cut. Wipe the knife clean and hot between every single cut. This keeps the chocolate from cracking and the layers neat, giving you beautiful, clean-edged almond butter bars every time.
Nutritional Estimates for Almond Butter Crunch Bars
I always get asked about the nutrition in these bars since I use maple syrup instead of refined sugar. While these Almond Butter Crunch Bars are a total treat, they pack a good punch of healthy fats and protein! Remember, these numbers are just estimates based on the ingredients I used, so your mileage might vary slightly depending on the brands you grab.
| Nutrient | Amount (Per Bar) |
|---|---|
| Calories | 280 |
| Fat | 20g |
| Protein | 7g |
| Sugar | 12g |
Don’t forget, these estimates are for one perfect bar cut from the batch of nine! If you enjoy treats like this, you might also love my recipe for Peanut Butter Cup Cookies.
Print
7 Amazing Almond Butter Crunch Bars Secrets
- Total Time: 75 minutes
- Yield: 9 bars
- Diet: Vegetarian
Description
Make these Almond Butter Crunch Bars for a satisfying, no-bake style treat. This recipe uses simple ingredients to create a crunchy base, creamy filling, and chocolate topping.
Ingredients
- Base Layer: 1½ cups oat flour
- Base Layer: ⅓ cup almond butter
- Base Layer: ¼ cup maple syrup
- Base Layer: 3 tbsp coconut oil, softened
- Middle Filling: ½ cup almond butter
- Middle Filling: 2 tbsp maple syrup
- Middle Filling: 2 tbsp coconut oil
- Top Coating: 1¼ cup dairy free chocolate chips
- Top Coating: 2 tbsp coconut oil
Instructions
- Preheat oven to 350°F and line an 8×8 pan with parchment paper.
- Mix all base layer ingredients until a dough forms. Press evenly into the pan.
- Bake for 10 minutes. Let cool for 10 minutes.
- Melt middle filling ingredients together until smooth.
- Spread evenly over the base layer. Freeze for 45 minutes.
- Melt chocolate chips and coconut oil until smooth.
- Remove pan from freezer, lift out using parchment paper, and cut into bars.
- Dip each bar into the chocolate mixture.
- Place on parchment paper and freeze for 5 minutes until set.
Notes
- Store in an airtight container in the refrigerator for up to 10 days or freeze up to 2 months.
- Prep Time: 20 minutes
- Cook Time: 10 minutes
- Category: Dessert
- Method: Baking and Freezing
- Cuisine: American
Nutrition
- Serving Size: 1 bar
- Calories: 280
- Sugar: 12g
- Sodium: 50mg
- Fat: 20g
- Saturated Fat: 8g
- Unsaturated Fat: 12g
- Trans Fat: 0g
- Carbohydrates: 22g
- Fiber: 3g
- Protein: 7g
- Cholesterol: 0mg