Skip to content

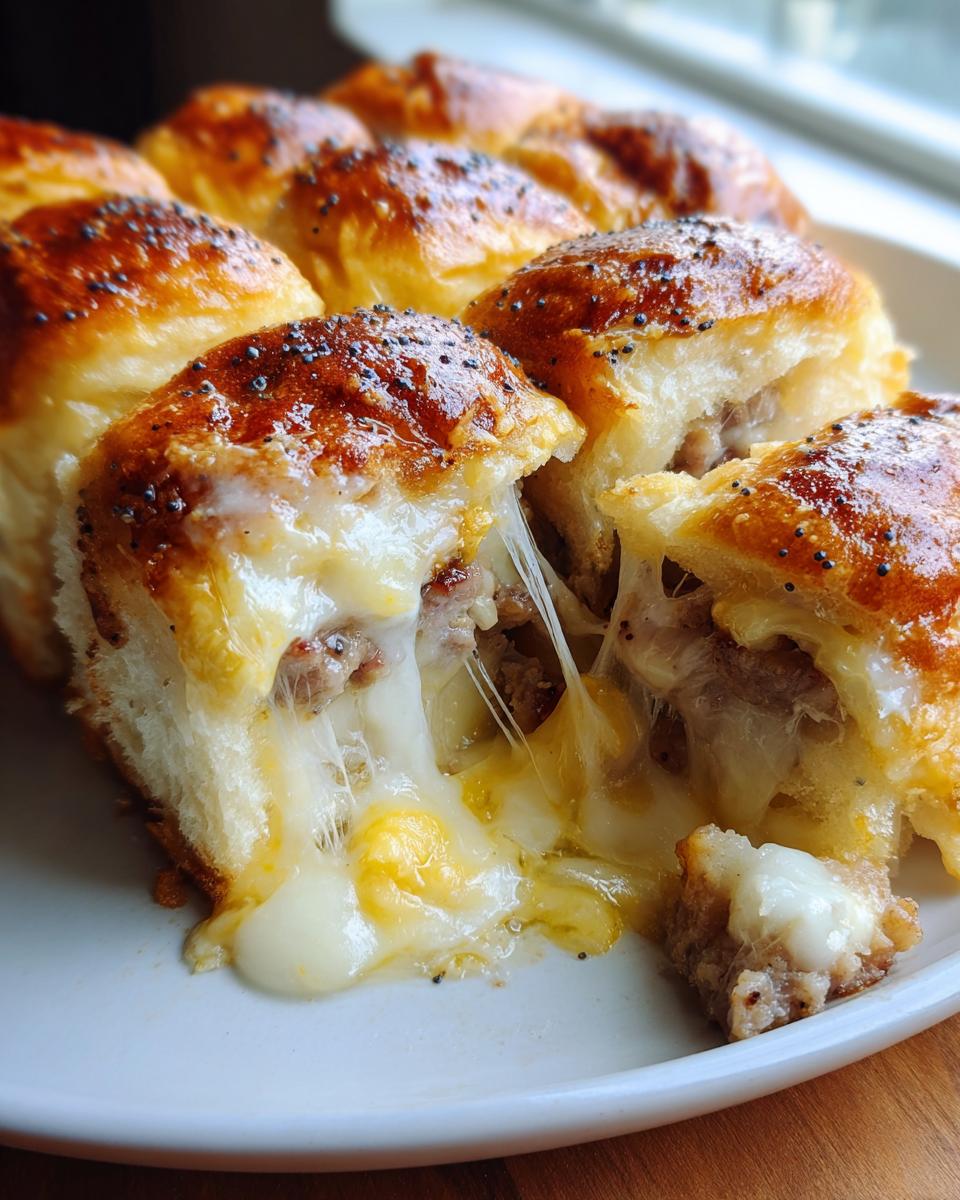
If you are hunting for a way to feed a crowd without spending all day in the kitchen, then you absolutely need these Baked Ham and Cheese Sliders in your life. Seriously, these are the ultimate easy appetizer! I’m Anna Kowalska, and here I share tried-and-true homemade recipes that you and your family will love. Everything I post here is made with heart and flavor, and I test these recipes until they are absolutely foolproof.
Forget fiddly little sandwiches! The beauty of these sliders is how quickly they come together, yet they deliver huge satisfaction. The secret lies in those sweet rolls and that incredible buttery, poppy seed topping. I’ve made this batch dozens of times for everything from game days to last-minute dinners, and they disappear every single time. Trust me, once you see how simple the assembly is, you’ll never go back to making regular sandwiches for a crowd again.

Jump to:
Why You Will Love These Baked Ham and Cheese Sliders
Seriously, these Baked Ham and Cheese Sliders are the definition of low-effort, high-reward party food. I promise they will become your go-to appetizer for any gathering. They are just so wonderfully simple to put together, and that sweet roll base combined with the savory filling is just addictive.
- Lightning-fast assembly time—you can have them ready for the oven in under 15 minutes!
- The sweet Hawaiian rolls create a soft, slightly sweet base that pairs perfectly with salty cheese and meat.
- They are the ultimate crowd-pleaser; everyone loves a warm, gooey, cheesy slider.
- That buttery, herbaceous poppy seed topping bakes up crispy and golden brown—it’s the best part!
Essential Ingredients for Perfect Baked Ham and Cheese Sliders
You don’t need a huge shopping list for these, which is another reason I love them so much! But getting these few components right is what makes these Baked Ham and Cheese Sliders truly special. Don’t skimp on the quality of your rolls or cheese here; it makes a difference!
The Foundation: Sweet Rolls and Deli Meats
You absolutely must start with the King’s Hawaiian Original Sweet Rolls. They are non-negotiable for that specific texture and sweetness that balances the savory filling. When it comes to the meat, stick to thinly-sliced deli chicken or turkey for this recipe. We aren’t using ham today, even though they are called ham and cheese sliders—chicken or turkey works better with the Swiss and Cheddar combo we have here!
Creating the Signature Poppy Seed Topping
This is where the magic happens, folks! The topping is a simple mixture but it brings so much flavor and texture. You’ll need melted unsalted butter as the base. Then, stir in that Worcestershire sauce for a little depth, along with the poppy seeds and onion powder. That combination bakes up perfectly crunchy on top.

Gathering Your Equipment for Baked Ham and Cheese Sliders
You don’t need fancy gear to make these amazing Baked Ham and Cheese Sliders, but having the right tools makes the assembly go super smooth. Since we are dealing with sticky spreads and a whole package of rolls, preparation is key! Lay everything out before you start mixing.
Baking Pans and Assembly Tools
Here is what you’ll need to pull these sliders together without making a huge mess:
- A sharp serrated bread knife: This is crucial for slicing the entire block of rolls in half horizontally without squishing them. You want clean, even cuts!
- A standard baking sheet: We use this briefly for the toasting step under the broiler.
- A light-colored glass or ceramic baking dish: A 9×13 inch dish is perfect for a 12-count package of rolls. If you use a dark pan, remember to turn the oven temperature down a little bit, or you’ll burn the bottoms.
- Small mixing bowls: You need one for your Dijon-mayo spread and another one for whipping up that delicious buttery poppy seed topping.
- A pastry brush: This helps you get the melted butter mixture evenly distributed over the tops and sides of the rolls. It’s essential for that crispy crust!
Step-by-Step Instructions for Baked Ham and Cheese Sliders
Okay, this is the fun part! Once you have all your ingredients ready, putting these Baked Ham and Cheese Sliders together is surprisingly fast. I always set up an assembly line on my counter. Remember, we are working with a whole slab of rolls here, so be gentle when slicing!
Preparing the Spread and Toasting the Buns
First things first, we need our spread. Grab a small bowl and mix up your mayonnaise and the Dijon mustard—just eyeball it until it looks nicely combined. Set that aside for a second. Now for the important step that makes the difference: toasting the inside! Preheat your broiler to high, and make sure your oven rack is about six inches from the heat source. Carefully slice the entire package of sweet rolls horizontally, keeping the top and bottom halves connected as much as possible. Lay the rolls, cut-side up, on a baking sheet. Watch them like a hawk under the broiler—seriously, one minute too long and they turn black! We only want them lightly golden, about 1 to 2 minutes max.
Once toasted, take them out. Now, preheat your main oven to 350 degrees F, middle rack position. Lightly spray your glass baking dish—this stops anything from sticking later on.
Layering and Assembling Your Baked Ham and Cheese Sliders
Time to build! Place the bottom half of the toasted rolls into your prepared baking dish. Take about half of that Dijon-mayo spread and brush it evenly over these bottom rolls. Now we layer up! Start with your thinly-sliced sharp cheddar cheese across the entire surface. Next, pile on your deli chicken or turkey—don’t be shy, but try to keep the meat relatively flat so the tops sit evenly. Then, top that with the Swiss cheese. Spread the remaining Dijon-mayo mixture onto the toasted side of the top half of the rolls. Place these tops over the Swiss layer, gently pressing down so everything settles together.
Applying the Buttery Topping and Baking Stages
This butter mixture is what makes these Baked Ham and Cheese Sliders legendary. Melt your butter and pour it into a bowl. Whisk in the Worcestershire sauce, the poppy seeds, the onion powder, and just a tiny pinch of salt if your cheeses aren’t too salty already. Drizzle this gorgeous mixture all over the top of the assembled rolls. Use your pastry brush to gently coax the butter down the sides so every inch gets coated. It’s okay if some pools in the bottom of the pan—that’s flavor!
Cover the whole dish tightly with foil and let them sit on the counter for about five minutes. This lets the bread soak up all that buttery goodness. Then, pop them into the 350-degree oven and bake covered for 20 minutes. This steams everything gently and melts the cheese perfectly. Finally, remove the foil and bake uncovered for another 5 to 10 minutes until those tops are beautifully golden brown and slightly crispy. Keep a close eye on them during this last stage!
Expert Tips for Perfect Baked Ham and Cheese Sliders
Even though these Baked Ham and Cheese Sliders are super easy, a few little tricks will take them from good to absolutely incredible. I learned these tips through trial and error—mostly error when I first tried to rush the broiling step! Pay attention to the heat and what you layer in, and you’ll never have a soggy or uneven slider again.
Timing and Temperature Control
The initial broiling step is non-negotiable, I’m telling you! Those sweet rolls go from perfect to charcoal in seconds. You want a light toast on the cut sides to give them just a tiny bit of structure so they don’t turn into mush when we add the wet ingredients. Once you switch to baking at 350 degrees F, make sure you stick to the two stages: covered, then uncovered. The foil traps the steam to melt the cheese without drying out the bread. But that final uncovered bake? That’s what gives you that signature golden, slightly crisp top layer. Don’t walk away during those last 5 to 10 minutes!
Ingredient Notes and Acceptable Substitutions
When it comes to cheese, thickness matters more than anything else for these Baked Ham and Cheese Sliders. Make sure your cheddar and Swiss are thinly sliced—the thick-cut stuff takes forever to melt completely and might release too much oil before the bread is done. If you are making these for someone who avoids pork, sticking to that thinly-sliced turkey or chicken is perfect. Even though the recipe is called Ham and Cheese, these poultry versions are just as delicious and hold up beautifully under that buttery topping. Don’t try to substitute the sweet rolls, though; that’s the whole point of the flavor profile!
Serving Suggestions for Your Baked Ham and Cheese Sliders
Once these Baked Ham and Cheese Sliders come out of the oven, gooey and smelling amazing, you need something on the side to balance out all that richness and sweetness. They are so satisfying on their own, but a little fresh contrast really makes the whole meal pop. I always try to lighten things up so we don’t feel weighed down after eating a few of these beauties!
Pairing Ideas
Because the rolls are sweet and the cheese is rich, I lean toward sides that are tangy, vinegary, or super fresh. They cut right through the butter beautifully.
- Tangy Coleslaw: A crisp, vinegar-based slaw is my number one choice. Skip the heavy mayo-based ones; the crunch and tang are exactly what these sliders need.
- Simple Green Salad: Just some mixed greens, maybe a few cucumber slices, and a bright lemon vinaigrette. Keep the dressing light!
- Dill Pickle Spears: The sharp, salty dill flavor is the perfect palate cleanser between bites of warm, gooey cheese.
- Sweet Potato Fries: If you want something warm, sweet potato fries offer a nice earthy balance, though you might want to skip any extra dipping sauce.
- Tomato Soup (for dipping!): If you are serving these for a cozy night in, a small cup of creamy tomato soup for dipping is heaven—it’s like a grown-up grilled cheese experience!
Storing and Reheating Leftover Baked Ham and Cheese Sliders
Oh, the rare occasion when we have leftovers of these incredible Baked Ham and Cheese Sliders! They are usually gone in minutes, but if you manage to save a few, you want to make sure you store and reheat them correctly. Nobody wants a soggy slider the next day, right? The key is keeping that beautiful poppy seed topping from getting completely soft.
Storage Guidelines
If you have any remaining sliders, you need to get them stored quickly so the cheese doesn’t solidify into a hard block and the bread doesn’t dry out completely. Don’t leave them sitting on the counter for too long. Place the leftovers in an airtight container. You can usually get away with keeping them at room temperature for a few hours, but for anything longer, pop them straight into the refrigerator. They usually stay perfectly good for about three days this way, though honestly, the texture is best within the first 24 hours.
Here is a quick look at what you can expect:
| Item | Storage Method | Approximate Shelf Life |
|---|---|---|
| Baked Ham and Cheese Sliders | Airtight Container | 3 Days Refrigerated |
Reheating Methods
You have two options for reheating your leftover Baked Ham and Cheese Sliders, but I highly recommend the oven if you want to save that crisp topping. Microwaving them works fast, but it turns the bread soft and steamy, and the topping gets damp. Not ideal!
For the best texture, use the oven. Preheat your oven to 350 degrees F. Place the sliders on a baking sheet (you can line it with foil if you worry about cheese residue). Bake them uncovered for about 8 to 12 minutes. This allows the residual moisture to evaporate and crisps up that buttery topping again while gently melting the cheese. If you are in a huge rush and must use the microwave, only heat them for about 20 to 30 seconds until just warm, but be prepared for a softer crust.
Frequently Asked Questions About Baked Ham and Cheese Sliders
I get so many questions about these Baked Ham and Cheese Sliders because everyone wants to make them perfectly for their next party! Here are a few things I hear most often when people are planning their baking day.
Can I Make These Ahead of Time?
You absolutely can prep these ahead of time, which is a lifesaver when hosting! You can assemble the entire thing—bottom buns, meat, cheese, top buns, and the Dijon-mayo spread—the night before. Keep the entire thing covered tightly in the baking dish in the refrigerator. However, I strongly suggest you wait to pour that amazing buttery poppy seed topping over them until about 15 minutes before you plan to bake. If you put the butter topping on too early, the raw poppy seeds can get a bit soggy sitting in the fridge. Assemble everything else, then top and bake as directed!
What Cheese Works Best Besides Cheddar and Swiss?
While the Cheddar and Swiss combination provides that perfect sharp and nutty melt, you have a few great options if you need to swap things out for your Baked Ham and Cheese Sliders. Provolone melts beautifully and offers a milder flavor that lets the sweet rolls shine through. Monterey Jack is another excellent choice if you want maximum meltiness without too much sharpness. Just make sure whatever you choose is sliced thinly, just like the recipe calls for!
Are these sliders too sweet for a main meal?
That’s a common concern! Since we use King’s Hawaiian sweet rolls, they definitely have a touch of sweetness, but layering them with sharp cheddar, savory deli meat, and that salty Worcestershire sauce in the topping balances it out completely. They make fantastic party food, but I often serve them for a quick weeknight dinner alongside a big salad or soup. They are rich, but they aren’t overly sugary, trust me!
Nutritional Estimate for Baked Ham and Cheese Sliders
Now, before you dive headfirst into a whole stack of these amazing Baked Ham and Cheese Sliders, I always like to give a little heads-up about the nutrition side of things. Because we are using whole rolls and lots of that delicious buttery topping, they are definitely a treat!
Please remember that these numbers are just an estimate. The exact count can change a bit based on the brand of sweet rolls you buy, how much butter soaks into the pan versus staying on top, and the specific sodium levels in your deli meat and cheese. I calculated this based on making 12 total servings, meaning this estimate is for two sliders per serving size.
If you are counting strictly, you might want to use lower-sodium cheese, but honestly, the flavor payoff is worth the slight variation!
| Nutrient | Estimated Amount (Per 2 Sliders) |
|---|---|
| Calories | 495kcal |
| Protein | 23g |
| Carbohydrates | 33g |
| Fat | 30g |
| Sodium | 814mg |

Baked Ham and Cheese Sliders: 1 Amazing Recipe
- Total Time: 45 minutes
- Yield: 12 sliders 1x
- Diet: Vegetarian
Description
Bake these easy Ham and Cheese Sliders for a crowd-pleasing appetizer or quick meal. The sweet rolls bake up golden with a savory, buttery poppy seed topping.
Ingredients
- 1 package King’s Hawaiian Original Sweet Rolls (12-count)
- 3 tablespoons mayonnaise
- 2 tablespoons Dijon mustard
- ½ pound thinly-sliced deli chicken or turkey
- ¼ pound deli-sliced sharp cheddar cheese
- ¼ pound deli-sliced Swiss cheese
- 4 tablespoons unsalted butter, melted
- 1 teaspoon Worcestershire sauce
- 1–1/2 teaspoons poppy seeds
- ½ teaspoon onion powder
- pinch kosher salt, if needed
Instructions
- Stir mayonnaise and 2 tablespoons Dijon mustard in a small bowl to make the slider spread. Set aside.
- Slice the slider buns in half horizontally using a serrated bread knife. Place the cut sides up on a baking sheet.
- Preheat your oven’s broiler to high with the rack in the second position from the top (about 6 inches from the element). Broil the cut sides only for 1-2 minutes until lightly toasted. Monitor closely to prevent burning.
- Preheat the oven to 350 degrees F with the rack in the middle position. Lightly spray a glass or light-colored ceramic baking dish with cooking spray. If using a dark pan, reduce the oven temperature to 325 degrees F.
- Place the bottom half of the toasted rolls in the prepared baking dish. Spread a little more than half of the Dijon-mayo mixture onto these rolls.
- Assemble the sliders by layering: cheddar cheese, chicken or turkey, and Swiss cheese. Spread the remaining Dijon-mayo onto the toasted side of the top half of the rolls and place them over the Swiss cheese layer.
- In a small bowl, combine the melted butter, Worcestershire sauce, poppy seeds, onion powder, and a pinch of salt (if using). Pour this mixture over the sliders, brushing evenly over the tops and sides. Some butter pooling in the dish is acceptable.
- Cover with foil and let stand for 5 minutes. Bake for 20 minutes until heated through and the cheese melts.
- Remove the foil and bake for another 5-10 minutes until the tops are golden and crispy. Watch carefully during this final baking stage.
- Let the sliders stand for a few minutes before cutting into individual servings. Serve hot.
Notes
- Nutrition Estimate per serving: 2 sliders
- Calories: 495kcal
- Carbohydrates: 33g
- Protein: 23g
- Fat: 30g
- Saturated Fat: 15g
- Trans Fat: 0.3g
- Cholesterol: 110mg
- Sodium: 814mg
- Sugar: 12g
- Prep Time: 15 minutes
- Cook Time: 30 minutes
- Category: Appetizer/Sandwich
- Method: Baking
- Cuisine: American
Nutrition
- Serving Size: 2 Sliders
- Calories: 495kcal
- Sugar: 12g
- Sodium: 814mg
- Fat: 30g
- Saturated Fat: 15g
- Unsaturated Fat: 10g
- Trans Fat: 0.3g
- Carbohydrates: 33g
- Fiber: 0.4g
- Protein: 23g
- Cholesterol: 110mg