Skip to content
When the afternoon light hits just right and you need something sweet but don’t want to spend half the day in the kitchen, you need something truly special. That’s why I’m sharing my recipe for Baked Sugar Puff Nuggets today! These little bites are pure magic—light as air, slightly crisp on the outside, and ready faster than you can decide what to watch next. I’m Anna Kowalska, and here I share tried-and-true homemade recipes that you and your family will love. Everything here is made with heart and flavor, just like my grandmother taught me during those long, golden summer evenings when we’d bake simple treats to enjoy on the porch.
Forget those complicated pastries you see online. These Baked Sugar Puff Nuggets prove that simple ingredients—flour, butter, sugar, eggs—can transform into an incredibly satisfying homemade snack. Trust me, once you nail the texture on these, they’ll become your go-to easy dessert for any time of day.
Jump to:
Why You Will Love These Baked Sugar Puff Nuggets
I hear you—you want delicious results without the fuss. That’s exactly what these Baked Sugar Puff Nuggets give you! They are the perfect answer when you need a satisfying treat fast. There’s no fancy equipment or long resting periods needed here, just pure, simple joy.
- They are unbelievably fast! You get a homemade snack on the table in under 40 minutes total.
- The flavor is perfectly balanced—sweet but not heavy, making them dangerous to keep around the house.
- They are so versatile; they work just as well for a quick breakfast treat as they do for an easy dessert after dinner.
Quick Prep and Bake Times
Seriously, this is the best part. From the moment you start mixing to the moment they come out golden brown, the whole process clocks in at about 35 minutes. That means you can decide you want a fresh baked treat at 5 PM and have them ready before 6 PM. It’s genuinely the quickest way to satisfy a serious baking craving!
Achieving That Signature Lightness
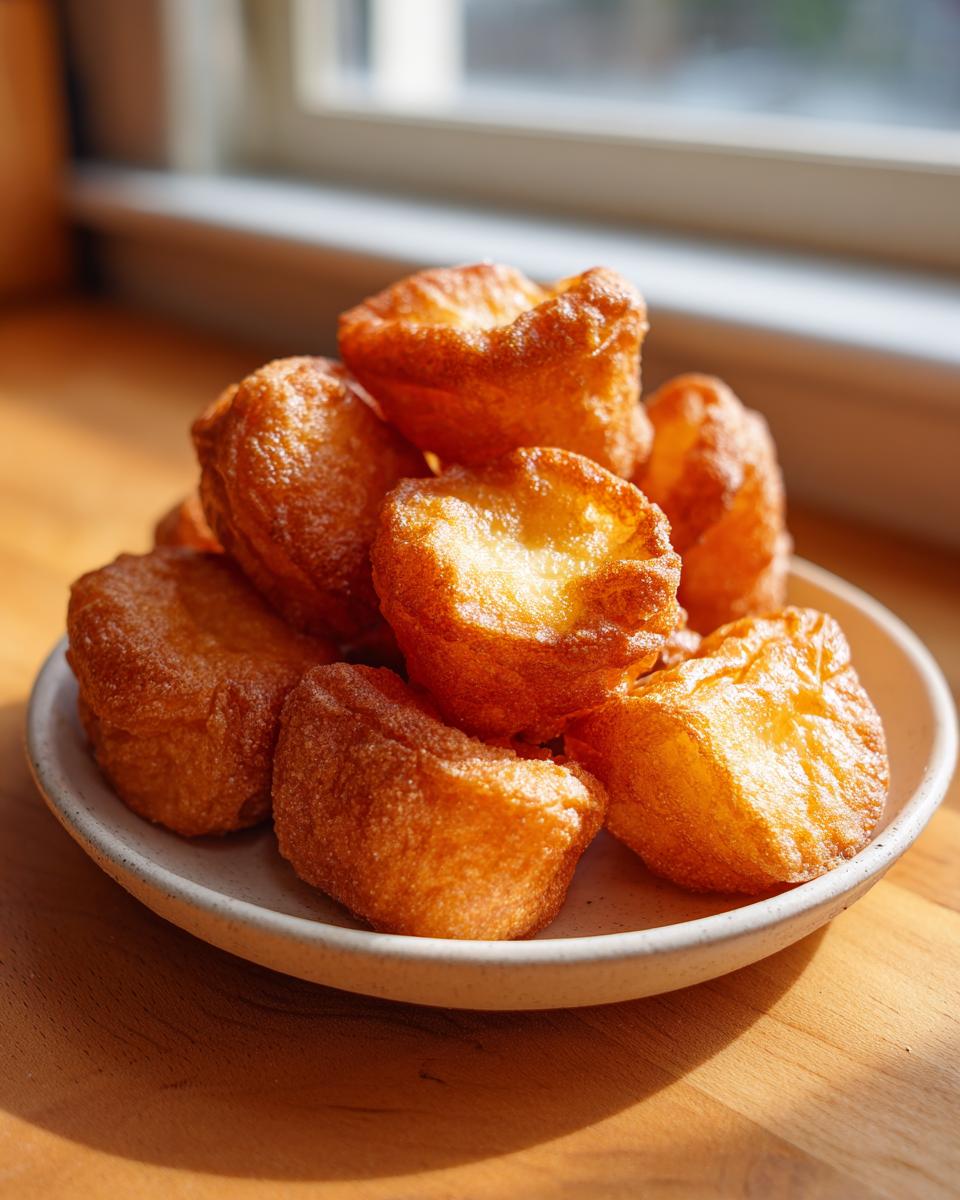
The goal here isn’t a dense cookie; it’s airy perfection! We are aiming for a shell that snaps slightly when you bite into it, giving way to a wonderfully light, almost hollow interior. That crisp exterior is non-negotiable, and it’s what separates a good nugget from a great one. It’s all about that perfect puff!
Essential Ingredients for Baked Sugar Puff Nuggets
You won’t find any weird, hard-to-find items here, I promise! The beauty of making Baked Sugar Puff Nuggets at home is that they rely on pantry staples we usually have on hand. We are building flavor and structure with just five core components. I always keep these things stocked because you never know when a baking emergency might strike!
Don’t worry about exact measurements right now; I’ve laid out everything precisely in the table below, but understanding *why* we use these specific versions of the ingredients is half the battle won. Getting the preparation right on these five things ensures you get that signature puff and that lovely crisp shell we talked about.
Ingredient Clarity and Preparation
The difference between a flat, sad nugget and a beautifully puffed one often comes down to simple prep work. Pay attention to these details:
- Flour: Just your standard all-purpose flour works perfectly here. Make sure you spoon it lightly into your measuring cup and level it off—don’t pack it down!
- Butter: This needs to be chilled and cut into small cubes. Cold butter is crucial for creating the steam pockets needed for that big lift.
- Sugar: I prefer standard granulated sugar for the dough, as it dissolves nicely while mixing. If you are coating them later, you might want caster sugar for a finer finish.
- Water: Use cold water for the dough. Just like the butter, we want everything as cool as possible initially before the heat hits it.
- Eggs: Large eggs are what the recipe calls for, and they absolutely must be at room temperature. Cold eggs can seize up the butter when added, which ruins the texture we are aiming for. Set them out about 30 minutes before you start mixing!
Equipment Needed for Your Baked Sugar Puff Nuggets
You don’t need a fancy bakery setup to make these at home, which is part of the charm! Having your tools ready before you start mixing makes the whole 20-minute prep time fly by. I always lay everything out on the counter so I can move quickly from step to step.
- A sturdy mixing bowl for bringing the dough together.
- A rolling pin to get the dough to the right thickness.
- A sharp knife or a small cookie cutter to shape the nuggets.
- A good quality baking sheet.
- Parchment paper is my best friend here; it prevents sticking and helps with cleanup!
Step-by-Step Instructions to Make Baked Sugar Puff Nuggets
Okay, this is where the magic happens! Follow these steps closely, and you’ll be pulling perfectly puffed, golden Baked Sugar Puff Nuggets out of the oven before you know it. Remember, precision in the dough stage pays off big time when they start rising!
Preparing and Developing the Dough Base
First things first, let’s get our oven ready to work. Preheat your oven to 400 degrees Fahrenheit. We need a hot start to get that immediate steam action that makes these puff up so beautifully. Don’t skip this preheating step!
In your mixing bowl, combine the flour and the sugar. Give that a quick whisk just to make sure everything’s evenly distributed. Now, add your chilled, cubed butter. This is a crucial moment! You need to work that butter into the dry ingredients until the mixture looks like coarse cornmeal or tiny peas. I use my fingertips for this because I can feel when the butter is just the right size. If you use a food processor, pulse gently—you don’t want to blend it into a paste!
Next, we add the liquid components. Whisk your egg with the cold water in a separate small cup. Make a well in the center of your flour-butter mixture and pour in the liquid all at once. Mix quickly with a wooden spoon or rubber spatula until just combined. Do not overmix! The dough will look shaggy and slightly messy; that’s exactly what we want for this type of recipe. Turn the shaggy mass out onto a lightly floured surface.
Shaping and Sizing Your Baked Sugar Puff Nuggets
Now we need to bring the dough together. Knead it just two or three times—enough to form a cohesive ball. Over-kneading develops too much gluten, and we want light and airy, not tough like bread. Wrap the dough tightly in plastic wrap and let it rest in the refrigerator for about 10 minutes. This chilling time helps the butter firm up again, which is essential for the next step.
After chilling, dust your surface lightly again. Roll the dough out evenly until it’s about a quarter-inch thick. You want consistency so they all bake at the same rate. Now, take your knife or favorite small cutter and slice or stamp out your nugget shapes. They don’t have to be perfect squares or ovals—that rustic, uneven look adds to the charm of a homemade snack!
If the dough starts getting sticky while you work, just pop it back in the fridge for five minutes. Place the cut nuggets onto a baking sheet lined with parchment paper, leaving about an inch of space between each one so they have room to expand without touching.
The Baking Process for Maximum Puff
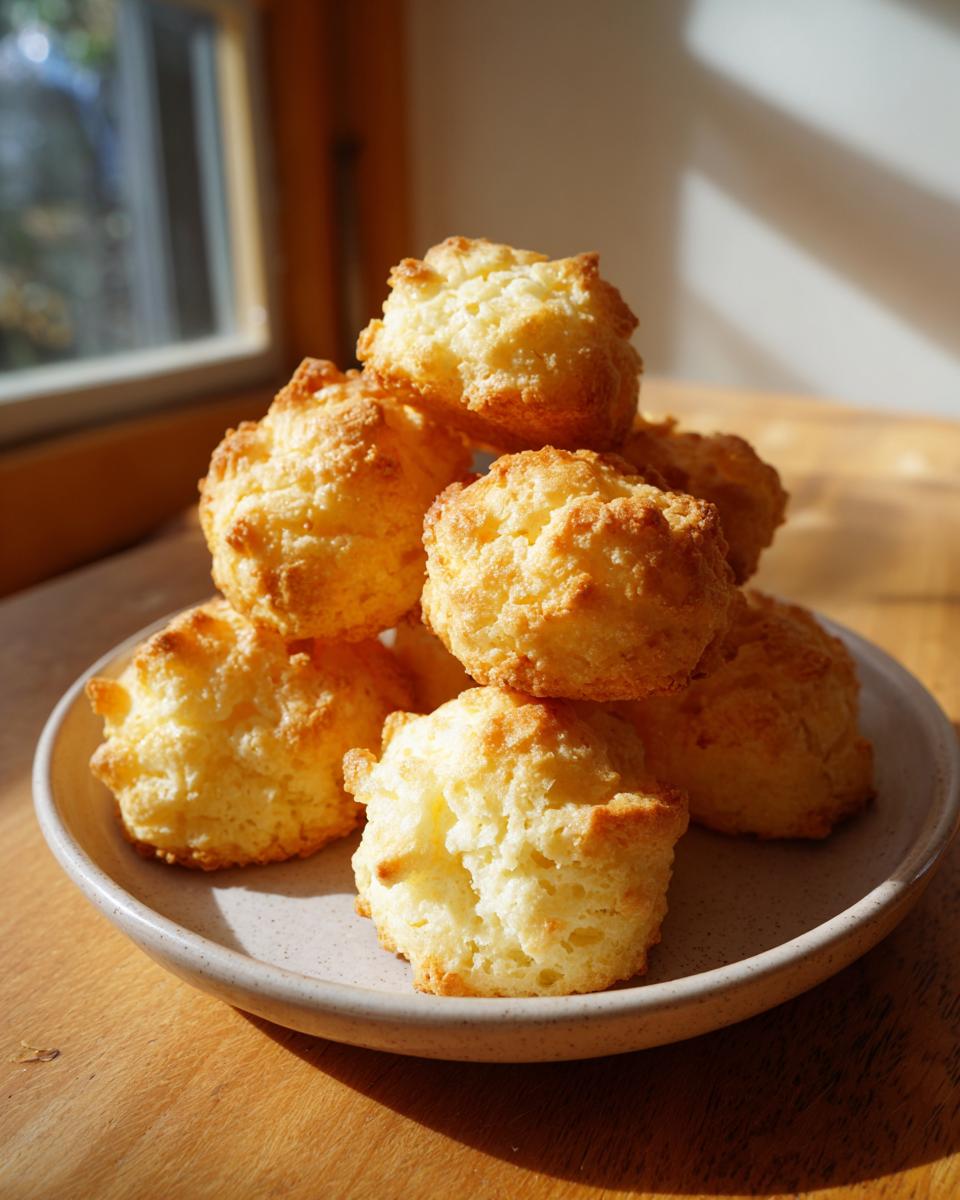
Carefully place your baking sheet onto the middle rack of your preheated 400-degree oven. Set your timer for 12 minutes initially. Watch them closely after that 12-minute mark. You are looking for them to balloon up significantly—they should look dramatically puffed!
Once they are visibly puffed and starting to turn a pale golden color, you can give them another minute or two until they achieve that desired slightly crisp exterior. If you see them browning too quickly, pull them back a shelf, but don’t pull them out until they look set. They should feel light when you gently lift one with a spatula.
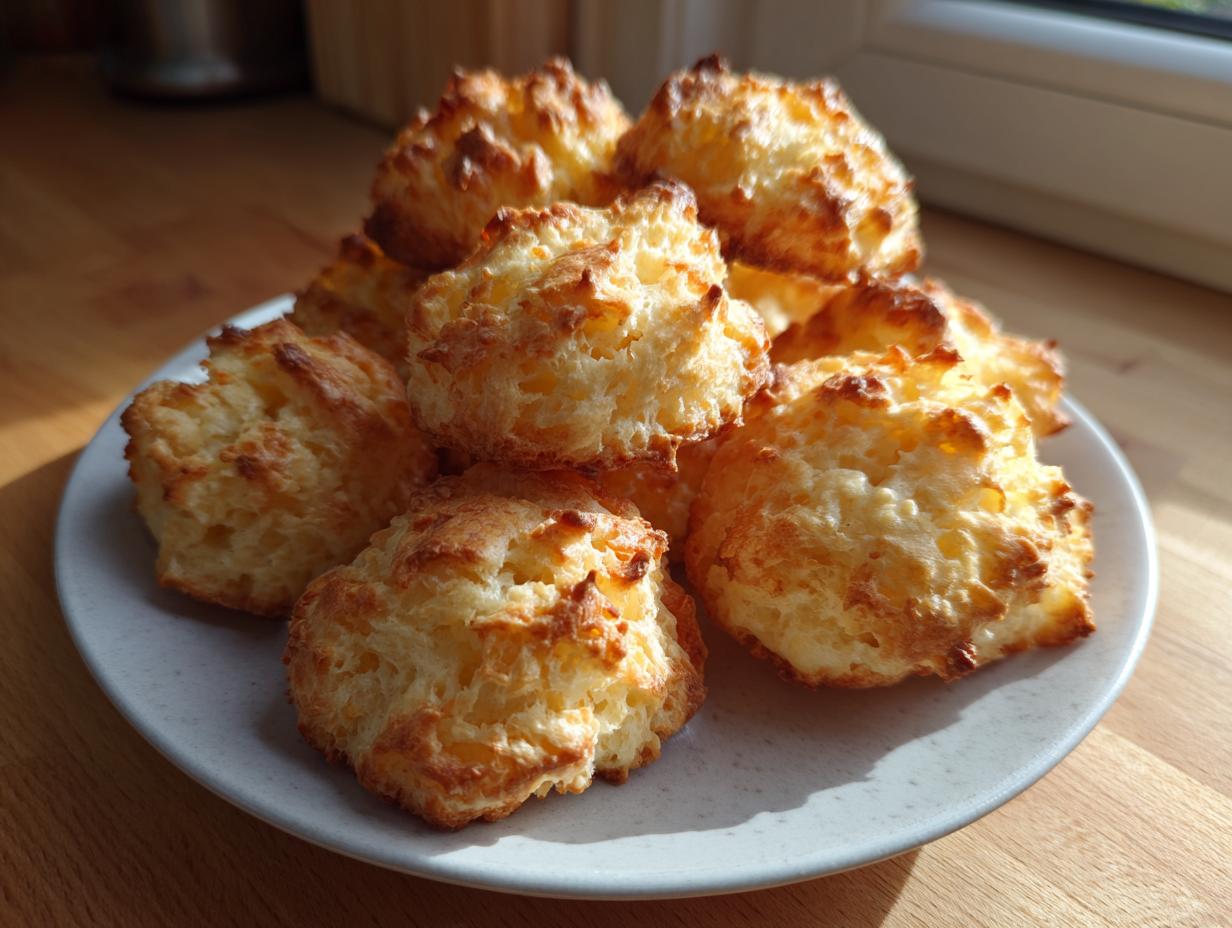
Remove the sheet from the oven immediately. Let the Baked Sugar Puff Nuggets cool on the pan for just about five minutes before transferring them to a wire rack to cool completely. They will deflate just a tiny bit as they cool, but they should maintain most of their gorgeous height!
Tips for Success with Baked Sugar Puff Nuggets
I’ve made dozens of batches of these—sometimes they are perfect, and sometimes they end up a little flatter than I’d like. Baking is chemistry, right? But a few little tricks I’ve picked up over the years make a huge difference between a good nugget and a fantastic, soaring one. Keep these points in mind, and you’ll master the puff!
Temperature Control is Key
The oven temperature has to be right—and I mean spot-on right! If your oven runs cool, you won’t get that immediate blast of heat needed to turn the water in the dough into steam fast enough. That steam is what physically pushes the dough up. If you have an oven thermometer, trust it over the dial. A consistent 400 degrees Fahrenheit is your best friend for maximum rise. For more on how oven temperatures affect baking, check out this guide to oven thermometers.
Avoiding a Soggy Bottom
We talked about wanting that crisp shell, and that crispness has to happen on the bottom too! Never place the baking sheet directly onto the lowest rack, especially if you have a gas oven where the heat source is below. I always place mine on the middle rack. If you notice the bottoms are browning faster than the tops, try placing the sheet on a second, empty baking sheet underneath it. This acts as a heat buffer and spreads the temperature out evenly.
Ingredient Substitutions for Baked Sugar Puff Nuggets
Part of the joy of home baking is knowing you can adapt things if you run out of one item. While my original recipe for Baked Sugar Puff Nuggets calls for standard granulated sugar and real butter, you absolutely have options if you need them. Just remember, sometimes substitutions affect the final texture, especially the puff!
If you are out of granulated sugar, fine caster sugar works wonderfully because it dissolves faster, which is helpful for the dough. Brown sugar is generally a no-go here because its extra moisture content can weigh down the batter and prevent that high rise we are looking for. For the butter, you can substitute with a high-quality vegetable shortening, but you will lose some of that rich, buttery flavor. If you use shortening, make sure it is cold, just like the butter would have been. Stick to the eggs, though; they are too important for structure to mess around with in this particular recipe! If you are looking for other great baking tips, check out my recipe for the best zucchini bread recipe.
Frequently Asked Questions About Baked Sugar Puff Nuggets
I know you might still have a few questions buzzing around after seeing how quick this recipe is! It’s a little different from standard cookies or cakes, so it’s natural to wonder about the details. Here are some things folks ask me all the time about making this easy dessert at home.
Can I make these ahead of time?
You certainly can prepare the dough ahead of time! Wrap the unbaked dough tightly and keep it in the fridge for up to two days. When you’re ready to bake, just let the dough sit out for about 10 minutes to soften slightly before rolling and cutting. For long-term storage, see my section below on keeping them crisp!
What makes these nuggets so light?
It’s all about the steam! Because the dough is relatively lean and we use very cold butter, when the dough hits that hot oven, the water in the butter and the egg turns into steam almost instantly. This steam is what physically pushes the dough up. It’s a lot like how a true puffed pastry works, but much simpler to achieve! Understanding the science behind steam leavening can help with all your baking projects, like learning about steam in baking.
What is the best sugar to use for the coating?
If you want a super fine, melt-in-your-mouth coating that looks beautiful, use caster sugar if you have it. It’s granulated sugar processed into finer crystals. If you don’t have caster sugar, just pulsing regular granulated sugar a few times in a clean blender or food processor will do the trick perfectly for that final dusting!
Storing and Reheating Your Homemade Snack
Since the best part of these Baked Sugar Puff Nuggets is that light, crisp shell, storage is important! Do not seal them in an airtight container right away, or the trapped moisture will make them soft. Let them cool completely on a wire rack first—that’s non-negotiable!
Once totally cool, store them in a paper bag or an unsealed cookie tin at room temperature for up to three days. If they lose a little crispness, just pop them back in a 300-degree oven for about 3 minutes to refresh them. Check the storage table below for quick reference!
Share Your Perfect Baked Sugar Puff Nuggets
I put my heart and soul into these recipes, and nothing makes me happier than seeing them come to life in your kitchens! If you tried these Baked Sugar Puff Nuggets, please let me know how they turned out. Leave a rating below, or better yet, snap a picture and share it on social media! Seeing your family enjoy these simple, flavorful homemade snacks really builds the community here. For more simple, satisfying snacks, check out my recipe for peanut butter cup cookies.
Print
Amazing 35-Minute Baked Sugar Puff Nuggets
- Total Time: 35 minutes
- Yield: 12 nuggets
- Diet: Vegetarian
Description
Baked Sugar Puff Nuggets are light, airy treats with a slightly crisp exterior, perfect for a simple, satisfying snack.
Ingredients
- Flour
- Water
- Butter
- Sugar
- Eggs
Instructions
- Prepare the dough.
- Shape the dough into nuggets.
- Bake the nuggets until they are fully puffed.
Notes
- Achieve a slightly crisp shell on the nuggets.
- Prep Time: 20 minutes
- Cook Time: 15 minutes
- Category: Dessert
- Method: Baking
- Cuisine: American
Nutrition
- Serving Size: 1 nugget
- Calories: 120
- Sugar: 8g
- Sodium: 50mg
- Fat: 5g
- Saturated Fat: 3g
- Unsaturated Fat: 2g
- Trans Fat: 0g
- Carbohydrates: 15g
- Fiber: 1g
- Protein: 3g
- Cholesterol: 30mg