Skip to content
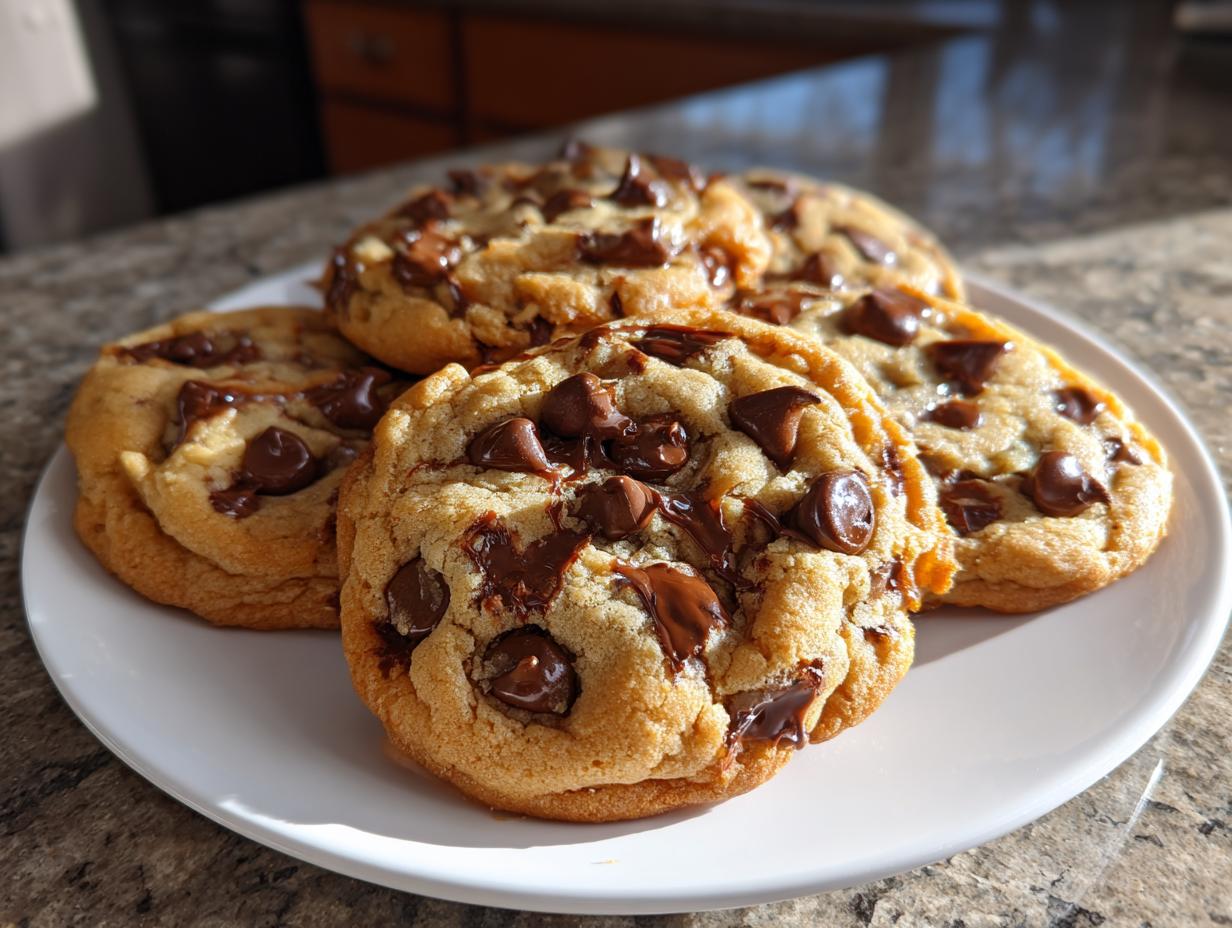
Alright, let’s talk about truly amazing Bakery-Style Chocolate Chip Cookies. As Anna Kowalska, I’ve always believed that the best food comes straight from the heart, and that’s exactly what you’ll find in my kitchen – recipes made with love and bursting with flavor. These aren’t just any cookies; they’re my special take on that perfect bakery cookie, the kind that makes you close your eyes and smile. I remember spending hours experimenting, trying to get that *exact* chewy center and slightly crisp edge, loaded with pockets of melty chocolate. It took a few tries, but this recipe? It’s the one that finally nailed it, and I’m so excited to share it with you!
Jump to:
Why These Bakery-Style Chocolate Chip Cookies Are a Must-Try
Honestly, if you’re looking for a cookie that just hits *all* the right notes, you’ve found it. These Bakery-Style Chocolate Chip Cookies are the real deal, and I promise, they’re worth every second you put into them. What makes them so special? Well, let me tell you:
- They have this incredible texture – super thick and chewy in the middle, with just the slightest crisp on the edges. It’s the perfect balance, you know?
- The flavor is just unreal. We’re talking a rich, buttery base that really lets the chocolate shine. It’s that classic, comforting taste you crave.
- And the chocolate! Oh my goodness, the chocolate. We’re loading these up with three different kinds – semi-sweet chips, milk chocolate chips, and even chunks of a dark chocolate bar. It makes every bite an adventure.
- Plus, they’re surprisingly simple to whip up! Even if you’re not usually a big baker, you can totally nail these. They’re the perfect homemade treat to impress your friends or just make a Tuesday feel like a weekend.
Seriously, they’re the kind of cookies that disappear fast, and everyone will be asking for the recipe. That’s how you know you’ve got a winner!
Gather Your Ingredients for Bakery-Style Chocolate Chip Cookies
Okay, so to get those perfect Bakery-Style Chocolate Chip Cookies, we need to be a little bit specific with our ingredients. Don’t worry, it’s nothing crazy, just a few key things that make a huge difference. Think of it like building a great foundation for a delicious house! We want everything to be just right so the final cookie is pure magic. I always lay everything out before I start mixing, it just makes the whole process smoother and way more enjoyable. Trust me, having everything ready to go is half the battle!
Flour Power for Perfect Bakery-Style Chocolate Chip Cookies
This is where we get that signature bakery texture! Instead of just one type of flour, we’re using a mix. We’ve got a cup of all-purpose flour for structure, but then we add a cup of cake flour. Cake flour has less protein, which means it creates a super tender crumb. It’s the secret to getting that soft, melt-in-your-mouth quality without the cookies spreading too thin. Plus, a little bit of cornstarch is in there too, which helps bind everything together and makes them extra soft. It’s a little trick I picked up that really makes a difference!
Sweeteners and Binders for Richness
For that deep, caramel-y flavor and perfect chewiness, we’re using both granulated sugar and dark brown sugar. Make sure that brown sugar is packed down into the cup – that’s where all the good moisture and molasses flavor lives! And for binding and richness, we’ve got one large egg plus an extra egg yolk. That extra yolk is pure gold for making cookies extra rich and chewy. Don’t forget the vanilla extract, too; it just rounds out all those flavors and makes everything taste even better. It’s the little things, right?
The Chocolate Blend for Ultimate Indulgence
Now for the best part – the chocolate! We’re not messing around here. We’re using a mix of semi-sweet chocolate chips and milk chocolate chips for a balanced sweetness and melty texture. But to really take it over the top, we’re also adding chunks of a good quality dark chocolate bar. When these melt into the dough, they create these amazing pockets of intense chocolatey goodness. It’s what makes these cookies feel truly decadent and bakery-worthy. So grab your favorite chocolate, we’re going all out!
Step-by-Step Guide to Baking Bakery-Style Chocolate Chip Cookies
Alright, let’s get these amazing Bakery-Style Chocolate Chip Cookies into the oven! It’s a pretty straightforward process, but there are a couple of things that really make a difference, so pay attention! My kitchen always smells incredible when I get to this stage, and you’re about to experience it too.
Preparing the Dough for Bakery-Style Chocolate Chip Cookies
First things first, we need to get our dry ingredients mixed. In a medium bowl, just give a whisk to the all-purpose flour, cake flour, baking powder, baking soda, salt, and that little bit of cornstarch. Set that aside for a sec. Now, grab your stand mixer – or a good sturdy bowl and a whisk if you’re feeling strong! – and beat the softened butter with both the granulated and dark brown sugars. You want to mix this on medium speed for about 2-3 minutes until it’s really light and fluffy. This step is super important for the texture! Then, mix in the egg, the extra egg yolk, and the vanilla extract until it’s all smooth and combined. Don’t forget to scrape down the sides of the bowl so everything gets incorporated. Now, gradually add those dry ingredients to the wet mixture, mixing on low speed. Stop mixing as soon as it’s just combined – seriously, don’t overmix! Finally, use a spatula to gently fold in all those lovely chocolate chips and chunks. This is the part where you really want to distribute them evenly. Now for the magic: cover the bowl and pop it in the fridge for at least an hour. I sometimes let it go for 24 hours because the flavor gets even deeper, but an hour is the minimum. This chilling step is crucial for getting those thick, chewy cookies!
Shaping and Baking Your Bakery-Style Chocolate Chip Cookies
Okay, dough is chilled and ready to go! Preheat your oven to 350°F (177°C). While the oven heats up, grab a baking sheet and line it with parchment paper. This makes cleanup a breeze and stops any sticking. Now, you want to scoop out pretty big balls of dough – I usually use about a 1/3 cup scoop. It might seem like a lot, but remember, these are bakery-style! Place them on your prepared baking sheet, making sure to leave about 3 inches between each one because they will spread a bit. Now, pop them into the preheated oven and bake for about 15 to 18 minutes. The key here is to not overbake them! You want the edges to look set and lightly golden, but the centers should still look a little soft and maybe even a tiny bit underbaked. That’s exactly what you’re going for to get that perfect chewy center. Trust me on this!
Tips for Achieving Bakery-Style Chocolate Chip Cookie Perfection
You know, getting these Bakery-Style Chocolate Chip Cookies just right is all about a few little secrets I’ve picked up over the years. It’s those small details that really turn a good cookie into an absolutely amazing one. Don’t worry if your first batch isn’t *exactly* like the picture – baking is a journey, and mine definitely had its moments!
The Secret to Thick Bakery-Style Chocolate Chip Cookies
The absolute biggest secret to getting these cookies thick and gorgeously chewy, not flat and sad, is chilling the dough. Seriously, don’t skip this step! Letting the dough rest in the fridge for at least an hour (or even better, overnight!) allows the fats to firm up and the flour to hydrate properly. This means the cookies spread less in the oven and hold their shape, giving you that perfect thick profile. Also, making sure your butter isn’t too soft when you start creaming is key – it should be soft, but not melty. That helps too!
Cooling and Storing Your Bakery-Style Chocolate Chip Cookies
Once they’re out of the oven, resist the urge to move them immediately! Let your beautiful Bakery-Style Chocolate Chip Cookies cool on the baking sheet for about 5 to 10 minutes. They’re still quite soft when they come out and need that little bit of time to set up properly. If you move them too soon, they might just crumble apart. After that initial cooling, gently transfer them to a wire rack to cool completely. For storing, just pop them into an airtight container once they’re totally cool. They’ll stay wonderfully chewy and delicious for a good few days!
Frequently Asked Questions About Bakery-Style Chocolate Chip Cookies
Got questions about these amazing Bakery-Style Chocolate Chip Cookies? I’ve got answers! Baking should be fun, not frustrating, so let’s clear up anything that might be on your mind. I’ve definitely learned a thing or two over the years, and I love sharing those little tips that make all the difference.
What makes these cookies “bakery-style”?
That’s a great question! What really sets these apart is the texture and the richness. We use a combination of all-purpose and cake flour for that perfect thick, chewy center with just slightly crisp edges – no flat cookies here! Plus, the extra egg yolk and the specific mix of sugars give them this incredible buttery flavor and a satisfying chewiness that you just don’t get with a standard chocolate chip cookie recipe. And of course, loading them up with three kinds of chocolate doesn’t hurt!
Can I use different types of chocolate?
Absolutely! While I adore the blend of semi-sweet, milk, and dark chocolate chunks in this recipe, feel free to get creative. White chocolate chips, peanut butter chips, or even chopped toffee would be delicious additions. Just keep in mind that different chocolates have different melting points and sweetness levels, so it might change the final cookie slightly, but it’ll still be yummy! I sometimes use a mix of chopped chocolate bars and chips for the best melt factor.
How long can I chill the cookie dough?
This is a big one for texture and flavor! You need to chill the dough for at least 1 hour, but honestly, the longer the better. I often let it sit in the fridge for 24 hours, or even up to 48 hours. Chilling allows the flour to fully hydrate and the flavors to really meld together, which results in a thicker, chewier cookie with a much more complex, rich taste. It really makes a noticeable difference, so if you can plan ahead, I highly recommend it!
Nutritional Information for Bakery-Style Chocolate Chip Cookies
Now, I’m not a nutritionist or anything, but I know a lot of you like to know the general stats for your treats. These numbers are estimates, of course, because every batch of my Bakery-Style Chocolate Chip Cookies is made with love and a little bit of kitchen magic! They’re a decadent dessert, so enjoy them as a wonderful indulgence. Here’s a rough idea of what you’re getting in one cookie:
Print
Amazing Bakery-Style Chocolate Chip Cookies: 3 Secrets
- Total Time: 1 hour 38 minutes
- Yield: Approximately 18-24 cookies 1x
- Diet: Vegetarian
Description
Anna Kowalska shares her recipe for Bakery-Style Chocolate Chip Cookies, a family favorite made with heart and flavor, perfect for any occasion.
Ingredients
- 1 cup all-purpose flour
- 1 cup cake flour
- 1 teaspoon baking powder
- ½ teaspoon baking soda
- ½ teaspoon salt
- 1 tablespoon cornstarch
- 1 cup unsalted butter, room temperature
- ½ cup granulated sugar
- ½ cup dark brown sugar packed
- 1 large egg + 1 egg yolk
- 2 teaspoons vanilla extract
- 1 cup semi-sweet chocolate chips
- ½ cup milk chocolate chips
- 3 oz dark chocolate bar, chopped
Instructions
- In a medium bowl, whisk together the all-purpose flour, cake flour, baking powder, baking soda, salt, and cornstarch. Set aside.
- In a stand mixer with the paddle attachment, beat the butter, granulated sugar, and brown sugar on medium speed for 2-3 minutes until light and fluffy.
- Mix in the egg, egg yolk, and vanilla extract until smooth. Scrape down the bowl as needed.
- Add the dry ingredients gradually, mixing on low speed until just combined.
- Use a spatula to fold in the chocolate chips, ensuring even distribution.
- For best thickness, refrigerate the dough for at least 1 hour, or up to 24 hours for deeper flavor.
- Preheat the oven to 350°F (177°C).
- Line a baking sheet with parchment paper.
- Scoop large dough balls (about ⅓ cup each) and place them 3 inches apart on the sheet.
- Bake for 15-18 minutes, or until edges are set but the centers look slightly underbaked.
Notes
- Chilling the dough is key for thickness and flavor development.
- Do not overbake; the centers should appear slightly underdone when removed from the oven.
- Allow cookies to cool on the baking sheet for a few minutes before transferring them to a wire rack.
- Prep Time: 20 minutes
- Cook Time: 18 minutes
- Category: Dessert
- Method: Baking
- Cuisine: American
Nutrition
- Serving Size: 1 cookie
- Calories: 300
- Sugar: 25g
- Sodium: 150mg
- Fat: 18g
- Saturated Fat: 11g
- Unsaturated Fat: 7g
- Trans Fat: 0.5g
- Carbohydrates: 35g
- Fiber: 2g
- Protein: 3g
- Cholesterol: 60mg