Skip to content
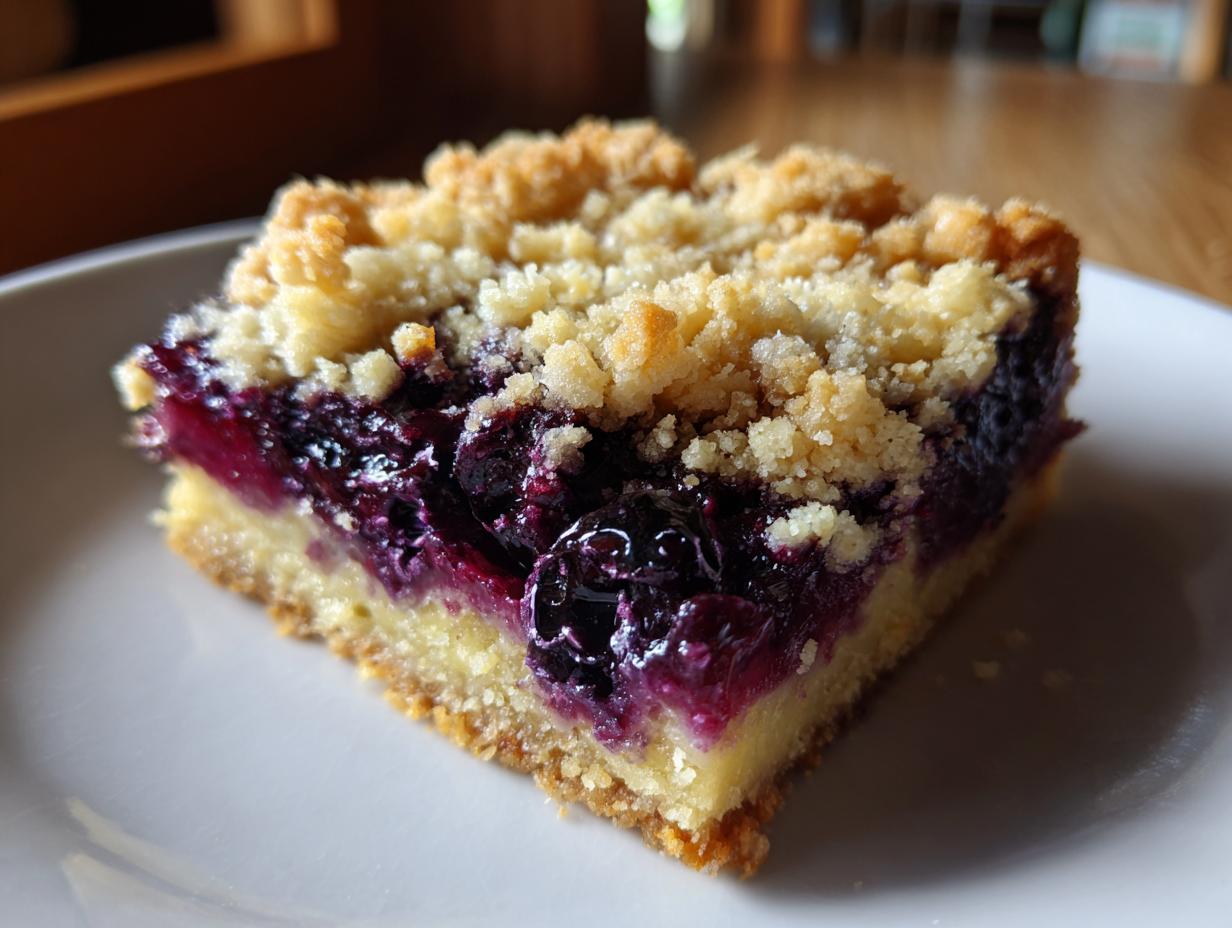
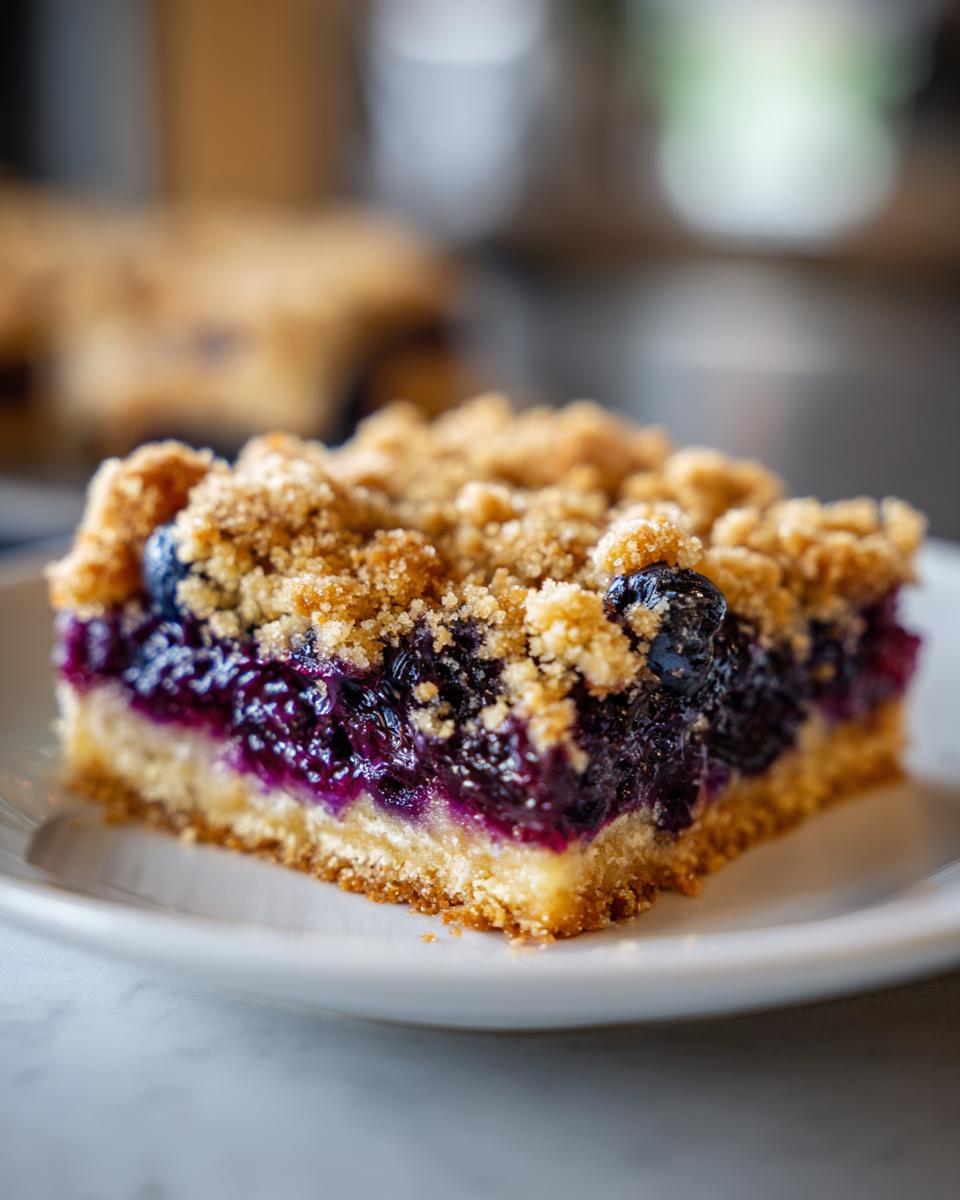
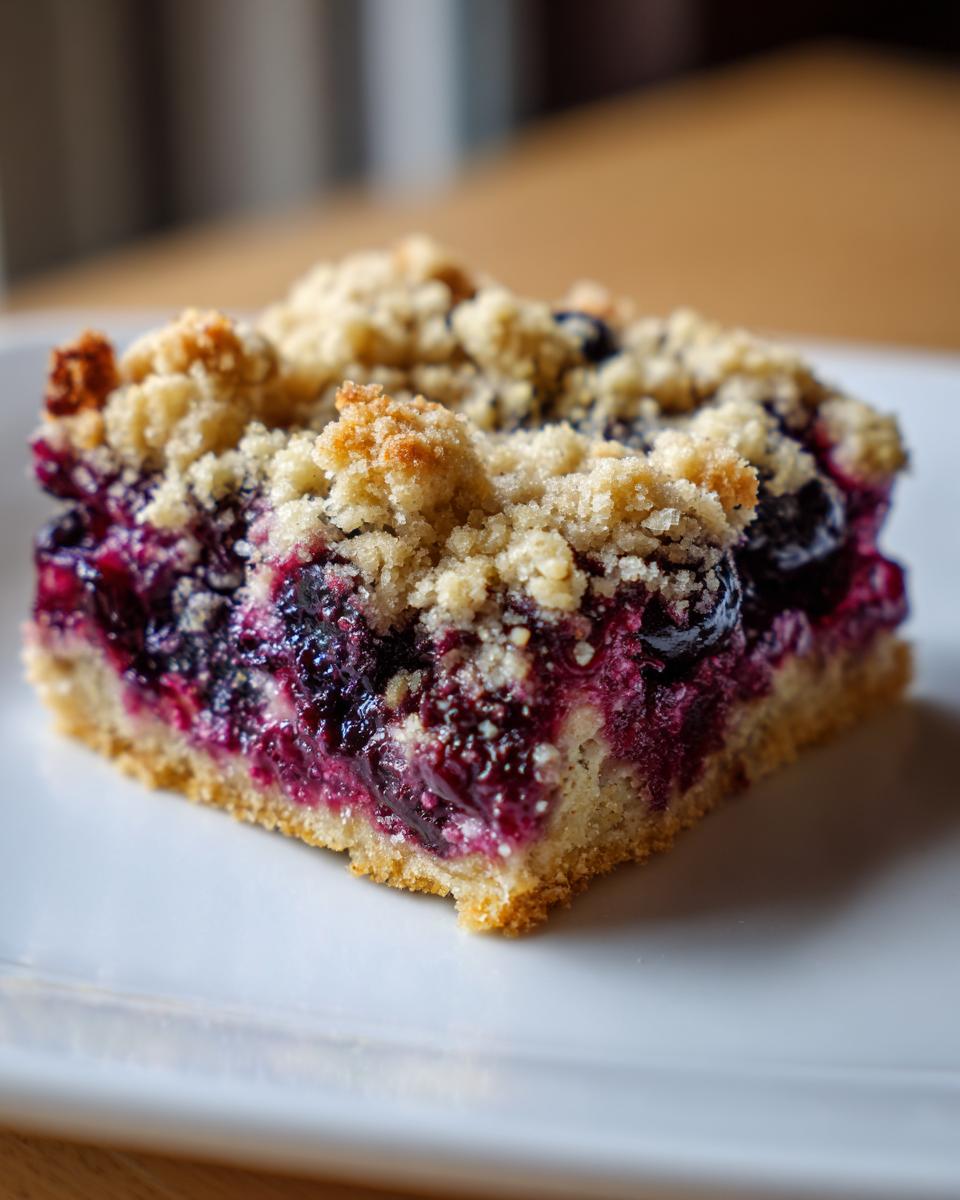
If you are looking for that perfect, buttery, slightly tangy treat that screams summer but tastes amazing any time of year, then you have landed in the right spot for the ultimate Blueberry Crumb Bars. Honestly, these bars are pure magic. They are the kind of dessert that disappears the second you set them out on the counter. My kitchen has been filled with the sweet smell of baking fruit and vanilla lately, and I just had to share this recipe with you all.
I’m Anna Kowalska, and here I share tried-and-true homemade recipes that you and your family will love. Everything I post here is made with heart and flavor, never compromised for speed. I grew up watching my aunt make fruit bars that always looked so simple but tasted impossibly good. It took me years of testing to finally nail down the exact right ratio of butter in the topping to get that perfect sandy crumble. These Blueberry Crumb Bars are the result of that obsession.
We need real flavor, right? Forget those dry, sad packaged snacks. These bars deliver juicy berries nestled between a sweet, sturdy base and a gorgeous, melt-in-your-mouth topping. Trust me, once you try this texture combination, you’ll be making them every week!
Jump to:
Why You Will Love These Easy Blueberry Crumb Bars
These fruit bars are an absolute staple in my house because they solve so many baking dilemmas. They’re easy, they’re quick, and they always impress. I promise you won’t regret adding this recipe to your rotation.
- Quick Preparation Time: Seriously, I can mix up the base in about 15 minutes flat. No fancy equipment needed, just quick mixing!
- Perfect Texture Combination: You get that wonderful contrast—a soft, buttery foundation, burstingly fresh blueberries, and the best sandy crumb topping imaginable.
- Versatile Sweet Treat: They are sturdy enough to grab for a quick breakfast on the go, perfect for an afternoon snack with coffee, or decadent enough to serve for dessert.
Gathering Ingredients for Blueberry Crumb Bars
The beauty of these Blueberry Crumb Bars is that they use pantry staples we usually have on hand. The key here is paying close attention to how the butter is treated for the two different parts of the recipe. Don’t mix up your melted butter with your softened butter—that makes a huge difference in the final structure!
Base and Filling Components
For the base, we are mixing up the flour, sugar, baking powder, salt, melted butter, and one egg. This creates a batter that’s almost like a thick cookie dough once mixed. Then we layer on the star of the show: our blueberries.
Clarifying Blueberry Selection
You absolutely have the choice here! I often use fresh berries when they are in season, but if I’m making these in the middle of winter, frozen works just as well. The important thing is not to thaw the frozen ones—toss them straight from the freezer into the pan. This stops them from bleeding color too much into the base layer during the initial bake.
Creating the Perfect Crumb Topping
This is where we need precision for that authentic crumb texture. For the topping, we use a bit more flour, more sugar, and crucially, softened butter. When you mix this, you want it to resemble coarse sand or little pebbles. If your butter is melted here, you’ll end up with a sheet of buttery crust instead of that delightful crumble.
| Ingredient | Quantity | Preparation State |
|---|---|---|
| All-Purpose Flour (Base) | 1 ½ cups | As measured |
| Granulated Sugar (Base) | ¾ cup | As measured |
| Baking Powder | ½ teaspoon | As measured |
| Salt | ¼ teaspoon | As measured |
| Unsalted Butter (Base) | ½ cup | Melted |
| Egg | 1 | Large |
| Blueberries | 1 cup | Fresh or frozen (unthawed) |
| Flour (Topping) | ½ cup | As measured |
| Sugar (Topping) | ¼ cup | As measured |
| Butter (Topping) | ¼ cup | Softened |
Essential Equipment for Baking Blueberry Crumb Bars
You don’t need a stand mixer for these easy Blueberry Crumb Bars; simple bowls and a sturdy spoon will do the trick! Having your tools ready makes the 15-minute prep time fly by.
Baking Pan Specification
You’ll need one standard 8×8 inch square baking dish. That size is perfect for getting those nice thick layers.
Mixing Tools Required
Grab a medium bowl for mixing the base ingredients, a separate smaller bowl for the topping, and a sturdy spatula or wooden spoon for combining everything. A whisk is great for blending the dry ingredients quickly.
Step-by-Step Instructions to Make Blueberry Crumb Bars
Alright, let’s get baking! This process is straightforward, but timing the two separate baking stages is key to getting those perfect Blueberry Crumb Bars.
Preparing the Base Layer
First things first, get your oven hot—preheat it to 350°F (175°C). While that’s warming up, prepare your 8×8 inch baking dish. You can grease it lightly, but I usually line mine with parchment paper with an overhang so I can just lift the whole thing out later. In your medium bowl, whisk together the 1 ½ cups of flour, ¾ cup of sugar, baking powder, and salt for the base. Pour in that ½ cup of melted butter and the egg. Mix it just until everything comes together into a thick, slightly sticky batter. Don’t overmix it! Press this batter evenly across the bottom of your prepared pan. It should form a nice, flat foundation.
Layering and Initial Bake
Now for the fruit! Scatter your 1 cup of blueberries right over that batter layer. If you’re using frozen ones, just sprinkle them on top directly. Don’t worry if they look a little sparse; they will spread out a bit while baking. Pop the pan into the preheated oven and let it bake all by itself for 25 minutes. This gives the base time to set up properly before we add the heavy topping.
Mixing and Applying the Crumb Topping
While those bars are getting happy in the oven, make your crumb topping. In that smaller bowl, combine the remaining ½ cup of flour and ¼ cup of sugar for the topping. Here is the crucial part: cut or crumble in that ¼ cup of softened butter. Use your fingers or a pastry blender to work the butter into the dry ingredients until you have nice, loose crumbs—like coarse cornmeal. When the 25 minutes are up, carefully pull the pan out. Sprinkle that buttery crumb mixture evenly over the partially baked blueberry layer. Try to cover all the fruit!
Final Baking and Cooling
Return the whole pan back into the oven. Bake for just 10 more minutes. You are looking for the topping to be beautifully golden brown and smelling absolutely incredible. Once they come out, resist the urge to cut them! These Blueberry Crumb Bars must cool completely—and I mean completely—before you try slicing them. If you cut them hot, the base will just crumble apart. Let them cool on the counter for at least an hour, or even chill them briefly if you can wait that long!
Tips for Perfect Blueberry Crumb Bars
Baking is forgiving, but a few little tricks can take your Blueberry Crumb Bars from good to legendary. These are the things I learned the hard way so you don’t have to!
Achieving the Ideal Crumb Texture
I cannot stress this enough: the topping butter must be soft, like room temperature soft, but not greasy or melted. If it’s melted, it soaks into the flour and sugar instead of staying separate, and you lose that wonderful sandy texture we are aiming for. Softened butter creates the pockets of fat that brown up beautifully.
Ensuring Clean Slices
This is the true test of patience, but it’s worth it. If you try to slice these bars while they are even slightly warm, the buttery base will smear, and the fruit juices will run everywhere, making a sticky mess. Let them cool fully on a wire rack first. For super clean cuts, especially if you plan to serve them at a party, pop the cooled bars into the fridge for 30 minutes before slicing them with a sharp knife.
Storage and Reheating Instructions for Blueberry Crumb Bars
These bars are so moist they last surprisingly well, but we want to keep that buttery topping from getting soggy, so storage matters!
Keeping Your Blueberry Crumb Bars Fresh
Because of the high butter content, these are best kept covered tightly at room temperature for up to three days. If your kitchen is really hot or humid, or if you made them with a glaze (which I sometimes do!), they are safer in the refrigerator. If you do chill them, let them sit on the counter for about 20 minutes before eating to bring that buttery flavor back up.
| Storage Method | Duration | Reheating Suggestion |
|---|---|---|
| Airtight Container (Counter) | 3 Days | Room temp is best |
| Airtight Container (Fridge) | Up to 5 Days | Warm slightly in the microwave (10 seconds) |
| Freezer (Wrapped well) | Up to 2 Months | Thaw overnight, then warm briefly |
Frequently Asked Questions About Blueberry Crumb Bars
Can I substitute the blueberries in these crumb bars?
Absolutely! These bars are wonderful with other fruit. Raspberries work beautifully, though they might be a bit tarter. Chopped apples mixed with a little cinnamon are fantastic, especially in the fall. Just use the same amount of fruit called for in the recipe.
What kind of flour works best for the base?
I always use standard all-purpose flour because it gives the perfect balance of structure and tenderness for this recipe. If you want to sneak in some whole grains, you could swap out up to half of the all-purpose flour with whole wheat pastry flour. It will give it a slightly nuttier flavor, which is delicious!
Why did my topping turn out greasy instead of crumbly?
That’s almost always the butter temperature in the topping mix. If you used melted butter instead of softened butter, the mixture just turns into a paste rather than holding those little crumb structures. Next time, just leave your butter out on the counter for an hour before you mix the topping ingredients. It should yield easily to gentle pressure.
Share Your Blueberry Crumb Bars Experience
I truly hope these easy Blueberry Crumb Bars bring a little bit of sunshine to your day! Let me know in the comments below how they turned out for you and if you tried any fun fruit substitutions. Tag me in your pictures!
Why You Will Love These Easy Blueberry Crumb Bars
These fruit bars are an absolute staple in my house because they solve so many baking dilemmas. They’re easy, they’re quick, and they always impress. I promise you won’t regret adding this recipe to your rotation.
- Quick Preparation Time: Seriously, I can mix up the base in about 15 minutes flat. No fancy equipment needed, just quick mixing!
- Perfect Texture Combination: You get that wonderful contrast—a soft, buttery foundation, burstingly fresh blueberries, and the best sandy crumb topping imaginable.
- Versatile Sweet Treat: They are sturdy enough to grab for a quick breakfast on the go, perfect for an afternoon snack with coffee, or decadent enough to serve for dessert.
Gathering Ingredients for Blueberry Crumb Bars
The beauty of these Blueberry Crumb Bars is that they use pantry staples we usually have on hand. The key here is paying close attention to how the butter is treated for the two different parts of the recipe. Don’t mix up your melted butter with your softened butter—that makes a huge difference in the final structure!
Base and Filling Components
For the base, we are mixing up the flour, sugar, baking powder, salt, melted butter, and one egg. This creates a batter that’s almost like a thick cookie dough once mixed. Then we layer on the star of the show: our blueberries.
Clarifying Blueberry Selection
You absolutely have the choice here! I often use fresh berries when they are in season, but if I’m making these in the middle of winter, frozen works just as well. The important thing is not to thaw the frozen ones—toss them straight from the freezer into the pan. This stops them from bleeding color too much into the base layer during the initial bake.
Creating the Perfect Crumb Topping
This is where we need precision for that authentic crumb texture. For the topping, we use a bit more flour, more sugar, and crucially, softened butter. When you mix this, you want it to resemble coarse sand or little pebbles. If your butter is melted here, you’ll end up with a sheet of buttery crust instead of that delightful crumble.
| Ingredient | Quantity | Preparation State |
|---|---|---|
| All-Purpose Flour (Base) | 1 ½ cups | As measured |
| Granulated Sugar (Base) | ¾ cup | As measured |
| Baking Powder | ½ teaspoon | As measured |
| Salt | ¼ teaspoon | As measured |
| Unsalted Butter (Base) | ½ cup | Melted |
| Egg | 1 | Large |
| Blueberries | 1 cup | Fresh or frozen (unthawed) |
| Flour (Topping) | ½ cup | As measured |
| Sugar (Topping) | ¼ cup | As measured |
| Butter (Topping) | ¼ cup | Softened |
Essential Equipment for Baking Blueberry Crumb Bars
You don’t need a stand mixer for these easy Blueberry Crumb Bars; simple bowls and a sturdy spoon will do the trick! Having your tools ready makes the 15-minute prep time fly by. It’s all about being prepared so you can move fast when mixing the base.
Baking Pan Specification
You’ll need one standard 8×8 inch square baking dish. That size is perfect for getting those nice thick layers.
Mixing Tools Required
Grab a medium bowl for mixing the base ingredients, a separate smaller bowl for the topping, and a sturdy spatula or wooden spoon for combining everything. A whisk is great for blending the dry ingredients quickly.
Step-by-Step Instructions to Make Blueberry Crumb Bars
Alright, let’s get baking! This process is straightforward, but timing the two separate baking stages is key to getting those perfect Blueberry Crumb Bars.
Preparing the Base Layer
First things first, get your oven hot—preheat it to 350°F (175°C). While that’s warming up, prepare your 8×8 inch baking dish. You can grease it lightly, but I usually line mine with parchment paper with an overhang so I can just lift the whole thing out later. In your medium bowl, whisk together the 1 ½ cups of flour, ¾ cup of sugar, baking powder, and salt for the base. Pour in that ½ cup of melted butter and the egg. Mix it just until everything comes together into a thick, slightly sticky batter. Don’t overmix it! Press this batter evenly across the bottom of your prepared pan. It should form a nice, flat foundation.
Layering and Initial Bake
Now for the fruit! Scatter your 1 cup of blueberries right over that batter layer. If you’re using frozen ones, just sprinkle them on top directly. Don’t worry if they look a little sparse; they will spread out a bit while baking. Pop the pan into the preheated oven and let it bake all by itself for 25 minutes. This gives the base time to set up properly before we add the heavy topping.
Mixing and Applying the Crumb Topping
While those bars are getting happy in the oven, make your crumb topping. In that smaller bowl, combine the remaining ½ cup of flour and ¼ cup of sugar for the topping. Here is the crucial part: cut or crumble in that ¼ cup of softened butter. Use your fingers or a pastry blender to work the butter into the dry ingredients until you have nice, loose crumbs—like coarse cornmeal. When the 25 minutes are up, carefully pull the pan out. Sprinkle that buttery crumb mixture evenly over the partially baked blueberry layer. Try to cover all the fruit!
Final Baking and Cooling
Return the whole pan back into the oven. Bake for just 10 more minutes. You are looking for the topping to be beautifully golden brown and smelling absolutely incredible. Once they come out, resist the urge to cut them! These Blueberry Crumb Bars must cool completely—and I mean completely—before you try slicing them. If you cut them hot, the base will just crumble apart. Let them cool on the counter for at least an hour, or even chill them briefly if you can wait that long!
Tips for Perfect Blueberry Crumb Bars
Baking is forgiving, but a few little tricks can take your Blueberry Crumb Bars from good to legendary. These are the things I learned the hard way so you don’t have to! I’ve had batches turn out sticky, and I’ve had batches that crumbled into dust before I could even get them out of the pan. Trust me, these tips save you heartache.
Achieving the Ideal Crumb Texture
I cannot stress this enough: the topping butter must be soft, like room temperature soft, but not greasy or melted. If it’s melted, it soaks into the flour and sugar instead of staying separate, and you lose that wonderful sandy texture we are aiming for. Softened butter creates the pockets of fat that brown up beautifully. If you are rushing, just cut the cold butter into tiny cubes first, and then let those cubes sit on the counter for 10 minutes while you clean up the base bowl. That usually gets them just right.
Ensuring Clean Slices
This is the true test of patience, but it’s worth it. If you try to slice these bars while they are even slightly warm, the buttery base will smear, and the fruit juices will run everywhere, making a sticky mess. Let them cool fully on a wire rack first. For super clean cuts, especially if you plan to serve them at a party, pop the cooled bars into the fridge for 30 minutes before slicing them with a sharp knife. Honestly, cutting them warm is the number one way people ruin beautiful Blueberry Crumb Bars.
Storage and Reheating Instructions for Blueberry Crumb Bars
These bars are so moist they last surprisingly well, but we want to keep that buttery topping from getting soggy, so storage matters! I usually bake a double batch just so I have extras for the week, and they hold up beautifully. Don’t worry about them drying out too fast; the butter and fruit keep everything tender.
Keeping Your Blueberry Crumb Bars Fresh
Because of the high butter content, these are best kept covered tightly at room temperature for up to three days. If your kitchen is really hot or humid, or if you made them with a glaze (which I sometimes do!), they are safer in the refrigerator. If you do chill them, let them sit on the counter for about 20 minutes before eating to bring that buttery flavor back up. They never really need reheating, but a quick zap can bring back that just-baked warmth.
| Storage Method | Duration | Reheating Suggestion |
|---|---|---|
| Airtight Container (Counter) | 3 Days | Room temp is best |
| Airtight Container (Fridge) | Up to 5 Days | Warm slightly in the microwave (10 seconds) |
| Freezer (Wrapped well) | Up to 2 Months | Thaw overnight, then warm briefly |
Frequently Asked Questions About Blueberry Crumb Bars
I always get a ton of questions about these fruit bars because everyone wants their batch of Blueberry Crumb Bars to be absolutely perfect! Here are the things I hear most often when people try this recipe for the first time.
Can I substitute the blueberries in these crumb bars?
Absolutely! These bars are wonderful with other fruit. Raspberries work beautifully, though they might be a bit tarter. Chopped apples mixed with a little cinnamon are fantastic, especially in the fall. Just use the same amount of fruit called for in the recipe, and treat them the same way—toss them on top right before the first bake!
What kind of flour works best for the base?
I always use standard all-purpose flour because it gives the perfect balance of structure and tenderness for this recipe. If you want to sneak in some whole grains, you could swap out up to half of the all-purpose flour with whole wheat pastry flour. It will give it a slightly nutier flavor, which is delicious!
Why did my topping turn out greasy instead of crumbly?
That’s almost always the butter temperature in the topping mix. If you used melted butter instead of softened butter, the mixture just turns into a paste rather than holding those little crumb structures. Next time, just leave your butter out on the counter for an hour before you mix the topping ingredients. It should yield easily to gentle pressure. That soft butter is the secret to that amazing crumb!
Share Your Blueberry Crumb Bars Experience
I truly hope these easy Blueberry Crumb Bars bring a little bit of sunshine to your day! I put so much heart into getting this recipe just right for you. Let me know in the comments below how they turned out for you and if you tried any fun fruit substitutions. Don’t forget to rate them so others know just how delicious these fruit bars are!
Print
Amazing 1-Step Blueberry Crumb Bars
- Total Time: 50 minutes
- Yield: 12 bars 1x
- Diet: Vegetarian
Description
These Blueberry Crumb Bars feature a sweet, buttery base, a layer of fresh blueberries, and a delightful crumbly topping. They are simple to make and perfect for any occasion.
Ingredients
- 1 ½ cups all-purpose flour
- ¾ cup granulated sugar
- ½ teaspoon baking powder
- ¼ teaspoon salt
- ½ cup unsalted butter (melted)
- 1 egg
- 1 cup blueberries
- ½ cup flour (for topping)
- ¼ cup sugar (for topping)
- ¼ cup butter softened (for topping)
Instructions
- Preheat your oven to 350°F (175°C). Prepare your baking dish.
- Mix the base ingredients together. Spread this batter evenly into the prepared baking dish.
- Scatter the blueberries over the base layer.
- Bake for 25 minutes.
- While baking, mix the topping ingredients until crumbly.
- Remove the bars from the oven. Crumble the topping mixture evenly over the partially baked bars.
- Return to the oven and bake for 10 more minutes, until the topping is golden brown.
Notes
- Use fresh or frozen blueberries. If using frozen, do not thaw them first.
- Ensure the butter for the topping is softened, not melted, for the best crumb texture.
- For cleaner cutting, let the bars cool completely before slicing.
- Prep Time: 15 minutes
- Cook Time: 35 minutes
- Category: Dessert
- Method: Baking
- Cuisine: American
Nutrition
- Serving Size: 1 bar
- Calories: 250
- Sugar: 18g
- Sodium: 100mg
- Fat: 14g
- Saturated Fat: 9g
- Unsaturated Fat: 5g
- Trans Fat: 0g
- Carbohydrates: 30g
- Fiber: 2g
- Protein: 3g
- Cholesterol: 40mg