Skip to content
When the summer heat just won’t quit, what is the absolute best answer? For me, it’s something icy cold, bright, and easy to grab straight from the freezer. Forget those complicated store-bought popsicles! I’m Anna Kowalska, and here in my little corner of the internet, I share tried-and-true homemade recipes that you and your family will absolutely love. Everything here is made with heart and flavor, designed to bring a little joy to your everyday kitchen routine.
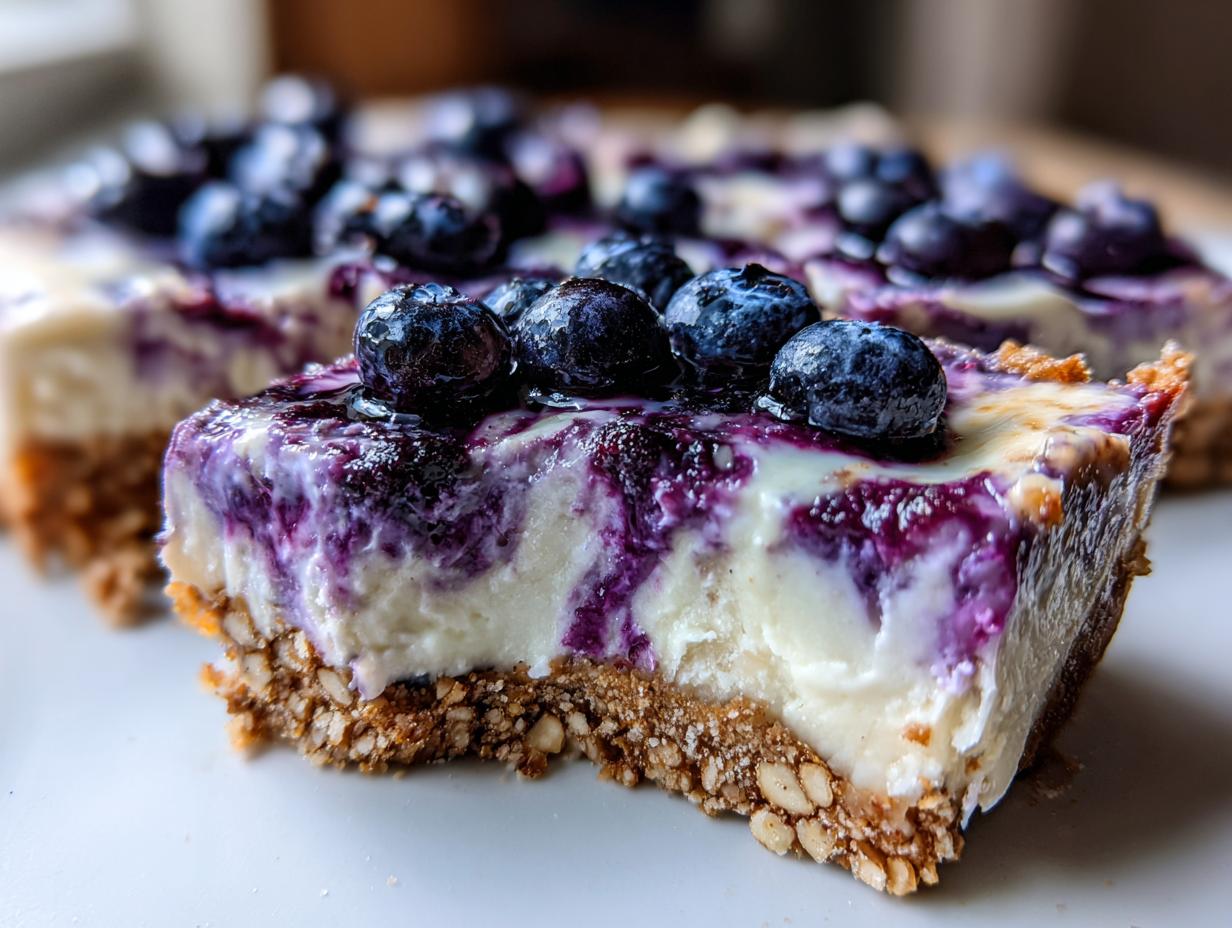
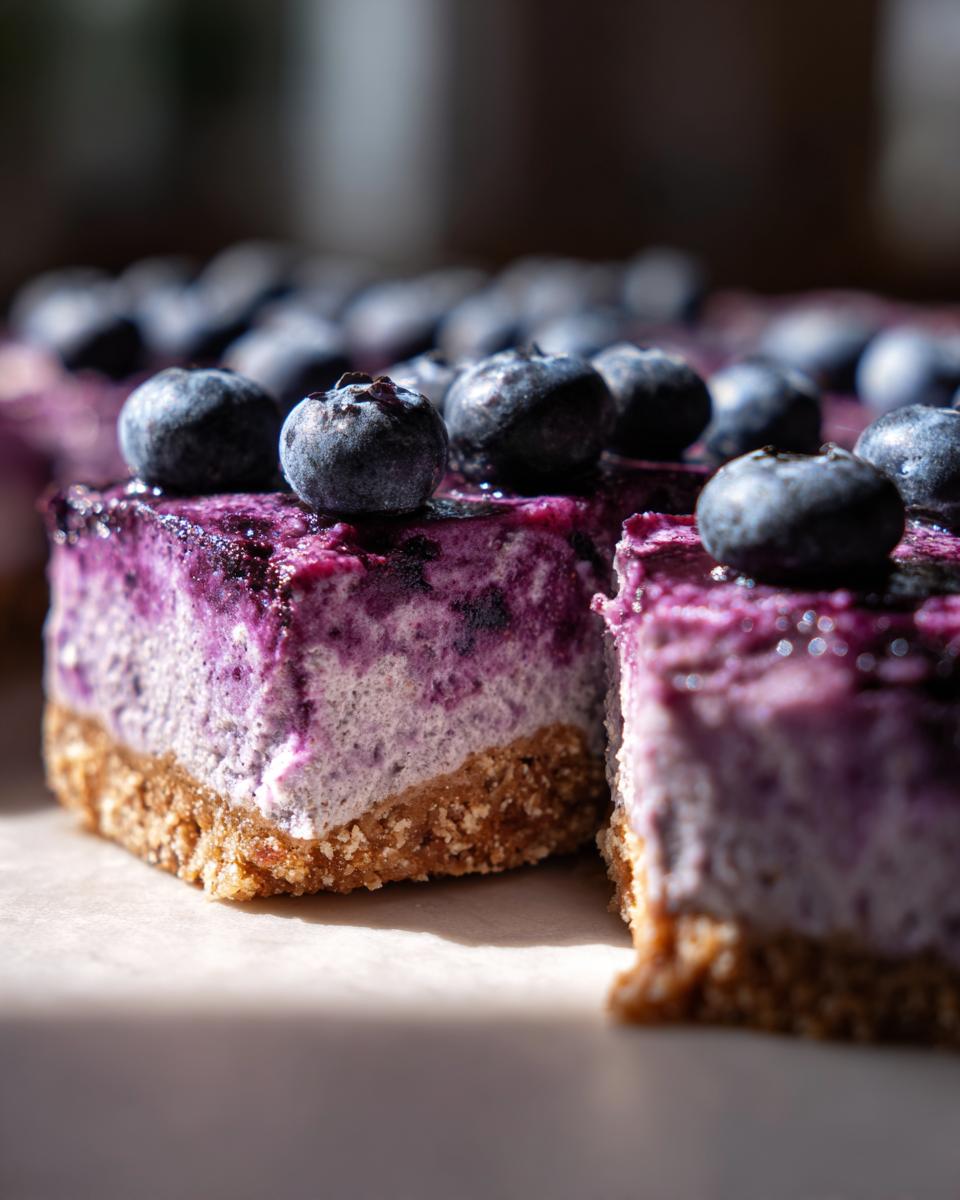
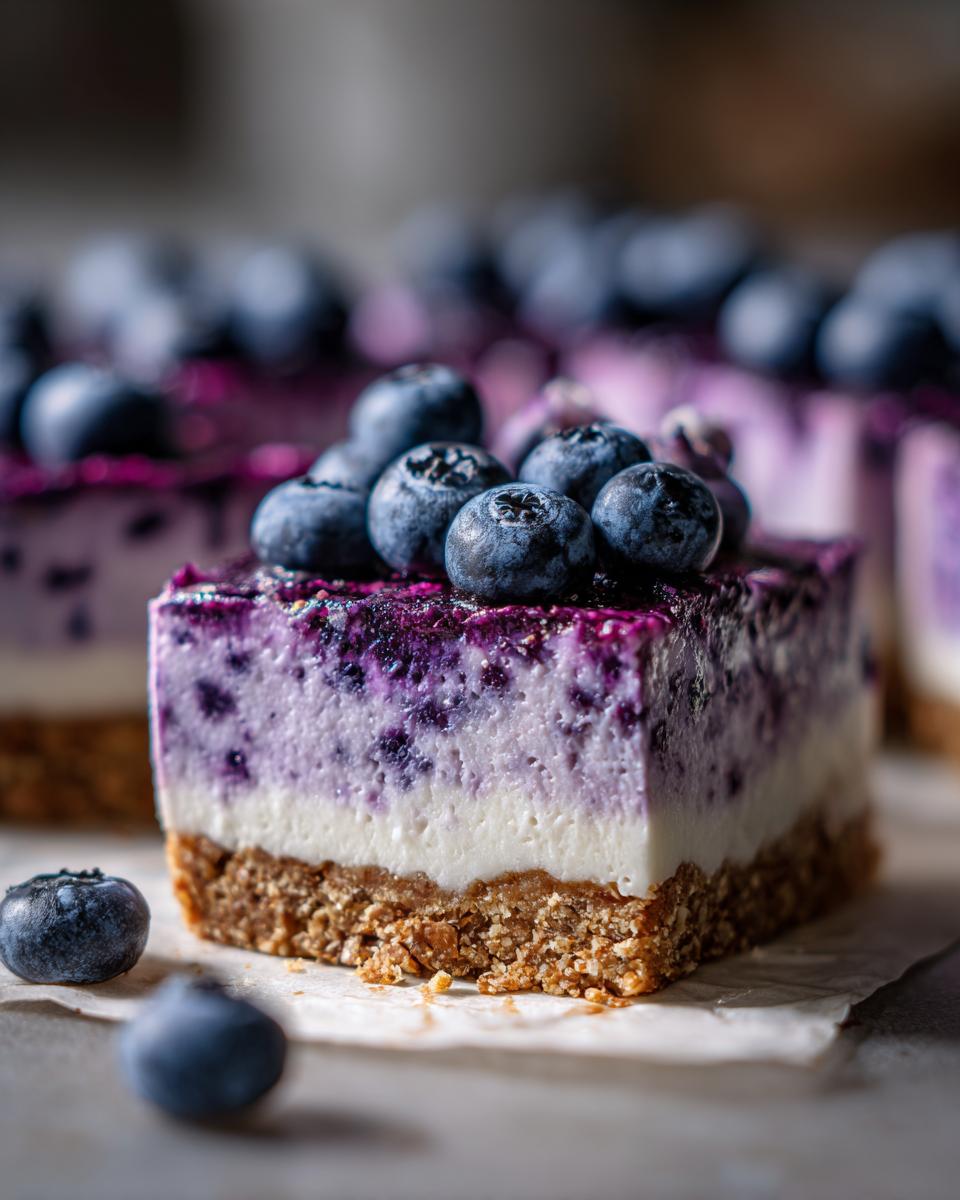
This year, I perfected my recipe for Blueberry Yogurt Bars, and wow, they are a game-changer for beating the afternoon slump. These aren’t just dessert; they’re a wonderfully refreshing frozen snack that tastes like a dream but takes almost no effort to assemble. The combination of that crunchy whole-grain base and the creamy, slightly tart blueberry topping is just perfect. Seriously, you have to try these Blueberry Yogurt Bars before the summer is over!
Jump to:
Why You’ll Love These Easy Blueberry Yogurt Bars
If you need a dessert that comes together faster than you can decide on takeout, this is it! These Blueberry Yogurt Bars are the definition of low-effort, high-reward. I love them because they use ingredients I almost always have on hand, and there’s zero baking required—just mixing and freezing. They hit that sweet spot between a healthy snack and a satisfying treat, making them perfect for kids and adults alike. Trust me, once you see how quickly you can whip up a batch of these, they’ll become your go-to summer staple.
Quick Prep Time Makes These Blueberry Yogurt Bars Simple
Honestly, the best part? The prep time is just 15 minutes! I mean, who has time for complicated steps when it’s hot outside? You spend maybe ten minutes crushing biscuits and mixing the filling, and then you just let the magic happen in the freezer. If you’re looking for easy frozen fruit bars, these Blueberry Yogurt Bars are truly unbeatable for speed. You can assemble them right after dinner and have dessert ready the next day.
Essential Equipment for Making Your Frozen Treat
You don’t need a fancy ice cream maker for this, thankfully! Just grab a few basic kitchen tools. Make sure your knife is sharp for clean slicing later—safety first when cutting something rock solid!
- 8×8 inch baking pan
- Parchment paper (don’t skip this!)
- Mixing bowls (at least two)
- Whisk or sturdy spoon
- Measuring cups and spoons
- Sharp knife for cutting
Ingredients for Perfect Blueberry Yogurt Bars
Gathering your supplies for these Blueberry Yogurt Bars is half the fun, and you’ll notice we’re keeping things super simple here—no weird chemicals or hard-to-find extracts needed! We need just six things to make this frosty dream happen. I always measure my ingredients out before I start mixing, which is my secret to keeping that 15-minute prep time accurate. If you’re using store-bought whole grain biscuits, make sure they are finely crushed, almost like sand, for the best base texture.
This recipe relies on quality ingredients to shine, especially the yogurt and the fresh blueberries. Here is exactly what you’ll need for a perfect batch:
| Item | Amount | Notes |
|---|---|---|
| Crushed Whole Grain Biscuits | 1½ cups | Finely crushed for the base |
| Coconut Oil | ⅓ cup | Melted |
| Thick Yogurt | 1½ cups | See breakdown below! |
| Blueberry Purée | ½ cup | Fresh or frozen, blended smooth |
| Maple Syrup | 2 tbsp | For just a hint of sweetness |
| Whole Blueberries | ½ cup | For scattering on top |
Ingredient Breakdown and Preparation Clarity
Let’s talk about the yogurt for a second, because that’s where a lot of people get stuck. You absolutely must use thick yogurt here, like Greek yogurt or Icelandic Skyr. If you use regular, thinner yogurt, your filling will freeze icy and runny instead of creamy. We need that high protein content to hold up in the freezer!
For the base, I prefer crushing simple, slightly sweet whole grain biscuits—think something like graham crackers, but whole wheat! You can put them in a zip-top bag and smash them with a rolling pin, or pulse them quickly in a food processor if you have one. Just aim for fine crumbs so the base holds together nicely when you slice the bars later.
Step-by-Step Instructions to Make Blueberry Yogurt Bars
Okay, now for the fun part! This is where everything comes together, and I promise you it moves fast. Remember, we aren’t turning on the oven—that’s the beauty of these frozen treats! Get your 8×8 pan ready first, lining it completely with parchment paper so the edges hang over a bit. This parchment sling is your best friend later when you need to lift the solid block out for cutting. It makes the whole process so much cleaner!
Creating the Whole Grain Base for Your Blueberry Yogurt Bars
First things first, we tackle the crust. In a medium bowl, combine your 1½ cups of crushed whole grain biscuits with the ⅓ cup of melted coconut oil. Use a fork to mix it up until all those crumbs look evenly moistened—it should resemble wet sand. Now, pour this mixture right into your prepared pan. Use the bottom of a measuring cup or just your clean fingers to press this base down really firmly and evenly across the bottom. You want a nice, compact layer so your Blueberry Yogurt Bars don’t crumble when you try to eat them!
Mixing the Creamy Yogurt Filling
Time for the creamy center! Grab your second, clean bowl. We are mixing the thick yogurt, the ½ cup of blueberry purée, and the 2 tablespoons of maple syrup. Whisk this vigorously until it’s perfectly smooth—no streaks of plain yogurt or lumps of purée should remain. Give it a quick taste test here; if you like it a little sweeter, now is the time to add a tiny splash more syrup. Once it’s silky smooth, gently pour this filling right over that pressed biscuit base. Spread it out carefully with a spatula so you don’t disturb the crust underneath.
Freezing and Slicing Your Final Blueberry Yogurt Bars
Now for the waiting game, but trust me, it’s worth it. Take your pan and scatter the remaining ½ cup of whole blueberries right across the top of the yogurt layer. Gently press them in just a hair so they don’t all roll off when you move it. Place the whole thing carefully into the freezer. You need to let these Blueberry Yogurt Bars freeze solid, which takes about 3 hours. Don’t rush this part! Once they are completely firm, lift the entire block out using the parchment paper handles. Wipe your sharp knife under hot water, dry it quickly, and slice them into neat bars. If they are too hard to cut right out of the freezer, let them sit on the counter for just five minutes before slicing your beautiful Blueberry Yogurt Bars.
Tips for Success with Your Homemade Blueberry Yogurt Bars
I’ve made these tasty frozen treats more times than I can count, and I’ve definitely learned a few tricks along the way to make sure they come out perfect every single time. The biggest pitfalls are usually a runny center or a base that decides to stick fast to the pan. We want perfect squares of frozen goodness, not a messy struggle!
My main advice for achieving the best texture in your Blueberry Yogurt Bars is temperature control—both for your ingredients going in and for the final product coming out. If you use thick yogurt that’s too warm, it won’t blend as smoothly with the cold purée. Also, don’t skimp on the freezing time; under-frozen bars turn into yogurt soup when you try to serve them!
Preventing Sticking When Freezing Blueberry Yogurt Bars
Listen closely: the parchment paper is non-negotiable! You need those generous overhangs on the sides of your 8×8 pan. When the bars are done freezing, you aren’t trying to pry them out with a spatula; you just grab those paper handles and lift the entire frozen slab right out onto a cutting board. This is the cleanest way to handle any frozen dessert.
If you try to slice them straight from a deep freeze, the knife drags and creates messy edges. I always let my block of Blueberry Yogurt Bars sit on the counter for about five to seven minutes before I even touch the knife. This slight softening around the edges is just enough to let you get those beautiful, clean cuts without ruining the base layer. It makes all the difference!
Storage and Keeping Your Blueberry Yogurt Bars Fresh
Since these are a frozen snack, storage is key to maintaining that perfect firm texture! Once you’ve sliced your beautiful Blueberry Yogurt Bars, don’t just toss them back in the box. They need airtight protection to prevent freezer burn and absorbing any weird smells from the back of the freezer.
I like to layer mine in a freezer-safe container. Put down a small piece of wax paper between the layers so they don’t stick together in a giant frozen brick. They are best eaten within a month for peak flavor!
| Item | Timeframe |
|---|---|
| Best Quality | Up to 4 Weeks |
| Safe Storage | Up to 3 Months |
Frequently Asked Questions About Blueberry Yogurt Bars
I get so many lovely messages asking about tweaks and substitutions, which just shows how much you all love making these treats! Here are the most common things people ask me when they are getting ready to make their own batch of Blueberry Yogurt Bars.
Q1. Can I use frozen blueberries instead of fresh ones?
Absolutely, you can! If you use frozen blueberries, just toss them in with the purée before you blend it. If you want to scatter whole frozen berries on top, that works too, but make sure you don’t thaw them first. They hold their shape better that way!
Q2. My yogurt filling is separating a little after freezing. What went wrong?
That usually happens if you don’t use thick yogurt, like Greek yogurt or Skyr. If you used regular yogurt, it has too much water content, which freezes into icy crystals instead of staying creamy. Next time, try draining your regular yogurt overnight in a cheesecloth-lined sieve to thicken it up!
Q3. Is it mandatory to use the coconut oil for the base?
Coconut oil melts beautifully and sets up hard in the freezer, which is why I love it for the crust. You can substitute it with melted butter, but your base might be a little softer when frozen. Do not use liquid oils like vegetable oil, or your base will stay greasy and crumbly.
Q4. How can I make these bars vegan?
That’s a great question! For vegan Blueberry Yogurt Bars, you’ll need to swap the thick yogurt for a very thick, plain coconut or cashew-based yogurt. Make sure it’s the unsweetened kind so you can control the sweetness with the maple syrup. The rest of the ingredients work perfectly!
Can I Substitute the Whole Grain Biscuits in these Blueberry Yogurt Bars?
You can certainly try, but it changes the game a bit! If you use vanilla wafers or shortbread cookies instead of whole grain biscuits, your base will be sweeter and less nutty. The texture might also be slightly less sturdy. If you use something like crushed pretzels for a salty kick, you’ll need to reduce the maple syrup in the yogurt layer slightly. The whole grain biscuits offer that perfect balance of fiber and light crunch that complements the creamy top layer perfectly.
How Long Do Blueberry Yogurt Bars Last in the Freezer?
For the absolute best texture and flavor, I recommend finishing your Blueberry Yogurt Bars within four weeks. After that, they are still perfectly safe to eat for a few months, but they might start to lose a little bit of that fresh, bright flavor and could develop some minor freezer burn if not wrapped tightly. Always wrap those slices individually before putting them back in the container!
Understanding the Estimated Nutrition in Your Blueberry Yogurt Bars
I always get asked about the nutrition facts when people see how simple these bars are, and I totally get it! We want a treat that tastes amazing but doesn’t derail the whole day. Because we are using real fruit, thick yogurt, and whole grain crumbs, these Blueberry Yogurt Bars definitely offer a better profile than a standard processed dessert.
Now, I have to give you the standard disclaimer here: since I don’t use industrial ingredient scales and I rely on the natural variation in my yogurt and fruit, these numbers are just my best guesstimate based on the ingredients listed. Please treat them as a guideline rather than a strict guarantee! If you are interested in learning more about the general health benefits of blueberries, check out this resource.
Here is a rough idea of what you might see in one serving size (one bar), assuming you get about 10 bars out of the pan:
| Nutrient | Estimated Amount (Per Bar) |
|---|---|
| Calories | Approx. 150-180 kcal |
| Total Fat | Approx. 8-10g |
| Total Carbohydrates | Approx. 18-22g |
| Protein | Approx. 5-7g |
See? That protein count from the thick yogurt is great for a snack! It keeps you feeling full longer than a regular sugary cookie. If you want to lower the sugar, you can always reduce the maple syrup slightly when making your next batch of Blueberry Yogurt Bars, but I find that 2 tablespoons gives the perfect balance against the tartness of the berries.
Print
Amazing 15-Min Blueberry Yogurt Bars
- Total Time: 3 hours 15 minutes
- Yield: Varies (Approx. 9-12 bars)
- Diet: Vegetarian
Description
These Blueberry Yogurt Bars offer a refreshing, slightly sweet frozen treat perfect for a quick snack. They feature a simple whole-grain base topped with creamy yogurt and fresh blueberries.
Ingredients
- 1½ cups crushed whole grain biscuits
- ⅓ cup coconut oil, melted
- 1½ cups thick yogurt
- ½ cup blueberry purée
- 2 tbsp maple syrup
- ½ cup whole blueberries
Instructions
- Line an 8×8 pan with parchment paper.
- Combine biscuit crumbs and melted coconut oil. Press this mixture firmly into the bottom of the prepared pan to create the base layer.
- In a separate bowl, mix the thick yogurt, blueberry purée, and maple syrup until smooth.
- Spread the yogurt filling evenly over the biscuit base.
- Scatter the whole blueberries across the top layer.
- Place the pan in the freezer and freeze for 3 hours, or until solid.
- Remove the pan from the freezer, lift out the parchment paper, and slice the frozen mixture into bars.
Notes
- Best enjoyed frozen.
- Prep Time: 15 minutes
- Cook Time: 0 minutes
- Category: Dessert/Snack
- Method: Freezing
- Cuisine: American
Nutrition
- Serving Size: 1 bar
- Calories: Estimate based on ingredients
- Sugar: Estimate based on ingredients
- Sodium: Estimate based on ingredients
- Fat: Estimate based on ingredients
- Saturated Fat: Estimate based on ingredients
- Unsaturated Fat: Estimate based on ingredients
- Trans Fat: 0g
- Carbohydrates: Estimate based on ingredients
- Fiber: Estimate based on ingredients
- Protein: Estimate based on ingredients
- Cholesterol: Estimate based on ingredients