Skip to content
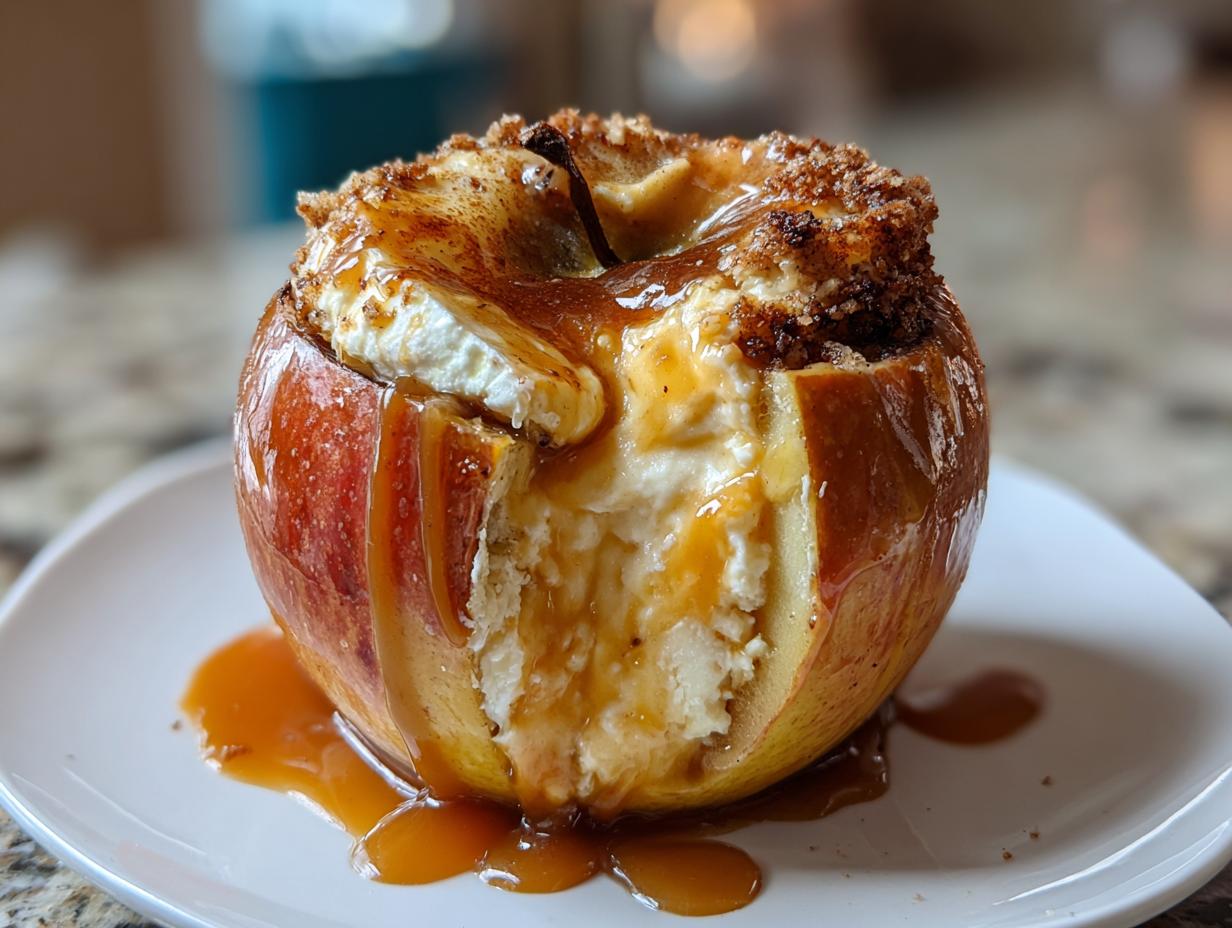
Get ready to fall in love with Cheesecake Stuffed Apples: A Delicious Twist on a Classic Dessert! As Anna Kowalska, I’ve always believed that the best meals come from the heart, and here I share tried-and-true homemade recipes that you and your family will adore. For me, it’s all about making food with heart and flavor, and this recipe is a perfect example. It takes the humble apple and gives it a luxurious makeover with a creamy, dreamy cheesecake filling, all baked until tender and then finished with a luscious caramel drizzle. Trust me, this dessert is pure magic and so much fun to make!
Jump to:
Why You’ll Love This Cheesecake Stuffed Apples Recipe
Honestly, what’s not to adore about these Cheesecake Stuffed Apples? They’re like a warm hug on a plate! You get all the cozy, comforting flavors of baked apples, but with this incredible, creamy cheesecake filling that just melts in your mouth. It’s the perfect blend of tart and sweet, with that gorgeous caramel drizzle on top. Plus, they look super impressive but are surprisingly easy to whip up. Seriously, they’re perfect for a weeknight treat when you need something special, or even to wow your guests at a dinner party. You’ll find yourself making these Cheesecake Stuffed Apples again and again because they’re just that good!
- Super Easy to Make: You don’t need to be a pastry chef to nail these.
- Incredible Flavor Combo: Tart apples meet rich, creamy cheesecake and sweet caramel – pure bliss!
- Looks Fancy, Tastes Amazing: They’re a showstopper without all the fuss.
- Versatile: Perfect for fall gatherings, holidays, or just a Tuesday night treat.
- Customizable: Easily adapt the filling to your liking!
Simple Ingredients for Your Cheesecake Stuffed Apples
One of the best things about this recipe is that it uses pretty straightforward ingredients you probably already have in your kitchen or can grab easily. We start with some lovely medium-sized apples – I really love Granny Smith for their tartness because it balances the sweet filling, but Honeycrisp is fantastic too if you like a bit more sweetness. For that dreamy cheesecake filling, we’ve got softened cream cheese (make sure it’s nice and soft!), granulated sugar, and a touch of brown sugar for that lovely caramelly depth. Vanilla extract is a must for warmth, and a little cinnamon just sings with the apples. Sour cream makes the filling extra smooth and luscious, and crushed graham crackers add a delightful texture, almost like a mini crust inside. If you’re feeling fancy, a sprinkle of chopped nuts adds a nice crunch, but it’s totally optional! Oh, and don’t forget the caramel sauce for drizzling – that’s non-negotiable for me!
Essential Equipment for Baking Perfect Cheesecake Stuffed Apples
You really don’t need a whole fancy arsenal for this recipe. Just a good old baking dish, ideally one that can hold the apples upright. A medium mixing bowl is essential for whipping up that glorious cheesecake filling. You’ll also want a hand mixer or a stand mixer to get that cream cheese perfectly smooth and creamy. A sharp knife or a melon baller is perfect for coring the apples, and measuring cups and spoons are your best friends for getting the ingredient ratios just right. And of course, you’ll need aluminum foil to cover them while they bake initially!
Step-by-Step Guide to Making Cheesecake Stuffed Apples
Preparing the Apples
First things first, let’s get those apples ready! Give them a good wash under cool water and pat them dry. Now, this is where we create our little edible bowls. Grab a sharp knife or a melon baller and carefully remove the core from each apple. You want to go deep enough to make a nice cavity for all that yummy filling, but make sure you don’t cut all the way through the bottom – we want to keep that filling contained! As soon as you’ve got your apples cored, give the inside of each one a little drizzle of lemon juice. This is my secret trick to stop them from turning brown while we’re busy with the filling. It keeps them looking fresh and pretty!
Crafting the Creamy Cheesecake Filling
Now for the star of the show – that luscious cheesecake filling! Grab your softened cream cheese and pop it into a big mixing bowl. Add the granulated sugar and beat it all together with your mixer on medium speed. You’re looking for it to get nice and smooth and creamy, which usually takes about 2 to 3 minutes. Don’t rush this part; it makes a difference! Once it’s looking good, toss in the brown sugar, vanilla extract, cinnamon, and a pinch of salt. Mix it all up until everything is beautifully combined. Next, add the sour cream – this is what makes our filling extra velvety. Mix that in until it’s fully incorporated. Finally, gently fold in the crushed graham crackers and those optional chopped nuts. Just use a spatula for this part so you don’t overmix. You want to see those little bits of cracker and nut throughout the creamy filling.
Assembling and Baking Your Cheesecake Stuffed Apples
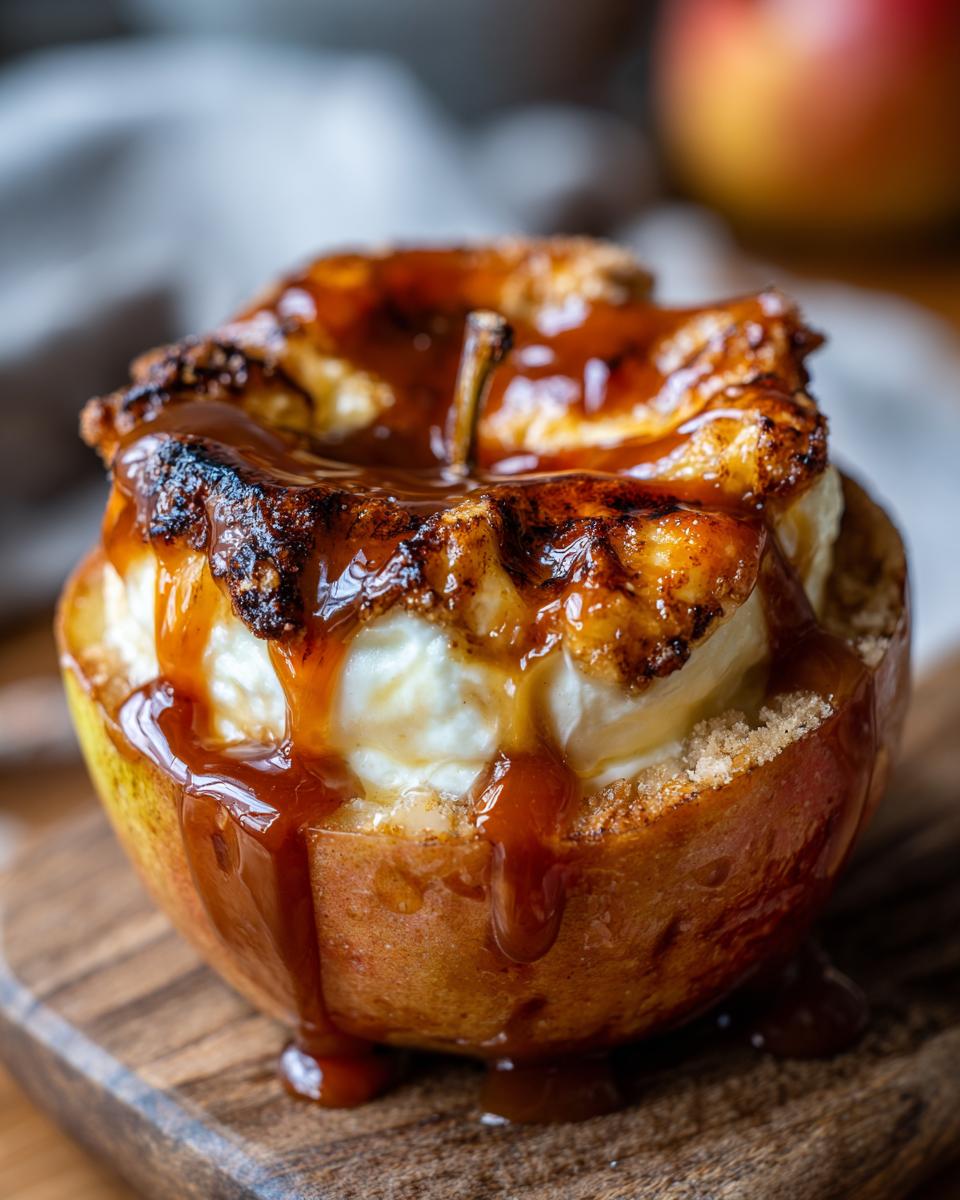
Alright, it’s time to bring it all together! Grab your prepared apples and start spooning that gorgeous cheesecake filling into the cavities you made. Pack it in there gently but firmly – you want them nice and full! If you have any extra filling, just spoon it around the apples in the baking dish; it bakes up into these delicious little golden clusters. Now, nestle your filled apples upright in your baking dish. Cover the whole dish snugly with aluminum foil. Pop it into your preheated oven (remember, 350°F or 175°C!) and let them bake for about 25 to 30 minutes. We want the apples to get tender, but not so soft that they turn to mush. After that initial bake, carefully remove the foil. This is key! Now, let them bake for another 10 to 15 minutes uncovered. This helps the tops of the cheesecake filling get just a little bit golden and delicious.
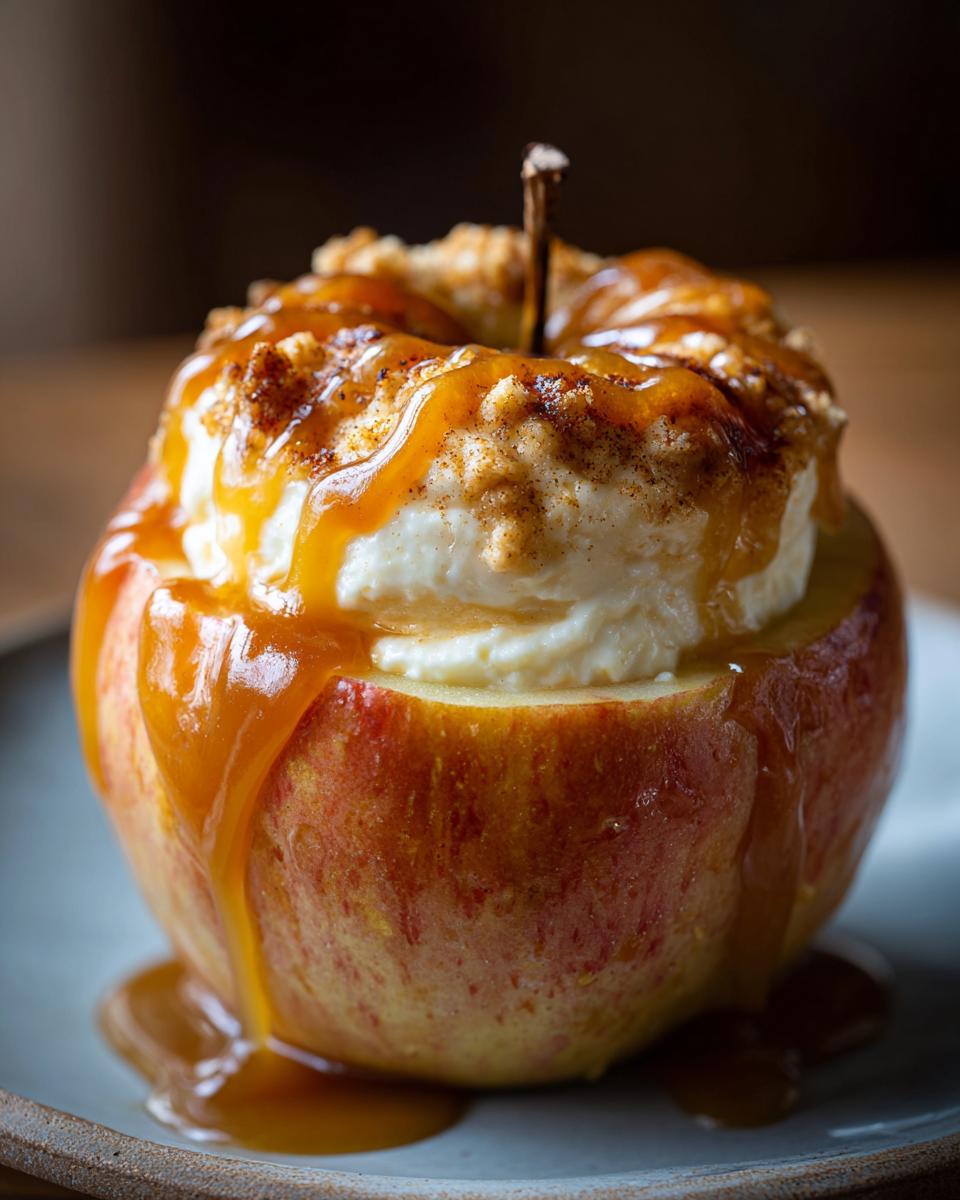
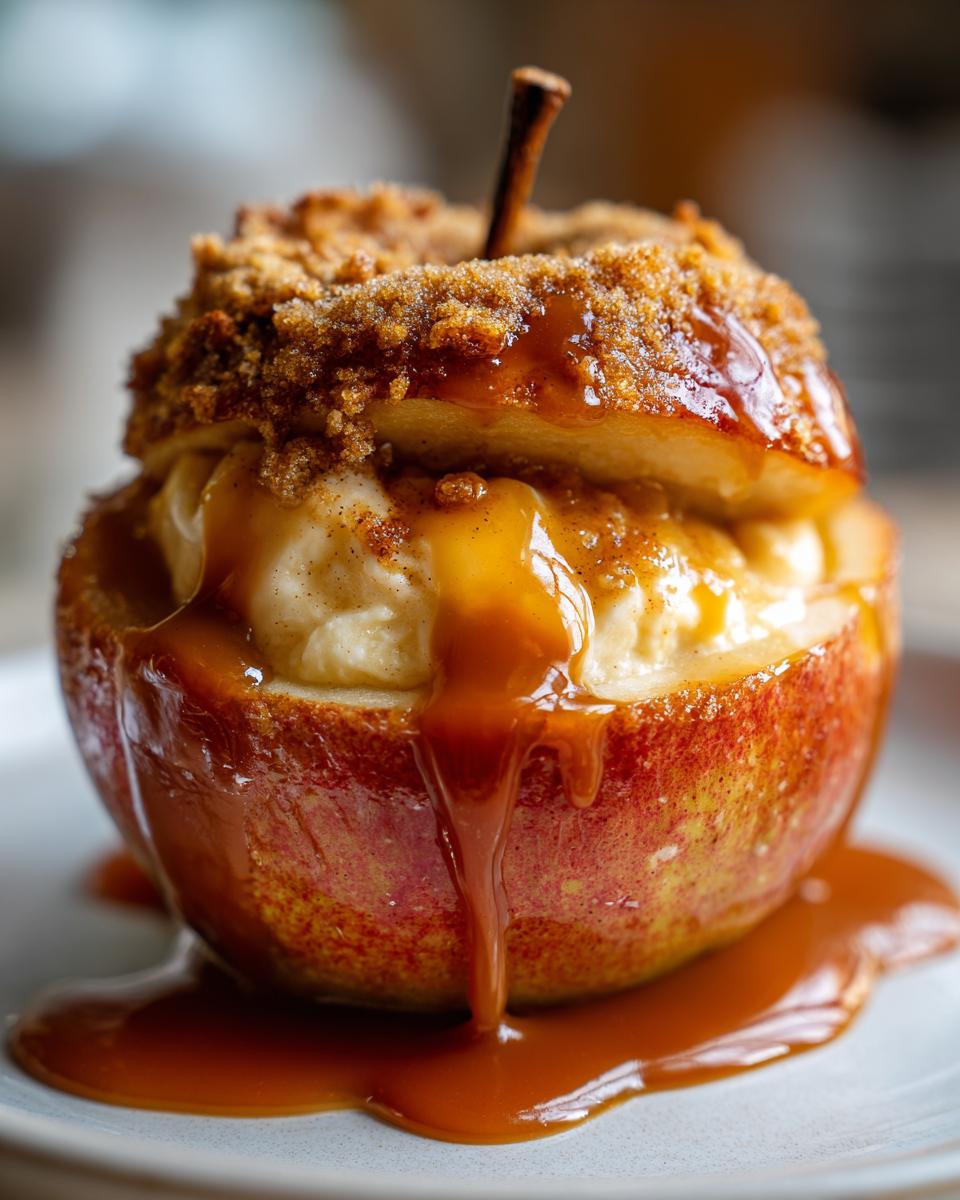
The Final Touch: Drizzling and Serving
The hardest part is waiting! Let those beautiful Cheesecake Stuffed Apples cool in the baking dish for about 10 minutes. This helps them set up just a bit. Then comes the best part – the drizzle! Warm up your caramel sauce just a little so it flows nicely, and generously drizzle it all over the tops of the apples. If you like, you can even give them an extra sprinkle of cinnamon for that extra pop of flavor and aroma. Serve them warm – they are absolutely divine with a scoop of vanilla ice cream or a dollop of whipped cream. That cold creaminess against the warm, spiced apple and cheesecake is just heavenly!
Tips for the Best Cheesecake Stuffed Apples
To make sure your Cheesecake Stuffed Apples turn out absolutely perfect every time, here are a few little tricks I’ve learned. First, choose apples that hold their shape well when baked; Granny Smith and Honeycrisp are great for this. Make sure your cream cheese is truly softened – this is crucial for a smooth, lump-free filling! If you don’t have a mixer, just use a sturdy whisk and some elbow grease; it’ll still work. When coring the apples, don’t worry if it’s not perfectly neat; the filling and caramel will hide any little imperfections. Baking them covered first ensures the apples get tender without the filling drying out, and then uncovering them gives that lovely slightly browned top. And trust me, don’t skip the caramel drizzle!
Creative Variations for Your Cheesecake Stuffed Apples
While these cheesecake stuffed apples are fantastic as is, they’re also a wonderful canvas for your own creativity! Want a little more spice? Add a pinch of nutmeg or allspice to the filling along with the cinnamon. Feeling like a different texture? Try folding in some finely chopped dried cranberries or even a tablespoon of lemon zest for an extra bright flavor. If you don’t have graham crackers, finely crushed vanilla wafer cookies or even digestive biscuits work wonderfully. For a grown-up twist, a splash of bourbon or rum in the filling would be divine!
Storing and Reheating Your Delicious Cheesecake Stuffed Apples
If by some miracle you have leftovers, storing them is super simple. Let the apples cool completely first. Then, pop them into an airtight container and keep them in the refrigerator. They’ll be good for about 2-3 days. To reheat, you can pop them in a low oven (around 300°F or 150°C) for about 10-15 minutes until warmed through. You can also gently reheat them in the microwave, but keep an eye on them so they don’t get too soft. Just be aware that the texture might change slightly after reheating, but they’ll still taste delicious!
Frequently Asked Questions about Cheesecake Stuffed Apples
Q1. Can I use different types of apples for this recipe?
Absolutely! While Granny Smith and Honeycrisp are my favorites for their balance of tartness and sweetness, feel free to experiment. Fuji, Gala, or even Pink Lady apples can work well, though they might make the dessert a bit sweeter. Just make sure they’re firm enough to hold their shape when baked.
Q2. What can I substitute for graham crackers in the filling?
No graham crackers? No problem! You can easily substitute them with crushed vanilla wafers, digestive biscuits, or even shortbread cookies. Just crush them up finely, and they’ll add a lovely texture to the cheesecake filling.
Q3. Can I make these Cheesecake Stuffed Apples ahead of time?
You can prepare the filling a day in advance and store it in the refrigerator. You can also core the apples and toss them with lemon juice a few hours ahead. However, it’s best to fill and bake them closer to serving time for the freshest results. They are most delicious served warm right after baking!
Q4. My apples are turning brown even with lemon juice. What should I do?
Make sure you’re using fresh lemon juice and really drizzling it inside the cored cavity. If you’re prepping the apples a bit further ahead, you can submerge them in a bowl of cold water with a tablespoon of lemon juice while you make the filling. Just drain and pat them dry thoroughly before filling.
Q5. Can I make these dairy-free or nut-free?
Yes! For a dairy-free version, use dairy-free cream cheese and sour cream alternatives. For a nut-free version, simply omit the chopped nuts. The recipe is naturally vegetarian.
Nutritional Information for Cheesecake Stuffed Apples
Here’s a look at the estimated nutritional breakdown for these delightful Cheesecake Stuffed Apples. Please keep in mind that these values are approximate and can vary based on the exact size of your apples and the specific brands of ingredients you use. Enjoy this treat!
| Serving Size | 1 apple |
| Calories | N/A |
| Sugar | N/A |
| Sodium | N/A |
| Fat | N/A |
| Carbohydrates | N/A |

Cheesecake Stuffed Apples: 3 Irresistible Twists
- Total Time: 60-65 minutes
- Yield: 4 servings 1x
- Diet: Vegetarian
Description
Cheesecake Stuffed Apples: A Delicious Twist on a Classic Dessert. This recipe offers a delightful way to enjoy apples with a creamy cheesecake filling, baked to perfection and drizzled with caramel.
Ingredients
- 4 medium-sized apples (Granny Smith or Honeycrisp)
- 8 oz cream cheese, softened
- 1/2 cup granulated sugar
- 1/4 cup brown sugar
- 1 tsp vanilla extract
- 1/2 tsp ground cinnamon
- 1/4 tsp salt
- 1/2 cup sour cream
- 1/2 cup crushed graham crackers
- 1/4 cup chopped nuts (optional, walnuts or pecans)
- 1/4 cup caramel sauce (for drizzling)
- 1 tbsp lemon juice (to prevent browning of apples)
Instructions
- Preheat your oven to 350°F (175°C).
- Wash the apples thoroughly under cold water and pat them dry.
- Carefully remove the core from each apple, leaving the bottom intact to create a cavity.
- Drizzle a little lemon juice inside each apple to prevent browning.
- In a large mixing bowl, combine the softened cream cheese and granulated sugar. Beat on medium speed until smooth and creamy (about 2-3 minutes).
- Add the brown sugar, vanilla extract, ground cinnamon, and salt. Mix until well incorporated.
- Add the sour cream and mix until fully combined.
- Fold in the crushed graham crackers and chopped nuts (if using) with a spatula.
- Fill each apple with the cheesecake mixture using a spoon or piping bag, packing it gently but firmly.
- Place the filled apples upright in a baking dish. Spoon any leftover filling around the apples.
- Cover the baking dish with aluminum foil.
- Bake in the preheated oven for 25-30 minutes until the apples are tender but not mushy.
- Remove the foil and bake for an additional 10-15 minutes to brown the tops slightly.
- Let the apples cool for about 10 minutes before serving.
- Drizzle with caramel sauce and sprinkle with extra cinnamon if desired.
- Serve warm with a scoop of vanilla ice cream or a dollop of whipped cream for a delightful contrast.
- Allow any leftovers to cool completely before storing in an airtight container in the refrigerator.
Notes
- For a nut-free version, simply omit the chopped nuts.
- Feel free to experiment with different apple varieties for varying sweetness and tartness.
- Prep Time: 20 minutes
- Cook Time: 40-45 minutes
- Category: Dessert
- Method: Baking
- Cuisine: American
Nutrition
- Serving Size: 1 apple
- Calories: N/A
- Sugar: N/A
- Sodium: N/A
- Fat: N/A
- Saturated Fat: N/A
- Unsaturated Fat: N/A
- Trans Fat: N/A
- Carbohydrates: N/A
- Fiber: N/A
- Protein: N/A
- Cholesterol: N/A