Skip to content
Forget those sad, spongy little store-bought treats because today, we are making the absolute best Chocolate Cream Snack Cakes right here in your own kitchen! I’m Anna Kowalska, and I share tried-and-true homemade recipes that you and your family will absolutely love. Everything I share here is made with heart and flavor, and I truly believe that the best memories are made around a table full of incredible, scratch-made food.
I remember seeing these little cakes in the bakery case and always thinking they looked impossible to recreate at home—all that fluffy filling and that perfect, shiny chocolate shell! Well, I spent a solid month messing around with temperatures and sugar syrups until I cracked the code. This recipe isn’t just about indulgence; it’s about taking something that seems complicated and proving you can absolutely master it. Trust me, once you pull these beautiful, rich Chocolate Cream Snack Cakes out of the oven, you’ll never look back!
Jump to:
Why You Will Love These Chocolate Cream Snack Cakes
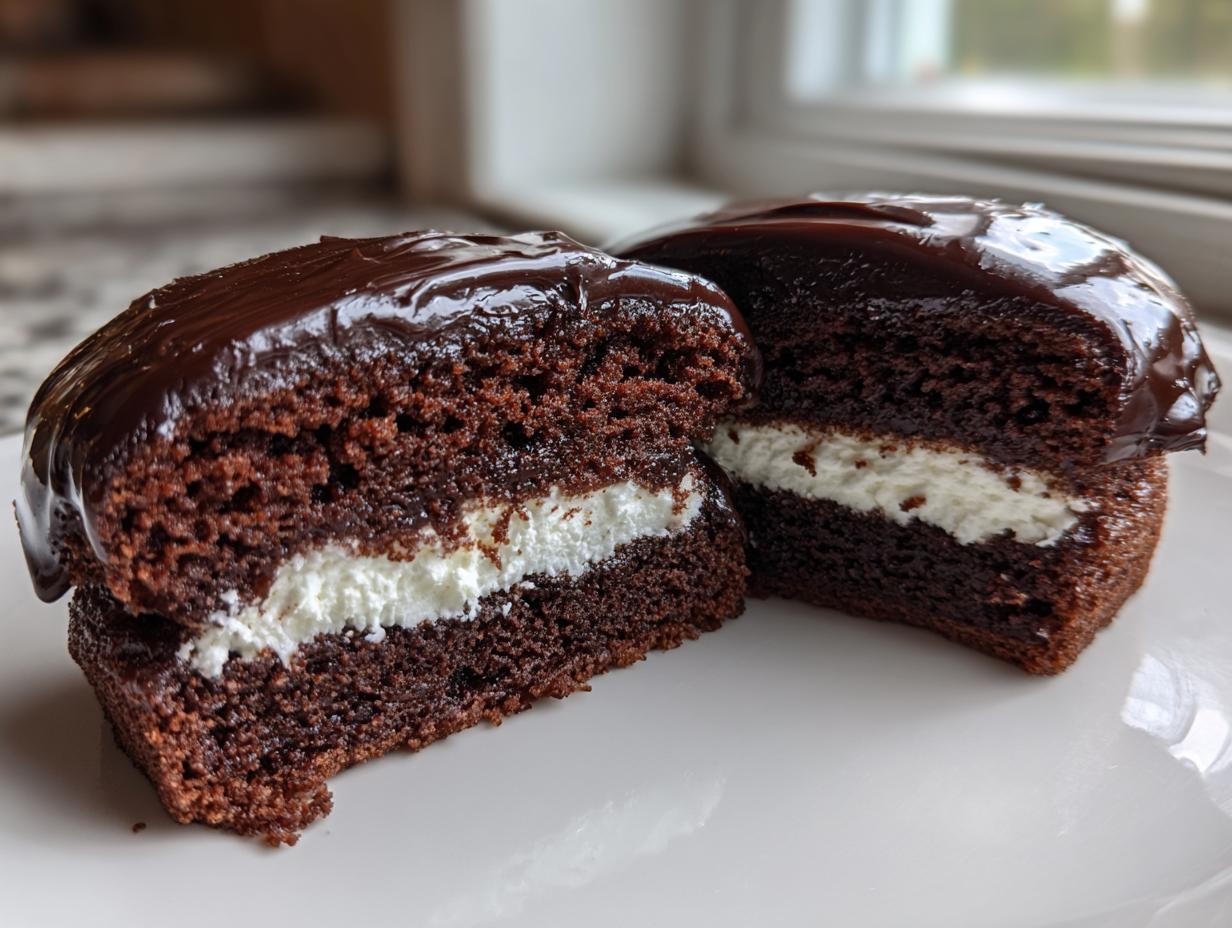
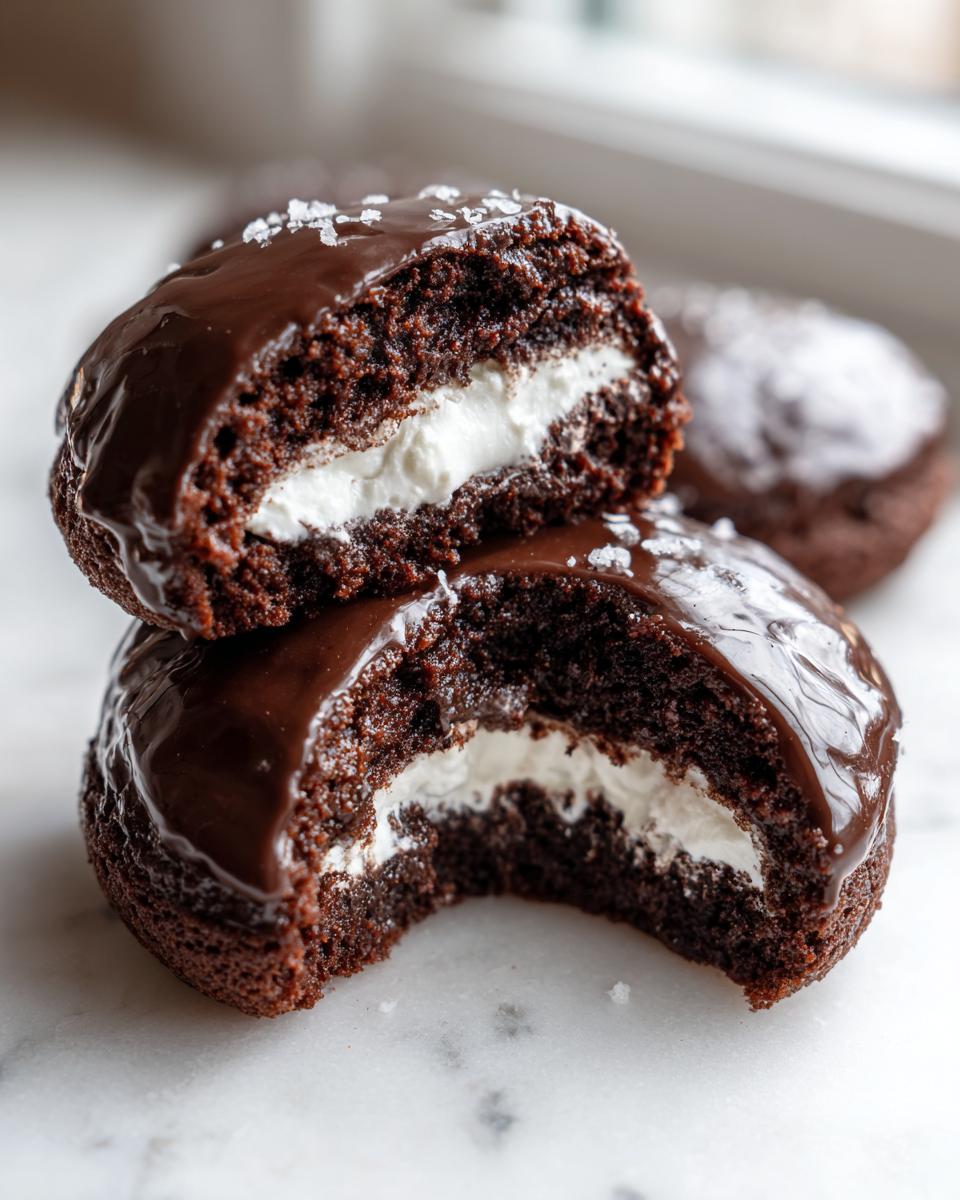
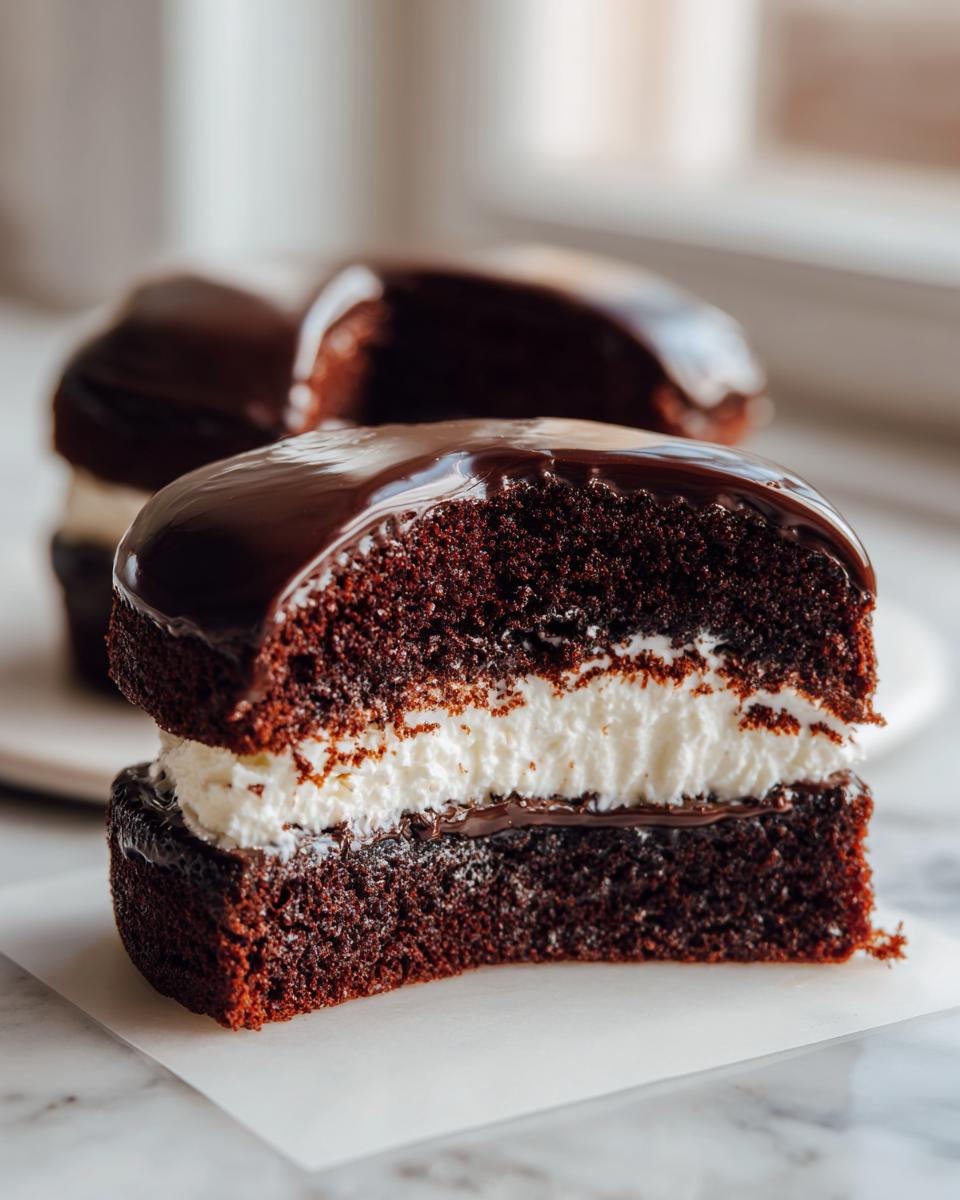
These aren’t your average cupcakes, friends. These Chocolate Cream Snack Cakes deliver that perfect combination of textures that makes you close your eyes after the first bite. They are rich, they are decadent, and honestly, they taste a million times better than anything store-bought. You get that deep, dark chocolate cake, that cloud of vanilla cream filling, and that gorgeous, firm glaze all in one perfect package.
- The chocolate cake base is incredibly moist—it stays soft for days!
- The homemade vanilla cream filling is light as air, thanks to the meringue base.
- They are perfectly portioned, making them ideal for lunchboxes or a quick after-dinner treat.
- The final chocolate glaze sets up beautifully, giving you that satisfying crack when you bite in.
Essential Equipment for Perfect Chocolate Cream Snack Cakes
You are going to need a few specialized tools for the cream filling because we are making a proper meringue here. Don’t skip these, or the filling won’t set up right!
- A reliable stand mixer fitted with both the paddle and the whisk attachments is a must-have for the batter and the cream.
- A candy thermometer is non-negotiable for hitting that exact temperature for the sugar syrup—it’s the secret to stable cream!
- A disposable pastry bag (or a sturdy zip-top bag) and a large round piping tip are needed to inject that beautiful vanilla filling.
- A standard 12-cup muffin pan, well-greased, is what we use for baking the individual cakes.
Gathering Ingredients for Chocolate Cream Snack Cakes
Okay, let’s talk about what you need to pull off these amazing Chocolate Cream Snack Cakes. Since we are baking from scratch, the quality of your components really does matter here. We aren’t just tossing things together; we are building layers of flavor, starting with the cake itself. Don’t panic about the long ingredient list—it’s just broken down into three distinct parts: the cake, the filling, and the glaze. Make sure your butter and eggs for the cake batter are at room temperature; it makes such a huge difference in how light your batter turns out!
When you look at the list, you’ll see we need a few specialty items for that iconic filling, especially the corn syrup, which helps stabilize that fluffy vanilla cream. Trust me, taking the time to gather everything first means the actual assembly process flows like a dream!
Cake Batter Components
- 1/2 cup unsalted butter, room temperature
- 1/2 cup unsweetened cocoa powder
- 1/2 cup boiling water
- 1 1/4 cups all-purpose flour
- 1 teaspoon baking powder
- 1/2 teaspoon fine sea salt
- 1 1/4 cup white sugar
- 2 large eggs, room temperature
- 1 1/2 teaspoons vanilla extract
- 1/4 cup whipping cream
Vanilla Cream Filling Ingredients
- 2/3 cup white sugar (the remaining amount)
- 1 1/3 cups light corn syrup (the majority of it)
- 1/4 cup water
- 2 large egg whites
- 1/4 teaspoon cream of tartar
- 2 teaspoons vanilla extract
Smooth Chocolate Glaze Requirements
- 1/4 cup unsalted butter, cubed
- 4 ounces bittersweet chocolate
- 1 1/2 teaspoons light corn syrup (the remainder)
Step-by-Step Instructions for Chocolate Cream Snack Cakes
This is where the magic happens! I know the instructions look long, but honestly, it’s just a sequence of straightforward tasks. We tackle the cake first, then focus on that tricky, beautiful vanilla cream filling, and finish with the chocolate bath. Read everything through once before you start your oven fan—that’s my number one baking rule!
Baking the Moist Chocolate Cakes
First things first, get that oven preheated to 350 degrees F (175 degrees C) and position your rack right in the middle. Grab your 12-cup muffin pan and butter the top surface well, lining each cup with a paper liner. Now for the dry stuff: whisk your cocoa powder and boiling water together in a small bowl until it’s totally smooth—it’ll be a thick paste. In a separate bowl, whisk the flour, baking powder, and salt.
In your stand mixer, cream that 1/2 cup of room-temperature butter with 1 1/4 cups of sugar until it gets light and fluffy; this takes about 4 to 5 minutes, so be patient! Beat in your two eggs one at a time, scraping down the sides after each one, then mix in 1 1/2 teaspoons of vanilla. Now we alternate! Mix in about a third of the flour mixture on low speed, then half of that chocolate cocoa mixture. Repeat this until everything is in there and the batter is smooth. Finally, mix in the whipping cream. Divide that beautiful batter evenly among the 12 liners, filling them only about 3/4 full. Pop them in to bake for 22 to 25 minutes. You want a toothpick to come out clean! Let them cool in the pan for just five minutes before carefully transferring them to a wire rack to cool completely. They must be totally cool before we attempt the filling.
Crafting the Homemade Vanilla Cream Filling
This part requires attention to temperature, so keep that candy thermometer handy! In a small saucepan, combine the remaining 2/3 cup sugar, 1/3 cup corn syrup, and 1/4 cup water. Heat this over medium heat, stirring only until the sugar dissolves. Once it starts bubbling around the edges, stop stirring completely! Use a pastry brush dipped in water to wash down any sugar crystals clinging to the sides of the pot—this prevents the whole batch from seizing up. Keep cooking without stirring until your thermometer hits exactly 230 degrees F (110 degrees C).
While that syrup is heating, get your egg whites and cream of tartar into the clean, dry bowl of your stand mixer, ready to whisk. As soon as the syrup hits the 230 mark, start beating those egg whites on medium-high speed. When the syrup hits 240 degrees F (116 degrees C), pull it off the heat! Now, slowly, slowly drizzle that hot syrup into the beating egg whites in a steady stream. This is crucial—if you dump it too fast, you’ll cook the eggs! Keep beating for another 6 to 8 minutes until you have stiff, glossy peaks. Mix in the last 2 teaspoons of vanilla. Transfer this heavenly vanilla cream into your piping bag.
Assembling and Glazing Your Chocolate Cream Snack Cakes
Time to put these Chocolate Cream Snack Cakes together! Take a small paring knife or the end of a large round piping tip and carefully cut a small plug or hole out of the top center of each cooled cake. Gently pipe that luscious vanilla cream filling down into the hole. Don’t overfill! Take the little cake plug you removed and gently press it back on top to seal the cream inside. Pop the filled cakes into the freezer for at least 15 minutes; this makes dipping them in the hot glaze so much cleaner!
While they chill, make the glaze. Melt the cubed butter, bittersweet chocolate, and the last bit of corn syrup (1 1/2 teaspoons) in a double boiler or a bowl set over simmering water, stirring until it’s perfectly smooth. Take it off the heat and let it cool for just five minutes—if it’s too hot, it will melt the cream filling right out!
Working quickly, remove the chilled cakes from the freezer. Dip the top of each cake into the warm chocolate glaze, letting the extra drip right off. Set them on a wire rack until that glaze sets completely firm. If you saved any extra cream, you can dollop a little swirl on top for decoration. These amazing Chocolate Cream Snack Cakes are ready when the chocolate shell is hard!
Tips for Mastering Your Chocolate Cream Snack Cakes
Listen, making these Chocolate Cream Snack Cakes involves some candy-making techniques, so a couple of little warnings will save you headaches later! The biggest issue people run into is the sugar syrup crystallizing when making the filling. Remember my rule: once that sugar mixture boils, DO NOT STIR IT. If you see crystals forming on the sides of the pot above the liquid line, use a wet pastry brush to gently wipe them down before the syrup gets too hot. That’s the key to a smooth meringue!
Also, don’t rush the cooling process for the cakes. If the chocolate cake is even slightly warm when you try to cut the hole or pipe the filling, the whole thing will turn into a gooey mess. A quick 15-minute freeze before glazing is your best friend here. A well-chilled cake dipped into slightly cooled glaze guarantees that beautiful, shiny, shatter-proof coating we are aiming for on these incredible Chocolate Cream Snack Cakes.
Storage and Keeping Your Chocolate Cream Snack Cakes Fresh
The best part about these treats is that they actually keep really well, thanks to that sturdy chocolate shell and the stabilized cream filling. You definitely want to store them in an airtight container, and the refrigerator is the best place for them, especially if your kitchen runs warm. The chocolate glaze holds up beautifully when chilled.
They are actually best enjoyed after they’ve sat in the fridge for a few hours because the flavors meld together. If you want to serve them slightly softer, just pull them out of the fridge about 20 minutes before you plan to eat them. They should stay perfectly delicious for up to four days.
Here’s a quick rundown on keeping your hard work fresh:
| Component/Condition | Storage Recommendation | Maximum Duration |
|---|---|---|
| Airtight Container (Room Temp) | Not recommended for more than 12 hours | 1 Day |
| Airtight Container (Refrigerated) | Best environment for setting the glaze | Up to 4 Days |
| Freezing (Un-glazed Cakes Only) | Wrap tightly in plastic wrap first | Up to 2 Months |
Frequently Asked Questions About Chocolate Cream Snack Cakes
I get so many questions about these because people worry about mastering the filling! Here are the most common ones I hear about making these Chocolate Cream Snack Cakes at home.
Q1. Can I substitute the light corn syrup in the filling?
I really, really advise against it for this specific vanilla cream. The corn syrup is what prevents the sugar and egg white mixture from turning grainy or weeping liquid later on. It’s essential for that stable, fluffy texture. Stick to the corn syrup for the best results!
Q2. What if I don’t have a stand mixer for the cream? Can I use a hand mixer?
You absolutely can, but you need serious arm strength for whipping the egg whites while slowly streaming in that hot sugar syrup. If you use a hand mixer, make sure you have a very heat-safe bowl, and have a friend help you pour while you mix slowly. It will take longer, but it’s doable!
Q3. Do I have to freeze the cakes before dipping them in the chocolate glaze?
Yes, please do! If the cakes are room temperature, the heat from the glaze will melt the delicate vanilla cream filling right out, and you’ll have a soupy mess dripping everywhere. A quick freeze ensures the filling stays put while the chocolate sets up nicely around your Chocolate Cream Snack Cakes.
Q4. Can I make these ahead of time for a party?
They are perfect for making ahead! You can bake the cakes a day early and keep them covered at room temperature. Assemble and glaze them the day before you serve them. Store them in the fridge, and remember to pull them out 20 minutes before serving so the cake softens up just right.
Sharing Your Homemade Chocolate Cream Snack Cakes
There you have it! I hope you feel as excited as I do about conquering these beautiful, rich Chocolate Cream Snack Cakes. They take a little effort, especially with that candy thermometer business, but the payoff is incredible. When you bite into that perfect combination of dark chocolate, light cream, and shiny glaze, you’ll know every minute was worth it.
I truly want to see your creations! Snap a picture of your finished cakes and tag me on social media. If you baked these for a special occasion, tell me about it in the comments below! Did your vanilla cream fill perfectly? Did the glaze set just right? Let me know how your version of these amazing Chocolate Cream Snack Cakes turned out, and don’t forget to leave a star rating so others know just how special this recipe is!
Tips for Mastering Your Chocolate Cream Snack Cakes
Listen, making these Chocolate Cream Snack Cakes involves some candy-making techniques, so a couple of little warnings will save you headaches later! The biggest issue people run into is the sugar syrup crystallizing when making the filling. Remember my rule: once that sugar mixture boils, DO NOT STIR IT. If you see crystals forming on the sides of the pot above the liquid line, use a wet pastry brush to gently wipe them down before the syrup gets too hot. That’s the key to a smooth meringue!
Also, don’t rush the cooling process for the cakes. If the chocolate cake is even slightly warm when you try to cut the hole or pipe the filling, the whole thing will turn into a gooey mess. A quick 15-minute freeze before glazing is your best friend here. A well-chilled cake dipped into slightly cooled glaze guarantees that beautiful, shiny, shatter-proof coating we are aiming for on these incredible Chocolate Cream Snack Cakes.
Storage and Keeping Your Chocolate Cream Snack Cakes Fresh
The best part about these treats is that they actually keep really well, thanks to that sturdy chocolate shell and the stabilized cream filling. You definitely want to store them in an airtight container, and the refrigerator is the best place for them, especially if your kitchen runs warm. The chocolate glaze holds up beautifully when chilled.
They are actually best enjoyed after they’ve sat in the fridge for a few hours because the flavors meld together. If you want to serve them slightly softer, just pull them out of the fridge about 20 minutes before you plan to eat them. They should stay perfectly delicious for up to four days. I wouldn’t recommend reheating these at all—the cream filling just doesn’t handle microwave heat well!
Here’s a quick rundown on keeping your hard work fresh so you can enjoy your Chocolate Cream Snack Cakes all week long:
| Component/Condition | Storage Recommendation | Maximum Duration |
|---|---|---|
| Airtight Container (Room Temp) | Not recommended for more than 12 hours | 1 Day |
| Airtight Container (Refrigerated) | Best environment for setting the glaze | Up to 4 Days |
| Freezing (Un-glazed Cakes Only) | Wrap tightly in plastic wrap first | Up to 2 Months |
Frequently Asked Questions About Chocolate Cream Snack Cakes
I get so many questions about these because people worry about mastering the filling! Here are the most common ones I hear about making these Chocolate Cream Snack Cakes at home.
Q1. Can I substitute the light corn syrup in the filling?
I really, really advise against it for this specific vanilla cream. The corn syrup is what prevents the sugar and egg white mixture from turning grainy or weeping liquid later on. It’s essential for that stable, fluffy texture. Stick to the corn syrup for the best results!
Q2. What if I don’t have a stand mixer for the cream? Can I use a hand mixer?
You absolutely can, but you need serious arm strength for whipping the egg whites while slowly streaming in that hot sugar syrup. If you use a hand mixer, make sure you have a very heat-safe bowl, and have a friend help you pour while you mix slowly. It will take longer, but it’s doable!
Q3. Do I have to freeze the cakes before dipping them in the chocolate glaze?
Yes, please do! If the cakes are room temperature, the heat from the glaze will melt the delicate vanilla cream filling right out, and you’ll have a soupy mess dripping everywhere. A quick freeze ensures the filling stays put while the chocolate sets up nicely around your Chocolate Cream Snack Cakes.
Q4. Can I make these ahead of time for a party?
They are perfect for making ahead! You can bake the cakes a day early and keep them covered at room temperature. Assemble and glaze them the day before you serve them. Store them in the fridge, and remember to pull them out 20 minutes before serving so the cake softens up just right.
Sharing Your Homemade Chocolate Cream Snack Cakes
There you have it! I hope you feel as excited as I do about conquering these beautiful, rich Chocolate Cream Snack Cakes. They take a little effort, especially with that candy thermometer business, but the payoff is incredible. When you bite into that perfect combination of dark chocolate, light cream, and shiny glaze, you’ll know every minute was worth it.
I truly want to see your creations! Snap a picture of your finished cakes and tag me on social media. If you baked these for a special occasion, tell me about it in the comments below! Did your vanilla cream fill perfectly? Did the glaze set just right? Let me know how your version of these amazing Chocolate Cream Snack Cakes turned out, and don’t forget to leave a star rating so others know just how special this recipe is!
Print
Master 12 Divine Chocolate Cream Snack Cakes Now
- Total Time: 65 minutes
- Yield: 12 cakes 1x
- Diet: Vegetarian
Description
Make these Chocolate Cream Snack Cakes at home for a rich, satisfying treat. This recipe guides you through creating moist chocolate cakes filled with a homemade vanilla cream and covered in a smooth chocolate glaze.
Ingredients
- 1/2 cup unsalted butter, at room temperature, plus more for greasing pan
- 1/2 cup unsweetened cocoa powder
- 1/2 cup boiling water
- 1 1/4 cups all-purpose flour
- 1 teaspoon baking powder
- 1/2 teaspoon fine sea salt
- 1 1/4 cup plus 2/3 cup white sugar, divided
- 2 large eggs, at room temperature
- 3 1/2 teaspoons vanilla extract, divided
- 1/4 cup whipping cream
- 1 1/3 cup plus 1 1/2 teaspoons light corn syrup, divided
- 1/4 cup water
- 2 large egg whites
- 1/4 teaspoon cream of tartar
- 1/4 cup unsalted butter, cubed
- 4 ounces bittersweet chocolate
Instructions
- Preheat your oven to 350 degrees F (175 degrees C). Position a rack in the center. Lightly butter the top surface of a 12-cup muffin pan and place a cupcake liner in each cup.
- Whisk the cocoa powder and boiling water in a small heat-safe bowl until smooth. In a medium bowl, whisk together flour, baking powder, and salt.
- In the bowl of a stand mixer fitted with a paddle attachment, beat 1/2 cup butter and 1 1/4 cups sugar at medium speed until light and fluffy, 4 to 5 minutes. Scrape the bowl well. Mix in 2 eggs, one at a time, at medium speed, scraping the bowl well after each addition. Mix in 1 1/2 teaspoons vanilla.
- Mix in about 1/3 of the flour mixture at low speed. Mix in half of the cocoa mixture. Repeat, alternating between the flour mixture and cocoa mixture, until fully incorporated and the batter is smooth. Mix in the whipping cream.
- Divide the batter among the prepared muffin cups, filling each about 3/4 full. Bake until a toothpick inserted into the center of a cake comes out clean or with a few moist crumbs, 22 to 25 minutes. Cool in the pan for 5 minutes, then use a small offset spatula or a knife to remove each cake; transfer to a wire rack and let cool completely.
- Heat the remaining 2/3 cup sugar, 1/3 cup corn syrup, and 1/4 cup water in a small saucepan over medium heat, stirring until the sugar is dissolved. When bubbles start to form around the edges, stop stirring. Use a pastry brush dipped in water to dissolve any sugar left on the sides of the pot. Cook, without stirring, until a candy thermometer registers 230 degrees F (110 degrees C).
- Meanwhile, put the egg whites and cream of tartar in the bowl of a stand mixer fitted with a whisk attachment. The bowl must be clean and dry. When the sugar mixture reaches 230 degrees F (110 degrees C), start beating the egg white mixture at medium-high speed.
- When the sugar mixture reaches 240 degrees F (116 degrees C), remove it from the heat and add it to the egg white mixture in a slow, steady stream, beating until soft peaks form, 6 to 8 minutes more. Mix in the remaining 2 teaspoons vanilla. Transfer the vanilla cream to a disposable pastry bag and cut a 1/2-inch opening from the tip.
- Use the base of a large round piping tip, a small round cookie cutter, or a paring knife to cut a hole out of the top of each cake. Pipe vanilla cream into the holes. Top with the small piece of removed cake to help seal the cream inside. Freeze the cakes while you make the glaze for at least 15 minutes.
- Melt the cubed butter, chocolate, and remaining 1 1/2 teaspoons corn syrup in a double boiler or a heat-safe bowl set over simmering water, stirring occasionally, until the mixture is smooth. Remove from heat; let cool 5 minutes. Stir before using.
- Dip the top of each cake into the glaze, allowing the excess to drip off; transfer to a wire rack. Let stand until the glaze sets completely. If you want, decorate the tops of the cakes with the remaining vanilla cream. Chill in an airtight container until ready to serve, up to 4 days.
Notes
- Ensure your stand mixer bowl is clean and dry when whipping the egg whites.
- Cool the cakes completely before attempting to remove them from the pan or fill them.
- When cooking the sugar syrup, avoid stirring once it starts to boil to prevent crystallization.
- Prep Time: 35 minutes
- Cook Time: 30 minutes
- Category: Dessert
- Method: Baking and Candy Making
- Cuisine: American
Nutrition
- Serving Size: 1 cake
- Calories: 501
- Sugar: 65g
- Sodium: 181mg
- Fat: 20g
- Saturated Fat: 12g
- Unsaturated Fat: 8g
- Trans Fat: 0g
- Carbohydrates: 79g
- Fiber: 3g
- Protein: 5g
- Cholesterol: 67mg