Skip to content
If you’re like me, sometimes you just need a major sugar hit *right now*, but the thought of turning on the oven feels like too much work. That’s why I’m obsessed with no-bake recipes, and today I’m sharing my absolute favorite: Chocolate Peanut Butter Bars. I’m Anna Kowalska, and here I share tried-and-true homemade recipes that you and your family will love, everything is made with heart and flavor.
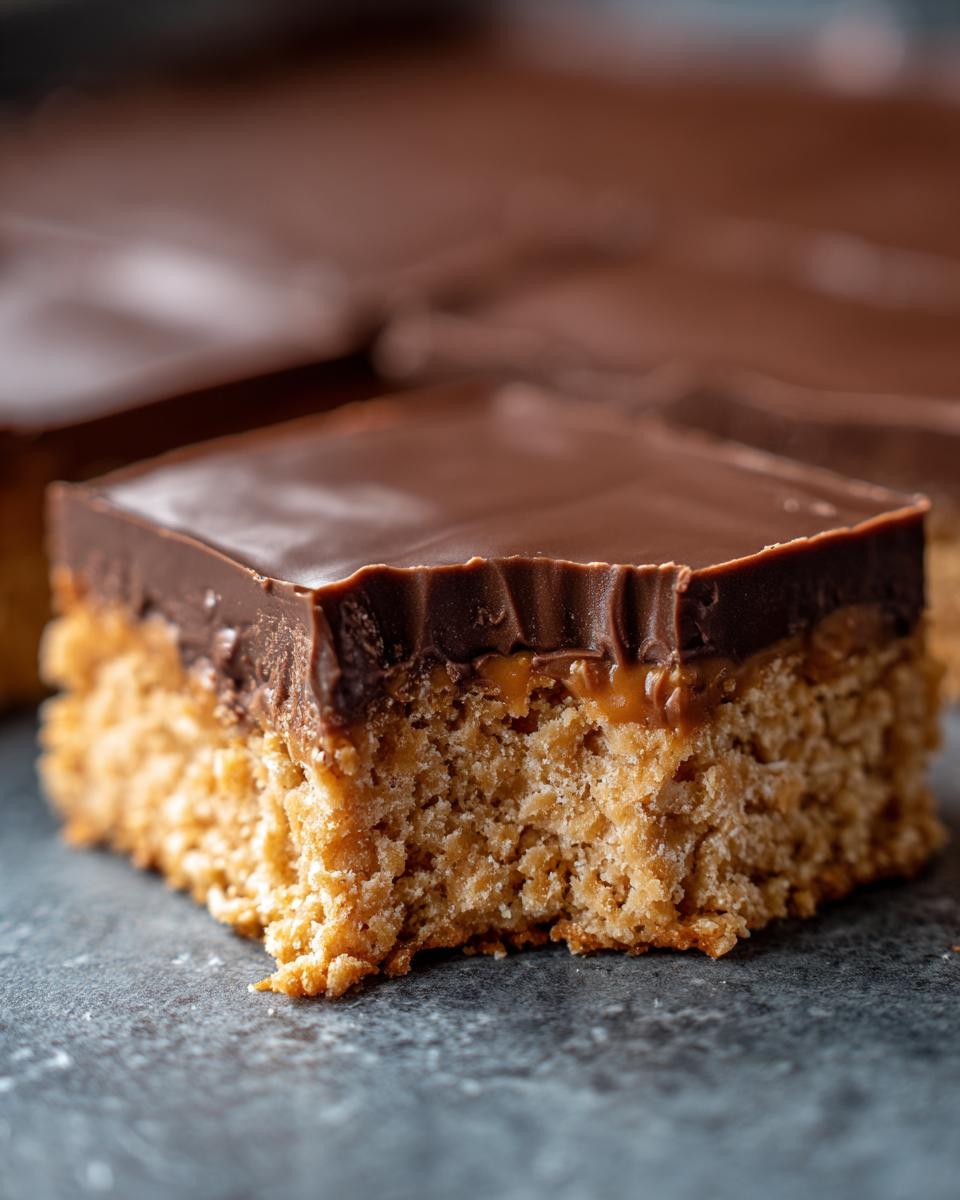
Over the years, I’ve perfected dozens of quick desserts for those nights when the craving hits hard. What makes these bars legendary? It’s the perfect marriage of salty crunch from the pretzels hitting that sweet, creamy peanut butter layer, all sealed under a blanket of smooth chocolate. Seriously, you won’t believe how fast these come together. My experience guarantees that these bars deliver maximum flavor with minimum fuss. They are truly the ultimate no-bake sweet treat!

Jump to:
Why You Will Love These Chocolate Peanut Butter Bars
I hear you—sometimes you need dessert yesterday! These Chocolate Peanut Butter Bars are the answer to every busy weeknight craving. They fly off the counter at every potluck I bring them to, and the best part is how little effort they require. You’re going to want to keep this recipe handy!
-
Quick Preparation for Busy Days
We are talking about 15 minutes of actual work time, folks! Since there’s no oven involved, you just mix, press, melt, and chill. It’s dessert magic with almost zero cleanup, which is a huge win in my book.
-
Irresistible Flavor Profile
Forget boring flavors! These bars hit every note perfectly. You get the savory, salty crunch from those crushed pretzels, which cuts through the richness of the smooth peanut butter layer, and then that gorgeous, melty chocolate finish. It’s the ultimate salty-sweet combination.
Essential Ingredients for Perfect Chocolate Peanut Butter Bars
Okay, let’s talk about what goes into these amazing Chocolate Peanut Butter Bars. Because this is a no-bake recipe, the quality and preparation of your ingredients matter a lot. We aren’t relying on baking chemistry to save us, so we need to make sure everything is spot on!
When I first started making these, I tried swapping out the butter for something else, and let me tell you, it was a disaster. The base just crumbled! So, trust me on this: stick to the list. Every single item plays a critical role, whether it’s providing structure or that perfect salty counterpoint to the sweet chocolate.
Ingredient Clarity and Preparation Notes
You’ll notice we use peanut butter twice—that’s intentional! One cup goes into the base for body, and the remaining quarter cup is mixed right into the chocolate topping for extra creaminess. Before you start, make sure your butter is melted and your pretzels are crushed finely—we want crumbs, not big chunks, for that smooth bottom layer. Check out the table below for the exact measurements; precision is key here!
Ingredient Table
| Ingredient | Amount | Preparation Note |
|---|---|---|
| Thin Pretzel Sticks | 2 cups | Crushed into fine crumbs |
| Unsalted Butter | 1 1/2 sticks | Melted |
| Powdered Sugar | 1 1/2 cups | Sifted if lumpy |
| Smooth Peanut Butter (Base) | 1 cup | Room temperature is best |
| Smooth Peanut Butter (Topping) | 1/4 cup | Room temperature is best |
| Milk Chocolate Chips | 1 1/2 cups | For melting |
Equipment Needed for Your Chocolate Peanut Butter Bars
You don’t need a stand mixer or any fancy gadgets for these Chocolate Peanut Butter Bars, which is fantastic! Since this is no-bake, we are keeping the equipment list short and sweet. Having the right tools just makes the 15 minutes of prep time even faster, trust me.
Preparing Your Pan and Mixing Bowls
The most important piece of equipment here is the right pan—a 9×9 inch square pan is perfect for getting thick, satisfying squares. You absolutely must line this pan with parchment paper first. Let the paper hang over two sides like little handles; this is the only way you’ll be able to lift the entire set base out later without breaking everything! You’ll also need a medium mixing bowl for the base and a separate microwave-safe bowl for melting that glorious chocolate topping.
Step-by-Step Instructions for No-Bake Chocolate Peanut Butter Bars
Alright, let’s get down to business! These instructions for the Chocolate Peanut Butter Bars are so simple, I almost feel guilty calling it a recipe. We move fast here, so have your 9×9 pan lined and ready to go before you start mixing. Let’s make some magic happen!
Creating the Pretzel-Peanut Butter Base
First things first, we need crumbs! Take those 2 cups of pretzel sticks and crush them up until they look like coarse sand. You can use a food processor if you have one—that’s the fastest way—but I often just toss them in a Ziploc bag and smash them with a rolling pin while listening to loud music. It’s very therapeutic! Once crushed, dump those crumbs into your medium bowl.
Now, add the melted butter, the powdered sugar, and that big cup of peanut butter right on top of the crumbs. Grab a sturdy spoon or spatula and start mixing everything together. You need to stir this mixture until it is totally uniform. Keep going until there are absolutely no dry pockets of sugar or crumbs left hiding at the bottom. It should look like thick, slightly sticky dough.
Take that beautiful base mixture and press it firmly and evenly into the bottom of your prepared, parchment-lined pan. Use the bottom of a measuring cup or just your clean hands to pack it down tight. This base needs to be solid so it can hold up the chocolate topping!
Melting the Chocolate Topping
Time for the luxurious top layer! In a separate, microwave-safe bowl, toss in your remaining 1/4 cup of peanut butter and all those milk chocolate chips. Now, listen closely, because this is where people mess up: DO NOT try to melt this all at once! Microwave it in short bursts—only 30 seconds at a time.
After the first 30 seconds, pull it out and stir it well, even if it doesn’t look melted yet. The residual heat will keep going. Repeat this stirring and microwaving process until it’s mostly smooth, then stir until the last few lumps melt away. Stirring is key to keeping that chocolate shiny and preventing it from seizing up or burning. We want smooth, silky chocolate here!
Assembling and Setting the Chocolate Peanut Butter Bars
Pour that melted chocolate mixture right over your pressed pretzel base. Use an offset spatula or the back of a spoon to gently spread the chocolate evenly across the top. Try not to press down too hard, or you might mess up that nice, level peanut butter layer underneath.
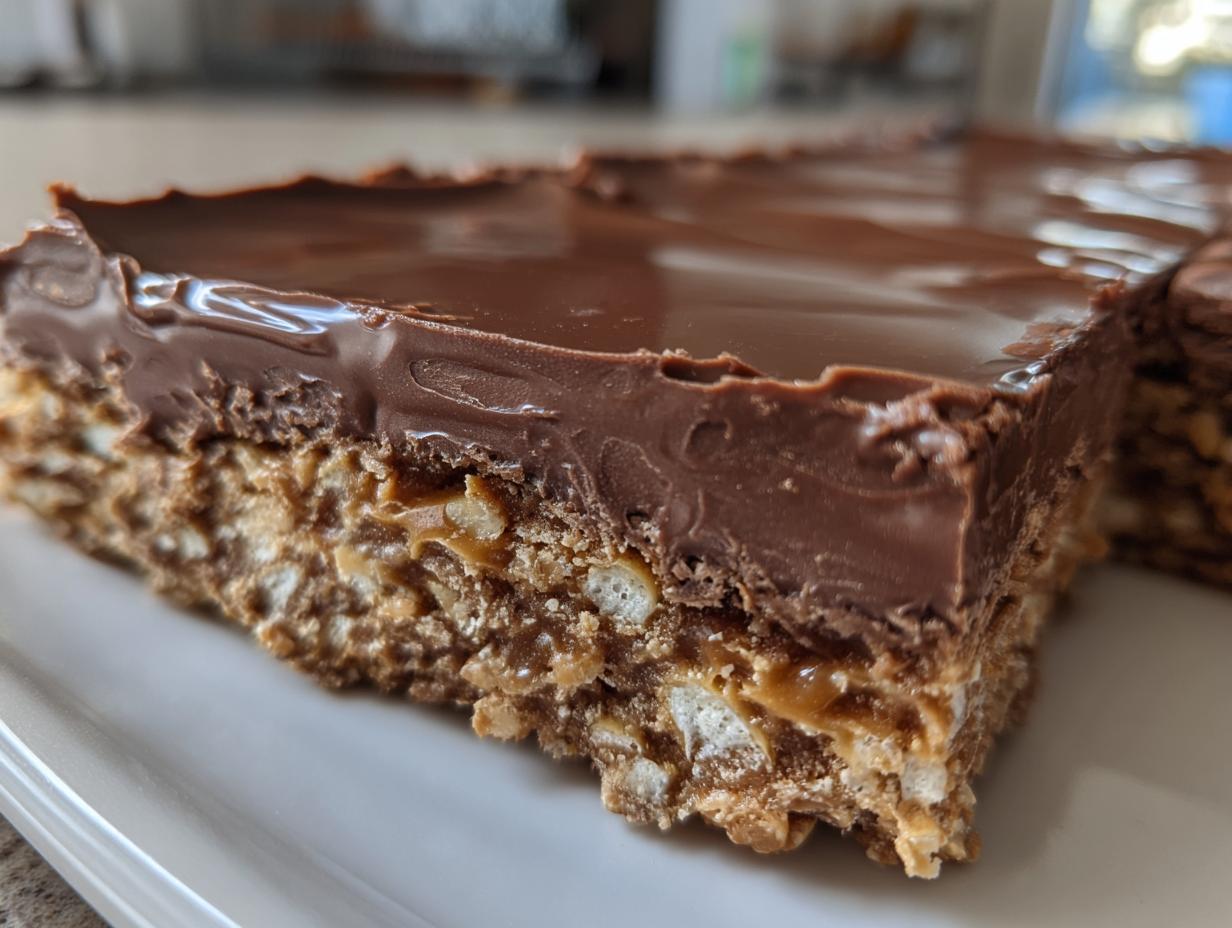
Once it’s spread beautifully, the hardest part begins: waiting! Pop the whole pan into the refrigerator. You need to let these Chocolate Peanut Butter Bars chill for at least 30 minutes. This chilling time is mandatory; it allows the chocolate to firm up so you can cut clean squares. Once the chocolate is completely firm to the touch, use those parchment paper handles to lift the whole slab out of the pan and slice it into 16 neat squares. Enjoy immediately or move on to storage!
Tips for Making the Best Chocolate Peanut Butter Bars
Even though these Chocolate Peanut Butter Bars are no-bake, there are definitely a few little tricks I’ve learned over the years that make the difference between a good bar and a spectacular one. Don’t skip these little details, they really matter when you don’t have the oven doing the heavy lifting!
Achieving the Right Base Texture
My biggest warning about the base is mixing! You must mix that pretzel, butter, sugar, and peanut butter combination until it is perfectly uniform. I can’t stress this enough: scrape down the sides of your bowl constantly. If you leave any dry pockets of powdered sugar or just plain pretzel crumbs at the bottom, those spots will crumble when you try to cut the bars later. You want a dense, slightly sticky mass that holds together like a dream under the chocolate.
Storing Your Leftover Chocolate Peanut Butter Bars
These bars are so rich that you might not eat them all in one sitting—though I certainly try! Since they contain butter and chocolate, they really prefer the cold. Always store your finished Chocolate Peanut Butter Bars in an airtight container. They stay perfectly fresh and firm in the refrigerator for about a week. Seriously, they taste even better the next day once the flavors have really settled together! If you are looking for other great no-bake ideas, check out my Buckeye Balls recipe.
Frequently Asked Questions About Chocolate Peanut Butter Bars
I get so many questions every time I post these Chocolate Peanut Butter Bars on social media! They are just so popular, and usually, the questions center around substitutions or timing. It’s great to see so many of you making them for your families. Here are the ones I hear most often!
Can I Make These Chocolate Peanut Butter Bars Ahead of Time
Yes, absolutely! In fact, I highly recommend it. Because this is a no-bake recipe, the chilling time is essential for the layers to set properly. You can easily make these bars a day or two before you plan to serve them. Just make sure they are stored tightly sealed in the refrigerator. They hold up beautifully for several days, which makes them perfect for parties or meal prepping snacks! For more quick dessert inspiration, take a look at my collection of desserts.
What Type of Peanut Butter Works Best
For the smoothest, creamiest texture in both the base and the topping, you should definitely use creamy (smooth) peanut butter. I always use Jif or Skippy—the standard, shelf-stable kind. Avoid natural peanut butter where the oil separates, because that extra oil can make your base greasy and prevent it from setting up correctly. If you absolutely love crunch, you could swap out the 1 cup of peanut butter in the base for crunchy, but keep the topping smooth for the best mouthfeel! Understanding the science behind fats in baking can be helpful; for more information on ingredient roles, you might find resources on food science principles useful.
Storage and Serving Suggestions for Your Chocolate Peanut Butter Bars
Once you’ve cut up your glorious Chocolate Peanut Butter Bars, the real question is how to keep them tasting as amazing as they do fresh out of the fridge. Since they are no-bake, keeping them cool is non-negotiable to maintain that firm chocolate top and dense base.
For serving, these bars are fantastic on their own, but if you’re feeling fancy, try dusting the top lightly with a tiny bit of extra powdered sugar or maybe even some mini chocolate chips sprinkled over the top before the chocolate fully sets. They are great alongside a big glass of cold milk or served slightly chilled with coffee!
Storing Leftovers Properly
If you manage to have any leftovers of these incredible Chocolate Peanut Butter Bars, storage is super simple. We want to keep them away from any warm spots in the kitchen, so the fridge is their happy place. Just make sure they are in an airtight container. They will keep perfectly fine for up to one week—though I honestly doubt they last that long in my house!
Storage Information Table
| Storage Method | Duration | Notes |
|---|---|---|
| Airtight Container | Up to 1 Week | Must be refrigerated |
Share Your Experience Making Chocolate Peanut Butter Bars
I just know you’re going to adore these Chocolate Peanut Butter Bars as much as my family does! Once you’ve pulled them out of the fridge and cut those perfect squares, please come back and let me know how they turned out. Drop your rating and any fun serving suggestions in the comments below! If you enjoy this type of simple, satisfying treat, you might also enjoy my recipe for Peanut Butter Cup Cookies.
Print
Amazing 16-bite Chocolate Peanut Butter Bars
- Total Time: 45 minutes
- Yield: 16 small squares 1x
- Diet: Vegetarian
Description
Creamy peanut butter meets chocolate in these easy no-bake bars, perfect for a sweet treat or snack in minutes. These no-bake chocolate peanut butter bars are ideal for busy home cooks who want a quick, indulgent dessert. The combination of creamy peanut butter, a hint of salt from pretzels, and smooth chocolate makes each bite irresistible. Perfect for school lunches, snacks, or a quick treat for family and friends.
Ingredients
- 2 cups thin pretzel sticks
- 1 1/2 sticks unsalted butter, melted
- 1 1/2 cups powdered sugar
- 1 cup smooth peanut butter
- 1/4 cup smooth peanut butter
- 1 1/2 cups milk chocolate chips
Instructions
- Crush pretzel sticks in a food processor until fine crumbs, or place in a sealed bag and crush with a rolling pin.
- In a medium bowl, mix pretzel crumbs, melted butter, powdered sugar, and 1 cup peanut butter until smooth and fully combined.
- Line a 9×9-inch square pan with parchment paper and press the pretzel-peanut butter mixture evenly into the bottom.
- In a microwave-safe bowl, combine the remaining 1/4 cup peanut butter and milk chocolate chips. Microwave in 30-second intervals, stirring after each, until melted and smooth.
- Pour the melted chocolate mixture over the pressed peanut butter base and spread evenly.
- Refrigerate for 30 minutes until the chocolate is firm.
- Remove from the fridge and lift out the bars using the parchment paper. Cut into small squares.
- Serve immediately or store in an airtight container in the refrigerator for up to 1 week.
Notes
- Every ingredient listed is used in the recipe, ensuring balance and consistency.
- No cooking is required, making it ideal for a quick dessert.
- Prep Time: 15 minutes
- Cook Time: 0 minutes
- Category: Dessert
- Method: No-Bake
- Cuisine: American
Nutrition
- Serving Size: 1 square
- Calories: 473
- Sugar: Unknown
- Sodium: Unknown
- Fat: 25g
- Saturated Fat: Unknown
- Unsaturated Fat: Unknown
- Trans Fat: Unknown
- Carbohydrates: 55g
- Fiber: Unknown
- Protein: 8g
- Cholesterol: Unknown