Skip to content
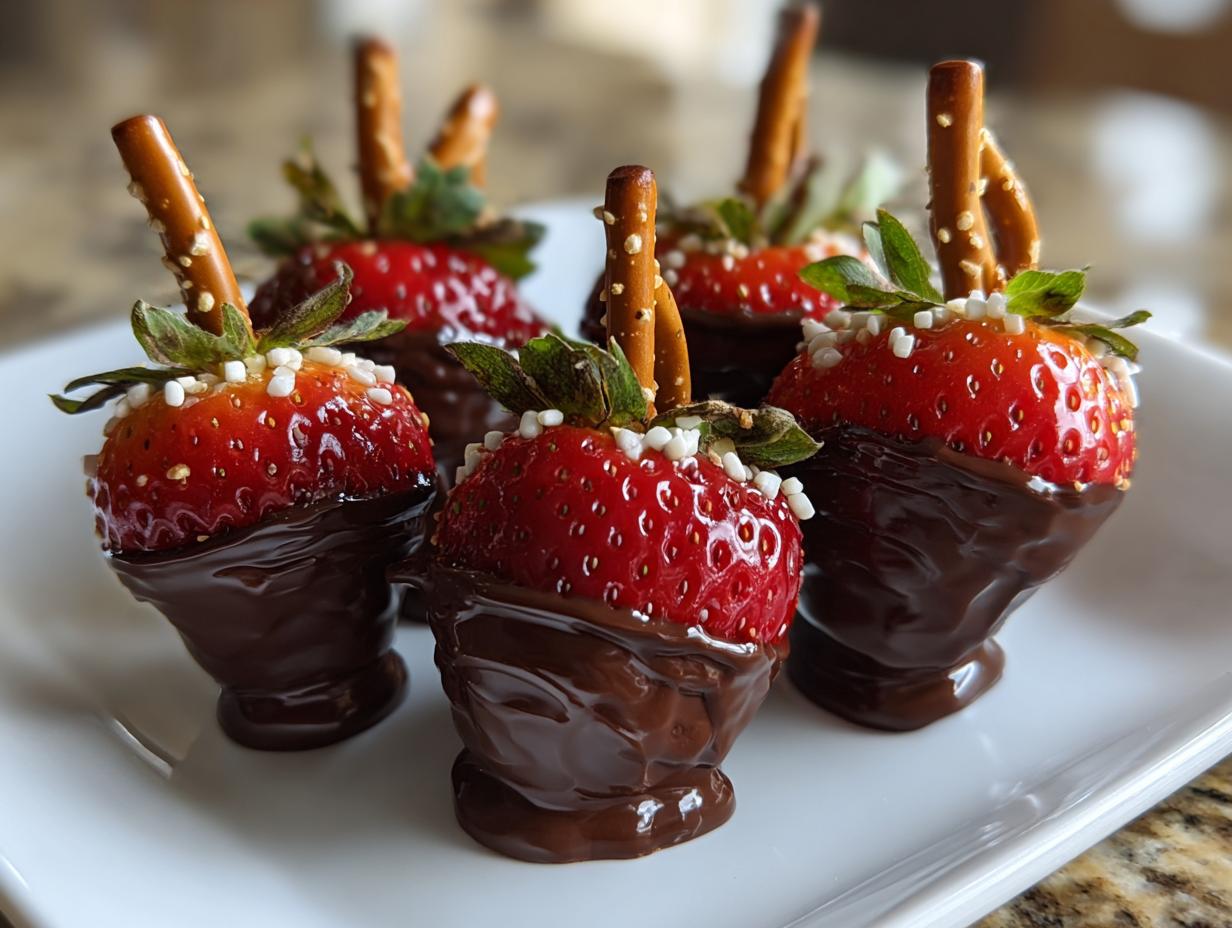
Chocolate Strawberry Treats! Oh, you are going to absolutely *love* these little gems. I’m Anna Kowalska, and here I share tried-and-true homemade recipes that you and your family will love. Everything I share with you is made with heart and flavor, focusing on making kitchen memories that stick. My journey into baking really started when I realized how much joy simple, beautiful food brings people together. When I see a recipe that looks complicated but tastes amazing, I work until I’ve simplified it down to its core magic—that’s exactly what happened with these fun snacks!
We’re talking about dipping fresh fruit into melted chocolate, adding crunchy pretzels, and soft marshmallows. It’s the perfect assembly project for a rainy afternoon or a centerpiece for any party. Forget fussy baking; these are all about assembly and chilling, and I’ve got the foolproof method down so nothing slips or slides!
Why These Chocolate Strawberry Treats Are a Family Favorite
Honestly, these Chocolate Strawberry Treats are my secret weapon for instant party success, especially when the kids are around. They look fancy, right? Like something you’d buy at a specialty shop! But they are truly so easy to put together. Because they involve dipping and sticking things on, kids absolutely adore helping out. We always make a huge batch for holidays, but honestly, they are just as fun on a random Tuesday when we need a little sweet pick-me-up. My expertise here is taking something that looks intricate and breaking it down so anyone—even beginner bakers—can nail that perfect, stable chocolate coating every single time.
Jump to:
Gather Your Supplies for Chocolate Strawberry Treats
Before we dive into the fun part—the dipping!—we need to make sure our workstation is ready. Getting all your tools out first makes the assembly process for these Chocolate Strawberry Treats move so much faster. You don’t want to be scrambling looking for a skewer while your chocolate is starting to seize up, trust me on that one!
Essential Equipment List
- A sturdy baking sheet lined with parchment paper—this is non-negotiable for easy cleanup and release!
- Microwave-safe bowls for melting both the milk and white chocolate chips separately.
- Small skewers or toothpicks for dipping the strawberries completely.
- A sharp knife for trimming the marshmallows and strawberries neatly.
Ingredients for Perfect Chocolate Strawberry Treats
Getting the ingredients right is the first step to making these Chocolate Strawberry Treats stable and delicious. We need fresh berries because soggy ones make the chocolate slide right off! The measurements here are precise because we are building little structures, not just making a cake batter.
Key Components for Your Chocolate Strawberry Treats
| Item | Amount | Notes |
|---|---|---|
| Medium Strawberries | 14 | Must be thoroughly washed and dried! |
| Milk Chocolate Chips | 1 cup | For dipping and securing the legs. |
| White Chocolate Chips | ½ cup | For dipping the pretzel feet only. |
| Pretzel Sticks | 12 | We need these broken in half for the legs. |
| Mini Marshmallows | 12 | Cut diagonally for the best flat base. |
Step-by-Step Preparation of Chocolate Strawberry Treats
Okay, this is where the fun really starts! We’re moving from measuring ingredients to actually building these adorable little guys. Follow these steps closely, especially around the chilling times, and you’ll have sturdy, show-stopping Chocolate Strawberry Treats that won’t fall apart the second someone picks them up. It’s all about layering the chocolate correctly.
Building the Marshmallow Pretzel Base
First things first, we need to create the structural support—the little legs! Line your baking sheet with parchment paper right now; I can’t stress this enough. Next, take those pretzel sticks and snap them right in half. Don’t worry if they’re a little jagged; we are hiding the rough edges later!
Now for the marshmallows. You have to cut those mini marshmallows in half diagonally. This creates a nice, flat surface that adheres beautifully to the strawberry. Take one of your broken pretzel pieces and gently insert it into the cut side of the marshmallow half. It should stick in there nicely, but we need chocolate glue to make it permanent.
Time for the first bit of chocolate! Melt your milk chocolate chips in the microwave, stirring every 20 seconds until it’s perfectly smooth. Dip the cut/flat side of the marshmallow piece—the side opposite the pretzel stick—into the melted chocolate. Then, press that chocolatey side right onto the bottom of a strawberry. You want the pretzel sticks pointing down like little legs. Place these chocolate-anchored strawberries on your parchment sheet. Pop them in the fridge for just 10 minutes until that base chocolate is firm. This step keeps the legs from sliding off later!
Dipping the Chocolate Strawberry Treats
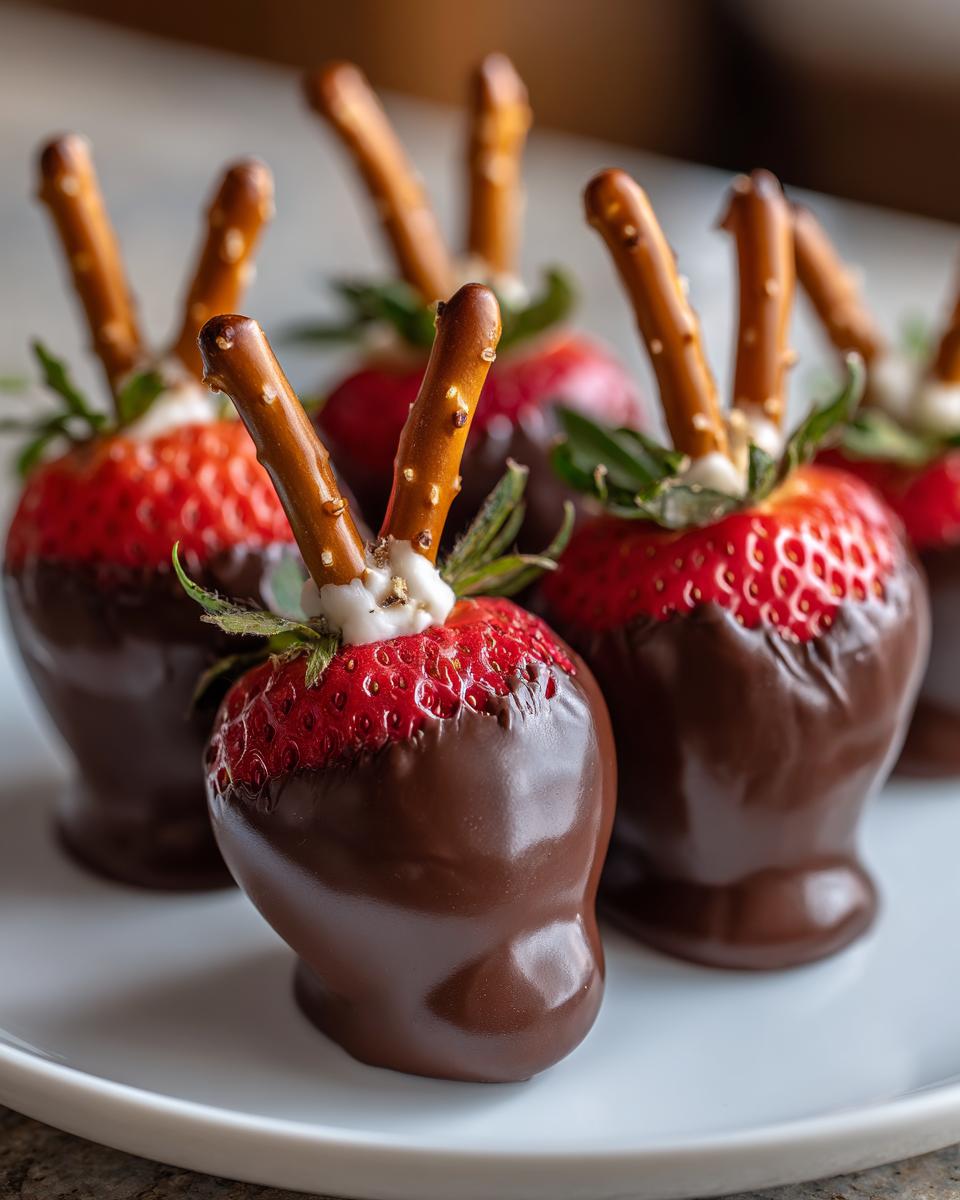
Once those legs are set, it’s time for the main event! Take a skewer or a sturdy toothpick and carefully insert it through the top tip of the strawberry. This gives you a handle so your fingers don’t mess up the chocolate coating.
Take the strawberry by the skewer and dip it into the remaining milk chocolate. You want to coat almost the entire berry, leaving just a little bit of that gorgeous red showing near the top if you want that classic look, or cover it completely—your call! As you pull it out, gently tilt and rotate the strawberry, letting the excess chocolate drip back into the bowl. Don’t rush this part; letting the extra drip off means your final coating won’t be too thick and messy.
Place the dipped berry back onto the parchment paper. Now, these need a good chill—at least 30 to 60 minutes in the refrigerator until that milk chocolate is completely hard to the touch. Patience here prevents smudges!

Adding the Final Decorative Touch
While the main chocolate is setting up, melt your white chocolate chips in a separate small bowl. Again, short bursts in the microwave are your friend here. Once smooth, you’re going to dip just the ends of those pretzel legs into the white chocolate to create little “feet.” It gives it such a finished, professional look!
Place them back on the parchment paper one last time. They don’t need a long chill this time, but give them a final 20 minutes in the fridge just to make sure that white chocolate sets up hard. When they come out, carefully pull the skewers out, plug the small holes with a tiny bit of leftover melted chocolate if you want, or check out this guide on how to temper chocolate for the best shine, and admire your perfect Chocolate Strawberry Treats!
Tips for Success with Chocolate Strawberry Treats
I’ve made enough of these Chocolate Strawberry Treats to know exactly where things can go wrong, so let me save you a few headaches! The biggest issues are usually the marshmallows slipping off or the chocolate looking lumpy. A little bit of technique goes a long way in making these look flawless.
Mastering the Chocolate Melting Technique
When you’re melting chocolate, especially the milk chocolate for the base, never, ever try to rush it on high heat. Chocolate scorches so easily, and once it seizes up, it’s basically ruined for dipping. I always use 50% power on the microwave, stirring every 20 seconds. If you see even one little lump, keep stirring gently until it melts from the residual heat. If your chocolate gets too thick while you are working, just zap it for 5 seconds more—don’t pour in any oil or water, or it will split! For more general baking tips, you might find this resource helpful on chocolate substitutions.
Achieving the Best Chill Times
Those chilling times I listed aren’t suggestions; they are structural requirements! That first 10-minute chill after attaching the marshmallow legs is crucial. If you skip that, the weight of the strawberry will push the marshmallow right off when you dip it in the warm, liquid chocolate. Likewise, waiting the full 30 to 60 minutes for the main dip to set ensures that when you handle them to dip the feet, you aren’t leaving fingerprints or squishing the base structure. Think of the fridge as your temporary construction site supervisor!
Answering Common Questions About These Treats
I get so many messages about these fun desserts, especially from parents trying to make them for school parties! If you’re making these Chocolate Strawberry Treats for the first time, you probably have a few questions about assembly or keeping them looking perfect. I tried to cover the tricky spots in the steps above, but here are a few things I hear most often from bakers.
The main thing to remember is that because we are working with fresh fruit, these are best eaten the day you make them. Don’t worry about trying to reheat them at all—that will just result in a melted, messy puddle! If you are looking for other quick dessert ideas, check out my recipe for quick easy lasagna soup.
Storage & Reheating Instructions for Chocolate Strawberry Treats
Since these delicious little snacks rely on cold temperatures to keep their chocolate coating hard and the strawberries firm, the refrigerator is their only home. They do great in the fridge, but you need to keep an eye on them because strawberries release moisture over time, which can make the chocolate weep slightly.
| Action | Detail for Chocolate Strawberry Treats |
|---|---|
| Storage Location | Airtight container in the refrigerator. |
| Maximum Shelf Life | Up to 1 day. |
| Reheating Recommended? | Absolutely not! Serve chilled only. |
| Best Serving Tip | Let them sit out for 5 minutes before serving for the best flavor. |
Serving Suggestions for Your Creations
Once you’ve made these amazing Chocolate Strawberry Treats, the fun isn’t quite over—now you have to decide how to present them! Because they hit that perfect balance of sweet fruit, rich chocolate, and salty crunch from the pretzels, they pair wonderfully with simple things. We usually don’t need much else on the dessert table when these are around, but sometimes a little something extra makes the snack spread feel complete.
For a real crowd-pleaser, especially with kids, serve them alongside a big bowl of vanilla bean ice cream. The cold creaminess contrasts beautifully with the snap of the chocolate coating. If you’re serving them for a grown-up gathering, a small bowl of lightly salted roasted nuts nearby works great—it really emphasizes that salty pretzel note. If you need another easy appetizer for your gathering, take a look at my baked cranberry brie bites.
They look so cute lined up on a tiered platter, too! Just make sure they stay chilled right up until it’s time to eat so those pretzel legs stay nice and firm. Enjoy watching everyone grab these first!
Print
Amazing 14 Chocolate Strawberry Treats Now
- Total Time: 80 minutes
- Yield: 12–14 treats 1x
- Diet: Vegetarian
Description
Create adorable chocolate strawberry treats with marshmallows and pretzels. Perfect for kids and festive occasions.
Ingredients
- 14 medium strawberries
- 12 pretzel sticks
- 12 mini marshmallows
- 1 cup milk chocolate chips
- ½ cup white chocolate chips
Instructions
- Line a baking sheet with parchment paper.
- Snap pretzel sticks in half. Cut mini marshmallows in half diagonally to create flat surfaces. Insert a pretzel half into each marshmallow piece.
- Melt milk chocolate chips in a microwave-safe bowl at 20-second intervals until smooth, stirring in between.
- Dip the flat side of each marshmallow into the milk chocolate and attach to the bottom sides of the strawberries to form “legs.” Place on the prepared baking sheet.
- Chill in the refrigerator for 10 minutes until the chocolate sets.
- Insert a skewer through the top of each strawberry and dip the entire strawberry into the remaining milk chocolate. Let excess chocolate drip off.
- Place strawberries on parchment paper and refrigerate for 30–60 minutes until fully hardened.
- Melt white chocolate chips in a small bowl. Dip the ends of the pretzel legs into the white chocolate to create “feet.”
- Refrigerate for 20 minutes to set the white chocolate. Serve chilled.
Notes
- Store these treats in the refrigerator for up to 1 day.
- The number of treats depends on strawberry size.
- Prep Time: 20 minutes
- Cook Time: 60 minutes
- Category: Dessert
- Method: Chilling/Dipping
- Cuisine: American
Nutrition
- Serving Size: 1 treat
- Calories: 120
- Sugar: Unknown
- Sodium: Unknown
- Fat: 5g
- Saturated Fat: Unknown
- Unsaturated Fat: Unknown
- Trans Fat: Unknown
- Carbohydrates: 18g
- Fiber: Unknown
- Protein: 2g
- Cholesterol: Unknown