Skip to content
Do you ever just need a treat that feels decadent but doesn’t require turning on your oven for an hour? If your answer is yes, then you absolutely need these Chocolate Tahini Bars in your life right now. Seriously, stop what you are doing and bookmark this page!
Hi there, I’m Anna Kowalska, and here I share tried-and-true homemade recipes that you and your family will love. Everything I post here is made with heart and flavor, and I wouldn’t share anything that hasn’t been tested until it’s perfect—and these bars are perfection defined.
I first made these when I was trying to cut down on baking time but still wanted that satisfying crunch and rich chocolate hit. The secret is layering! You get this incredible, almost fudge-like oat base, followed by a silky, nutty cream, all topped with snappy chocolate. It’s sophisticated enough for company but easy enough for a Tuesday night craving. Trust me, once you nail this simple chilling process, you’ll be making these all the time.
Jump to:
Why You’ll Love These Chocolate Tahini Bars
I know you’re busy, and that’s why I developed this recipe to be your new favorite weeknight treat. These bars hit every mark—they’re easy, they use ingredients I always have on hand, and they deliver serious flavor payoff for minimal effort. You’ll see why these Chocolate Tahini Bars are a staple in my kitchen!
- No oven required! This is a fantastic no-bake dessert for hot days or when you’re short on time.
- They freeze beautifully, meaning you can make a big batch and always have a treat ready when you need one.
- The layers are distinct and satisfying—you get the chew, the cream, and the snap all in one bite.
- They use simple pantry staples like oats and tahini, making them easy to whip up on a whim.
Quick Preparation and Simple Assembly
Prep time is only about 15 minutes for these beauties. The actual cooking time is five minutes, mostly spent melting the chocolate. The rest of the time is just waiting patiently while they chill in the freezer. Total time clocks in around 65 minutes, but most of that is hands-off chilling time. You can’t beat that speed for a multi-layered dessert!
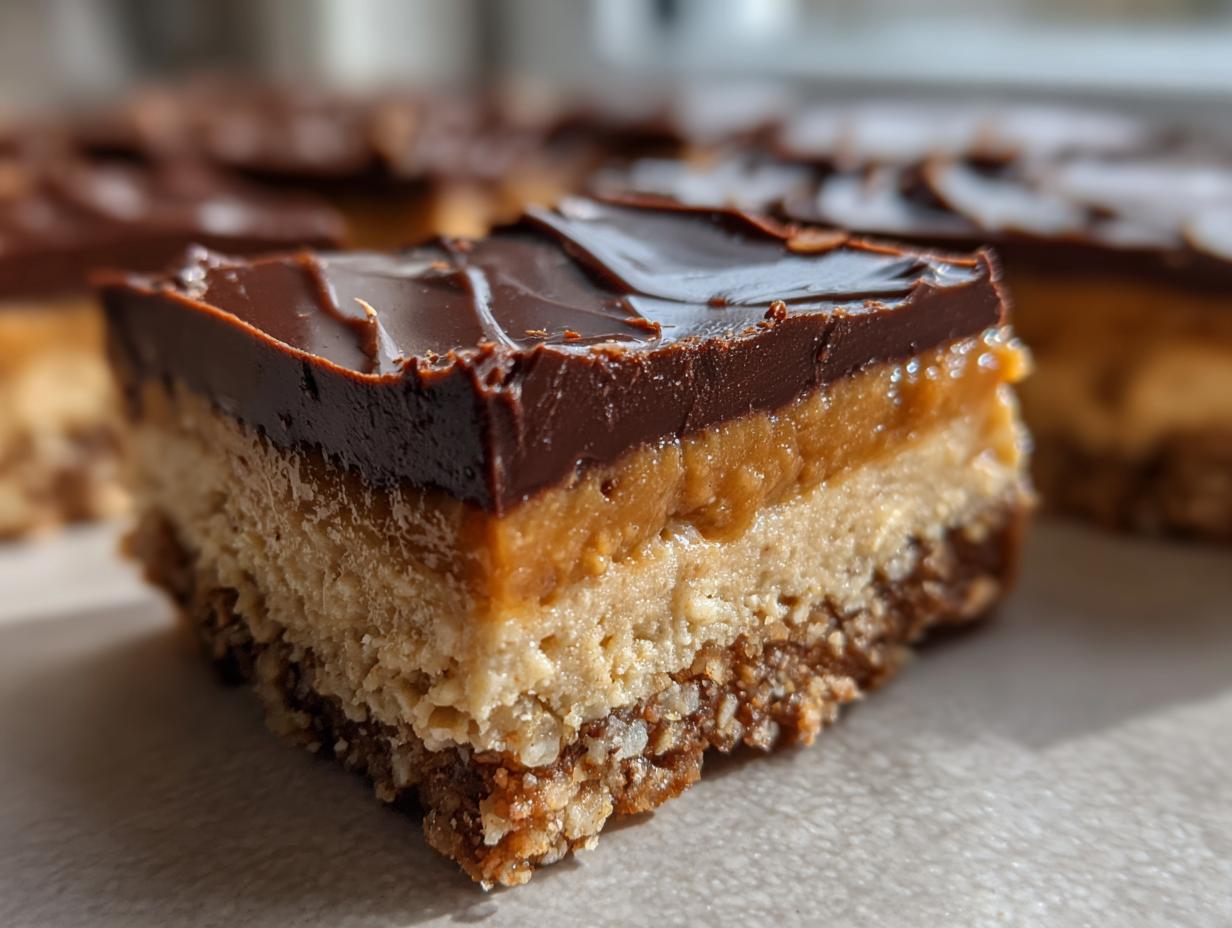
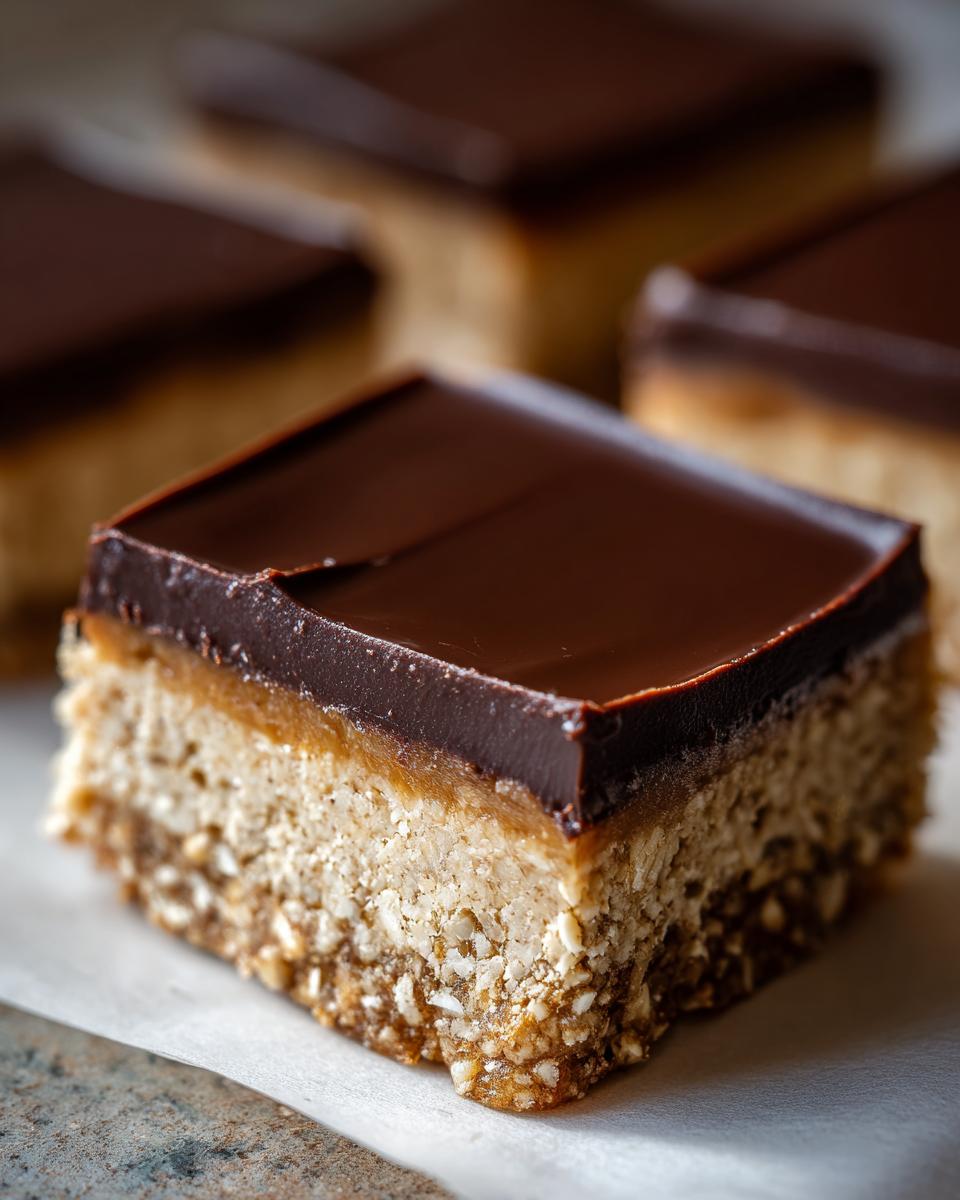
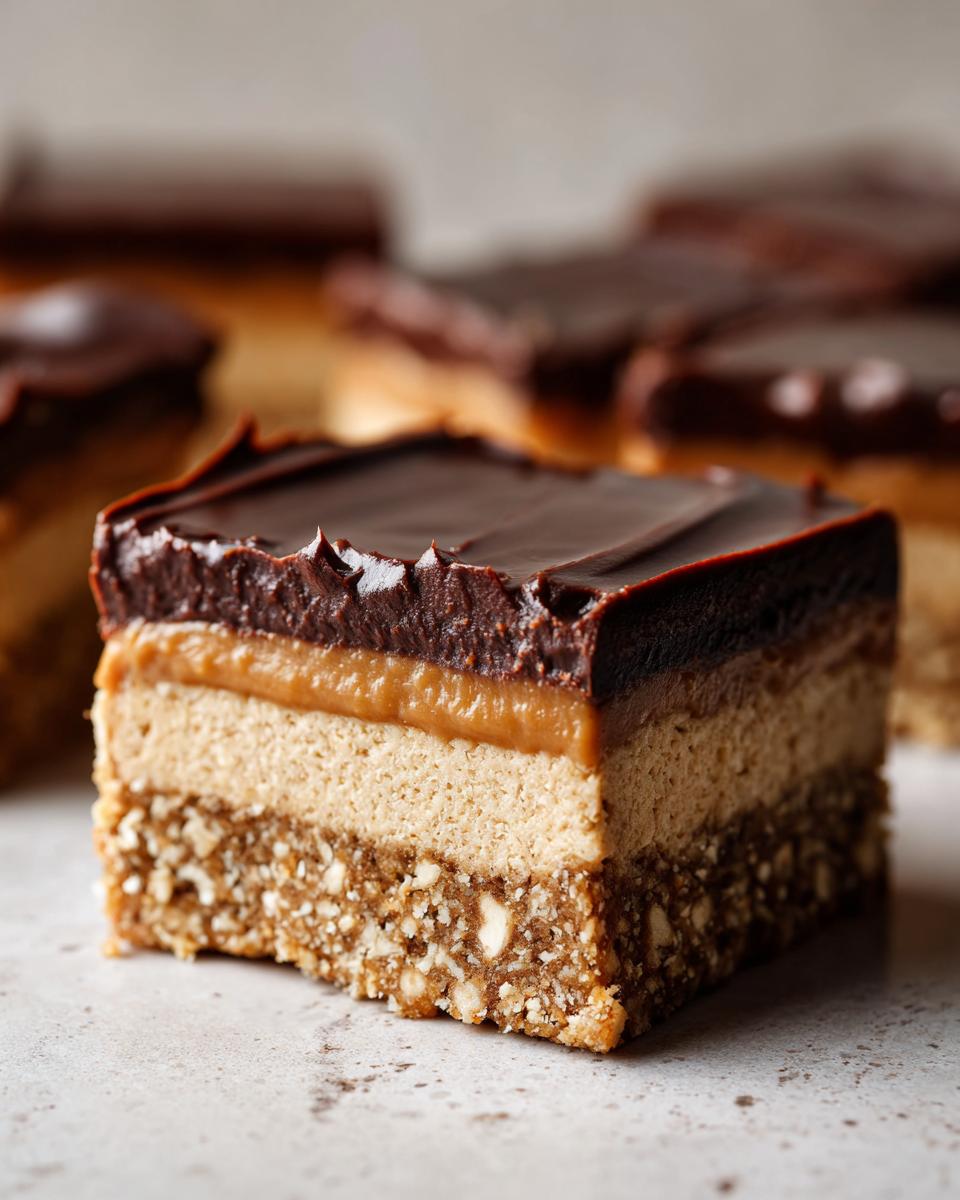
Perfect Texture Combination for Chocolate Tahini Bars
Oh, the texture is what makes these bars sing! You start with that slightly dense, chewy oat flour base that holds everything together perfectly. Then comes the star: the creamy, smooth tahini filling that melts beautifully on your tongue. Finally, you get that satisfying *crack* from the rich, snappy chocolate topping. It’s a three-part harmony of chew, silk, and snap that keeps you coming back for another square.
Essential Ingredients for Perfect Chocolate Tahini Bars
You know how I always say that the best recipes rely on quality ingredients handled with care? Well, these Chocolate Tahini Bars are no exception! Since this is a no-bake recipe, every single component needs to pull its weight in flavor and texture, and we aren’t using any weird chemicals to force it into shape. It’s all about the right balance of oats, tahini, and maple syrup. Don’t try to substitute the oat flour; it gives that crucial sturdy chew that keeps the layers from collapsing.
I’ve made batches using every kind of tahini under the sun—from the super thick paste to the really oily kind—and I’ve figured out exactly what works best for these bars to get that perfect middle layer. It’s all laid out below. Remember, because we aren’t baking, the quality of your tahini really shines through, so grab the good stuff! For more information on the health benefits of sesame seeds, you can check out this Mayo Clinic resource.
Base Layer Components for Your Chocolate Tahini Bars
This layer is the foundation, so it needs to be firm enough to support the creamy middle layer once it chills. We are using oat flour, which I often make myself by just blitzing rolled oats in my blender—it’s so easy! The combination of tahini and maple syrup binds it just enough so it presses into a solid, chewy crust. Don’t skimp on pressing it down in the pan!
Cream Filling Ingredients for Chocolate Tahini Bars
This is where the magic happens! We use tahini again, but this time it’s paired with just a tiny bit of maple syrup to sweeten it up slightly. This layer needs to be smooth and spreadable right before it hits the freezer. If your tahini is too thick, the cream layer might feel heavy instead of light and luscious.
Rich Chocolate Topping Ingredients
For the top, we need a good quality dark chocolate that melts beautifully. Since these are vegan, I use dairy-free chocolate chips, but any good melting chocolate works. The secret weapon here is the coconut oil. It’s non-negotiable! It makes the chocolate topping snap perfectly when chilled, giving you that wonderful contrast to the soft layers underneath.
| Ingredient | Amount | Preparation Note |
|---|---|---|
| Oat Flour | 1 1/2 cups | |
| Tahini (Base) | 1/3 cup | |
| Maple Syrup (Base) | 1/4 cup | |
| Tahini (Cream) | 1/3 cup | |
| Maple Syrup (Cream) | 2 tbsp | |
| Dairy Free Chocolate Chips | 1 1/2 cups | |
| Coconut Oil | 2 tbsp |
Step-by-Step Guide to Making Chocolate Tahini Bars
This is the fun part! Since these are no-bake, the whole process is about layering and chilling, which is so much easier than worrying about oven temperatures. Just follow these steps exactly, and you’ll have stunning, perfectly structured Chocolate Tahini Bars in just over an hour. I promise, the waiting is the hardest part!
Preparing the Base Layer of Your Chocolate Tahini Bars
First things first, grab that 8×8 pan and line it completely with parchment paper. You want lots of overhang on the sides—this is your handle later, so don’t be shy with the paper! Now, in a bowl, quickly mix your oat flour, the base tahini, and the base maple syrup until it comes together. It will look crumbly at first, but keep mixing until it holds its shape when you squeeze it.
Dump that mixture into your lined pan. This is critical: press it down firmly and evenly across the bottom. I use the flat bottom of a measuring cup or a heavy glass to really compact it. You want this base layer dense so it doesn’t fall apart when you cut the bars later.
Setting the Cream Filling for Chocolate Tahini Bars
Once the base is packed tight, you move onto the creamy middle. Whisk together the cream tahini and the two tablespoons of maple syrup until it’s smooth and lump-free. Now, gently spread this mixture over the firm oat base. Try to make the surface as level as you can—it makes the final chocolate layer look so professional!
When that’s spread, the pan needs to go straight into the freezer. We are freezing this layer for 45 minutes until it is completely solid. If you try to pour the chocolate over it too early, everything will just blend together, and we want those distinct layers, right?
Finishing with the Chocolate Topping on Chocolate Tahini Bars
While that cream layer is hardening up, melt your chocolate chips and coconut oil. You can do this carefully over a double boiler, but I usually just use the microwave. Do it in 20-second bursts, stirring well between each burst. If you overheat it, the chocolate can seize up, so be patient! You want it glossy and perfectly pourable.
Pull that pan out of the freezer—the base should feel rock hard. Immediately pour that melted chocolate right over the top. Tilt the pan gently to make sure the chocolate covers every corner evenly. Back into the freezer it goes for just 15 more minutes to set the chocolate shell.
Slicing and Serving Your Chocolate Tahini Bars
Once that final 15 minutes is up, your bars are technically done! Don’t try to slice them right away or the chocolate will crack everywhere. The best trick is to use the parchment paper overhang to lift the entire block out of the pan and place it on a cutting board. Let it sit on the counter for about five minutes to take the deep chill off. Then, use a big, sharp knife to slice cleanly into 12 nice bars. Remember to keep these chilled before serving!
| Step | Action | Timing/Tip |
|---|---|---|
| 1 | Line 8×8 pan with parchment paper. | Makes removal simple. |
| 2 | Mix base ingredients; press firmly into the pan. | Use the bottom of a glass to pack tightly. |
| 3 | Spread cream layer over the base. | Freeze for 45 minutes until solid. |
| 4 | Melt chocolate chips and coconut oil until smooth. | Use low heat or short microwave bursts. |
| 5 | Pour melted chocolate over the frozen layers. | Freeze for an additional 15 minutes. |
| 6 | Lift using parchment paper and slice into bars. | Keep chilled before serving. |
Tips for Perfect Chocolate Tahini Bars
Even though this recipe is super simple, I’ve picked up a few tricks over the years to make sure your Chocolate Tahini Bars come out looking like they were made by a professional pastry chef. It’s all about controlling the texture since we aren’t using any baking powder or eggs to help things along. Follow these small pointers, and you’ll be golden!
Selecting the Right Tahini
This is my biggest piece of advice: use a high-quality, runny tahini here. If your tahini is super thick and pasty right out of the jar, it can make both your base and your cream layer feel heavy, almost like dense peanut butter. You want the kind that pours easily; it incorporates better and results in a much silkier filling that spreads like a dream. Give that jar a good stir before measuring!
Achieving a Firm Cream Layer
If you find your cream layer isn’t setting up hard enough after 45 minutes, it usually means the tahini you used was too oily or you didn’t mix the maple syrup in thoroughly enough. For the best firmness, make sure your base layer is completely packed down before you spread the cream. The solid foundation helps the softer layer set up correctly in the freezer. If it’s still soft after the first chill, just give it another 15 minutes before pouring the chocolate over the top.
Storing and Keeping Your Chocolate Tahini Bars Fresh
These bars are fantastic for making ahead because they actually taste better after they’ve had time to firm up completely in the cold. Because we aren’t using any eggs or dairy, they keep really well! I always store mine in the fridge because I love that firm, snappy chocolate top. If you plan to make a huge batch for later, the freezer works wonders too. Just make sure you use an airtight container so they don’t pick up any funny fridge smells. Here’s my go-to storage plan:
| Storage Method | Location | Duration |
|---|---|---|
| Airtight Container | Refrigerator | Up to 1 week |
| Airtight Container | Freezer | Up to 1 month |
Commonly Asked Questions About Chocolate Tahini Bars
I get so many questions whenever I post these layers bars, and that’s a good thing! It means you all want to make them, and I want you to have the best results possible. Here are the four questions I hear most often about these amazing tahini dessert bars.
Can I substitute the maple syrup in this Chocolate Tahini Bars recipe?
You can swap maple syrup for liquid sweeteners like agave nectar, which will work just fine for binding. However, I really caution against using granulated sugar, especially in the cream layer. Maple syrup is a liquid sweetener, and it helps keep that middle layer perfectly silky and spreadable. Granulated sugar will leave you with a grainy, hard cream filling once it chills, and we definitely don’t want that!
How do I ensure my tahini layer is smooth?
Smoothness is all about temperature and mixing time. Make sure your tahini is well-stirred before you measure it—you don’t want the thick sludge from the bottom of the jar. When you mix the cream layer, whisk it really well until the maple syrup is fully integrated. If your tahini seems overly stiff, you can gently warm the measured tahini and syrup together for just 10 seconds in the microwave to loosen it up before spreading. That makes a huge difference in achieving that silky texture.
Are these tahini dessert bars suitable for meal prepping?
Absolutely! In fact, I think they are better on day two or three. They are perfect for meal prepping because they are no-bake and hold up so well in the fridge. Since they are vegan and dairy-free, I don’t worry about spoilage, but they do firm up the longer they chill. If you plan to store them for longer than a week, wrap individual bars tightly in plastic wrap before freezing them in an airtight container. If you are interested in other great no-bake options, check out these eggless chocolate fudge brownies.
What is the best way to cut clean squares for the Chocolate Tahini Bars?
This is where a lot of people go wrong! If you try to cut them straight out of the freezer, the chocolate topping will shatter into a million little pieces. Wait about five to ten minutes after removing the block from the freezer—just long enough for the chocolate to soften slightly, but not long enough for the cream layer to get messy. Then, use a big, sharp knife that you wipe clean between each cut. That clean knife is key to getting those beautiful, defined squares.
Nutritional Estimates for Chocolate Tahini Bars
Now, I want to be super clear here—I’m a cook, not a nutritionist! These numbers are based on the specific ingredients I used, and they are just an estimate for one bar. Since we aren’t using any eggs or dairy, the nutrition profile is pretty fantastic for a decadent treat. If you make substitutions, of course, the final breakdown will change, so take this as a good guideline for these amazing Chocolate Tahini Bars. For a look at how to calculate nutrition for homemade recipes, this resource might be helpful: FDA Nutrition Labeling Guide.
| Nutrient | Amount per Serving |
|---|---|
| Calories | 250 |
| Fat | 18g |
| Carbohydrates | 22g |
| Protein | 5g |
Share Your Experience Making These Chocolate Tahini Bars
I truly hope you enjoy making these layers bars as much as I do! They are my go-to when I need something quick and satisfying. If you give this Chocolate Tahini Bars recipe a whirl, please come back and let me know how they turned out. Hit the star rating above and drop a comment below—I read every single one and I love seeing your results! If you are looking for more quick desserts, you might enjoy my recipe for Frosted Zucchini Spice Bars.
Print
5 Amazing Chocolate Tahini Bars Secrets
- Total Time: 65 minutes
- Yield: 12 bars
- Diet: Vegan
Description
These Chocolate Tahini Bars offer a rich, layered treat perfect for satisfying your sweet tooth. They feature a simple oat base, a creamy tahini filling, and a smooth chocolate topping.
Ingredients
- Base Layer: 1½ cups oat flour
- Base Layer: ⅓ cup tahini
- Base Layer: ¼ cup maple syrup
- Cream Layer: ⅓ cup tahini
- Cream Layer: 2 tbsp maple syrup
- Chocolate Layer: 1½ cups dairy free chocolate chips
- Chocolate Layer: 2 tbsp coconut oil
Instructions
- Line an 8×8 pan with parchment paper.
- Mix the base ingredients and press them firmly into the prepared pan.
- Spread the cream layer evenly over the base. Freeze for 45 minutes.
- Melt the dairy-free chocolate chips and coconut oil together until smooth.
- Pour the melted chocolate mixture over the frozen layers. Freeze for an additional 15 minutes.
- Remove the pan from the freezer, lift using the parchment paper, and slice into bars.
Notes
- Keep the bars chilled before serving.
- Prep Time: 15 minutes
- Cook Time: 5 minutes
- Category: Dessert
- Method: No-Bake, Chilling
- Cuisine: American
Nutrition
- Serving Size: 1 bar
- Calories: 250
- Sugar: 15g
- Sodium: 45mg
- Fat: 18g
- Saturated Fat: 6g
- Unsaturated Fat: 12g
- Trans Fat: 0g
- Carbohydrates: 22g
- Fiber: 3g
- Protein: 5g
- Cholesterol: 0mg