Skip to content
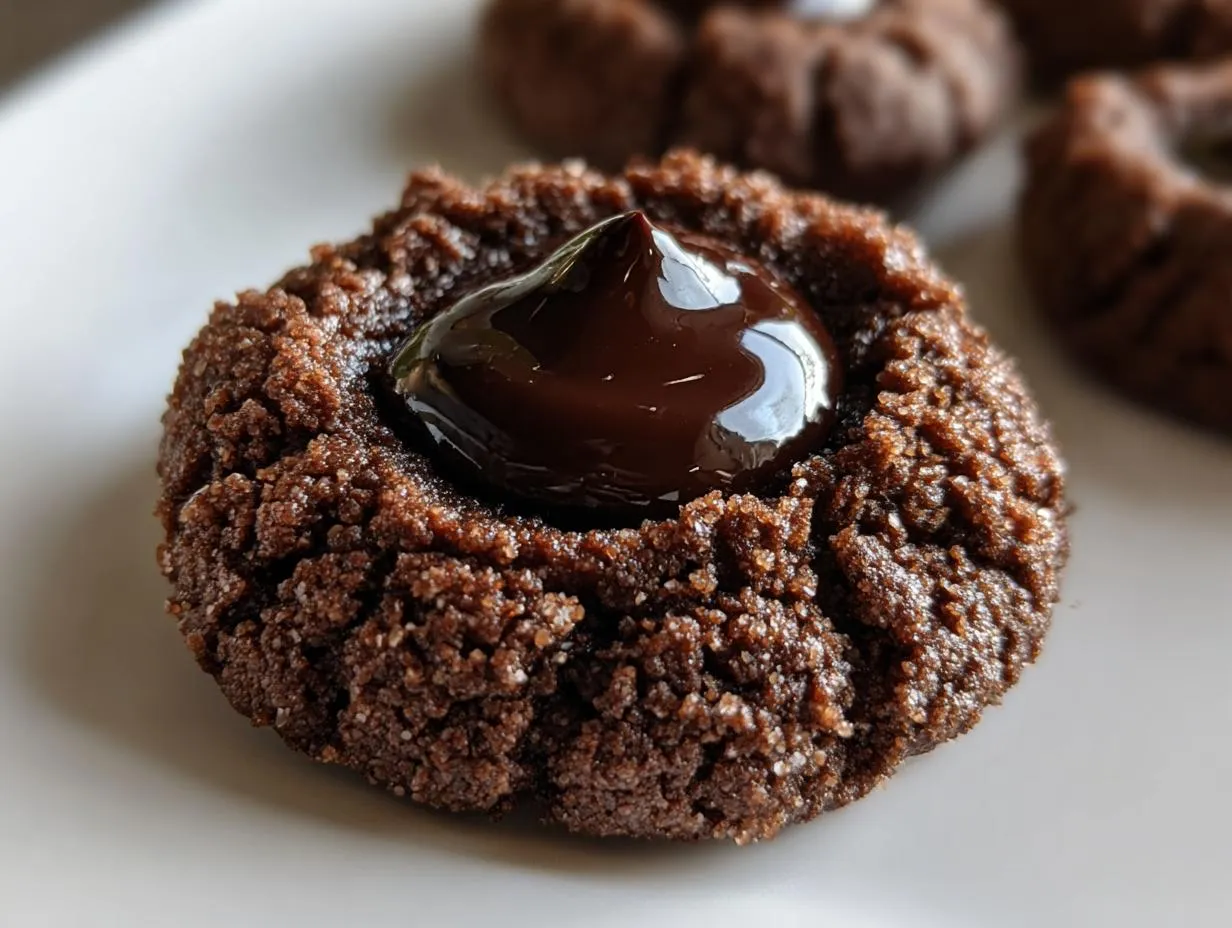
If you’re looking for the ultimate decadent treat that disappears the second you put it out, you’ve found it! These Chocolate Thumbprint Cookies are my absolute favorite for the holidays, but honestly, I make them year-round because they are just that good. I’m Anna Kowalska, and here I share tried-and-true homemade recipes that you and your family will love. Everything I post here is made with heart and flavor, and this cookie recipe proves that sometimes the classics are the best!

Why This Chocolate Thumbprint Cookies Recipe Stands Out
What sets these cookies apart is the incredible depth of the chocolate base paired with that silky, smooth ganache filling. Trust me, you want that rich, melt-in-your-mouth texture! My goal has always been to create reliable, homemade recipes, and these Chocolate Thumbprint Cookies are pure flavor, made with heart. They are proof that simple ingredients, handled correctly, result in something truly special.
Jump to:
Essential Ingredients for Perfect Chocolate Thumbprint Cookies
Getting the right ingredients ready before you start mixing is half the battle, especially with chocolate cookies that need to hold their shape. Don’t just eyeball these measurements; precision matters here for that perfect little well in the center!
Dry Ingredients Breakdown
For the dry stuff, we need flour, cocoa powder, salt, and baking powder. The most important rule for the flour is to measure it right. You absolutely must spoon the flour into your measuring cup and then level it off. If you scoop straight from the bag, you end up with too much flour, and your cookies will be crumbly little rocks. We’re using Dutch process cocoa powder here because it gives us that deep, dark color and smooth chocolate flavor we are aiming for. Understanding the difference in cocoa powder types is key for baking success.
Wet Ingredients and Flavor Base
The base of the cookie needs softened butter—not melted, just soft enough for your finger to leave an imprint. We use a mix of light brown sugar for chewiness and white granulated sugar for structure. Don’t skip the egg yolks; they add richness! And please, use vanilla bean paste if you can find it; the little black specks just make everything look and taste more homemade and special.
The Rich Ganache Filling Components
For the filling, it’s super simple: semi-sweet chocolate chips and heavy whipping cream. That’s it! The ratio here is key for a ganache that sets up nicely but stays creamy inside the cookie. Make sure your cream is full-fat heavy cream for the best results.
Equipment Needed for Making Chocolate Thumbprint Cookies
You don’t need fancy gadgets for these, but having the right tools makes the process so much smoother. I always lay out my parchment paper first—it saves my sanity later! You’ll definitely want two baking sheets ready to go.
Tools for Shaping and Baking
Make sure you have a good electric mixer, even if it’s just a hand mixer, for creaming that butter and sugar properly. The real secret weapon for the thumbprint shape is a 1/4 teaspoon measuring spoon. You’ll use it twice: once to press the indent before chilling, and again right after they come out of the oven. Don’t forget bowls for mixing and a small saucepan for heating that cream!
Step-by-Step Instructions to Make Chocolate Thumbprint Cookies
Now for the fun part! Follow these steps closely, and you’ll have bakery-quality cookies. Remember, baking is a bit of chemistry, so stick to the timings, especially for the chilling!
Preparing the Chocolate Thumbprint Cookies Dough
First things first, line those baking sheets with parchment paper. Trust me, cleanup is a breeze that way. In a medium bowl, whisk together your flour, cocoa powder, salt, and baking powder until everything looks evenly distributed. Set that bowl aside for a minute.
In a large bowl, use your electric mixer to cream the softened butter with both the brown and white sugars. Beat this until it looks pale and fluffy—that takes about two minutes. Now, mix in the egg yolks one at a time, followed by your vanilla. Make sure that’s all incorporated. Next, you’re going to add the dry ingredients. Mix them in slowly, just until you see the last streaks of flour disappear. Do not overmix here, or these chocolate cookies will get tough!
Shaping, Indenting, and Chilling the Dough
It’s time to scoop! I use about a tablespoon of dough for each cookie, which should give you around 34 total. Roll those portions gently between your palms into smooth balls and place them on your prepared sheets. Now for the signature shape: take a 1/4 teaspoon measure and gently press a well right into the center of each ball. Don’t push all the way to the bottom, just create a nice little dip.
This next step is vital: the dough needs to chill for at least one full hour. If you skip this, the cookies will spread way too much in the oven, and those lovely indentations will vanish. Seriously, don’t cheat the chill time! If you are looking for other great holiday baking ideas, check out my Peanut Butter Cup Cookies recipe.
Baking and Setting the Cookie Base
Once chilled, preheat your oven to 350 degrees. Arrange the dough balls about an inch and a half apart because they will puff up a bit. Bake them for 9 to 11 minutes. Watch them closely; you don’t want them taking a vacation in there. As soon as they come out—and I mean immediately—use that 1/4 teaspoon again to gently press the centers one more time. They will sink a bit, but this ensures a deep well for the ganache. Let them cool on the baking sheet for about five minutes before carefully moving them to a wire rack to cool completely.

Creating and Filling the Chocolate Ganache
While the cookies cool, make the filling. Put your semi-sweet chocolate chips in a small, heat-safe bowl. Heat your heavy whipping cream on the stove or in the microwave until it’s just about boiling—you’ll see tiny bubbles forming around the edges. Pour that hot cream right over the chips and let it sit, untouched, for one full minute. This lets the heat do the work.
Then, gently stir from the center outward until everything comes together into a beautiful, smooth chocolate ganache. Once the cookies are totally cool, use another 1/4 teaspoon or a small spoon to fill each cookie well with about 1 teaspoon of that amazing ganache. For more rich chocolate recipes, see my Eggless Chocolate Fudge Brownies.
Finalizing Your Chocolate Thumbprint Cookies
If you want that festive look, sprinkle a few nonpareils over the wet ganache right away. The last thing you need to do is pop the finished cookies into the refrigerator for about 10 to 15 minutes. This helps the ganache set up perfectly so they don’t get messy when you pick them up!
Tips for Achieving Perfectly Formed Chocolate Thumbprint Cookies
Look, I know baking can feel fussy sometimes, but these little tips are what take these chocolate cookies from good to absolutely unforgettable. Trust me, I’ve made enough batches to know exactly where things can go wrong!
Handling Dough Temperature
I cannot stress this enough: the chilling time is non-negotiable for these cookies! If the dough is too warm when it hits the oven, the butter melts too fast, and your beautiful little indentations will just flatten out into sad, chocolatey pancakes. Keep that dough cold—that one hour minimum chill time ensures they bake up sturdy enough to hold that lovely ganache filling.
Achieving a Smooth Ganache Finish
When you make the ganache, the biggest mistake people make is stirring too vigorously right away. You need to let that hot cream sit on the chocolate chips for that full minute before you touch it. When you do stir, start slow and gentle, right in the middle. If you whip it too fast, you might introduce air bubbles, which leaves you with a slightly grainy or dull-looking filling instead of that mirror-smooth finish we want on top of our holiday cookies. Learning about proper emulsion techniques can help with this step, so check out this guide on making perfect chocolate ganache.
Common Questions About Chocolate Thumbprint Cookies
I get so many questions about these chocolate cookies, especially when everyone is gearing up for holiday baking! It’s normal to wonder about substitutions, but trust me, these are worth sticking to for the best flavor.
Can I substitute the cocoa powder in these chocolate cookies?
I specifically call for Dutch process cocoa powder because it gives us that deep, rich, almost black color and a smoother flavor profile. If you only have natural cocoa powder, you certainly *can* use it, but the color will be lighter, and the flavor might be slightly more acidic. Since this recipe uses baking powder, sticking to Dutch process helps balance everything out perfectly for these decadent cookies.
How long does the ganache filling stay fresh on the chocolate cookies?
Because the filling is a rich chocolate ganache, these cookies do best when kept cool. Once the ganache is set, you can store them in an airtight container in the fridge for up to three days. They taste amazing cold, too! If you need to keep them longer, check out my storage section below, but honestly, these holiday cookies never last that long around my house!
Why did my thumbprint indentations disappear while baking?
Ah, the disappearing act! This almost always happens if the dough is too warm when it goes into the oven. The chilling time is crucial for the butter to firm up, which helps the cookie base hold its shape. The trick I swear by is giving them a second, quick press with that 1/4 teaspoon immediately after they come out of the oven while they are still piping hot. That second press locks in the well for the ganache!
Storing and Keeping Your Chocolate Thumbprint Cookies Fresh
I know it’s hard to imagine having leftovers of these rich chocolate cookies, but if you’re lucky enough to save some, treating them right ensures they taste just as good the next day! The key here is keeping the ganache firm and the cookie base from going stale.
Best Practices for Leftover Chocolate Thumbprint Cookies
Since these have a creamy ganache filling, refrigeration is your best friend. Don’t leave them sitting on the counter for too long, especially if your kitchen is warm. Always use an airtight container to keep out any fridge smells and maintain that beautiful texture we worked so hard for! If you are interested in other baked goods, you might enjoy my recipe for The Best Zucchini Bread Recipe.
| Storage Location | Container Type | Maximum Duration |
|---|---|---|
| Refrigerator | Airtight Container | Up to 3 Days |
| Countertop (Short Term) | Airtight Cookie Jar | Up to 1 Day |
Sharing Your Homemade Chocolate Thumbprint Cookies
Wow, you made them! I am so proud of you for tackling these rich chocolate cookies. Now that you’ve tasted the magic of that smooth ganache, I’d love to hear what you think. Did you sprinkle them with anything fun? Please leave a rating and let me know how they turned out in the comments below!
Print
Crazy 34 Chocolate Thumbprint Cookies Bliss
- Total Time: 1 hour 41 minutes
- Yield: 34 cookies 1x
- Diet: Vegetarian
Description
Make these rich Chocolate Thumbprint Cookies with a smooth chocolate ganache filling. This recipe yields a perfect holiday treat or an anytime indulgence.
Ingredients
- 1 1/2 cups (188 g) all-purpose flour, spooned and leveled
- 1/2 cup (40 g) cocoa powder, Dutch process
- 1/2 tsp salt
- 1/2 tsp baking powder
- 3/4 cup (168 g) unsalted butter, softened
- 3/4 cup (165 g) light brown sugar, packed
- 1/4 cup (50 g) granulated white sugar
- 2 egg yolks, at room temperature
- 1 1/2 tsp vanilla bean paste or extract
- 1 cup (200 g) semi-sweet chocolate chips
- 1/2 cup (120 ml) heavy whipping cream
- nonpareils for sprinkling on top, optional
Instructions
- Line two baking sheets with parchment paper.
- Whisk flour, cocoa powder, salt, and baking powder in a medium bowl. Set aside.
- Cream butter, brown sugar, and granulated sugar in a large bowl with an electric mixer for two minutes.
- Mix in egg yolks and vanilla until the mixture is pale and fluffy, 1-2 minutes.
- Mix in the dry ingredients just until combined.
- Scoop the dough into 34 portions and roll into balls (about 1 tablespoon each).
- Place dough balls on the baking sheets.
- Use a 1/4 tsp to press an indent into the center of each dough ball.
- Chill the indented dough balls for at least one hour.
- Preheat your oven to 350 degrees.
- Arrange dough balls about 1 1/2 inches apart on the baking sheets.
- Bake cookies for 9-11 minutes.
- Immediately after baking, lightly press the centers again with a 1/4 tsp.
- While hot, use a circular cookie cutter to reshape the cookies if needed.
- Let cookies cool on the baking sheet for 5 minutes. Transfer to a cooling rack to cool completely.
- Add chocolate chips to a small bowl.
- Heat heavy cream until just about boiling on the stove or in the microwave.
- Pour hot cream over chocolate chips and let sit for 1 minute for the chocolate ganache.
- Stir until the cream and chocolate combine into a smooth ganache.
- Fill each cookie well with about 1 tsp of ganache.
- Sprinkle with nonpareils, if desired.
- Chill cookies in the fridge for 10-15 minutes to set the ganache.
- Store leftovers in an airtight container for up to three days.
Notes
- Measure flour properly by spooning it into the measuring cup and leveling off the excess, or weigh it.
- One cup of flour equals 125 grams.
- Prep Time: 20 minutes
- Cook Time: 11 minutes
- Category: Dessert
- Method: Baking
- Cuisine: American
Nutrition
- Serving Size: 1 cookie
- Calories: Approx. 150
- Sugar: Approx. 10g
- Sodium: Approx. 40mg
- Fat: Approx. 9g
- Saturated Fat: Approx. 5g
- Unsaturated Fat: Approx. 4g
- Trans Fat: 0g
- Carbohydrates: Approx. 16g
- Fiber: Approx. 1g
- Protein: Approx. 2g
- Cholesterol: Approx. 30mg