Skip to content
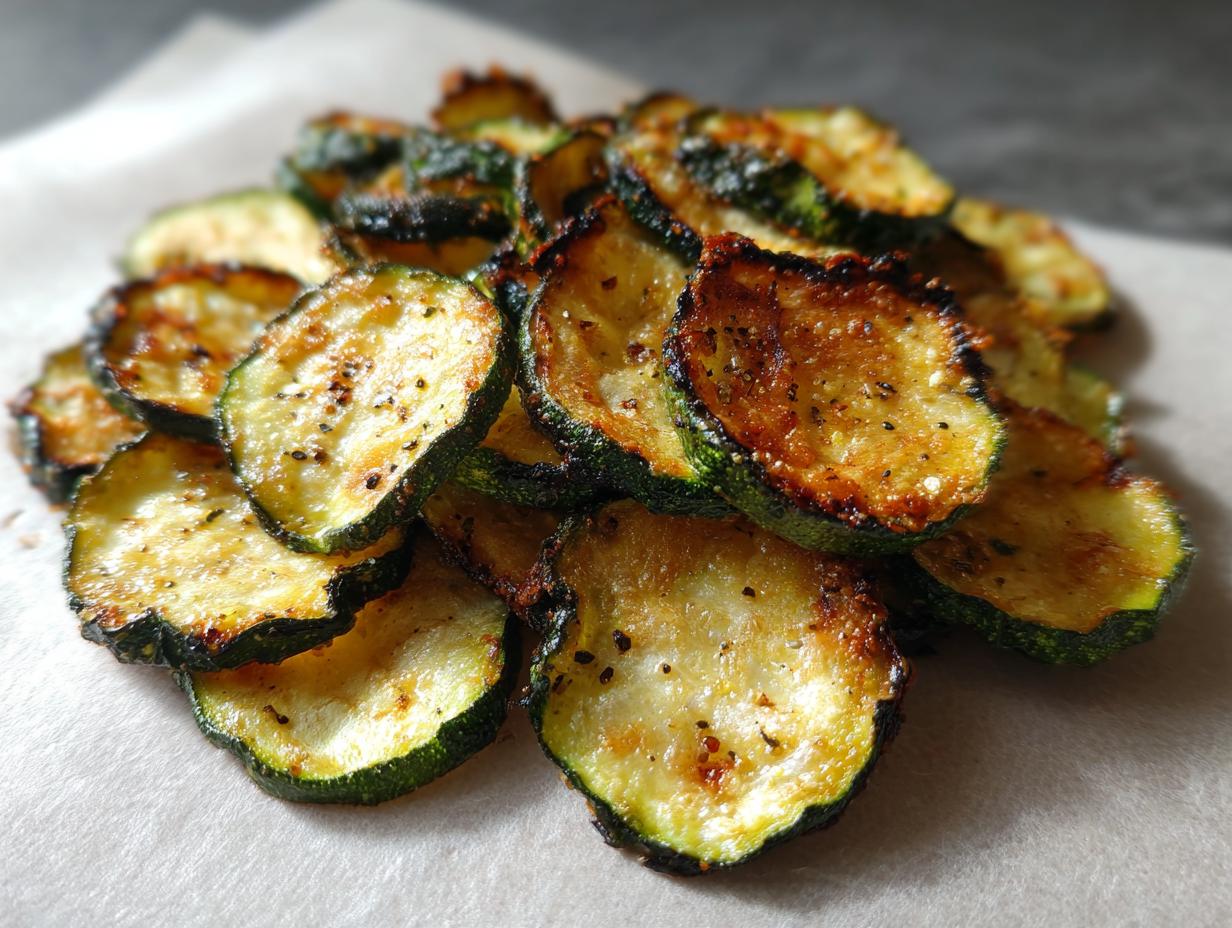
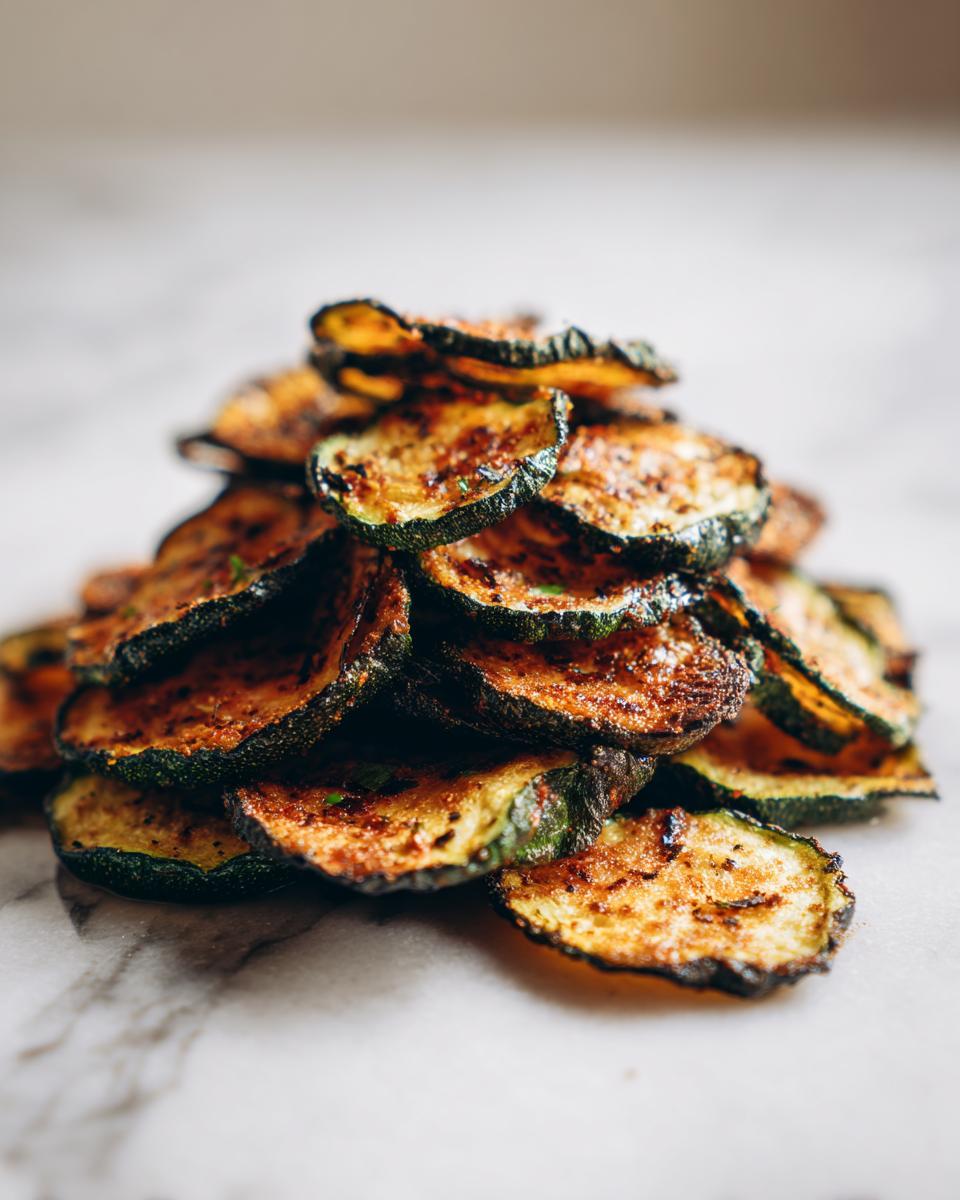
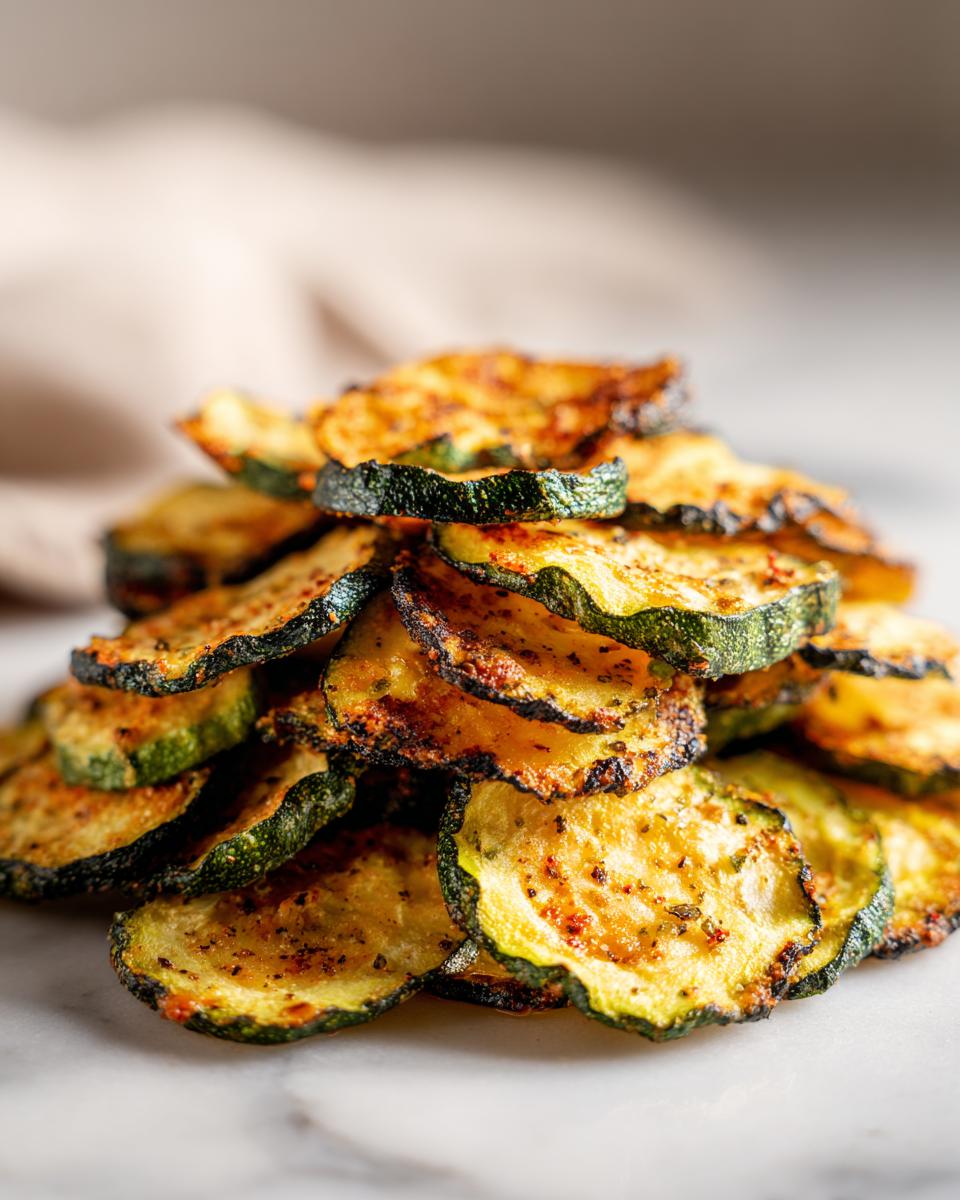
Oh, get ready to meet your new obsession: the Crispy Zucchini Chips Recipe! Seriously, if you’re looking for a snack that’s crunchy, flavorful, and actually good for you, you’ve landed in the right spot. I’m Anna Kowalska, and here I share tried-and-true homemade recipes that you and your family will love. Everything is made with heart and flavor. You know, I used to think zucchini was just for bread or a side dish, but then I stumbled upon this method and my whole snack game changed! I was tired of reaching for greasy chips, and honestly, finding something that satisfied that crunch craving without a side of guilt felt impossible. Then, I started experimenting with baking zucchini super thin, and wow, did it deliver! It’s so simple, and the results are these amazingly crisp, savory little bites that I just can’t get enough of. They’re perfect for munching on while watching a movie or even for serving up at a party. Trust me, you won’t even miss the potato chips!

Jump to:
Why You’ll Love This Crispy Zucchini Chips Recipe
Honestly, what’s not to love about these zucchini chips? They’re a total game-changer when you’re craving something satisfying. You get that amazing, incredibly crispy texture that we all love in a good snack, but without any of the usual guilt. These are truly healthy chips, packed with nutrients and super low in calories, making them a fantastic low calorie snack option. The best part? They’re ridiculously simple to make using just a few ingredients you probably already have. Plus, they’re a wonderfully gluten-free recipe, and many folks find them a perfect fit for a keto-friendly snack too. It’s a win-win-win!
Gathering Your Ingredients for Crispy Zucchini Chips
Alright, let’s get down to the good stuff – what you’ll need for these amazing crispy zucchini chips! Just like any good recipe, starting with fresh, quality ingredients is super important. It really makes a difference in the final flavor and texture. For these chips, we’re keeping it pretty simple, which is part of why I love them so much. You just need a couple of fresh zucchinis, some good olive oil, and a few pantry staples for seasoning. Don’t worry if you don’t have everything listed exactly – I’ll chat about some easy swaps in a bit. The key is to have everything prepped and ready to go so we can get these beauties into the oven!
| Ingredient | Quantity | Preparation Notes |
|---|---|---|
| Medium Zucchinis | 2 | Washed and thoroughly dried |
| Olive Oil | 1–2 tablespoons | Extra virgin recommended for best flavor |
| Sea Salt | ½ teaspoon | Adjust to taste |
| Garlic Powder | ½ teaspoon | For savory depth |
| Smoked Paprika | ½ teaspoon | Optional, for a smoky flavor |
| Black Pepper | ¼ teaspoon | Freshly ground preferred |
| Grated Parmesan (Opt.) | To taste | Use finely grated for even coating |
Ingredient Notes and Substitution Ideas for Crispy Zucchini Chips
Let’s talk details about these ingredients. When you’re picking out your zucchinis, try to grab ones that feel firm and aren’t too huge. The big guys can sometimes be a bit watery, and we want to avoid that for maximum crispiness. If you don’t have extra virgin olive oil, a regular olive oil or even a light avocado oil will work, though the flavor might be a little different. For the seasonings, feel free to play around! If you’re not big on smoked paprika, just skip it or try a pinch of chili powder for a little heat. Salt and pepper are always to your taste, so go for it! And if you’re keeping it dairy-free or vegan, skip the parmesan and toss in some nutritional yeast instead – it gives a lovely cheesy flavor without the cheese. Oh, and one more thing: slicing them super thin and evenly is really the secret sauce here, so a mandoline is your best friend!
Step-by-Step Guide to Making Crispy Zucchini Chips
Alright, let’s get these delicious zucchini chips into the oven! The process is super straightforward, but paying attention to a few key details will make all the difference between a soggy disappointment and a perfectly crispy, crave-worthy snack. We’re going to start with prepping the star ingredient, get it seasoned just right, and then let the oven do its magic. It might take a little patience with the low temperature, but trust me, the results are totally worth it. So grab your apron, and let’s get cooking!
Preparing the Zucchini Slices
First things first, we need to get our zucchinis ready. Give them a good wash under cool water and then, this is important, dry them *really* well. Any extra moisture is the enemy of crispiness! Now, if you have a mandoline slicer, now’s the time to use it – aim for super thin, even slices, about 1/8-inch thick. If you don’t have one, a sharp knife will work, but try your best to keep them consistent. Lay those slices out on some paper towels, sprinkle them lightly with salt, and let them hang out for about 10 minutes. This step helps draw out even more moisture, which is exactly what we want.
Coating and Seasoning for Flavor
Okay, after those slices have sweated out some of their water, grab another paper towel and pat them dry again. We want them nice and ready for their flavor bath! Toss them gently in a big bowl with your olive oil. Make sure every slice gets a nice, even coating – this helps them crisp up beautifully. Now, sprinkle in your sea salt, garlic powder, and that optional smoked paprika if you’re feeling fancy, plus your black pepper. Give them another gentle toss to distribute all those yummy seasonings. If you’re adding parmesan cheese, now’s the time to toss it in too! Just make sure it’s finely grated so it coats everything evenly.
Baking for Perfect Crispness
Now for the part that requires a little patience! Preheat your oven to a nice, low 250°F (120°C). Line a couple of baking sheets with parchment paper – this stops them from sticking. Arrange your seasoned zucchini slices in a single layer on the baking sheets. Seriously, don’t let them overlap at all, or they’ll steam instead of crisping up. Pop them into the oven and bake for about 1.5 to 2 hours. About halfway through, carefully flip each slice over. You’re looking for them to be golden brown and feel dry and crispy to the touch. Once they’re done, take them out and let them cool on the baking sheets for a few minutes – they’ll get even crispier as they cool!
Essential Equipment for Your Crispy Zucchini Chips Recipe
To whip up these fantastic crispy zucchini chips, you don’t need anything too fancy, but having the right tools makes the whole process a breeze. You’ll definitely want a couple of baking sheets – this helps you work in batches and give the chips enough space. Definitely grab some parchment paper too; it’s a lifesaver for preventing sticking and makes cleanup way easier. For slicing, a mandoline slicer is your best friend for getting those super thin, even rounds, but a really sharp knife will work if you’re careful. And of course, you’ll need some paper towels for drying, a big mixing bowl for tossing everything, and your trusty measuring spoons.
Tips for Achieving Perfectly Crispy Zucchini Chips
Okay, so you want those perfectly crisp zucchini chips every single time, right? I’ve got you covered! The biggest secret is really paying attention to moisture – we want as little of it as possible. So, make sure you slice those zucchinis super uniformly; using a mandoline slicer is honestly the best way to get them all the same thickness. If they’re uneven, some will burn while others are still soft. And remember that step where we salted them and patted them dry? Don’t skip that! It really pulls out the water. Also, when you lay them on the baking sheet, give them space! No overlapping, please. They need air to get crispy, not steam. Baking them low and slow is crucial too – resist the temptation to crank up the heat. It might take a little longer, but it ensures they dry out properly. Finally, let them cool completely on the rack; they’ll continue to crisp up as they sit. Patience is key here, but the reward is SO worth it!
Storing and Reheating Your Crispy Zucchini Chips
So, you made a whole batch of these amazing crispy zucchini chips and, shocker, you actually have leftovers! Hooray! Storing them is pretty simple, but you have to be a little careful because they can lose their crunch if they get humid. The best way to keep them is in an airtight container at room temperature. They’ll usually stay good for about 1-2 days, but honestly, they’re best eaten sooner rather than later. If they do soften up a bit, don’t fret! You can totally revive them by popping them back in the oven for a few minutes.
| Storage Method | Temperature | Duration | Reheating Instructions |
|---|---|---|---|
| Airtight Container | Room Temp | 1-2 days | Reheat in oven at 250°F (120°C) for 5-10 minutes |
Frequently Asked Questions about Crispy Zucchini Chips
Got questions about making the best crispy zucchini chips? I totally get it! Sometimes you just need a little extra guidance to get those perfect results. Let’s dive into some common queries. So, can you make these in an air fryer? Absolutely! Air fryers are fantastic for making things crispy. You’ll want to preheat your air fryer and cook the seasoned zucchini slices in a single layer, probably at around 375°F (190°C) for about 10-15 minutes, flipping them halfway through. Keep an eye on them, as air fryers can cook faster! Now, why are your zucchini chips not crispy? Usually, it’s one of a few things: not slicing them thin enough, not drying them well enough after salting, or overcrowding the baking sheet. All of these prevent proper dehydration. What’s the best way to slice zucchini for chips? Honestly, a mandoline slicer is your best bet for super thin and even slices, which is key for uniform crisping. If you don’t have one, just be really careful with a sharp knife to get them as consistent as possible. And yes, you can totally use different seasonings! Feel free to get creative. Chili powder, onion powder, a sprinkle of Italian herbs, or even some smoked paprika for extra depth are all fantastic options. Have fun experimenting!
Understanding the Nutritional Value of Crispy Zucchini Chips
It’s always good to know what you’re snacking on, right? These crispy zucchini chips are pretty light on the calories and packed with good stuff. Keep in mind these numbers are just estimates, since how much oil and seasonings you use can vary a bit. But generally, one serving (which is about a quarter of the recipe) comes in around 70 calories. You’re getting a decent amount of fiber and protein too, which helps keep you feeling full. Plus, the fat content is mostly the healthy kind from the olive oil. It’s a pretty guilt-free way to satisfy those crunchy cravings!
| Nutrient | Amount (per serving) |
|---|---|
| Calories | 70 |
| Fat | 5g |
| Saturated Fat | 1g |
| Unsaturated Fat | 4g |
| Carbohydrates | 5g |
| Fiber | 2g |
| Protein | 2g |
| Sodium | 300mg |
| Sugar | 3g |
Crispy Zucchini Chips: 1 Amazing Recipe
- Total Time: 2 hours 15 minutes
- Yield: 4 servings 1x
- Diet: Gluten Free
Description
Enjoy these crispy zucchini chips, a healthy and delicious snack alternative. They are low in calories, nutrient-rich, and easy to make at home. Perfect for satisfying your crunchy cravings without the guilt.
Ingredients
- 2 medium zucchinis
- 1–2 tablespoons olive oil
- ½ teaspoon sea salt
- ½ teaspoon garlic powder
- ½ teaspoon smoked paprika (optional)
- ¼ teaspoon black pepper
- Grated parmesan (optional)
Instructions
- Preheat your oven to 250°F (120°C).
- Wash and thoroughly dry the zucchinis. Slice them into thin rounds, about 1/8-inch thick.
- Lay the zucchini slices on paper towels, sprinkle lightly with salt, and let sit for 10 minutes to draw out moisture. Pat dry with another paper towel.
- In a large bowl, toss the zucchini slices with olive oil until evenly coated. Add salt, garlic powder, smoked paprika, and black pepper. Toss again. Add parmesan if using.
- Line a baking sheet with parchment paper. Arrange the zucchini slices in a single layer, ensuring they do not overlap.
- Bake for 1.5 to 2 hours, flipping the slices halfway through, until golden brown and crispy.
- Remove from the oven and let cool for 5 minutes to further crisp up.
Notes
- For best results, slice the zucchini as evenly as possible. A mandoline slicer is recommended.
- Do not overcrowd the baking sheet; allow space for air circulation.
- Bake at a low temperature for a longer time to ensure thorough dehydration and crispness without burning.
- Experiment with seasonings like chili powder or nutritional yeast for different flavors.
- Serve with dips like hummus, guacamole, or Greek yogurt dip.
- Prep Time: 15 minutes
- Cook Time: 2 hours
- Category: Snack
- Method: Baking
- Cuisine: American
Nutrition
- Serving Size: 1 serving (approx. 1/4 of recipe)
- Calories: 70
- Sugar: 3g
- Sodium: 300mg
- Fat: 5g
- Saturated Fat: 1g
- Unsaturated Fat: 4g
- Trans Fat: 0g
- Carbohydrates: 5g
- Fiber: 2g
- Protein: 2g
- Cholesterol: 0mg