Skip to content
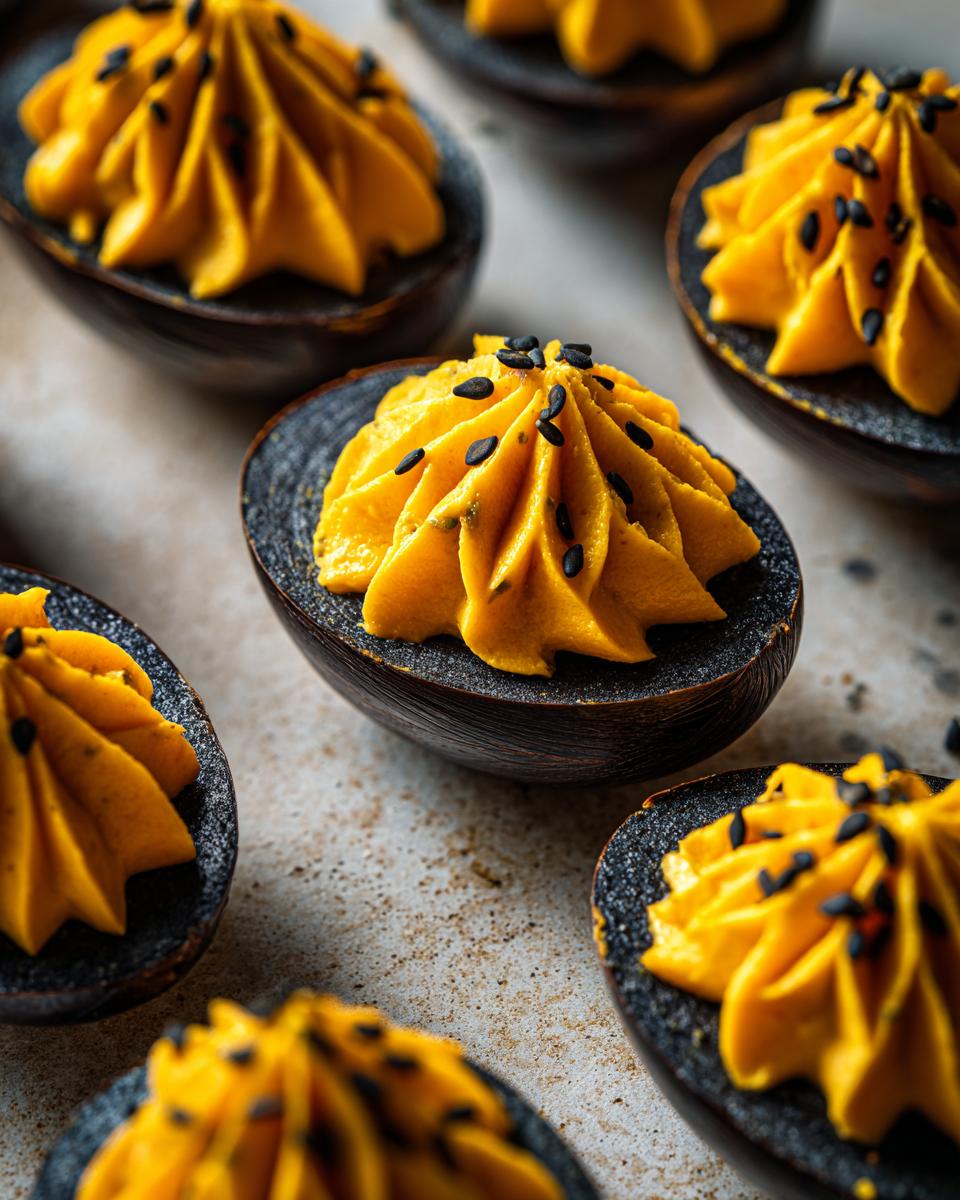
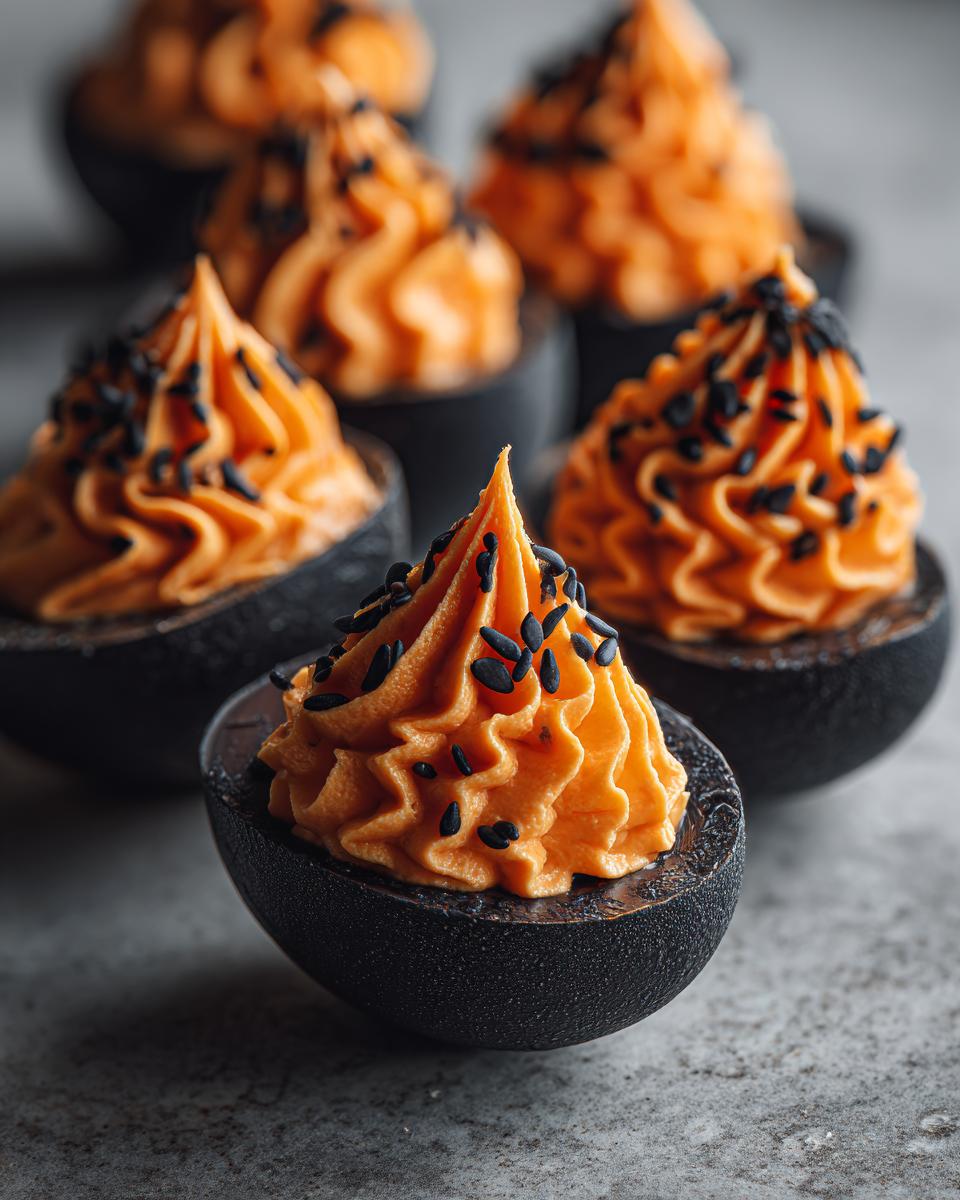
When you’re hosting a spooky gathering or just want to make a classic appetizer feel totally new, you need something that stops people in their tracks. Forget boring white and yellow! I’m talking about striking, dramatic color. That’s why these black and orange Deviled Eggs are my absolute favorite trick for Halloween parties. They look complicated, but trust me, the magic is surprisingly simple.
I’m Anna Kowalska, and here I share tried-and-true homemade recipes that you and your family will love. Everything I put on this site is made with heart and flavor, and these colorful eggs are no exception. The dual coloring—that deep, cracked black shell contrasting with the bright orange filling—makes them instantly memorable.
We aren’t just making any old picnic snack here; we’re creating edible art that tastes just as incredible as it looks. You’ll see exactly how I get that perfect marble effect on the outside and the creamy, citrusy filling on the inside. Get ready to wow your guests!
Jump to:
Essential Ingredients for Black and Orange Deviled Eggs
Getting the look right in these Deviled Eggs is all about the right components—not just for taste, but for color saturation! You absolutely need good quality yolks and fats for that dreamy, pipeable texture we’re aiming for. But the real stars here are the food gels. Forget the liquid drops; gel coloring is what gives you that intense black and vibrant orange without thinning out your amazing yolk mixture.
Don’t skimp on the acid, either! That little bit of lemon juice brightens up the whole filling so it doesn’t taste heavy. Trust me, using the right ingredients means the difference between a fun appetizer and a showstopper.
Gathering Your Deviled Eggs Components
Here is everything you need to make the magic happen. Write this list down twice, especially the coloring amounts, because getting that deep black color takes a surprising amount of dye!
- 12 boiled eggs
- 8 drops super black food gel (Yes, that many!)
- 5 cups water (for the soaking bath)
- 3 tablespoons mayonnaise
- 1 tablespoon Dijon mustard
- 1 tablespoon fresh lemon juice
- 1 tablespoon creme fraiche (or you can use whipped cream cheese or sour cream if you prefer)
- ½ teaspoon sea salt
- ½ teaspoon ground pepper
- 10 drops orange food gel
- 1 teaspoon black sesame seeds (for garnish)
Preparing the Unique Shells for Your Deviled Eggs
This is where the visual trickery starts! Before we even get to the creamy filling, we have to set the stage with those incredible cracked black shells. People always ask me how I get that depth of color on the outside of my Deviled Eggs. It’s actually super easy, but it requires patience during the chilling phase. The secret is cracking the shell *before* dyeing, so the color seeps into all those lovely little fissures.
We need perfectly cooked eggs first, though. If they stick, the whole process is ruined before it even begins!
Perfect Hard-Boiled Eggs
You have a few options here, and honestly, whatever works best for your schedule is fine. I sometimes use my Instant Pot because they peel like a dream afterwards. If you’re doing a big batch, steaming works great too. If you stick to the old-fashioned boiling method, make sure you plunge those hot eggs immediately into an ice bath. That rapid cooling stops the cooking process and helps the membrane separate from the white, giving you those smooth halves later.
Creating the Marbled Black Shell Effect
Once your eggs are cooled and peeled, grab a large, sturdy bowl. Mix your 5 cups of water with those 8 drops of black food gel. Stir it until it’s fully incorporated—it should look like ink! Now, take each peeled egg and gently tap it all over with the back of a spoon or a small rolling pin. You want lots of small cracks, but don’t take the shell off! Place the cracked eggs into the black water, cover the bowl, and move them to the fridge. They need at least two hours, but overnight is even better for that deep, dramatic black to set into the cracks.
Making the Creamy Orange Deviled Eggs Filling
Now that our shells are looking spooky and dramatic, it’s time to focus on the star of the show: the bright, tangy filling inside our Deviled Eggs! The goal here is smooth, fluffy, and flavorful. Nobody wants a grainy filling that won’t pipe nicely, right? We are aiming for a texture that holds its shape beautifully when you pipe it back into those black-and-white cups.
When I scoop out the yolks, I try to push them through the shell opening gently rather than just scraping them out with a spoon. This keeps the egg white halves looking pristine while giving you a head start on mashing the yolks.
Mixing the Yolk Base
Pop those yolks into a medium bowl. I dump in the mayo, that kick of Dijon, the lemon juice, the salt, and pepper. If you want that extra luxurious, velvety texture that pipes like a dream, use your hand mixer here! It whips a lot more air in than just using a spatula, which is key. If you’re using sour cream or cream cheese instead of creme fraiche, make sure it’s softened up so it blends immediately. Mix it until it’s completely smooth—no lumps allowed!
Coloring and Piping the Deviled Eggs Filling
Once you have that perfect base, it’s time for the orange pop! Add those 10 drops of orange gel right into the yolk mixture and mix it thoroughly until the entire batch is a uniform, happy orange color. Now, for presentation points: load this mixture into a large Ziploc bag fitted with a big star tip—I always use a #1 star tip. If you need help holding the bag upright while you fill it with a spatula, stick the open bag down into a tall glass first! Fold the top over and you are ready to pipe.
Assembling and Garnishing Your Deviled Eggs
We’re almost done! This is the fun part where all that careful coloring and mixing pays off. Getting the filling back into those stunning black-and-white shells is what makes these Deviled Eggs truly special. Remember, presentation is everything when you’re aiming for spooky elegance!
Filling the Egg White Halves
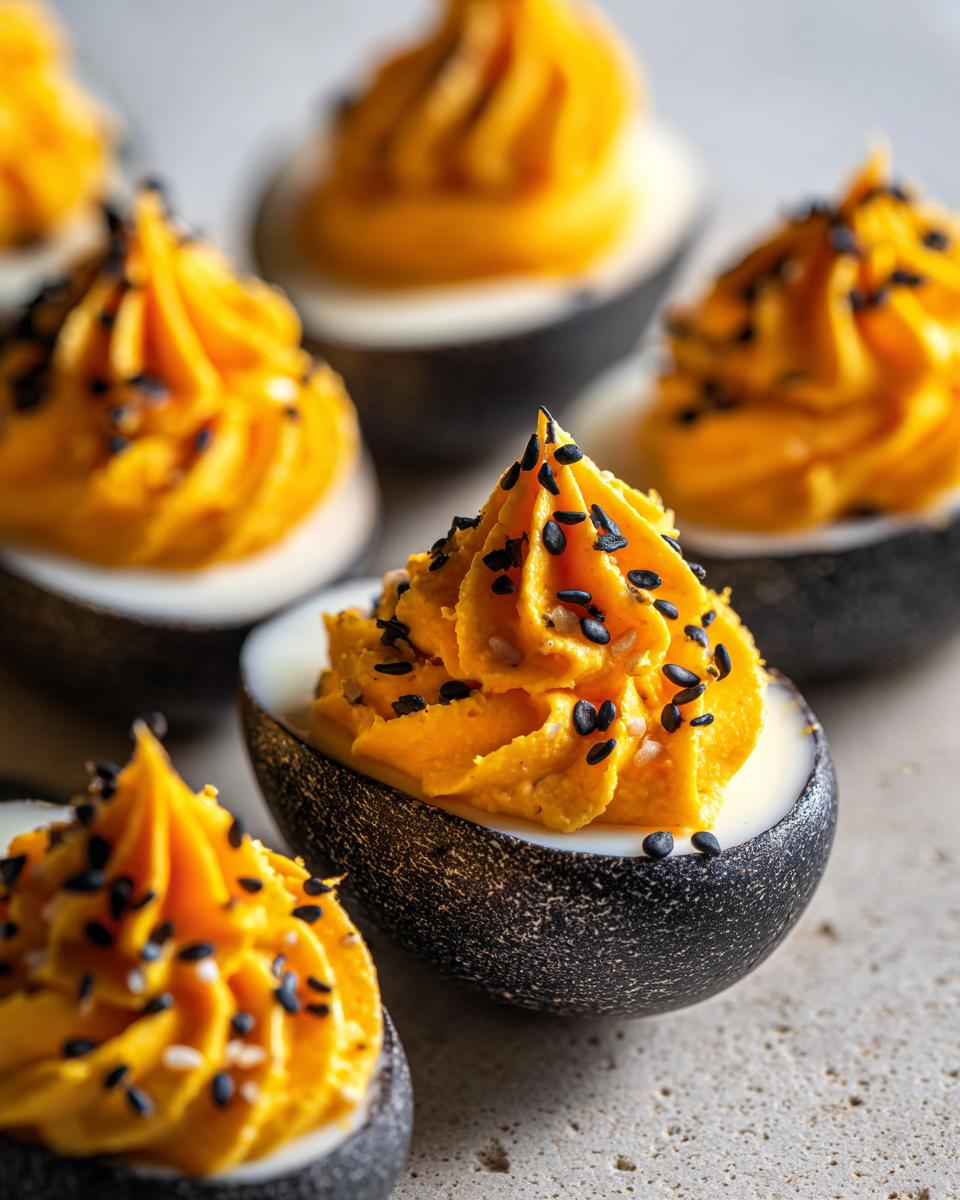
Take your piping bag full of bright orange filling and gently pipe a beautiful swirl right back into each egg white half. Don’t be shy; make a nice tall mound! If you want them to look extra professional, try to pipe from the outside edge toward the center, creating those nice ridges the star tip gives you.
Final Touches and Presentation
For the final, dramatic contrast, sprinkle just a few black sesame seeds right on top of that orange mound. This really ties the black shell and orange filling together. Once they are all decorated, cover them loosely and get them straight back into the refrigerator. These Deviled Eggs need to stay chilled until the moment your guests arrive!
Tips for Perfect Deviled Eggs Every Time
I’ve made batches of these Deviled Eggs for so many parties now that I’ve learned a few tricks to make your life easier. If your filling seems a little too thick to pipe nicely, don’t panic! Just stir in another tiny bit of mayonnaise or cream cheese until it gets smoother. It adds richness and makes the piping tip happy.
For the absolute fluffiest texture, you really should use that hand mixer on the yolks. It makes them airy, which is great for presentation. If you are making these for a big bash, totally make them ahead of time! Boil and slice the whites, but keep the filling separate in the piping bag. Assemble everything right before you serve so they look crisp and fresh!
Storing and Serving Suggestions for Your Deviled Eggs
These striking Deviled Eggs are best when served cold, especially since we are dealing with mayonnaise and dairy products. Because of the food coloring, I always recommend assembling them right before you plan to serve them if you can manage it. That way, the colors look their absolute brightest and the filling is perfectly firm.
If you have leftovers, or if you need to prep the day before, there are a couple of ways to handle it safely. Remember, these are designed to be an eye-catching appetizer, so keeping them looking good is just as important as keeping them tasting great!
Safe Storage and Reheating Guidelines
If you have assembled the Deviled Eggs completely, cover them tightly with plastic wrap, making sure the wrap doesn’t touch the filling, or use an airtight container. They should stay in the coldest part of your refrigerator. Honestly, they are best eaten within 24 hours. After that, the egg whites can start to get a little watery from the moisture in the filling.
If you are making them ahead, store the hard-boiled, sliced egg whites on a plate, covered, and store the orange yolk filling in the piping bag, sealed tightly. You can keep the filling separated like this for up to two days. When you’re ready to serve, just pipe the filling back into the whites and garnish. Never try to “reheat” deviled eggs—they are meant to be served chilled!
Common Questions About Colored Deviled Eggs
I get so many questions about these black and orange Deviled Eggs! People are usually worried about two things: the flavor and the safety of all that color. First off, don’t worry about the food coloring; the gel concentrates the color without adding much liquid, so it doesn’t mess up the texture. The orange dye tastes like nothing, and the black dye is mostly just for looks!
If you don’t like Dijon mustard, feel free to swap it out for regular yellow mustard—it will just change the flavor profile a bit. Also, if you’re out of creme fraiche, I mentioned using sour cream or cream cheese, and those work perfectly fine. Some people even ask about making them look like pumpkins! You absolutely can dye the shells orange and use orange filling, then top it with parsley for a little green stem. These Deviled Eggs are so versatile!
Print
Stunning 12 Black Orange Deviled Eggs
- Total Time: 2 hours 35 minutes
- Yield: 24 halves 1x
- Diet: Vegetarian
Description
Make striking black and orange Deviled Eggs perfect for a spooky gathering or a fun twist on a classic appetizer. This recipe uses food coloring to create a unique, visually appealing presentation.
Ingredients
- 12 boiled eggs
- 8 drops super black food gel
- 5 cups water
- 3 tablespoons mayonnaise
- 1 tablespoon Dijon mustard
- 1 tablespoon fresh lemon juice
- 1 tablespoon creme fraiche (sub whipped cream cheese or sour cream)
- ½ teaspoon sea salt
- ½ teaspoon ground pepper
- 10 drops orange food gel
- 1 teaspoon black sesame seeds
Instructions
- Make hardboiled eggs. Cook the eggs by boiling, using an instant pot, or steam method.
- In a large bowl, mix water and black food color dye. Hold each egg in a small towel and crack with the back of a spoon all over, then place down in the black water. Cover and chill the eggs for at least two hours.
- Peel and slice the boiled eggs in half. Gently push from the back of the egg to pop the yolk out instead of scooping it with a spoon.
- In a medium bowl, add the yolks, mayonnaise, Dijon mustard, lemon juice, salt, pepper, creme Fraiche’ or soft whipped cream cheese.
- Mix until well combined with a spatula or hand mixer. Add 10 drops of orange gel dye to the mixture, mix well, and load into a large zip lock bag fitted with a large star number one tip. Put the tip in the pastry bag, and use a tall glass to hold it while filling with a spatula.
- Fold down the top of the piping bag. Pipe the filling back into the boiled eggshell halves, and garnish with a few black sesame seeds. Keep refrigerated until ready to serve.
Notes
- Use a hand mixer for a creamy fluffy texture that pipes well.
- Add more mayo or cream cheese for a creamier, smoother filling that pipes easier.
- A large gallon zip-top bag and large star tip give the filling a professional look.
- For make-ahead preparation, boil and slice the eggs, keeping them covered. Fill the piping bag and assemble just before serving.
- For Halloween themes, color the eggs green, purple, or black.
- Decorate with black olive halves to resemble spiders.
- Swap Dijon mustard for yellow mustard for a different flavor profile.
- Add one teaspoon of garlic powder for extra flavor.
- To make pumpkin eggs, dye the shells orange and pipe in orange-colored filling, garnishing with parsley for the stem.
- Prep Time: 20 minutes
- Cook Time: 15 minutes
- Category: Appetizer
- Method: Boiling and Piping
- Cuisine: American
Nutrition
- Serving Size: 1 half
- Calories: 67kcal
- Sugar: 0.4g
- Sodium: 164mg
- Fat: 6g
- Saturated Fat: 1g
- Unsaturated Fat: 4g
- Trans Fat: 0.01g
- Carbohydrates: 1g
- Fiber: 0.1g
- Protein: 3g
- Cholesterol: 95mg