Skip to content
Hey there, sweet tooths and kitchen adventurers! Let’s talk about one of my absolute favorite things to whip up when I need a little magic in my day: Dipped Apple Slices on a Stick. Seriously, these little gems are just pure joy on a stick! I’m Anna Kowalska, and here I share tried-and-true homemade recipes that you and your family will love. Everything is made with heart and flavor, and trust me, I’ve spent years perfecting treats like these no-bake wonders. They’re perfect for parties, after-school snacks, or just because you deserve a little something special. You won’t believe how easy they are to make!
Jump to:
Why You’ll Love These Dipped Apple Slices on a Stick
Okay, so why should these Dipped Apple Slices on a Stick be your next kitchen adventure? Well, for starters, they are ridiculously easy to make. We’re talking minimal fuss, maximum deliciousness, and absolutely no oven required! This no-bake magic means you can whip them up in a flash, perfect for those last-minute party plans or when a sweet craving hits hard.
Plus, they are an absolute hit with the little ones (and let’s be honest, the grown-ups too!). The fun stick makes them feel like a special treat, and you can let the kids get involved in decorating. The best part? The sheer versatility! You can go wild with toppings:
- Super Simple & Quick: Seriously, you can have these ready in about 15 minutes total!
- Kid-Approved Fun: They’re a blast to make and eat.
- Endless Topping Options: From crunchy nuts to sweet candies, customize them however you like!
- No Oven Needed: Perfect for hot days or when your oven is already busy.
- Pure Delight: They’re just plain fun and incredibly satisfying.
Get ready to impress everyone with these delightful little apple wonders!
Gathering Your Dipped Apple Slices on a Stick Ingredients
Alright, let’s get down to business and gather everything we need to make these amazing Dipped Apple Slices on a Stick. It’s pretty straightforward, and you might even have most of it in your pantry already! The key is having good, firm apples that will hold up well once they’re all dressed up. I usually grab two nice big ones, core them, and then slice them into about 8 thick pieces each. And don’t forget the sticks! You’ll need 16 sturdy white sucker sticks – the thicker ones work best so they don’t snap.
Now, for the fun part: the coatings! We’ll need some semi-sweet chocolate chips and white chocolate chips, plus a little bit of coconut oil or shortening to make them melt down nice and smooth. And for that classic caramel apple flavor, we’ll melt down those yummy Kraft caramel candies with a tiny bit of water. Once those are prepped and ready, it’s time for the real magic – the toppings!
| Essential Components | Amount | Notes |
|---|---|---|
| Large Apples | 2 | Cored and cut into 8 thick slices each |
| White Sucker Sticks | 16 | Sturdy ones work best! |
| Semi-Sweet Chocolate Chips | 2/3 cup | For dipping |
| Coconut Oil or Vegetable Shortening | 1 teaspoon | For melting chocolate |
| White Chocolate Chips | 2/3 cup | For dipping |
| Kraft Caramel Candies | 16 wrapped candies | For classic caramel coating |
| Water | 1 tablespoon | For melting caramel |
A Rainbow of Topping Possibilities
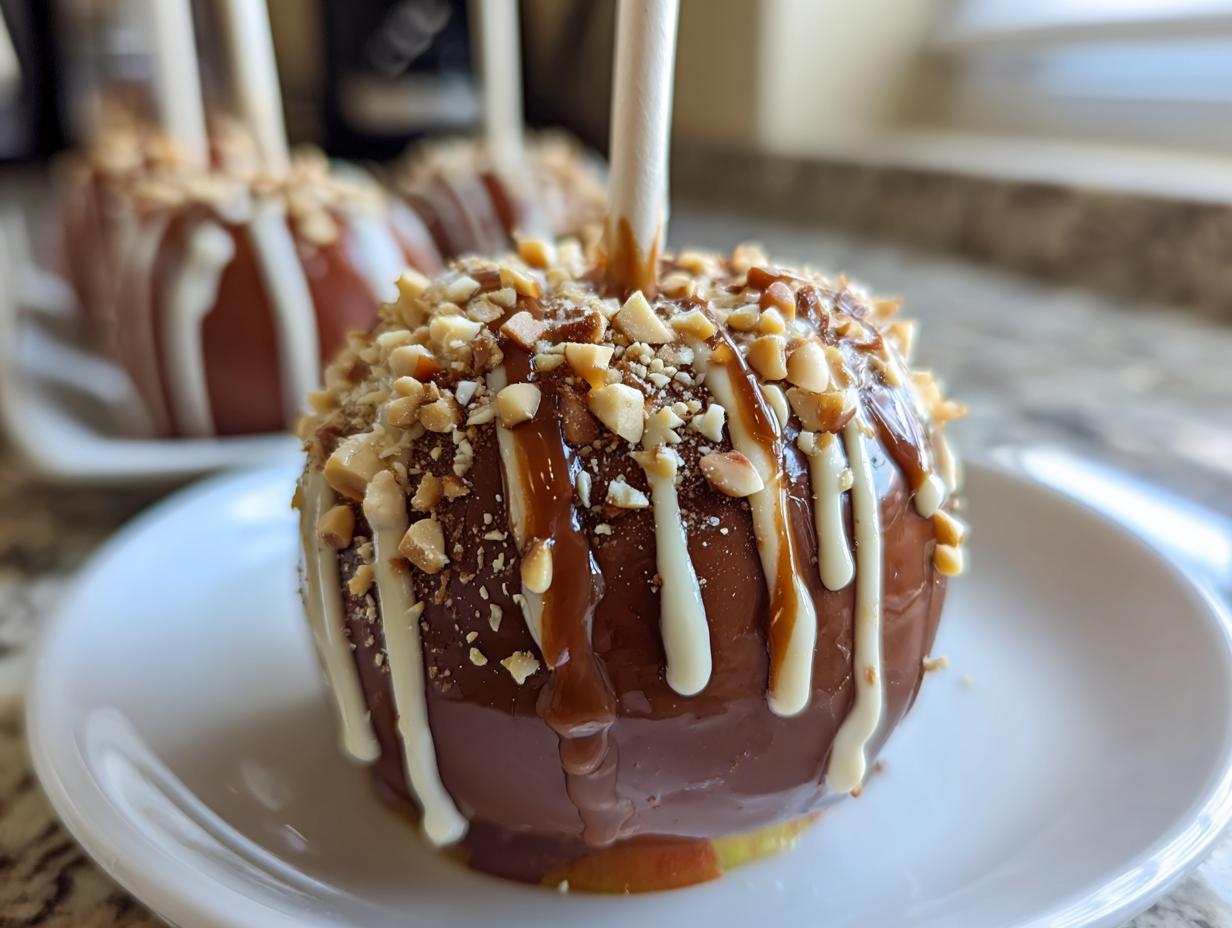
This is where you really get to play! I love having a whole spread of toppings so everyone can make their own perfect apple slice. You can go classic with chopped peanuts or get a little fancy. Here are some of my favorites:
- Crunchy & Salty: Chopped peanuts, crushed pretzels, toasted pecans, flakey sea salt.
- Sweet & Decadent: Crushed Oreos, mini M&M’s, shredded coconut, raisins, dried cranberries.
- Just for Fun: Sprinkles, of course!
Seriously, anything you love on a cookie or candy bar can probably go on these apples. Just have fun with it!
Crafting Perfect Dipped Apple Slices on a Stick: Step-by-Step
Alright, let’s get these beauties made! It’s honestly the easiest part because it’s so straightforward. You’ll be amazed at how quickly these go from apple slices to dazzling treats. The most important thing is to work a little quickly once things are melted and ready to go, so have all your toppings prepped and within reach!
Preparing Your Apple Slices
First things first, let’s get our apple slices ready for their delicious makeover. Make sure your apples are cored and sliced into those nice, thick wedges. Now, this is super important: pat them really, really dry with a paper towel. Seriously, get them as dry as you can. Any moisture will make the chocolate or caramel slide right off, and we want that coating to stick like glue! Once they’re dry, gently but firmly push a white sucker stick into the cut edge of each apple slice. Make sure it’s snug so it won’t wiggle out later.

Melting and Dipping Your Dipped Apple Slices on a Stick
Now for the fun part – melting! Grab small microwave-safe bowls for your semi-sweet chocolate, white chocolate, and those caramels. For the chocolates, just add the chips and one teaspoon of coconut oil or shortening to each bowl. For the caramels, unwrap them and put them in their bowl with a tablespoon of water. Pop them into the microwave on high for about 60 seconds. Give them a good stir until they’re super smooth and glossy. If they’re not quite there, microwave in 15-second bursts, stirring each time, until smooth. Now, take your apple slices by the stick and dip them into the melted coating, swirling them around to get a nice even coat. Let any excess drip off for a second.
The Art of Topping Application
This is where your Dipped Apple Slices on a Stick really come alive! As soon as you’ve dipped an apple slice and it’s coated, immediately sprinkle, roll, or press your chosen toppings onto the wet coating. If you wait too long, the chocolate or caramel will start to set, and the toppings won’t stick. Think about how you want to decorate – maybe roll the whole thing in crushed Oreos, or just dip half in chocolate and sprinkle peanuts on the other half. You can get really creative here! Some people like to do a drizzle of the other chocolate color over the top too, which looks so fancy.

Setting Your Delicious Creations
Once all your apple slices are dipped and beautifully topped, it’s time to let them set. Carefully place each one onto a baking sheet lined with parchment or wax paper. Make sure they have a little space between them so they don’t stick together. Pop the whole baking sheet into the refrigerator for about 10 minutes. You’ll know they’re ready when the chocolate or caramel coating is firm to the touch. And voilà! You’ve got yourself some gorgeous, homemade Dipped Apple Slices on a Stick, ready to be devoured!
Tips for Dipped Apple Slices on a Stick Success
Making these Dipped Apple Slices on a Stick is pretty foolproof, but a few little tricks can make them absolutely perfect every single time. I’ve learned a thing or two over the years, and I’m happy to share them with you! The goal is always a beautiful, delicious treat that looks as good as it tastes. Don’t worry if your first one isn’t magazine-perfect; they’ll still taste amazing!
Choosing the Right Apples
When you’re picking apples for this recipe, think firm and crisp! Varieties like Honeycrisp, Fuji, or Gala are fantastic choices because they hold their shape really well and have a lovely sweet-tart flavor that pairs beautifully with chocolate and caramel. Avoid softer apples like Red Delicious, as they can get mushy and don’t hold up as nicely on the stick. And remember that crucial step: patting them super dry before dipping is non-negotiable for good adhesion! For more information on apple varieties, you can check out resources on USApple.org.
Achieving a Smooth Coating
Melting chocolate and caramel can sometimes be a bit finicky, but a little trick makes it super smooth. Don’t overheat them! Microwave in short bursts and stir well between each one. The coconut oil or shortening is your best friend here; it helps everything melt down into a silky, luscious coating. If your chocolate seems a bit thick, just add another tiny bit of oil. For the caramel, a splash of water helps get that perfect drizzle consistency. And remember to dip quickly but confidently to get a nice, even layer.
Making Your Dipped Apple Slices on a Stick Shine
Presentation is part of the fun! Don’t be afraid to get creative with your toppings. Try combining textures – maybe some crunchy pretzels with sweet M&M’s, or a sprinkle of flakey salt over the caramel. You can even do a double dip: coat in caramel, let it set a bit, then dip the bottom half in chocolate. Or, use a fork to drizzle contrasting chocolate over the top for an elegant finish. The more colorful and varied your toppings, the more exciting your platter will look!
Frequently Asked Questions about Dipped Apple Slices on a Stick
Got questions about these fun little treats? I’ve got answers! These Dipped Apple Slices on a Stick are so popular, and I get asked about them all the time. Let’s clear up any lingering curiosities so you can make them perfectly!
Can I make these Dipped Apple Slices on a Stick ahead of time?
You sure can! These are great for making a day in advance. Just make sure they’re fully set in the fridge. Once they are, store them in an airtight container in the refrigerator. I like to put a layer of wax paper between them so they don’t stick together. They’ll stay good for about 2-3 days, though they’re best enjoyed within the first day or two while the apple is at its freshest.
What are the best apples for Dipped Apple Slices on a Stick?
For these apple on a stick treats, you really want apples that are firm and hold their shape well. My go-to choices are Honeycrisp, Fuji, Gala, or Granny Smith if you like a little tartness. They have a great crunch and don’t get mushy easily. Avoid softer apples because they can break apart or turn brown too quickly, and we want them to stay nice and crisp!
How do I store leftover Dipped Apple Slices on a Stick?
If, by some miracle, you have any leftovers, the best way to store them is in an airtight container in the refrigerator. Pop a piece of parchment paper or wax paper between the layers to prevent them from sticking to each other. They’ll hold up pretty well in the fridge for a couple of days, but honestly, they’re so good, they usually disappear way before that!
Can I substitute the chocolate or caramel?
Absolutely! Feel free to get creative. You can use milk chocolate chips instead of semi-sweet, or even white chocolate for the caramel ones if you like. Some people love using candy melts for brighter colors. For the caramel, you could certainly use a different brand of melting caramels or even homemade caramel sauce, just make sure it’s thick enough to coat the apple. The key is just to make sure whatever you use melts smoothly and sets up nicely!
Storing and Reheating Your Dipped Apple Slices on a Stick
So, you actually have some of these amazing Dipped Apple Slices on a Stick left over? That’s a rare treat! The best way to keep them tasting fantastic is to store them properly. Since they’re no-bake and have fresh fruit, the fridge is your best friend here. Just pop them into an airtight container. To make sure they don’t all stick together in a gooey mess, I like to lay down a sheet of wax paper or parchment paper, place the apple slices on top without them touching, and then add another layer of paper if I’m stacking them. They’re usually best enjoyed within a day or two for the freshest apple crunch!
| Storage Method | Timeframe | Notes |
|---|---|---|
| Airtight Container in Refrigerator | 1-2 days | Use parchment paper between layers to prevent sticking. |
Estimated Nutritional Information for Dipped Apple Slices on a Stick
Now, I gotta be upfront here – I’m not a nutritionist, and these numbers are definitely estimates. But when I make these Dipped Apple Slices on a Stick for parties or just for fun, I like to have a general idea of what we’re working with. They’re a treat, for sure, and honestly, the joy they bring is the most important part! But if you’re curious, here’s a rough breakdown of what you might find in one of these delightful little apple pops. Remember, the exact amounts can change quite a bit depending on your apple size and how much chocolate, caramel, and all those yummy toppings you load on! For more detailed nutritional information on apples, you can visit the USDA FoodData Central.
| Nutrient | Approximate Amount per Serving |
|---|---|
| Calories | 105 calories |
| Fat | 3 g |
| Saturated Fat | 3 g |
| Trans Fat | 0 g |
| Cholesterol | 2 mg |
| Sodium | 2.5 mg |
| Carbohydrates | 15 g |
| Fiber | 2 g |
| Sugar | 12 g |
| Protein | 1 g |

Delightful Dipped Apple Slices on a Stick Recipe
- Total Time: 15 minutes
- Yield: 16 servings 1x
- Diet: Vegetarian
Description
Enjoy these delightful Dipped Apple Slices on a Stick, a fun and easy treat perfect for any occasion. These no-bake delights are customizable with a variety of toppings, making them a hit with both kids and adults.
Ingredients
- 2 apples, cut into 8 slices each
- 16 white sucker sticks
- 2/3 cup semi-sweet chocolate chips
- 1 teaspoon coconut oil or vegetable shortening
- 2/3 cup white chocolate chips
- 1 teaspoon coconut oil or vegetable shortening
- 16 wrapped Kraft caramel candies
- 1 tablespoon water
- Chopped peanuts
- Crushed Oreos
- Shredded coconut
- Mini M&M’s
- Sprinkles
- Chopped pretzels
- Toasted pecans
- Raisins
- Dried cranberries
- Flakey salt
Instructions
- Prepare each topping by melting the chocolate chips or caramel candies with the specified oil or water in a small microwave-safe bowl. Microwave on high for about 60 seconds until melted. Stir until smooth.
- Insert a sucker stick into each apple slice. Dip the apple slices into your chosen topping.
- Place the dipped apple slices onto parchment or wax paper. Add your desired toppings while the coating is still wet.
- Refrigerate for about 10 minutes, or until the coatings are set.
Notes
- Ensure apple slices are completely dry before dipping. This helps the chocolate or caramel adhere properly to the apple.
- Prep Time: 10 minutes
- Cook Time: 5 minutes
- Category: Dessert
- Method: No Bake
- Cuisine: American
Nutrition
- Serving Size: 1 pop
- Calories: 105 calories
- Sugar: 2 g
- Sodium: 2.5 mg
- Fat: 3 g
- Saturated Fat: 3 g
- Unsaturated Fat: 0 g
- Trans Fat: 0 g
- Carbohydrates: 15 g
- Fiber: 2 g
- Protein: 1 g
- Cholesterol: 2 mg