Skip to content
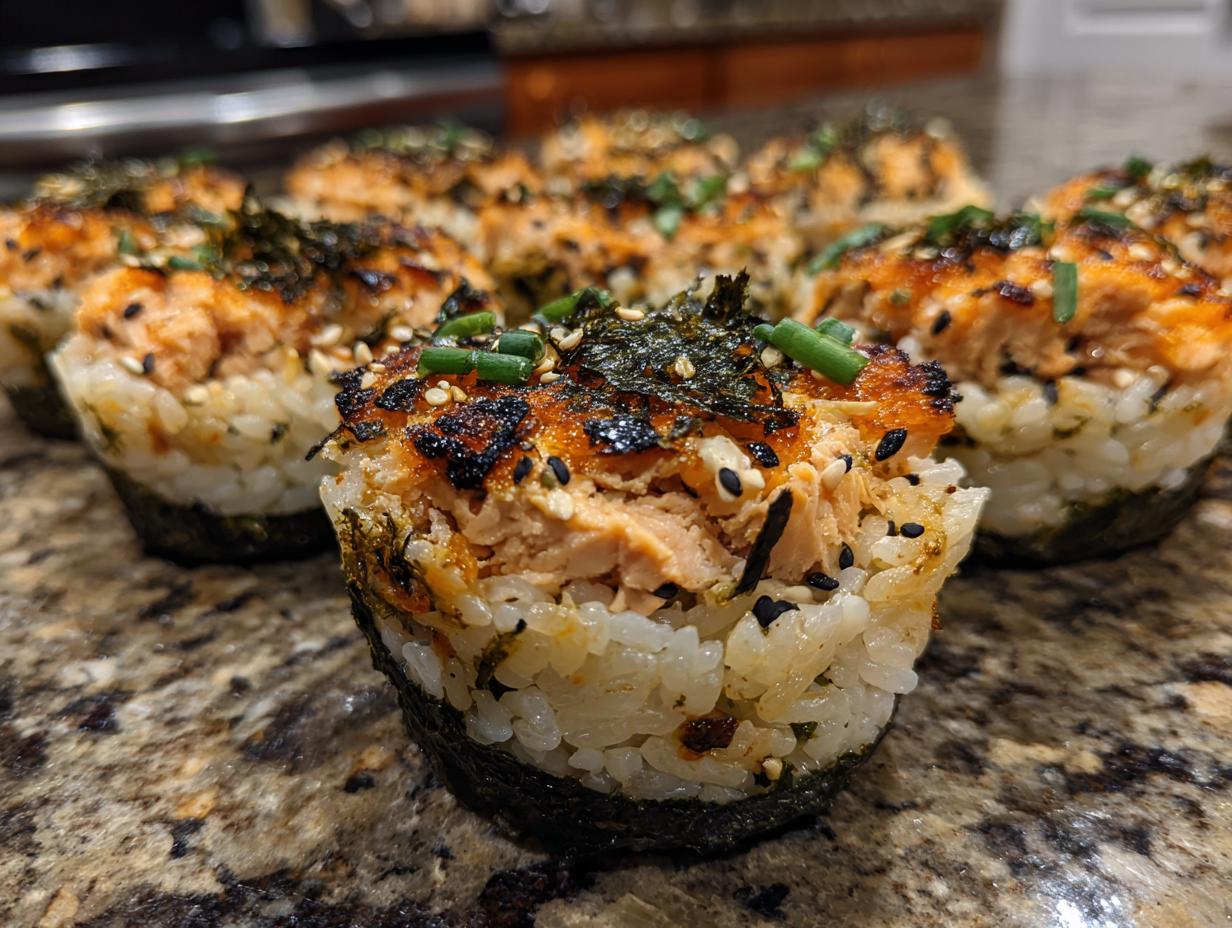
Hey there! Anna Kowalska here, your go-to for recipes that are made with heart and bursting with flavor. You know, I started this whole cooking journey because I truly believe that the best meals are the ones we make ourselves, with a little bit of love and a whole lot of taste. It’s all about sharing those tried-and-true homemade recipes that you and your family will absolutely adore. Today, we’re diving headfirst into something super fun and ridiculously tasty: Easy Baked Salmon Sushi Cups (Viral Recipe). If you’re looking for a way to get that amazing sushi flavor without all the fuss, you’ve come to the right place!
Honestly, finding recipes that are both incredibly delicious and genuinely simple to whip up can feel like searching for a needle in a haystack. That’s why I’m so excited about these baked salmon sushi cups. They’re a total game-changer, especially when you’re craving something a little special but don’t have hours to spend in the kitchen. Trust me, these little cups are going to be your new best friend for appetizers or even a quick, satisfying lunch.
Jump to:
Why You’ll Love This Easy Baked Salmon Sushi Cups (Viral Recipe)
You’re going to absolutely adore these baked salmon sushi cups, and honestly, it’s no wonder they went viral! They’re a total game-changer for anyone who loves sushi flavors but wants something super easy to make at home. Get ready for a recipe that’s as fun to make as it is to eat!
- Quick and Effortless Preparation: Seriously, these come together in a flash. Perfect for those nights when you want something delicious without spending hours in the kitchen.
- Irresistible Flavor Combination: You get that savory, slightly spicy salmon mixed with perfectly seasoned sushi rice, all wrapped up with a hint of crispy nori. It’s a flavor explosion in every bite!
- Perfect for Any Occasion: Whether you need a show-stopping appetizer for a party, a fun snack, or even a light and satisfying lunch, these cups hit the spot every single time.
- Visually Appealing Presentation: Baked in a muffin tin, these little cups look absolutely adorable and are sure to impress your guests. They’re almost too pretty to eat… almost!
Ingredients for Easy Baked Salmon Sushi Cups (Viral Recipe)
Okay, let’s talk about what you’ll need to make these amazing little sushi cups. Don’t worry, it’s all pretty straightforward! You’ll start with about a pound of salmon – I like to cube it into small, bite-sized pieces so it bakes up nicely. Then, for that incredible savory and spicy kick, we’ve got some pantry staples: 1 tablespoon of light soy sauce, 1 tablespoon of that wonderfully creamy Kewpie Mayo (it really makes a difference!), 1 tablespoon of sriracha for a little heat, and just a teaspoon of sesame oil for that nutty aroma. This is the magic mix for our salmon!
For the base, you’ll need about 1 ½ cups of uncooked sushi rice. Once that’s cooked up fluffy and perfect, we’ll toss it with a simple mixture of 1 tablespoon of rice vinegar and 2 teaspoons of white sugar, heated just enough to dissolve the sugar. And of course, we can’t forget the nori! You’ll need 3 large sheets, which we’ll cut up to fit into our muffin tin. Oh, and for that final flourish? A sprinkle of furikake and some chopped green onion for garnish. Don’t forget a little cooking spray to keep things from sticking!
| Ingredient | Quantity | Notes |
|---|---|---|
| Salmon | 1 lb | Cubed into bite-sized pieces |
| Light Soy Sauce | 1 tbsp | |
| Kewpie Mayo | 1 tbsp | Recommended for its creamy texture |
| Sriracha | 1 tbsp | Adjust to your spice preference |
| Sesame Oil | 1 tsp | For aroma and flavor |
| Sushi Rice | 1 ½ cups uncooked | Cooked according to package directions |
| Rice Vinegar | 1 tbsp | |
| White Sugar | 2 tsp | |
| Nori Sheets | 3 large | Cut into squares/rectangles for muffin tin |
| Furikake | For garnish | Optional, but delicious! |
| Green Onion | 1 stalk | Chopped, for garnish |
| Cooking Spray | As needed | To lightly grease the muffin tin |
Ingredient Notes and Substitutions
Let’s chat about a couple of these ingredients real quick! That Kewpie Mayo? It’s a Japanese mayonnaise that’s a little richer and tangier than the regular stuff, and it really makes the salmon mixture sing. If you absolutely can’t find it, you can try using regular mayonnaise and adding a tiny pinch of sugar and a splash of rice vinegar to it, but it won’t be quite the same. Totally understandable if you need to swap it out, though!
And the sriracha? That’s your heat level control! If you like it spicier, add a bit more. If you’re sensitive to heat, start with just a teaspoon or even omit it and just use a little extra mayo for moisture. For the furikake, it’s a Japanese seasoning blend that’s usually made with seaweed, sesame seeds, and a few other goodies. It adds a fantastic salty, umami flavor. If you don’t have it, don’t sweat it! A sprinkle of toasted sesame seeds and a tiny bit of salt will do in a pinch. Just remember, these little tweaks are all about making the recipe work for *you*!
How to Prepare Easy Baked Salmon Sushi Cups (Viral Recipe)
Alright, let’s get down to business and make these incredible baked salmon sushi cups! It’s really not as complicated as it sounds, and the payoff is SO worth it. We’re going to break it down step-by-step, so even if you’re new to sushi-making, you’ll nail it. First things first, the rice! You’ll want to cook your sushi rice according to the package directions. Make sure it’s nice and fluffy. While that’s going, grab a microwave-safe bowl and whisk together your rice vinegar and sugar. Pop it in the microwave for about 30 seconds, just until the sugar dissolves into that vinegar. Then, pour this sweet and tangy mixture over your hot, cooked rice and gently fold it in until everything is beautifully combined. This step is key for that authentic sushi rice flavor!
Now, let’s get that oven preheated to 400℉ (that’s 200℃). While the oven heats up, we’ll whip up our fabulous salmon topping. In a separate bowl, combine your cubed salmon with the soy sauce, Kewpie mayo, sriracha, and that lovely sesame oil. Give it all a good stir until every piece of salmon is coated in that delicious, creamy, spicy sauce. Set that aside for a moment – it’s going to be amazing!
Time to prep our nori! Take your three large nori sheets and carefully cut them into rectangles or squares. You want them big enough to line your muffin tin cups, so they create a nice little vessel for our sushi. Now, lightly spray your muffin tin with cooking spray. This is super important to make sure nothing sticks! Take a spoonful of your seasoned sushi rice and press it gently into the bottom of each nori square, then nestle that into a muffin tin cup. Repeat this until all your muffin cups are lined with rice. Then, spoon that glorious salmon mixture right on top of the rice in each cup, distributing it evenly.
Into the oven they go! Bake them at 400℉ for about 15 minutes. You’re looking for the salmon to be cooked through and the tops to get just a little bit golden and bubbly. Keep an eye on them; ovens can be a bit different! Once they’re done, carefully take them out of the oven and let them cool in the tin for a few minutes. This helps them set up a bit. Finally, the fun part: garnish! Drizzle a little extra sriracha or spicy mayo on top if you like it extra zesty, then sprinkle generously with furikake and your chopped green onions. Serve them up warm and watch them disappear!
| Step | Action |
|---|---|
| 1 | Cook sushi rice according to package directions. |
| 2 | In a microwave-safe bowl, combine rice vinegar and sugar. Microwave for 30 seconds until sugar dissolves. Pour over cooked rice and mix well. Set aside. |
| 3 | Preheat oven to 400℉ (200℃). |
| 4 | In a bowl, combine cubed salmon, soy sauce, Kewpie mayo, sriracha, and sesame oil. Mix until salmon is coated. Set aside. |
| 5 | Cut nori sheets into rectangles or squares large enough to fit muffin tin inserts. |
| 6 | Lightly grease muffin tin with cooking spray. Place a spoonful of sushi rice onto the center of each nori square, press down into the muffin tin insert. Repeat for all cups. Top rice with salmon mixture. |
| 7 | Bake at 400℉ (200℃) for 15 minutes, or until salmon is cooked through and tops are slightly golden. |
| 8 | Remove from oven, let cool for a few minutes. Drizzle with extra sriracha or spicy mayo. Garnish with furikake and chopped green onions. Serve immediately. |
Cooking the Sushi Rice
Getting the sushi rice just right is really the foundation of these cups. Make sure you use sushi rice specifically, as it has the right starch content to get that slightly sticky, perfect texture. After cooking it according to the package, the key is that seasoned vinegar mixture. Heating the rice vinegar and sugar just until the sugar dissolves is important – you don’t want to boil it! Pouring that warm mixture over the hot rice and gently folding it in with a rice paddle or spatula helps it get absorbed evenly. Don’t mash the rice; be gentle! You want distinct grains that are seasoned but not mushy.
Preparing the Savory Salmon Mixture
This is where we get all that fantastic flavor packed in! Cubing the salmon into small, bite-sized pieces ensures that each spoonful has a good amount of salmon and it cooks up quickly and evenly. The combination of Kewpie mayo, soy sauce, sriracha, and sesame oil is just *chef’s kiss*. The mayo makes it creamy and rich, the soy sauce adds that salty umami depth, the sriracha brings the heat, and the sesame oil gives it that wonderful nutty fragrance. Just mix it all together until the salmon is well-coated. It’s so simple, but the flavor is incredible!
Assembling the Sushi Cups
This part is super fun and really brings the whole idea together! Make sure your nori pieces are large enough to line the muffin tin cups. You want them to go up the sides a bit to hold everything in. Pressing the seasoned rice into the nori and then into the tin helps create a sturdy base. Don’t pack it down too hard, just enough so it holds its shape. Then, pile on that delicious salmon mixture. Make sure you distribute it evenly so every cup gets a good helping of that savory topping. It’s starting to look like something special already!
Baking to Perfection
Baking these in a hot oven (400℉!) for just about 15 minutes is the magic step. This cooks the salmon through beautifully and gives the edges of the nori and rice a lovely slight crispness. You’re looking for the salmon to flake easily with a fork and for the tops to be just lightly browned. It’s important not to overbake them, or the salmon can get a little dry, but you definitely want to ensure it’s fully cooked. The muffin tin helps them hold their shape perfectly while they bake.
Finishing Touches and Garnishing
The garnishes are what really take these from delicious to dazzling! After they’ve cooled just slightly, a little drizzle of extra sriracha or spicy mayo adds another layer of flavor and visual appeal. Then comes the sprinkle of furikake – oh, that stuff is addictive! It adds texture and a fantastic savory, seaweedy flavor. And of course, the fresh green onions add a pop of color and a nice fresh bite. These little finishing touches make these baked salmon sushi cups look and taste absolutely restaurant-worthy!
Tips for Perfect Easy Baked Salmon Sushi Cups (Viral Recipe)
Alright, let’s make sure your Easy Baked Salmon Sushi Cups turn out absolutely perfect every single time! It’s all about a few little tricks that make a big difference. Don’t stress if it’s your first time; these tips will have you feeling like a pro in no time. I’ve made these so many times, and a few things just really help them shine!
Achieving the Right Rice Texture
The rice is the foundation, so we want it just right! Make sure you’re using actual sushi rice – it’s designed to be a little sticky, which is exactly what we need. Cook it according to the package, and don’t skimp on seasoning it with that vinegar and sugar mix while it’s still hot. That step is crucial for flavor. When you’re pressing the rice into the nori and the muffin tin, be gentle but firm enough so it holds its shape. You don’t want it mushy, but it needs to stick together!
Ensuring Even Salmon Cooking
We want that salmon perfectly cooked, tender, and flaky, not dry. Cubing the salmon into roughly the same size pieces helps a lot with even cooking. Make sure each piece gets a good coating of that delicious sauce so it doesn’t dry out in the oven. When you bake them, keep an eye on them after about 12 minutes. If the salmon flakes easily with a fork, it’s usually done. Remember, the oven temp is 400℉, which is pretty hot, so they cook fast!
Nori Sheet Handling
Nori sheets can be a little delicate, so handle them with care. Cutting them into pieces that are just the right size to fit into your muffin tin cups is key. You want them to line the cups nicely without too much overlap or too little coverage. If you find your nori is a bit too stiff, you can lightly toast it over a low flame for a few seconds – this makes it more pliable and a little crispier, which is lovely! Just don’t let it burn!
Serving Suggestions
These Easy Baked Salmon Sushi Cups are so versatile, they can fit right into almost any meal plan! They’re fantastic on their own, but pairing them with a few other goodies can make them even more special. Think of them as the star of the show, but they love having supporting actors!
Appetizer Pairings
If you’re serving these as part of a larger appetizer spread, they’re going to be a huge hit! You could pair them with some simple edamame, maybe a clear vegetable broth soup, or even some crispy tempura vegetables. A light, tangy dipping sauce on the side, like a ginger-sesame vinaigrette, would also be lovely. They’re just so easy to pop into your mouth while you’re mingling!
Light Meal Companions
Want to turn these into a more substantial lunch or a light dinner? They’re perfect! I love serving them alongside a simple cucumber and avocado salad dressed with a rice vinegar and soy sauce dressing. A small bowl of miso soup is also a wonderful accompaniment. You could even add some pickled ginger and wasabi to the plate for that authentic sushi experience. They make a surprisingly filling and healthy light meal!
Storage and Reheating Instructions
These Easy Baked Salmon Sushi Cups are truly best enjoyed fresh, right out of the oven when they’re warm and the nori is still a little crisp. However, if you happen to have any leftovers (which is rare in my house!), you can store them in an airtight container in the refrigerator for up to 1-2 days. Just be aware that the nori will soften a bit over time, which is totally normal for sushi-style dishes stored this way.
When you’re ready to reheat, the microwave is your friend for speed, but it can make the nori a bit soggy. Just pop a cup or two in for about 20-30 seconds until warmed through. For a slightly better texture, you can try reheating them in a toaster oven or a regular oven at a low temperature (around 300℉) for about 5-7 minutes, just until warmed through. This helps crisp up the edges a bit more. Enjoy your delicious leftovers!
| Method | Duration | Notes |
|---|---|---|
| Refrigerator | 1-2 days | Store in an airtight container. Nori will soften. |
| Microwave Reheating | 20-30 seconds | Quick but may soften nori. |
| Oven/Toaster Oven Reheating | 5-7 minutes at 300℉ | Helps crisp up edges slightly. |
Frequently Asked Questions About Easy Baked Salmon Sushi Cups (Viral Recipe)
Got questions about these super fun baked salmon sushi cups? I totally get it! Making a recipe for the first time can bring up a few things, and I’m here to help clear them up so you can make these viral wonders perfectly. These little cups are so popular for a reason, and I want to make sure you have all the info you need!
Can I use raw salmon?
For these specific baked salmon sushi cups, we really want to use cooked salmon. The recipe calls for baking the cups to cook the salmon through, and starting with raw salmon might lead to uneven cooking or food safety concerns if it doesn’t get cooked properly in the short baking time. Plus, the baked salmon mixture has this amazing savory flavor that’s different from raw sushi-grade salmon. Stick to cooked salmon for the best and safest results!
What if I don’t have Kewpie Mayo?
Oh, Kewpie mayo is special, but don’t worry if you can’t find it! You can definitely substitute regular mayonnaise. To get a similar tanginess, try mixing in about half a teaspoon of rice vinegar and a tiny pinch of sugar into your regular mayo. It won’t be exactly the same, but it’ll give you a similar creamy, slightly tangy base for your salmon mixture. Just adjust to your taste!
How long do these cups last?
These baked salmon sushi cups are absolutely best when they’re fresh and warm from the oven. If you do have leftovers, they’ll keep in an airtight container in the refrigerator for about 1 to 2 days. Just a heads-up, the nori will soften up quite a bit the longer they sit, which is pretty normal for any sushi-style dish that’s been refrigerated. They’re still tasty, though!
Can I make these ahead of time?
You can do a little prep ahead of time, which is always a lifesaver! You can cook and season the sushi rice a few hours in advance and let it cool. You can also mix up the salmon mixture and keep it covered in the fridge. However, I wouldn’t assemble the cups and bake them until you’re ready to serve them. The magic is really in that fresh bake, especially for the nori and the warm rice. They’re quick to assemble and bake, so just doing the components ahead is usually the best bet!
Nutritional Information
Please keep in mind that these nutritional values are estimates and can vary based on exact ingredient brands and portion sizes. They’re a good general idea of what you’re getting in each delicious baked salmon sushi cup!
| Metric | Amount |
|---|---|
| Serving Size | 1 cup |
| Calories | 250 |
| Fat | 10g |
| Saturated Fat | 3g |
| Unsaturated Fat | 7g |
| Trans Fat | 0g |
| Carbohydrates | 30g |
| Fiber | 2g |
| Sugar | 5g |
| Protein | 15g |
| Sodium | 300mg |
| Cholesterol | 50mg |

Viral Cups: 5-Star Baked Salmon Sushi
- Total Time: 35 minutes
- Yield: 12 servings 1x
- Diet: Vegetarian
Description
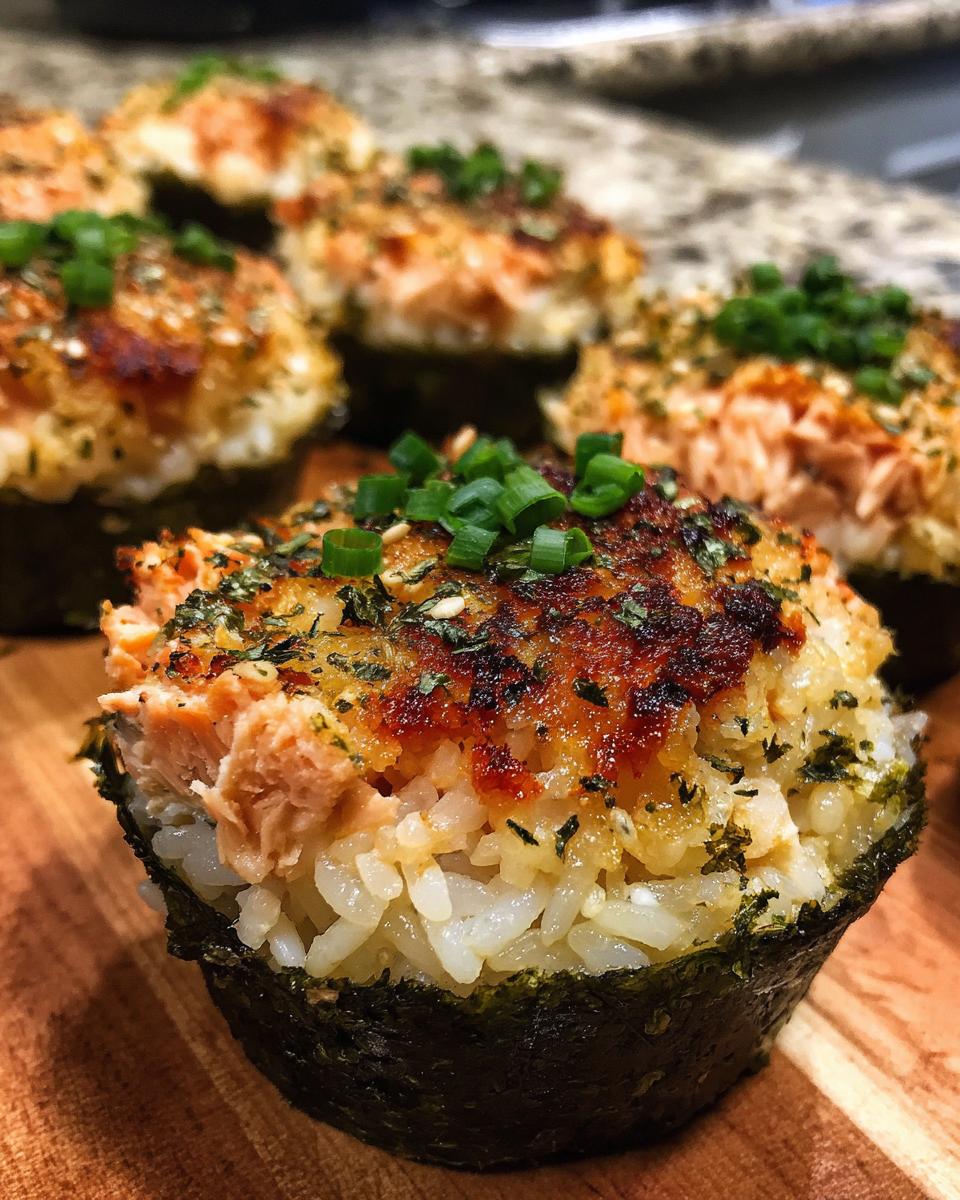
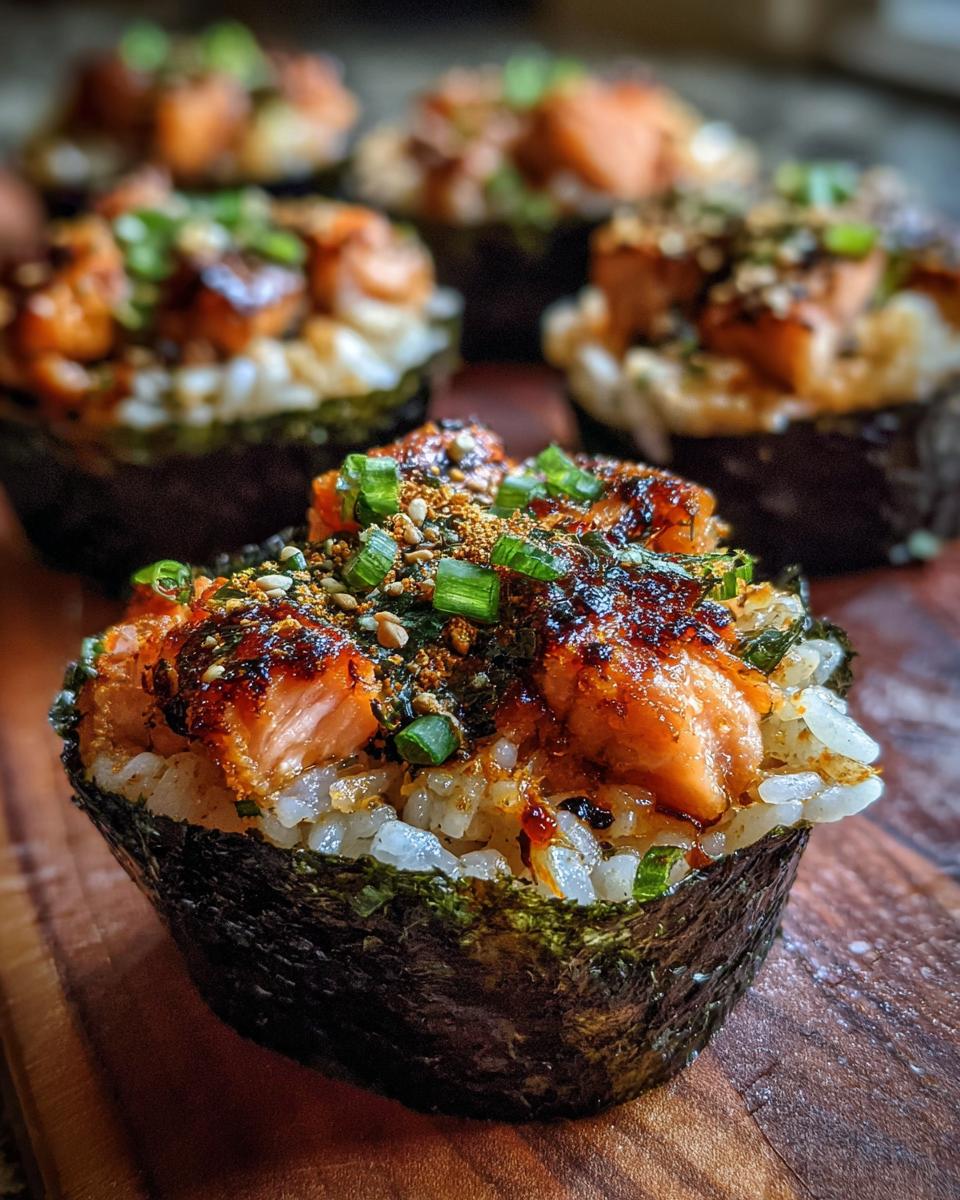
Easy Baked Salmon Sushi Cups (Viral Recipe) are a fun and delicious way to enjoy sushi flavors at home. These bite-sized cups feature seasoned sushi rice, a savory baked salmon mixture, and crispy nori, all baked in a muffin tin. They are perfect as an appetizer or a light meal.
Ingredients
- 1 lb salmon, cubed
- 1 tbsp light soy sauce
- 1 tbsp Kewpie Mayo
- 1 tbsp Sriracha
- 1 tsp sesame oil
- 1 ½ cup uncooked sushi rice
- 1 tablespoon rice vinegar
- 2 teaspoon white sugar
- 3 large nori sheets
- furikake, for garnish
- 1 green onion, for garnish
- cooking spray
Instructions
- Cook sushi rice according to package instructions.
- In a microwave-safe bowl, combine rice vinegar and sugar. Microwave for about 30 seconds, or until the sugar is dissolved. Pour the vinegar mixture over the cooked rice and mix until well combined. Set aside while you prepare the salmon mixture.
- Preheat the oven to 400℉.
- In a bowl, combine diced or cubed salmon, soy sauce, Kewpie mayo, sriracha, and sesame oil. Mix until well combined. Set aside.
- Cut the nori sheets into 4 rectangles or squares, large enough to fit into the muffin tins.
- Lightly grease the muffin tin with cooking spray. Add a spoonful of sushi rice onto the center of each nori square, then press it down lightly into each muffin tin insert. Repeat until the muffin tin is full. Then add a layer of salmon mixture on top of the rice.
- Bake in the oven at 400℉ for 15 minutes, or until the salmon is cooked through and the tops are slightly golden brown.
- Remove the sushi cups from the oven and let them cool for a few minutes. Drizzle some more sriracha or spicy mayo on top. Garnish with furikake and chopped green onions. Serve immediately and enjoy!
Notes
- Ensure salmon is fully cooked before removing from the oven.
- Adjust sriracha to your spice preference.
- These cups are best served fresh.
- Prep Time: 20 minutes
- Cook Time: 15 minutes
- Category: Appetizer
- Method: Baking
- Cuisine: Japanese-inspired
Nutrition
- Serving Size: 1 cup
- Calories: 250
- Sugar: 5g
- Sodium: 300mg
- Fat: 10g
- Saturated Fat: 3g
- Unsaturated Fat: 7g
- Trans Fat: 0g
- Carbohydrates: 30g
- Fiber: 2g
- Protein: 15g
- Cholesterol: 50mg