Skip to content
Hello there! I’m Anna Kowalska, and here I share tried-and-true homemade recipes that you and your family will absolutely love. Everything I put out here is made with heart and flavor, guaranteed! I started this little corner of the internet because I realized that too many recipes out there require you to be a professional chef, but honestly, good food shouldn’t be complicated.
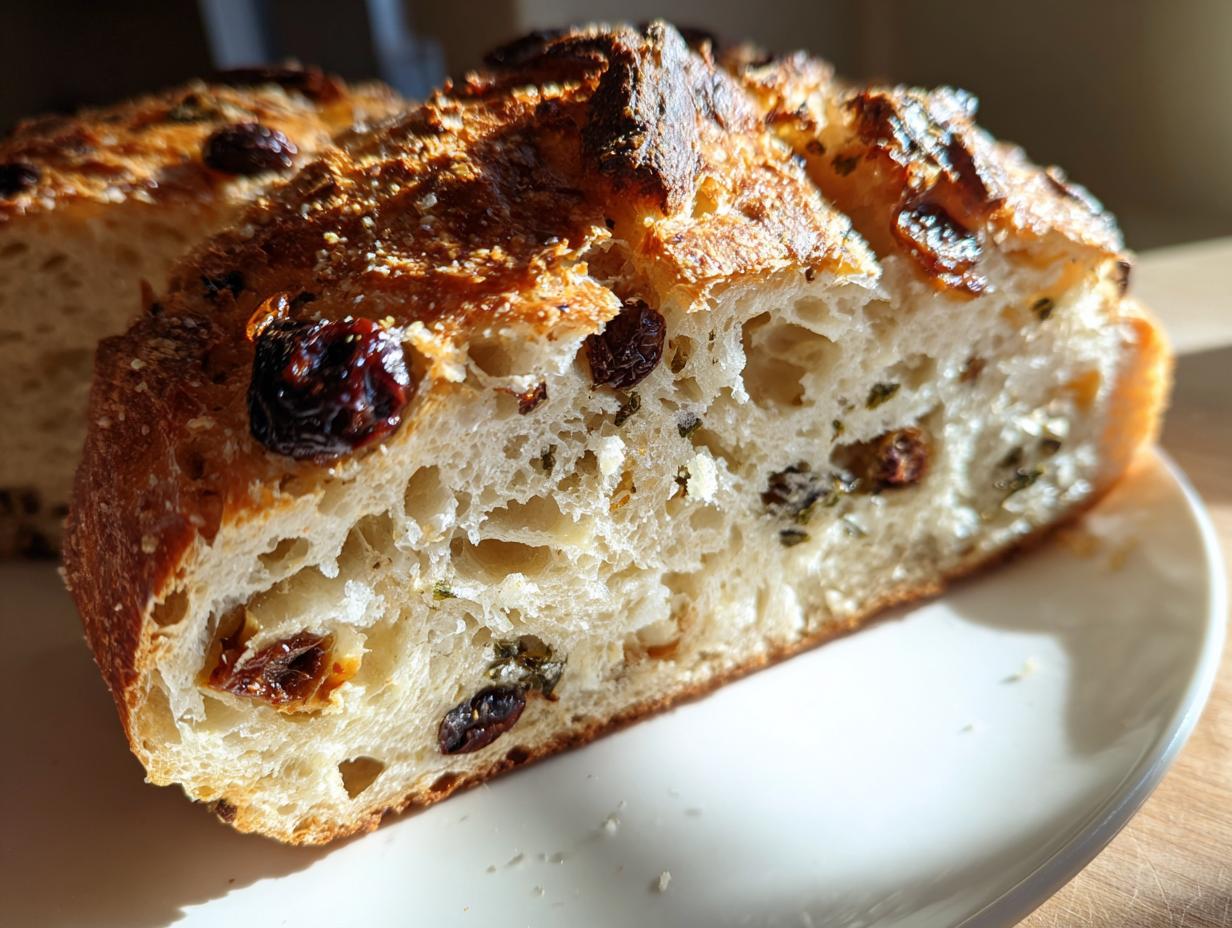
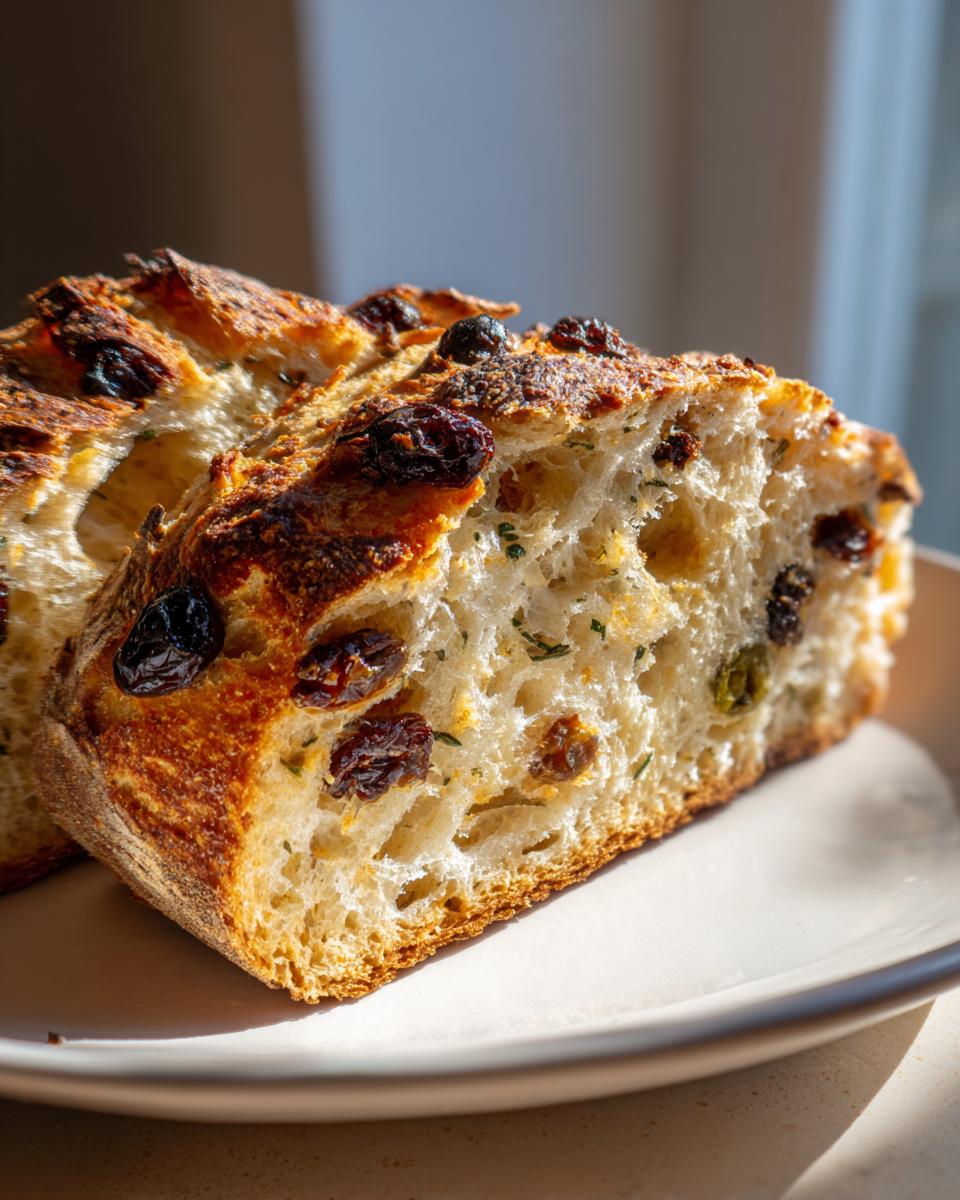
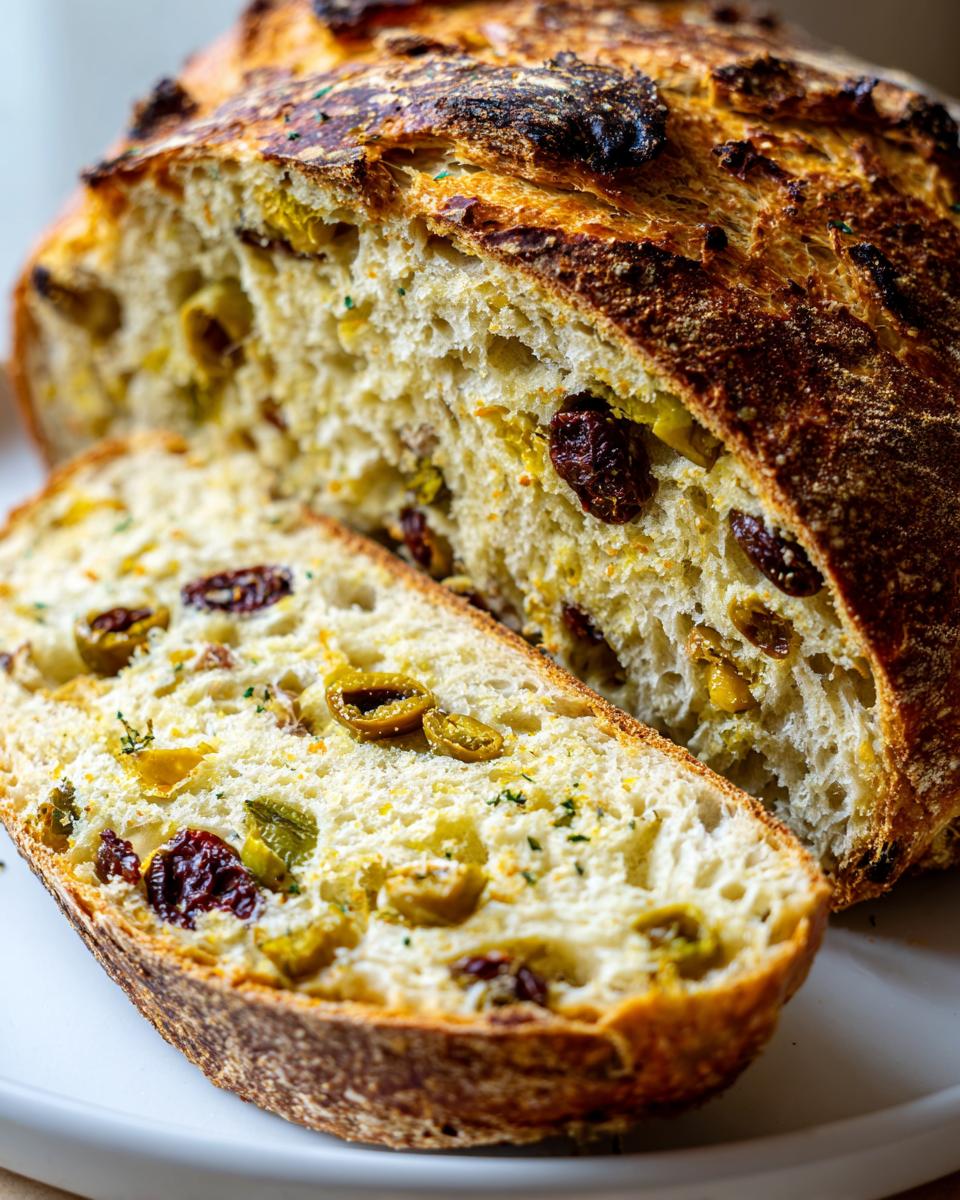
I want to show you that incredible, flavorful results don’t need fussy techniques. That’s why I’m so excited to share my secrets for the Easy No-Knead Olive Bread. This loaf—crusty on the outside, perfectly tangy on the inside—is the bread that convinced me no-knead was the best thing to ever happen to my weeknights.
Why This Easy No-Knead Olive Bread Changes Weeknight Baking
If you think baking bread means spending an hour kneading dough after a long day, think again! That’s the magic of the Easy No-Knead Olive Bread. Seriously, you just mix it up, walk away, and come back to this incredible, rustic loaf.
The best part? All those salty, delicious olives mixed right in! It’s got that gorgeous, crackly crust you usually have to fight for, but here, the long, slow rise does all the hard work for you. It’s my absolute go-to when I want something that tastes like I spent all day fussing over it, but really, it took maybe ten minutes of actual effort. Trust me, once you taste this bread warm from the oven, you won’t look back!
Jump to:
Gathering What You Need for Easy No-Knead Olive Bread
Okay, friend, the beauty of this recipe is that it uses pantry staples plus some lovely olives. You don’t need fancy equipment, which is why I love teaching this Easy No-Knead Olive Bread. It’s about simplicity! Lay everything out before you start mixing so you can just dump and stir. It makes the whole process feel like a breeze.
Essential Ingredients for Your Easy No-Knead Olive Bread
For the best results in this amazing Easy No-Knead Olive Bread, try to stick close to these measurements, especially the water temperature. It really matters for waking up that yeast!
- You’ll need about three and a quarter cups of bread flour. If you only have all-purpose, that’s okay, but bread flour gives you that chewy texture we’re aiming for!
- Two teaspoons of instant yeast and two teaspoons of coarse salt. Please use the coarse stuff; fine table salt is too strong here.
- For that Mediterranean flavor, grab two teaspoons of dried oregano and one and a half teaspoons of garlic powder.
- The star of the show: one heaping cup of roughly chopped olives. Use whatever kind you love—Kalamata, green, whatever!
- One and a half cups of water, and this is important—make sure it’s only close to room temperature, around 70°F.
Necessary Equipment for Baking Success
Don’t panic if you don’t have a Dutch oven; I’ve given alternatives for the crusty finish! Safety first when we get near that hot oven, alright?
- A large mixing bowl—we aren’t using a stand mixer here, nope!
- A spatula or sturdy spoon for mixing that sticky batter.
- Plastic wrap or foil to cover the bowl tightly for the rise.
- A large nonstick baking sheet, or parchment paper if your sheet isn’t nonstick.
- A sharp knife or those kitchen shears for scoring the top right before baking.
- An instant-read thermometer is super helpful for checking doneness, though I’ll show you the hollow tap test too!
Step-by-Step Guide to Perfect Easy No-Knead Olive Bread
Now for the magic part—which is mostly waiting, honestly! This process is so simple, it feels almost wrong how good the final Easy No-Knead Olive Bread tastes. Just follow these steps, and you’ll have that beautiful rustic loaf.
Mixing the Dough and Adding Olives
First things first, grab that large bowl you set aside. Whisk together all your dry ingredients: the flour, the yeast, the salt, oregano, and garlic powder. Make sure they are really well combined so you don’t end up with a pocket of pure salt somewhere! Next, toss in those chopped olives. I like to stir them around a bit with the dry mix so they get coated in flour and don’t all sink to the bottom later.
Pour in your room-temperature water. Now, this is where you need to embrace the mess! Use your spatula or a sturdy spoon and just gently mix until you don’t see any dry streaks of flour left. Don’t try to knead it in the bowl; we aren’t doing that here! The dough will be incredibly sticky—I mean, really wet and floppy. That’s exactly what we want. Use your hands briefly, just to coax it into one shaggy ball in the center of the bowl. That’s it for mixing! Don’t overwork it; we want that sticky texture for an open crumb.
The Crucial Rise Times for Easy No-Knead Olive Bread
Cover that bowl tightly. I mean *tightly*—plastic wrap pulled snug or heavy-duty foil. We need to trap all the moisture and warmth inside. Let it sit on your counter at room temperature for about two to three hours. You are looking for it to double in size and see lots of gorgeous air bubbles popping up on the surface. This initial rise is fast and builds up the yeast activity.
But here’s the real secret to deep, complex flavor in your Easy No-Knead Olive Bread: the cold rest! After the initial rise, pop the whole covered bowl right into the refrigerator. Let it chill for at least 12 hours, but honestly, if you can let it go for 24 or even 48 hours, the flavor gets so much better and more developed. It’s fantastic for planning ahead!
Shaping and Final Proofing
When you’re ready to bake, grab your baking sheet and dust it lightly with flour and maybe a little cornmeal if you have it—that gives the bottom a nice crunch. Turn that cold, jiggly dough out onto a floured counter. It won’t feel like normal dough; it’ll be slack. Just gently shape it into a rough ball. It’s okay if it spreads out a little; just guide it onto your prepared sheet.
Cover it loosely—a clean kitchen towel works great—and let it rest for 45 minutes. This is the final proof, or *rest*, before the oven gets hot. While it’s resting, crank your oven up to 425°F (218°C)! Don’t forget that high heat is essential. For more on the science behind high-heat baking, check out this guide on bread baking science.
Achieving the Golden Crust: Baking Your Easy No-Knead Olive Bread
When the 45 minutes are up, take a very sharp knife or some sturdy kitchen shears and score the top. A single slash about a half-inch deep across the top lets the steam escape nicely. If the dough flattened a bit during the rest, just gently tuck the edges under to give it a bit more shape before baking.
For the absolute crispest crust on your Easy No-Knead Olive Bread, put a shallow metal pan on the bottom rack while the oven preheats. Right before you slide the bread in, carefully pour 3 or 4 cups of boiling water into that bottom pan—watch out for the steam! Place the bread on the center rack and bake for 35 to 40 minutes. You’re looking for a deep golden brown color. If you have a thermometer, aim for 195°F inside, or just tap the bottom—if it sounds hollow, it’s done! Let it cool for at least 10 minutes before you slice into that beautiful loaf. If you are looking for other great bread recipes, you might enjoy my Cebularz Lubelski.
Tips for Flavorful Easy No-Knead Olive Bread
I love sharing the little tricks that take this bread from good to absolutely incredible. Since we aren’t kneading, we have to rely on quality ingredients and letting time do the heavy lifting for us. These tips will ensure your Easy No-Knead Olive Bread always comes out tasting like it came from a real artisan bakery.
Flour and Yeast Substitutions
While bread flour is my absolute favorite because it gives such a satisfying chew, don’t stress if you only have all-purpose flour—it works just fine as a one-to-one swap. Just know the texture might be slightly softer. If you use active dry yeast instead of instant, you might need to give that first rise a little extra time to get going. Also, please, if you use fine table salt, cut that amount down right away, or your Easy No-Knead Olive Bread will be way too salty! Understanding the role of yeast is key to successful baking; you can read more about how yeast works here.
Enhancing Flavor with Temperature and Time
This is where we really build that complex, tangy flavor in the dough. If you’re in a rush, the 2-hour counter rise is fine, but honestly, you miss out on so much depth. My biggest tip for the best Easy No-Knead Olive Bread is to push that cold fermentation! Letting the dough hang out in the fridge for 24 to 48 hours lets the yeast and bacteria slowly work on the flour, creating those wonderful sour notes that make rustic bread so addictive. Don’t skimp on the chilling time if you can help it!
Addressing Common Questions About This Bread
I get so many questions about this bread because it feels almost too easy to be true! People always worry when the dough doesn’t look like the smooth, elastic dough they see in traditional baking videos. Don’t fret; this is where the no-knead method shines!
Can I make Easy No-Knead Olive Bread Dough ahead of time?
Yes, you absolutely can! That’s one of the huge benefits of the Easy No-Knead Olive Bread recipe. Once you finish the initial 2 to 3-hour rise on the counter, cover the bowl tightly and stick it right into the fridge. It’s happy chilling there for up to three days. This makes it perfect for busy weekends—you can mix it Friday night and bake it Sunday morning without any rush. Just bring it back to room temperature for that final 45-minute rest before baking. If you are interested in other make-ahead recipes, check out my Breakfast Rolls.
What is the best way to store leftover olive bread?
This bread is truly best the day it’s baked, but leftovers are great too! I never keep it in the fridge because that dries it out fast. Just wrap the cooled loaf loosely in a clean kitchen towel or maybe a paper bag and leave it on the counter for up to three days. If it gets a little stale, just sprinkle it with water and pop it in a 350°F oven for five minutes. That steam brings the crust right back to life!
Why is my dough so sticky?
This is by design! If your dough isn’t sticky, you’ve probably added too much flour. For the Easy No-Knead Olive Bread, you want a very high-hydration dough—meaning lots of water relative to the flour. This wetness is what creates those big, open air pockets when it bakes, giving you that gorgeous, rustic crumb. Don’t add extra flour to make it manageable; just use a bench scraper and a floured surface to handle it when you shape it!
Storing and Reheating Your Homemade Bread
It’s important to treat this lovely loaf right after you’ve gone to the effort of baking it! Since this bread doesn’t have preservatives, how you store it makes a huge difference in how long it stays delicious. I find that reheating even slightly stale bread turns it back into something amazing.
Table of Storage and Reheating Guidelines
Keep this little chart handy so you know exactly how to keep your loaf perfect:
| Storage Location | How to Store | Longevity | Best Reheating Method |
|---|---|---|---|
| Room Temperature | Loosely covered with a towel or in a paper bag | Up to 3 days | Sprinkle with water, bake at 350°F for 5 minutes |
| Refrigerator | Wrapped tightly (use sparingly, as it dries faster) | Up to 1 week | Sprinkle with water, bake at 350°F for 8-10 minutes |
| Freezer | Wrap tightly in plastic wrap, then foil | Up to 3 months | Thaw overnight in fridge, then reheat as above |
Sharing Your Experience with Easy No-Knead Olive Bread
I truly hope this recipe brings that wonderful bakery smell right into your kitchen! I pour so much love into these simple recipes, and hearing from you makes it all worthwhile. Did you let yours cold-ferment for 48 hours? Let me know how your Easy No-Knead Olive Bread turned out in the comments below. I absolutely love seeing your crusty loaves!
Print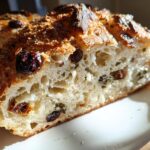
Amazing Easy No-Knead Olive Bread 12-hour rise
- Total Time: 3 hours 45 minutes (includes 3 hours initial rise)
- Yield: 1 loaf 1x
- Diet: Vegetarian
Description
This Easy No-Knead Olive Bread recipe delivers a flavorful loaf with minimal effort. You mix the ingredients, let the dough rest, and bake. The result is a crusty bread studded with olives and seasoned with oregano and garlic.
Ingredients
- 3 and 1/4 cups (about 430g) bread flour, plus more as needed
- 2 teaspoons instant or active dry yeast
- 2 teaspoons coarse salt
- 2 teaspoons dried oregano
- 1 and 1/2 teaspoons garlic powder
- 1 heaping cup (about 135g) roughly chopped olives
- 1 and 1/2 cups (360ml) water, close to room temperature (about 70°F or 21°C)
- Optional: cornmeal for dusting pan
Instructions
- In a large un-greased mixing bowl, whisk the flour, yeast, salt, oregano, and garlic powder. Mix in the olives with a spatula or spoon. Pour in the water and gently mix until all flour is moistened. Work the sticky dough into a ball in the bowl by hand.
- Cover the bowl tightly with plastic wrap or foil. Let the dough rise at room temperature for 2-3 hours until it doubles in size and shows many air bubbles.
- For best flavor, refrigerate the covered dough for at least 12 hours and up to 3 days.
- Lightly dust a large nonstick baking sheet with flour and/or cornmeal. Turn the dough onto a floured surface and shape it into a ball. Transfer the sticky dough to the prepared baking sheet. Loosely cover and let the dough rest for 45 minutes.
- During the 45-minute rest, preheat your oven to 425°F (218°C).
- When ready, use a sharp knife or shears to score the dough with a slash or an X about 1/2 inch deep. Reshape the loaf if it flattened during resting.
- Optional: For a crispier crust, place a shallow metal or cast iron pan on the bottom rack. Carefully pour 3-4 cups of boiling water into it just before baking.
- Place the scored dough on the center rack. Bake for 35-40 minutes until the crust is golden brown and a thermometer reads 195°F (90°C) in the center, or it sounds hollow when tapped.
- Remove the bread from the oven. Cool for 10-20 minutes before slicing and serving. Store leftovers loosely covered at room temperature for up to 3 days or refrigerated for up to 1 week.
Notes
- The dough can rest in the refrigerator for up to 3 days, making this recipe great for planning ahead.
- Baked bread can be cooled, wrapped, and frozen for up to 3 months. Thaw in the refrigerator and bring to room temperature before serving.
- To freeze the dough, complete up to step 3, wrap well, and freeze up to 3 months. Thaw overnight in the refrigerator or for 2-3 hours at room temperature, then continue from step 4.
- Bread flour gives the best texture, but a 1:1 substitution with all-purpose flour works. Avoid whole wheat flour if possible, or substitute up to 1 cup.
- Use instant yeast for faster rising. If using active dry yeast, the rise time in step 2 might increase.
- Use coarse salt; if you use fine table salt, reduce the amount to 1 and 1/2 teaspoons.
- You can substitute fresh oregano or other dried herbs. Use minced fresh or roasted garlic instead of garlic powder.
- If using a Dutch oven, preheat the pot with the lid inside at 425°F (218°C) for 30 minutes. Place dough on parchment paper, put it inside the hot pot, cover, and bake 30 minutes with the lid on, then 10 minutes uncovered.
- If using a pizza stone, preheat the stone in the oven. Dust the hot stone with cornmeal or flour before transferring the shaped dough onto it. Bake as directed.
- If you lack a nonstick pan, line a baking sheet with parchment paper and dust with flour/cornmeal. Check the parchment paper’s heat tolerance.
- Prep Time: 15 minutes
- Cook Time: 35-40 minutes
- Category: Bread
- Method: No-Knead, Baking
- Cuisine: American
Nutrition
- Serving Size: 1 slice
- Calories: Not specified
- Sugar: Not specified
- Sodium: Not specified
- Fat: Not specified
- Saturated Fat: Not specified
- Unsaturated Fat: Not specified
- Trans Fat: Not specified
- Carbohydrates: Not specified
- Fiber: Not specified
- Protein: Not specified
- Cholesterol: Not specified