Skip to content
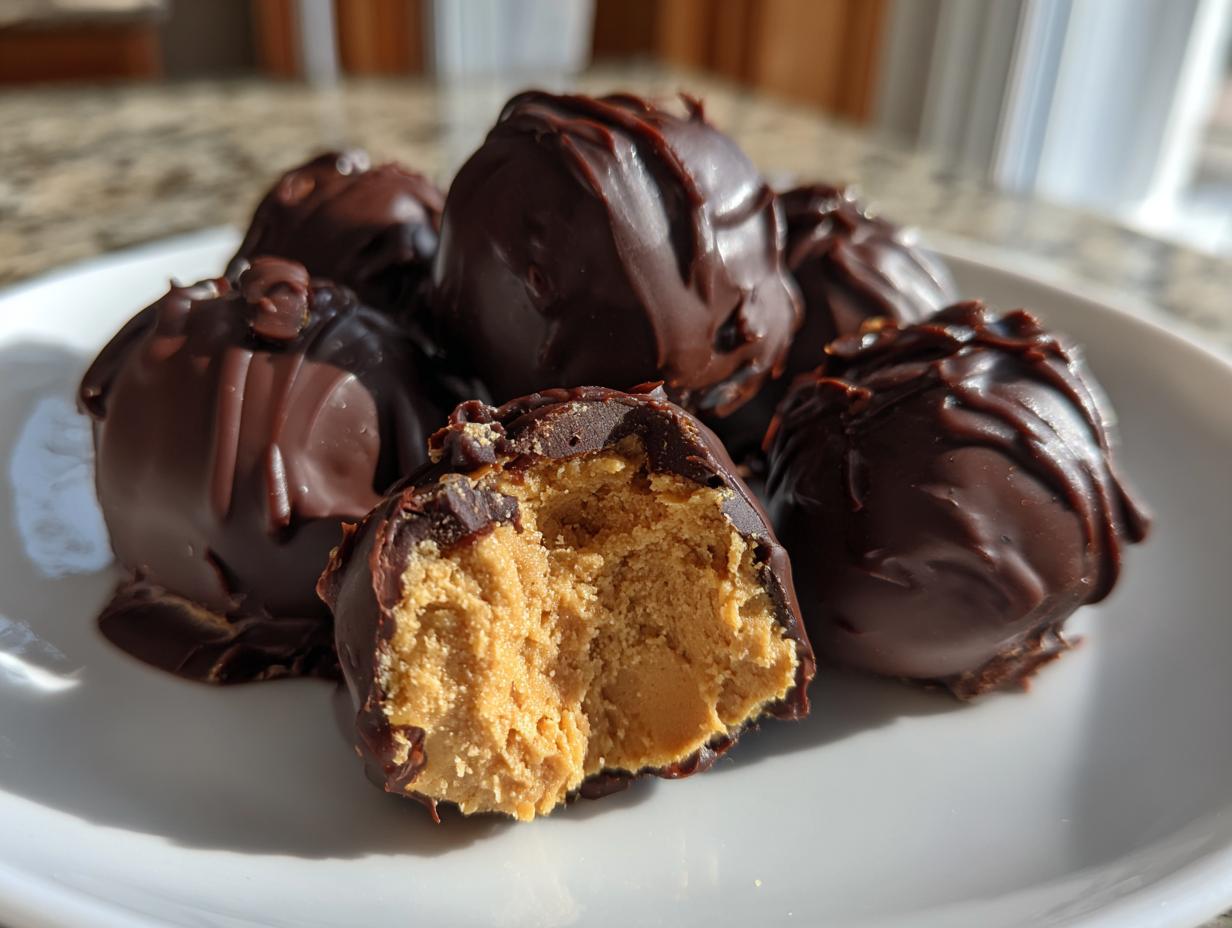
If you are ever in that desperate need for something sweet, something rich, and something that takes practically zero oven time, then listen up! We are talking about the absolute king of no-bake desserts: perfect **peanut butter balls**. Seriously, these things come together faster than you can decide what movie to watch. My name is Anna Kowalska, and here I share tried-and-true homemade recipes that you and your family will love. Everything I post is made with heart and flavor, and I promise these treats deliver on both counts.
I know life gets busy, and sometimes you just need that instant gratification that only a chocolate-peanut butter combination can provide. That’s why I’ve refined this recipe over the years to be the quickest, richest version possible. You don’t need fancy equipment or hours of waiting.
This simple recipe for **peanut butter balls** is your answer when company shows up unexpectedly or when that 3 PM craving hits hard. Trust me, once you master this basic ratio, you’ll be making these all the time!
Jump to:
Why You’ll Love These peanut butter balls
Honestly, these are the easiest, most satisfying treats I keep in my freezer rotation. They hit that perfect spot between salty and sweet, and the best part? No oven required! You can whip these up while the coffee is brewing. They are a total lifesaver when you need a crowd-pleaser fast.
- No-Bake Magic: Forget preheating! We mix, chill, and dip. It’s that simple.
- Few Ingredients: You probably have everything in your pantry right now.
- Rich Flavor: That classic combination of creamy peanut butter and sweet chocolate is unbeatable.
- Perfect Size: They are perfectly portioned little bites of heaven.
Quick Assembly and Minimal Effort
The active time for these peanut butter balls is maybe twenty minutes total. You stir the dough, roll the balls, and then the refrigerator and freezer do all the hard work for you. It’s the ultimate low-stress dessert, perfect for weeknights or last-minute holiday baking.
Flavor Profile of Our peanut butter balls
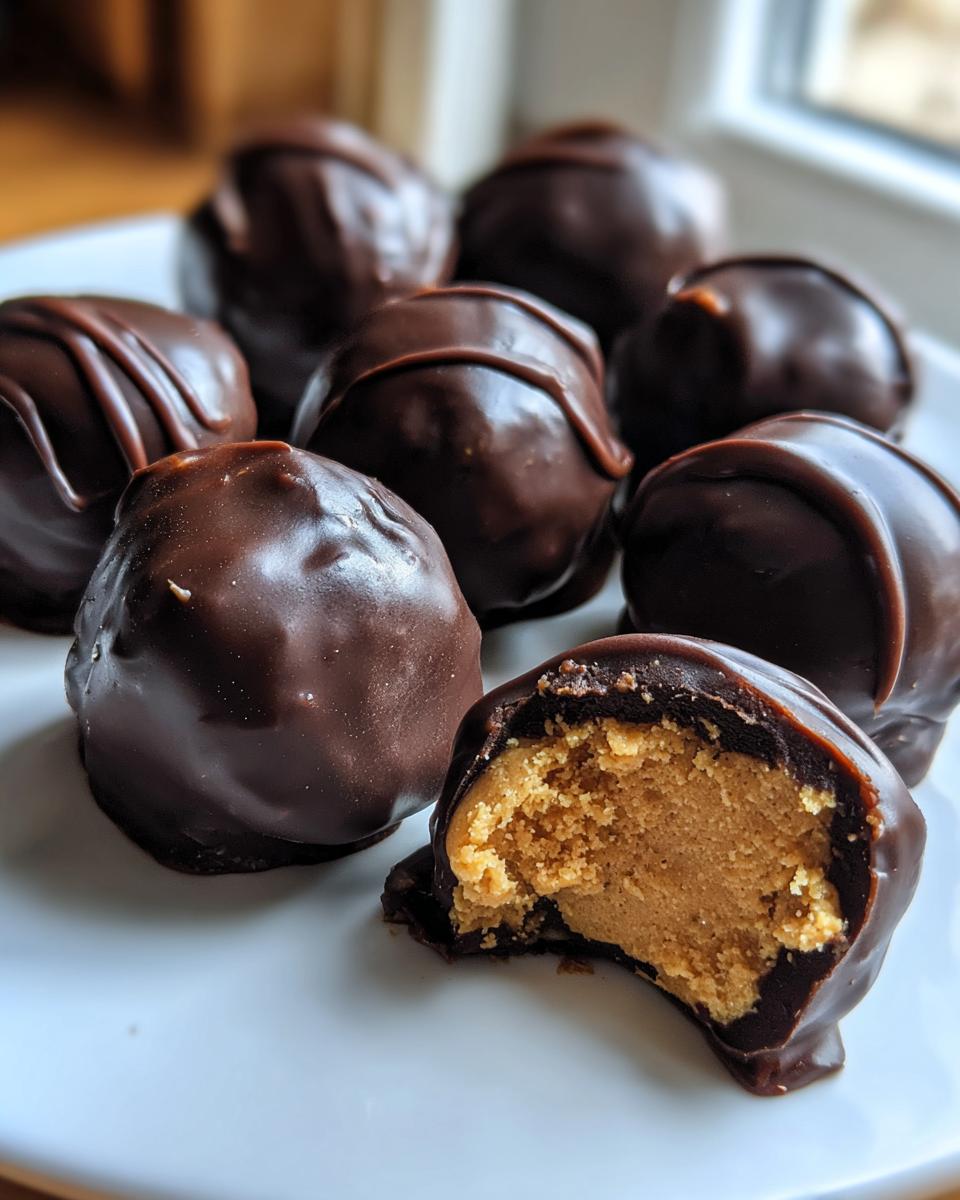
The inside is dense, slightly salty, and wonderfully smooth—not grainy like some recipes can be. When that rich, dark chocolate shell hardens around the sweet center, you get that wonderful *snap* when you bite in. These peanut butter balls taste exactly like your favorite candy shop treat, but you made them yourself!
Essential Ingredients for Perfect peanut butter balls
Okay, let’s talk ingredients because even though this recipe is simple, the quality really matters here. With only four main components, there’s nowhere to hide if something isn’t right! When I first started making these **peanut butter balls**, I tried cutting corners, and wow, did it show. For the best texture and flavor, you need to stick close to the list below. Don’t worry, it’s just peanut butter, butter, sugar, and chocolate!
I always lay everything out before I start mixing. It keeps me calm and makes sure I don’t miss a step when the dough starts coming together quickly. Having your butter soft and your peanut butter ready is key to success here.
Ingredient Specifications and Preparation
Here’s exactly what you need and how to make sure it’s ready to go:
| Ingredient | Amount | Preparation Note |
|---|---|---|
| Creamy Peanut Butter | 1 cup | Room temperature is best for easy mixing. |
| Unsalted Butter | 6 tablespoons | Must be softened—leave it out for an hour! |
| Powdered Sugar | 2 cups | Sifted, if possible, to avoid lumps later. |
| Chocolate Melting Wafers | 16 ounces | Use good quality wafers for the best melt. |
Ingredient Notes and Substitutions
The biggest question I always get is about the peanut butter. You absolutely must use creamy peanut butter for these **peanut butter balls**. Crunchy just won’t blend correctly into that smooth dough structure we are aiming for. Also, please use unsalted butter; we control the salt level entirely with the peanut butter, and using salted butter can throw off the sweetness balance.
I know some people want to use milk chocolate, but I strongly recommend using semi-sweet or dark chocolate melting wafers. The slight bitterness cuts through the richness of the peanut butter filling perfectly. Trust me, the chocolate coating needs to be sturdy, so skip the standard chocolate chips unless they are specifically designed for melting, or you risk seizing the chocolate!
Equipment Needed for Making peanut butter balls
You don’t need a giant stand mixer for this recipe, which is another reason I love it! Having the right tools just makes the process smoother, especially when dealing with sticky dough and melted chocolate. Make sure you have these few items ready before you start stirring.
- A sturdy mixing bowl for combining the filling.
- Measuring cups and spoons—precision helps here!
- A baking sheet lined with wax paper for setting the balls.
- A small saucepan and a heat-safe bowl for the double boiler setup.
- A small cookie scoop or tablespoon for uniform shaping.
- A fork or dipping tool for coating the chilled balls evenly.
Step-by-Step Instructions for peanut butter balls
Now for the fun part! Follow these steps closely, and you’ll have perfect, professional-looking **peanut butter balls** in no time. Remember, the chilling times aren’t suggestions; they are mandatory for success, especially when dealing with a soft filling like this!
Creating the Dough Base for Your peanut butter balls
First things first, grab that softened butter and the creamy peanut butter. We need them to blend beautifully so we don’t end up with streaks of unmixed fat. Pop them into your mixing bowl and stir them together until they are completely smooth and creamy. You want a homogenous base before we add the sugar. This takes a minute or two of good stirring.
Next, we introduce the powdered sugar. Do this slowly! If you dump all two cups in at once, you’re going to have a sugar cloud explosion in your kitchen, trust me! Add about a cup at a time, mixing until it’s just incorporated before adding the next batch. Keep mixing until a very thick, stiff dough forms. It should pull away cleanly from the sides of the bowl. If it seems too wet, don’t panic yet; the chilling step will fix most texture issues.
Chilling and Shaping the Dough
This is where patience comes in. Cover that thick dough and pop it into the refrigerator. You need this dough to chill for at least two full hours. If you skip this, the dough will be too soft to roll, and you’ll end up with sticky messes all over your hands. We are aiming for a consistency where you can handle it briefly without it melting immediately.
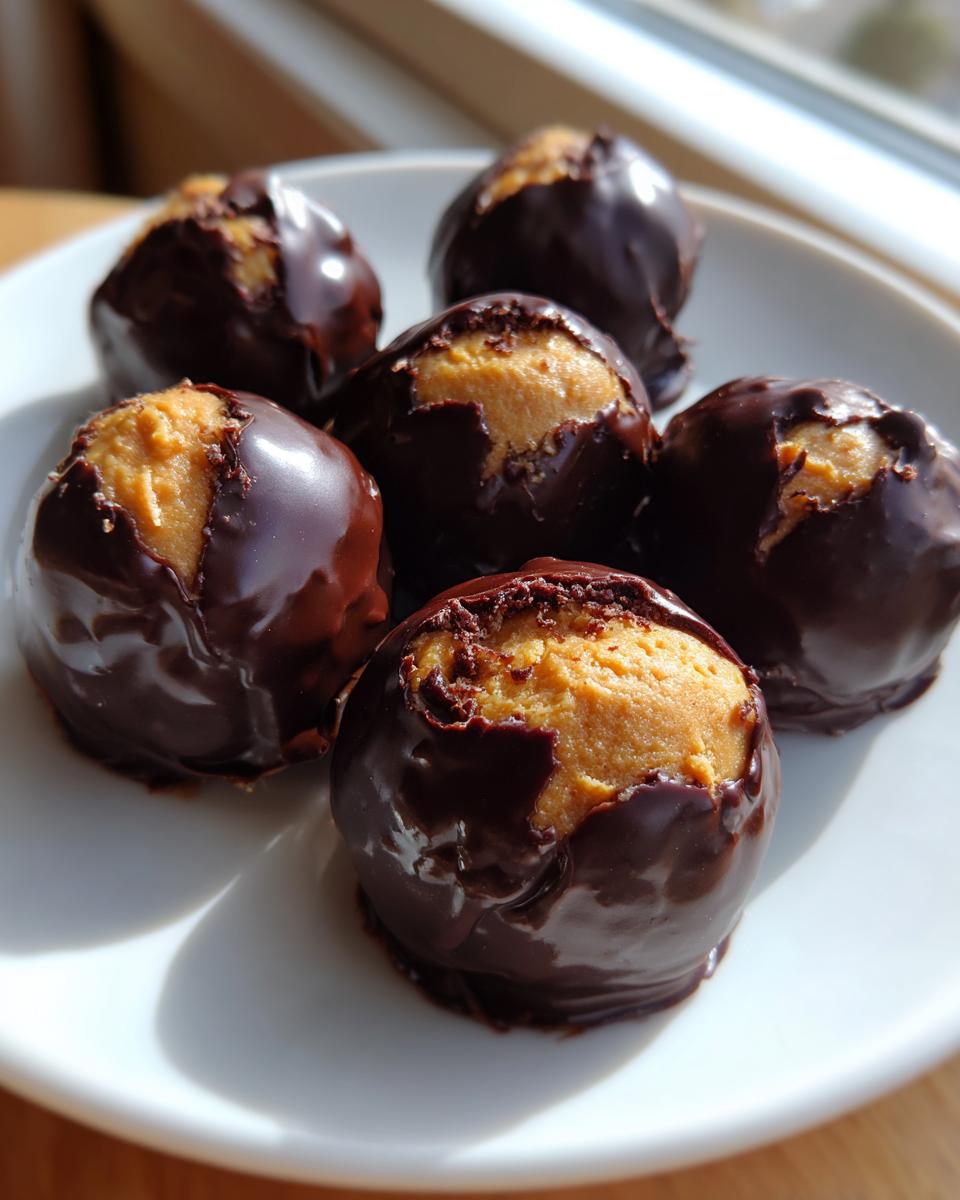
Once chilled, line a baking sheet with wax paper—this is your non-stick launching pad. Use a small cookie scoop or a tablespoon to portion out the dough. Roll each portion between your palms into uniform 1-inch balls. Try to keep them the same size so they all finish setting at the same time. Place them neatly on your prepared sheet.
Before dipping, we need one more chill. Transfer the shaped **peanut butter balls** to the freezer for about 20 minutes. This final freeze solidifies the centers just enough so that when they hit the hot chocolate, they don’t immediately start melting the coating or falling apart.
Coating with Smooth Melted Chocolate
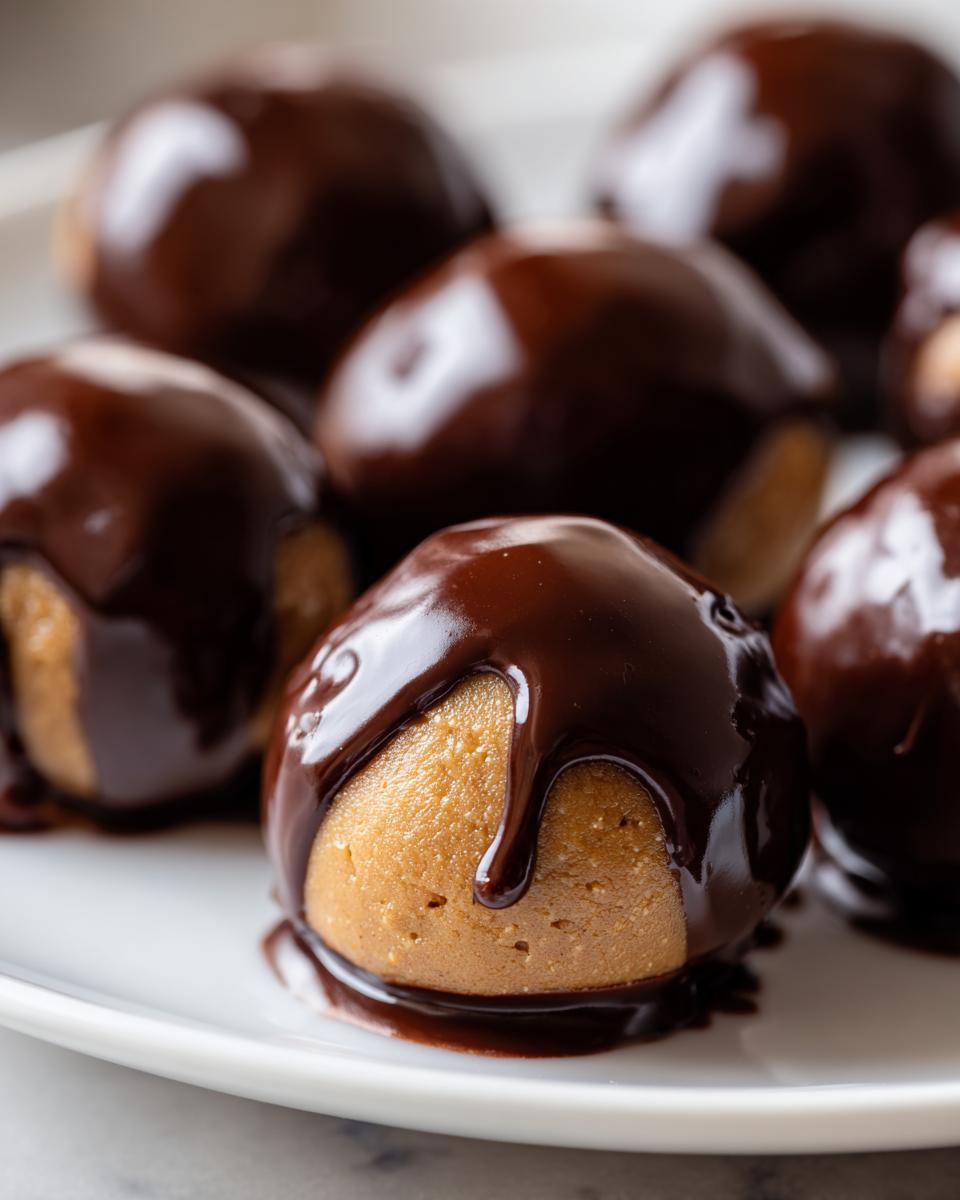
While the balls are freezing, set up your chocolate station. The best way to get that smooth coating is using a double boiler. Set a heat-safe bowl over a saucepan that has just a little bit of water simmering lightly—you don’t want the bottom of the bowl touching the water! Add your chocolate wafers and stir them constantly until they are silky smooth. If it looks thick, add a tiny bit of neutral oil, but usually, if you use good wafers, you won’t need much.
Now, pull those frozen **peanut butter balls** from the freezer. Working quickly, use a fork or a dipping tool to drop one ball into the melted chocolate. Rotate it gently until it’s fully submerged. Lift it out, letting the excess chocolate drip back into the bowl for a few seconds. A gentle tap on the side of the bowl helps shake off any drips.
Setting the Final Chocolate Coating
Return the freshly dipped ball to the wax paper-lined baking sheet. Make sure the chocolate looks even. If you notice a little “foot” of chocolate forming at the bottom, you can gently nudge it away with the tip of your fork before the chocolate sets up. We want clean bottoms!
Leave these finished treats at room temperature—no need to put them back in the fridge right away! They usually take about 30 minutes to set completely hard. Once the chocolate is firm to the touch, they are ready to move to an airtight container for storage. If you are looking for other simple, rich desserts, check out my recipe for eggless chocolate fudge brownies.
Tips for Making the Best peanut butter balls
Even with such a simple recipe, a few little hiccups can throw off your perfect batch of **peanut butter balls**. I’ve learned these tricks the hard way over the years, so listen up! Most issues come down to temperature or measuring the powdered sugar incorrectly. Nobody wants a crumbly mess or chocolate that looks dull, so let’s troubleshoot now so your final product is flawless.
The key to getting that classic, satisfying snap is respecting the chill times. Don’t rush it! The chocolate coating needs a nice, cold surface to set quickly against, creating that beautiful, even shell.
Achieving the Right Dough Consistency
If your dough seems too soft or sticky after mixing in all the sugar, it likely means your butter was too warm, or you might have accidentally used slightly less peanut butter than called for. If it’s still a bit soft after the initial chilling, pop it back in for another 30 minutes. If you find yourself fighting the dough while rolling, that means it wasn’t cold enough. Also, make sure you’re using powdered sugar and not granulated sugar—that’s a rookie mistake that ruins the texture!
Perfecting the Chocolate Dip
Chocolate seizing is the enemy here! If your melted chocolate looks grainy or thick, it means a tiny drop of water got into your bowl or the heat was too high. For the smoothest coat on your **peanut butter balls**, keep the heat low and stir constantly. When dipping, don’t swirl the ball around too much once it’s submerged; just a quick dunk and lift is enough. If the chocolate seems too thick to coat thinly, remove it from the heat entirely and let it cool for just a minute or two while stirring. This often thins it out enough for a beautiful, thin shell. Learning about proper chocolate tempering can help avoid seizing; you can read more about how to temper chocolate for the best results.
Serving Suggestions for Your Sweet Treat
These rich peanut butter balls are fantastic all on their own, but they pair wonderfully with a cold glass of milk—that’s my family’s absolute favorite way to eat them! If you’re serving them after dinner, a strong, hot cup of black coffee or an espresso cuts through the sweetness perfectly. They also look gorgeous piled high on a tiered platter next to some fresh strawberries for a nice color contrast.
For holidays, I sometimes sprinkle a little sea salt right on top of the chocolate before it sets, just for an extra little flavor pop. They disappear way too fast no matter how you serve them! If you enjoy peanut butter and chocolate combinations, you might also enjoy my recipe for peanut butter cup cookies.
Storing and Keeping Your peanut butter balls Fresh
The best part about these **peanut butter balls** is that they are fantastic make-ahead treats! Since they are no-bake and coated in chocolate, they hold up beautifully, but you do need to store them correctly to keep that chocolate shell looking shiny and prevent the filling from getting too soft. I always make a double batch around the holidays and stash them away.
You want to keep them in an airtight container. If you stack them, put a small piece of wax paper between the layers so the chocolate doesn’t stick together. They are best served slightly cool, straight from the fridge, but if you want that softer, melt-in-your-mouth texture, let them sit on the counter for about 15 minutes before serving.
| Storage Location | Recommended Time | Serving Temperature Tip |
|---|---|---|
| Airtight Container (Counter) | Up to 3 days | Serve at room temperature for softest filling. |
| Airtight Container (Refrigerator) | Up to 2 weeks | Let sit out 15 minutes before eating. |
| Freezer | Up to 3 months | Thaw briefly in the fridge, then serve cool. |
Frequently Asked Questions About peanut butter balls
I get so many questions about these little gems! Because they are so simple, people sometimes worry they missed a tiny step. Don’t stress! Here are the answers to the most common things folks ask me about making perfect **peanut butter balls** every single time.
Can I make peanut butter balls ahead of time?
Absolutely! These are the ultimate make-ahead treat. Because they are no-bake and coated in chocolate, they store wonderfully. I usually keep mine in the fridge in an airtight container for up to two weeks. If you need them for a party next month, they freeze like a dream for about three months. Just make sure they are fully set before you wrap them up!
What is the best type of chocolate for coating peanut butter balls?
My biggest advice here is to stick to chocolate melting wafers or candy coating specifically. Standard chocolate chips have stabilizers that make them hard to get smooth, and they often seize up when melted. Wafers melt down beautifully into that shiny, thin shell that cracks just right when you bite into your **peanut butter balls**. Semi-sweet is my go-to!
How do I prevent my peanut butter balls from crumbling?
Crumbling usually happens for one of two reasons. First, make sure your butter wasn’t cold when you mixed it—cold butter doesn’t incorporate the sugar properly. Second, and most important, you must chill the dough for the full two hours! If the dough is too soft when you try to roll it, it won’t hold its shape when you dip it. A quick 20-minute freeze right before dipping seals the deal and prevents crumbling during the coating stage. For more general baking tips, you might find resources on baking basics helpful.
Nutritional Information Disclaimer
I’m Anna, and while I cook everything with love, I’m not a certified nutritionist! The nutritional data provided for these **peanut butter balls** is just an estimate based on standard ingredient tracking. Please remember that exact numbers will change depending on the specific brands of peanut butter and chocolate you use. Cook with joy, not worry!
| Nutrient | Value |
|---|---|
| Serving Size | 1 ball |
| Calories | 190 |
| Fat | 12 g |
| Carbohydrates | 18 g |
| Protein | 4 g |

Amazing 4-Ingredient peanut butter balls Recipe
- Total Time: 30 minutes
- Yield: 24 servings 1x
- Diet: Vegetarian
Description
These peanut butter balls with chocolate coating are a simple no-bake dessert. They use few ingredients, come together fast, and make a rich sweet treat perfect for any occasion.
Ingredients
- 1 cup creamy peanut butter
- 6 tablespoons unsalted butter, softened
- 2 cups powdered sugar
- 16 ounces chocolate melting wafers
Instructions
- Combine peanut butter and softened butter in a bowl. Stir until the mixture is smooth.
- Slowly mix in the powdered sugar until a thick dough forms with no dry parts visible.
- Cover the bowl and chill the dough in the refrigerator for 2 hours until firm.
- Prepare a baking sheet by lining it with wax paper.
- Scoop the chilled mixture and roll it into 1-inch balls. Place the balls on the prepared sheet.
- Place the peanut butter balls in the freezer for 20 minutes to firm up before dipping.
- Melt the chocolate wafers using a double boiler with lightly simmering water. Stir until the chocolate is smooth.
- Dip each frozen ball into the melted chocolate, ensuring full coverage. Place the coated ball back on the lined sheet.
- Allow the chocolate coating to set at room temperature for about 30 minutes until hard.
Notes
- Store the finished peanut butter balls in an airtight container.
- Prep Time: 20 minutes
- Cook Time: 10 minutes
- Category: Dessert
- Method: No-Bake
- Cuisine: American
Nutrition
- Serving Size: 1 ball
- Calories: 190
- Sugar: Unknown
- Sodium: Unknown
- Fat: 12 g
- Saturated Fat: Unknown
- Unsaturated Fat: Unknown
- Trans Fat: Unknown
- Carbohydrates: 18 g
- Fiber: Unknown
- Protein: 4 g
- Cholesterol: Unknown