Skip to content
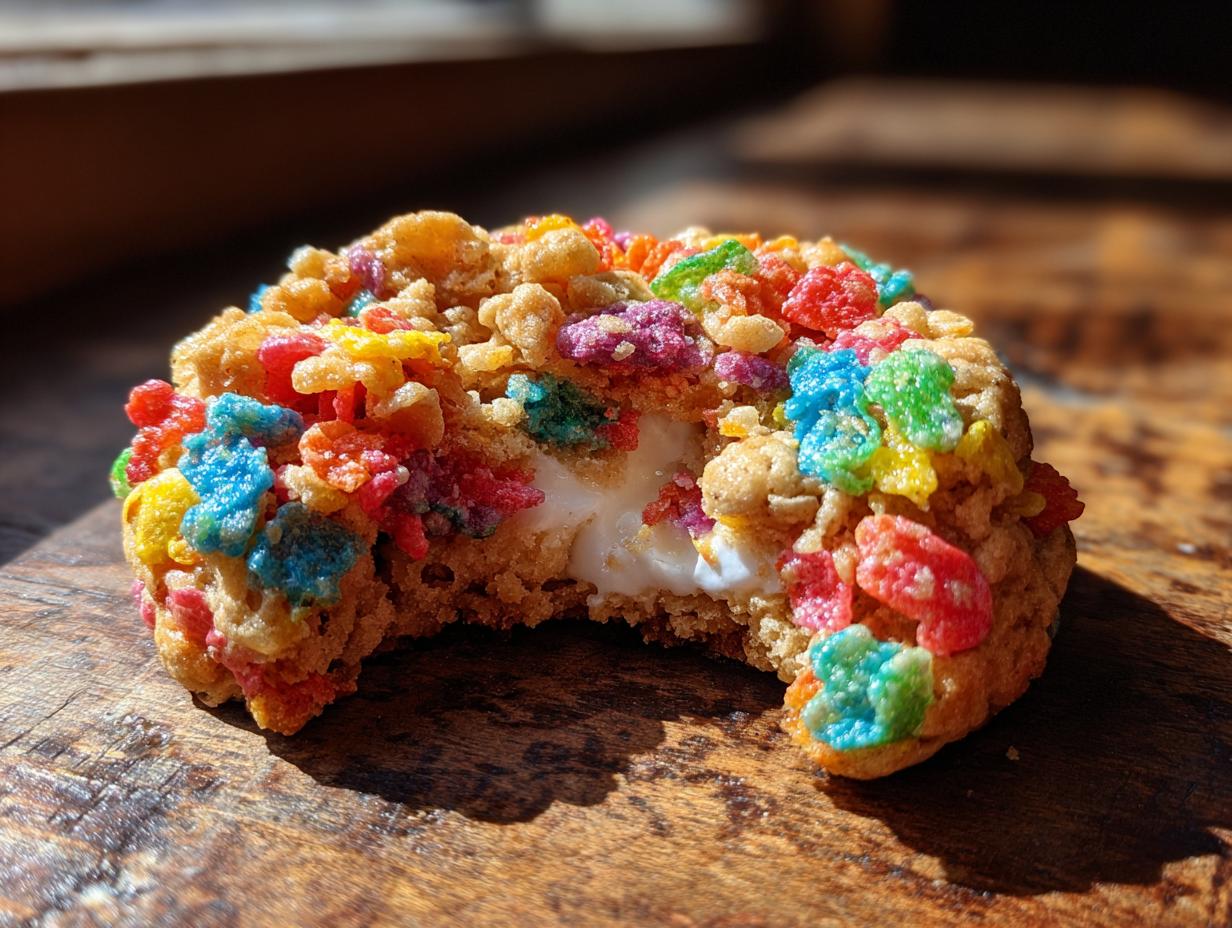
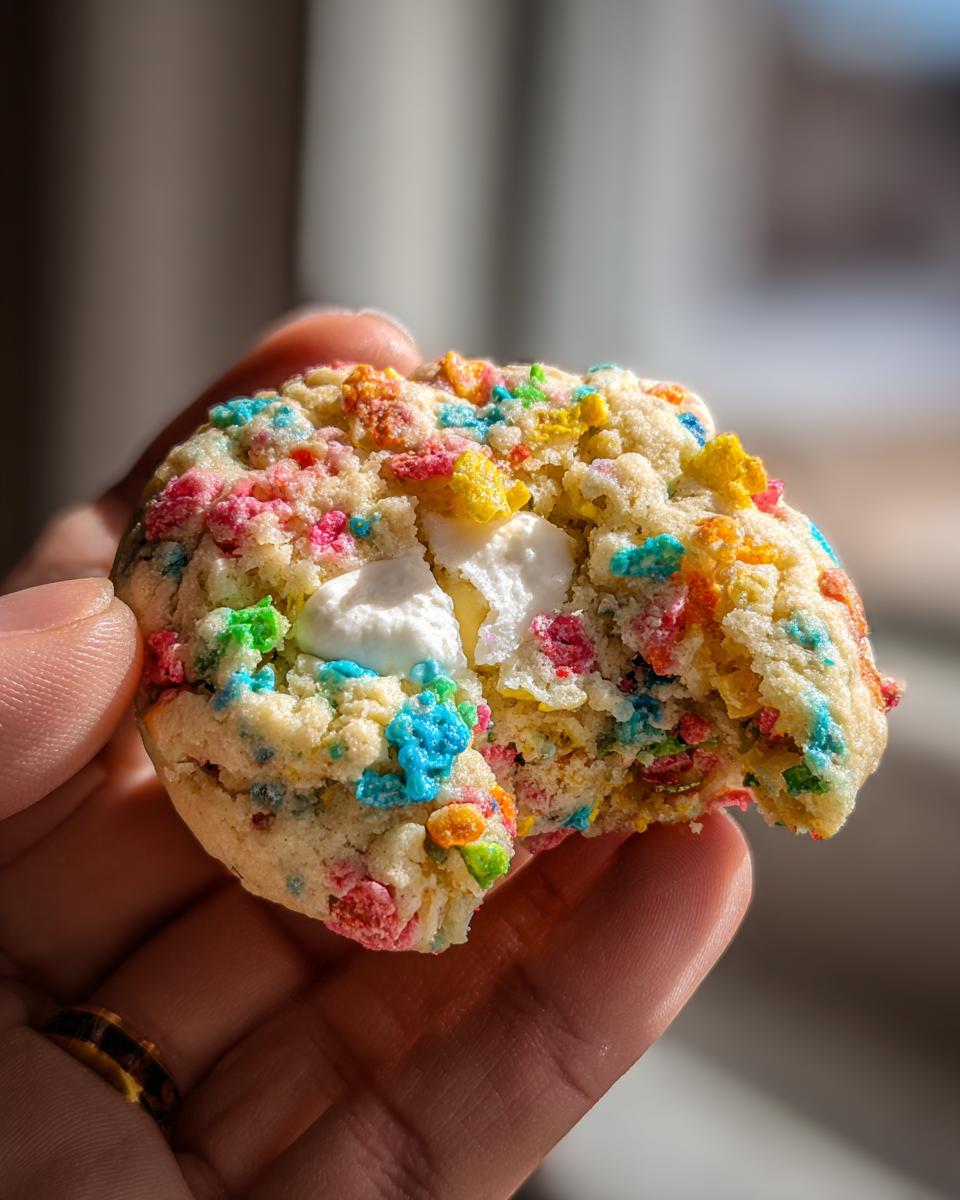
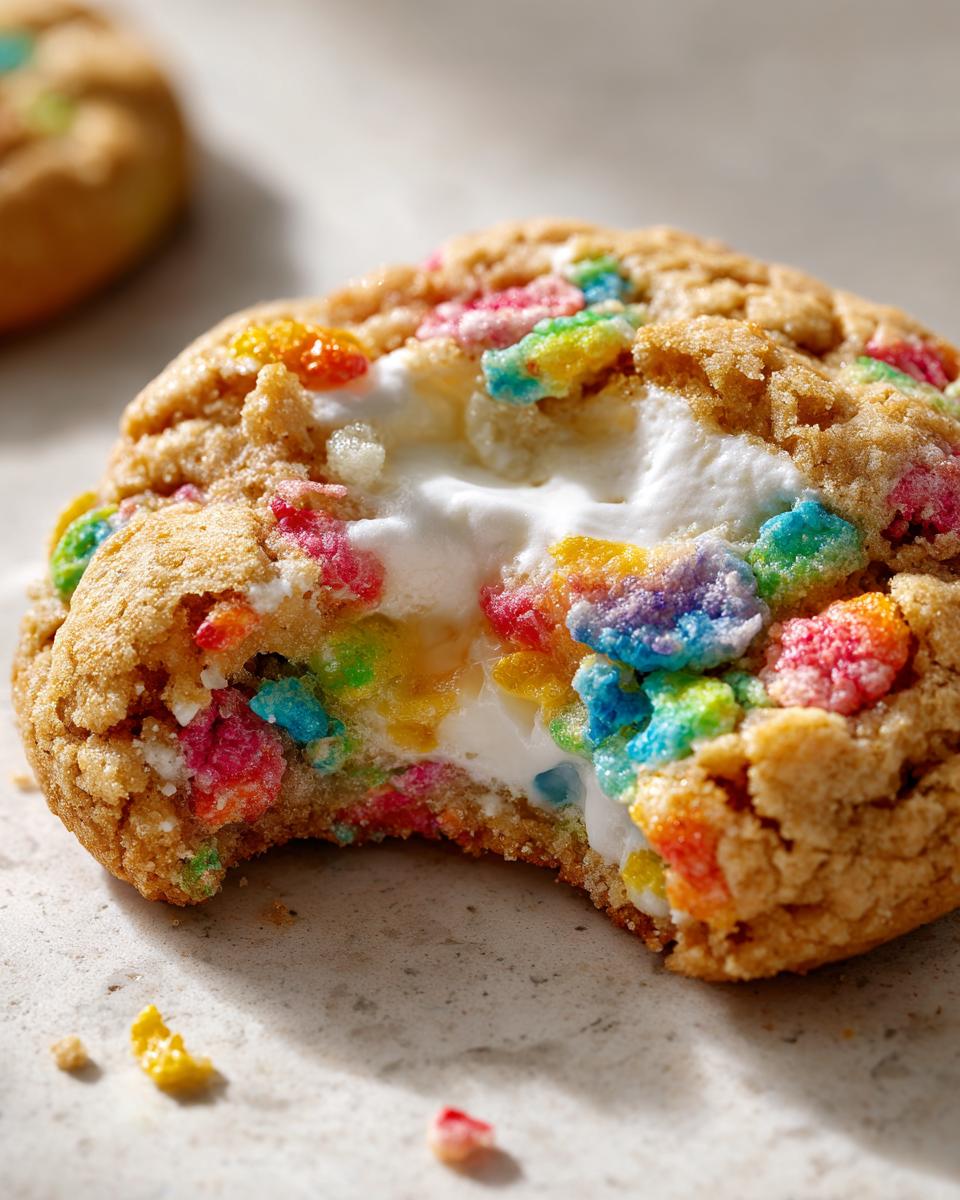
Fruity Pebble Marshmallow Cookies: Are you tired of cookies that promise chewy perfection but bake up flat and dry? I get it! That’s why here at my kitchen table, Anna Kowalska shares tried-and-true homemade recipes that you and your family will absolutely love. Everything I post is made with heart and flavor, and I test every batch until it’s exactly right—especially when gooey marshmallows are involved!
I spent weeks perfecting the ratio of sugar to butter just so these cookies bake up thick, soft, and just slightly crisp on the outside while keeping that marshmallow center molten. This recipe for Fruity Pebble Marshmallow Cookies is pure nostalgia wrapped up in color. Trust me, once you bite into the sweet, slightly tart cereal mixed into that soft vanilla dough, you’ll see why these are going to be your new go-to rainy-day or celebration treat.
Jump to:
Gathering Your Ingredients for Fruity Pebble Marshmallow Cookies
Making these gorgeous, colorful cookies is so easy once you have everything measured out. I know the ingredient list looks a little different than your standard chocolate chip cookie, but trust me, the payoff is huge! We need a few key elements to get that perfect soft texture and ensure the marshmallow doesn’t just melt right out the bottom. We’re aiming for a cookie that’s delightfully soft but sturdy enough to hold its shape, which means paying attention to how we measure the flour.
For the best experience making these Fruity Pebble Marshmallow Cookies, make sure your butter is truly softened—not melted—and that your egg is at room temperature. This helps everything emulsify beautifully. Also, don’t skimp on the cereal! It’s a flavor star here, not just a topping.
Essential Components for Fruity Pebble Marshmallow Cookies
- 10 tablespoons (140 g) unsalted butter, softened perfectly to room temperature.
- \u00bd cup (100 g) granulated sugar for sweetness.
- 2 cups (80 g) Fruity PEBBLES\u2122 Cereal or similar fruit-flavored crispy cereal, divided—remember, half goes into the dough and half for rolling!
- 1 large egg, also brought up to room temperature.
- 1 teaspoon vanilla extract—use the good stuff!
- 1\u00be cups (218.75 g) all-purpose flour, weighed or spooned and leveled carefully.
- 1 teaspoon baking soda for a little lift.
- \u00bc teaspoon salt to balance all that sweetness.
- 8 large marshmallows, the primary gooey center for our Fruity Pebble Marshmallow Cookies.
Equipment Required for Baking
- Large mixing bowl and an electric mixer (handheld or stand).
- Measuring cups and spoons, or a digital kitchen scale for accuracy.
- A sturdy rubber spatula for folding.
- Baking sheets, preferably light-colored.
- Parchment paper or silicone baking mats.
- A small cookie scoop or spoon for portioning dough.
Step-by-Step Instructions for Perfect Fruity Pebble Marshmallow Cookies
Okay, let’s get these beautiful, colorful cookies into the oven! The timing here is crucial, especially with that marshmallow center. You only need about 26 minutes total, which is amazing for such a show-stopping treat. Just follow these steps closely, and you’ll be rewarded with the softest, chewiest Fruity Pebble Marshmallow Cookies you’ve ever made.
Preparing the Base Dough for Fruity Pebble Marshmallow Cookies
First things first, get that oven preheated to 350\u00b0F. We don’t want any temperature surprises later! Now, grab your big bowl. This is where the magic starts. You need to cream together that softened butter, the granulated sugar, and half a cup of your Fruity Pebbles cereal. Don’t rush this—I mean it! Beat it on medium speed for a good two to three minutes until it looks fluffy and pale. This step whips air into the dough, which is key for a soft cookie later on. Once it looks light, mix in your room-temperature egg and that splash of vanilla until it’s just combined.
Next, whisk your dry ingredients—the flour, baking soda, and salt—in a separate little bowl. Add these dry bits into your wet ingredients slowly, mixing on low speed until you just see everything come together. Remember what I always say about overmixing? Don’t do it! Finally, gently fold in the remaining cup of cereal with a spatula. We want those colorful flakes suspended in the dough, not broken down into dust.
Assembling and Shaping the Marshmallow Center
This is the fun, slightly messy part! Take about three to four tablespoons of your cookie dough and flatten it out in your palm. Think of it like making a little dough pancake. Take one large marshmallow and place it right in the center. Now, you need to be careful here—gently bring the edges of the dough up and around the marshmallow until it’s completely sealed inside. Seriously check every seam; nobody wants a runaway marshmallow explosion in the oven!
Once you have a nice, sealed ball, take that remaining half-cup of cereal and roll your dough ball around in it until it’s coated beautifully on all sides. Place it onto a baking sheet lined with parchment paper. Since these cookies spread slightly, be sure to space them about three inches apart. I usually only bake four to six cookies at a time so they have room to breathe!
Baking and Cooling Your Fruity Pebble Marshmallow Cookies
Pop those trays onto the middle rack of your preheated oven. They only need 8 to 11 minutes to bake. You’ll know they are perfectly done because you’ll start to see tiny cracks appear on the surface, and sometimes you’ll see just a hint of marshmallow starting to peek through—that’s the cue! Don’t overbake them trying to get them golden brown; we want them soft!
When they come out, let them sit right there on the hot cookie sheet for just a minute or two. This brief rest lets the structure set up before you move them. Then, very carefully, use a thin spatula to move your warm Fruity Pebble Marshmallow Cookies over to a wire rack to cool completely. If you try to move them too soon, the centers are still very soft!
Tips for Success Making Fruity Pebble Marshmallow Cookies
Getting these cookies just right is all about texture management, especially keeping that marshmallow center gooey and the outside soft. My biggest tip for success with these Fruity Pebble Marshmallow Cookies is to pay close attention to your marshmallows. If you use standard, drier marshmallows, they sometimes don’t flatten nicely when you wrap the dough around them. If you find yours are fighting you, try tapping the baking sheet gently on the counter right after you pull the cookies out of the oven; that little jolt helps the center settle.
Also, remember that the cereal coating is important! Use the full amount specified for rolling the outside. That cereal layer acts like a tiny shield, helping the dough hold its shape during that quick bake time. If you are worried about your dough being too sticky before rolling, pop the wrapped balls into the fridge for just 10 minutes. This firms up the butter just enough. These Fruity Pebble Marshmallow Cookies are worth the little bit of extra attention to detail!

Frequently Asked Questions About Fruity Pebble Marshmallow Cookies
I always get questions when people try this recipe for the first time, especially about substitutions! Here are the things I hear most often when folks are whipping up a batch of these colorful cereal cookies.
Q1. Can I use a different kind of crispy cereal?
Absolutely! While Fruity Pebbles give that signature sweet and slightly tart flavor, you can definitely substitute them with another fruit-flavored crispy cereal you have on hand. Just make sure it’s not heavily frosted, or they might get a little too sweet!
Q2. My marshmallows kept melting out the bottom! What went wrong?
Oops! That usually means one of two things: either your dough wasn’t sealed completely around the marshmallow, or you baked them too long. Make sure you pinch every seam shut and roll them well in the outer cereal coating. Also, watch for that sign that they are done—when the marshmallow just starts to seep through the cracks, pull them out immediately!
Q3. Can I use mini marshmallows instead of large ones?
Yes, you can! If you use mini marshmallows, you’ll need about three or four stuffed into the dough ball together, or you can skip the wrapping step entirely and just mix a handful of minis right into the finished dough before you scoop them. Just keep an eye on the baking time since the centers are smaller.
Q4. Should the butter be cold when mixing?
No, definitely not cold! The butter needs to be room temperature—soft enough to press a finger into it easily, but not greasy or melted. If it’s too cold, you won’t be able to cream it properly with the sugar, and that creaming step is what gives the cookie its final soft texture. For more tips on achieving soft cookie texture, check out my guide on chewy cookies.
Storing and Keeping Your Fruity Pebble Marshmallow Cookies Fresh
You’ve made the most beautiful batch of Fruity Pebble Marshmallow Cookies, and now you need to keep them perfect! The biggest thing to remember is that marshmallow center. Once they cool completely, they are surprisingly sturdy, but you want to keep the exterior soft while preventing the marshmallow from hardening up too much.
If you’ve got leftovers—which I doubt you will—storage is simple. Since these cookies are rich and don’t rely on cream cheese or fresh fruit, they hold up really well at room temperature. Just make sure they are in an airtight container so that colorful cereal coating stays crisp against the soft cookie!
If you need to keep them longer, the freezer is your friend! They freeze like a dream, and reheating them just brings back that fresh-out-of-the-oven softness. Here’s my quick guide for keeping your Fruity Pebble Marshmallow Cookies tasting fantastic for days or even months. If you are interested in other great desserts, you might enjoy my collection of desserts.
| Storage Method | Duration | Best Practice |
|---|---|---|
| Room Temperature | Up to 1 Week | Store in a single layer or separated by wax paper in an airtight container. Keep them away from heat. |
| Freezing (Unfrosted) | Up to 3 Months | Wrap individual cookies tightly in plastic wrap, then place them in a freezer-safe bag or container. |
| Reheating | As needed | Warm for just 10-15 seconds in the microwave to refresh that gooey marshmallow center. |
What to Serve Alongside Your Fruity Pebble Marshmallow Cookies
These cookies are such a blast of color and fun, they really don’t need much accompaniment, but if you’re setting up a dessert platter, I have a few favorite pairings! Because the cookies are already sweet and feature that fun, fruity cereal flavor, you want drinks that balance that out.
A tall glass of ice-cold milk is almost mandatory; it’s the classic choice for a reason! For something a little different, try serving them with plain vanilla ice cream. The contrast between the warm, gooey cookie and the cold, smooth ice cream is just heavenly. If you’re serving them for a brunch event, a simple black coffee or some strong, unsweetened iced tea cuts through the sweetness perfectly. Enjoy that beautiful crunch! For more ideas on balancing sweet flavors, you can look into general baking science regarding sugar and flavor.
Print
Amazing 1 Batch Fruity Pebble Marshmallow Cookies Now
- Total Time: 26 minutes
- Yield: 8 cookies 1x
- Diet: Vegetarian
Description
Make these Fruity Pebble Marshmallow Cookies for a fun, colorful, and soft treat. This recipe wraps a gooey marshmallow inside a sweet cookie dough coated in crunchy cereal.
Ingredients
- 10 tablespoons (140 g) unsalted butter room temperature
- ½ cup (100 g) granulated sugar
- 2 cups (80 g) Fruity PEBBLES™ Cereal or other fruit-flavored crispy cereal, divided
- 1 large egg room temperature
- 1 teaspoon vanilla extract
- 1¾ cups (218.75 g) all-purpose flour weighed in grams or spooned and leveled
- 1 teaspoon baking soda
- ¼ teaspoon salt
- 8 large marshmallows
Instructions
- Preheat oven to 350°F.
- In a large bowl, cream together the softened butter, sugar, and ½ cup of Fruity PEBBLES™ cereal for 2-3 minutes on medium speed. Mix in the egg and vanilla extract.
- Stir the flour, baking soda, and salt into the wet ingredients until combined. Gently fold in 1 cup of cereal.
- Scoop a 3-4 tablespoon ball of dough, flatten it in your palm, and place one marshmallow in the middle.
- Wrap the cookie dough completely around the marshmallow to enclose it.
- Roll the dough ball in the remaining ½ cup of cereal and place it on a baking sheet. Repeat for all 8 cookies, spacing them 3 inches apart. Bake 4-6 cookies per sheet.
- Bake on the middle rack for 8-11 minutes, or until marshmallow starts to seep through cracks on top. Cool on the cookie sheet briefly, then carefully transfer to a wire rack.
Notes
- For best results, use soft marshmallows like Baker’s Corner Marshmallows from Aldi. Other brands might not flatten as easily; tap the pan on the counter after removing cookies from the oven if this happens.
- You can substitute large marshmallows with 3-4 mini marshmallows stuffed inside or mixed directly into the dough.
- Store the cookies at room temperature for up to 1 week or freeze them for up to 3 months.
- The provided nutrition information is an estimate and accuracy is not guaranteed.
- Prep Time: 15 minutes
- Cook Time: 11 minutes
- Category: Dessert
- Method: Baking
- Cuisine: American
Nutrition
- Serving Size: 1 cookie
- Calories: Estimate not provided
- Sugar: Estimate not provided
- Sodium: Estimate not provided
- Fat: Estimate not provided
- Saturated Fat: Estimate not provided
- Unsaturated Fat: Estimate not provided
- Trans Fat: Estimate not provided
- Carbohydrates: Estimate not provided
- Fiber: Estimate not provided
- Protein: Estimate not provided
- Cholesterol: Estimate not provided