Skip to content
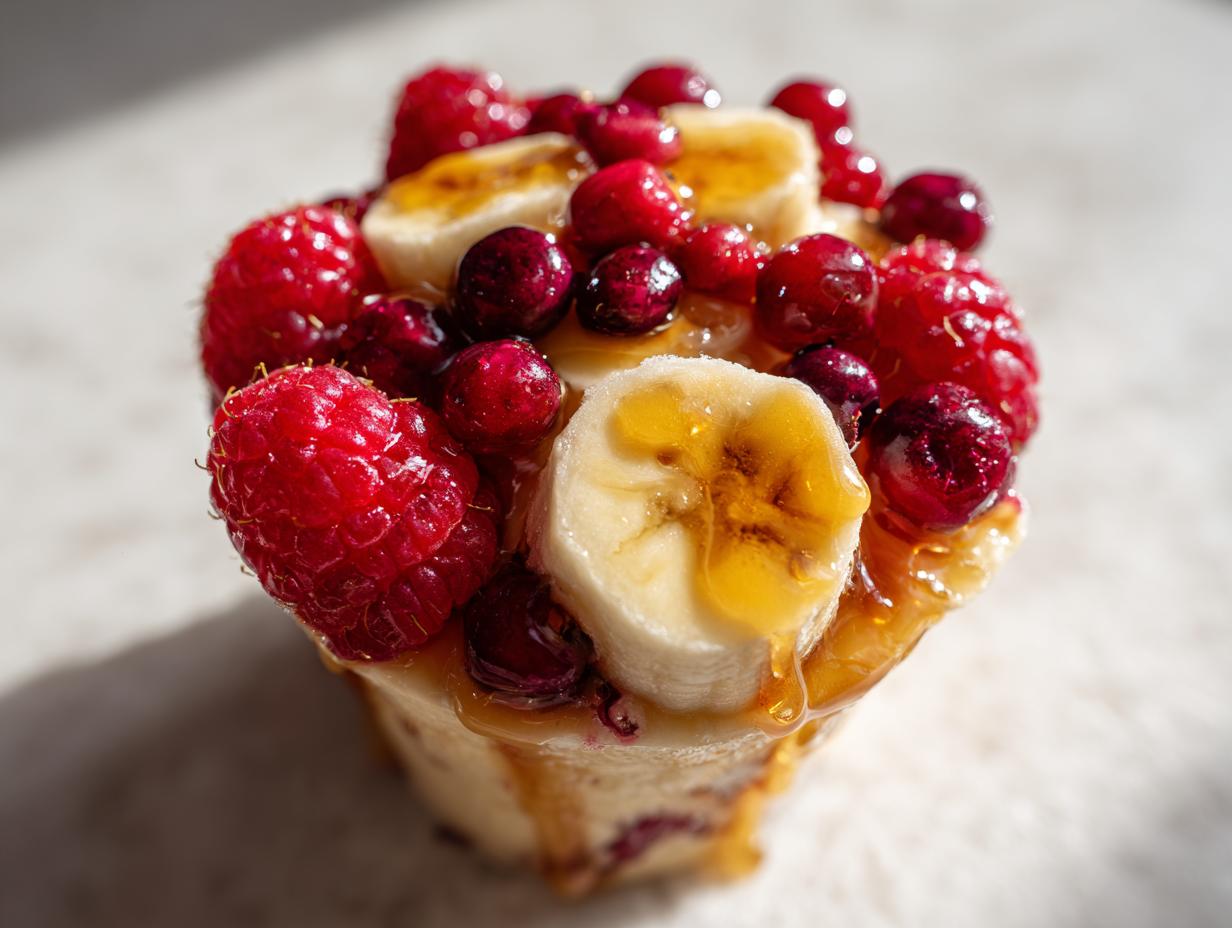
If you’ve ever wanted to turn a classic summer dessert into something totally show-stopping, you’ve landed in the right spot! We are diving deep into making the most gorgeous Handmade candy cup of banana split, raspberries, cranberries, decorated with honey. I’m Anna Kowalska, and here I share tried-and-true homemade recipes that you and your family will love; everything is made with heart and flavor.
I remember seeing those elaborate candy bowls at fancy dessert shops and thinking, “I bet I can make that sweeter, brighter, and totally mine!” This recipe transformed my baking game because it’s part candy craft and part fresh fruit indulgence. It’s totally achievable, even if you’ve never touched a candy thermometer before. Trust me, once you see that clear, glossy cup holding all that bright fruit, you’ll be hooked.
No heading needs to be written for the introduction. We’re going to move right into gathering our supplies because when you’re working with hot sugar, speed is your friend!
Jump to:
Assembling Your Ingredients for the Handmade candy cup of banana split, raspberries, cranberries, decorated with honey
Okay, before we turn up the heat, we need everything ready to go. Working with hot sugar means you can’t run back to the pantry mid-pour! Lay everything out so you can see it all. This recipe is really about the combination of that sturdy, shiny candy shell and the bright, fresh filling.
Here is exactly what you need to have on hand for this fantastic treat. Don’t skip the parchment paper; it saves so much cleanup!
| Item | Amount | Purpose |
|---|---|---|
| High-Quality Hard Candy | 2 cups | For the edible cups |
| Lemon Juice | 1 tablespoon | To help the candy cook evenly |
| Ripe Banana | 1 medium | Fresh filling base |
| Fresh Raspberries | ½ cup | Flavor and color |
| Dried Cranberries | ¼ cup | Tartness (must be rehydrated) |
| Raw, Unfiltered Honey | 2 tablespoons | Finishing drizzle |
Essential Components for the Edible Cups
The cups themselves are the star of the show! You absolutely need about two cups of good, clear hard candy—no weird chunks or fillings inside, please. The lemon juice acts like a little helper to keep the sugar from crystallizing on us. Most importantly, get your silicone molds ready. I like the little bowl shapes best. Make sure they are sitting flat on a baking sheet lined with parchment paper before you start melting anything. That setup is your safety net!
Fresh Fruit Filling and Honey Topping
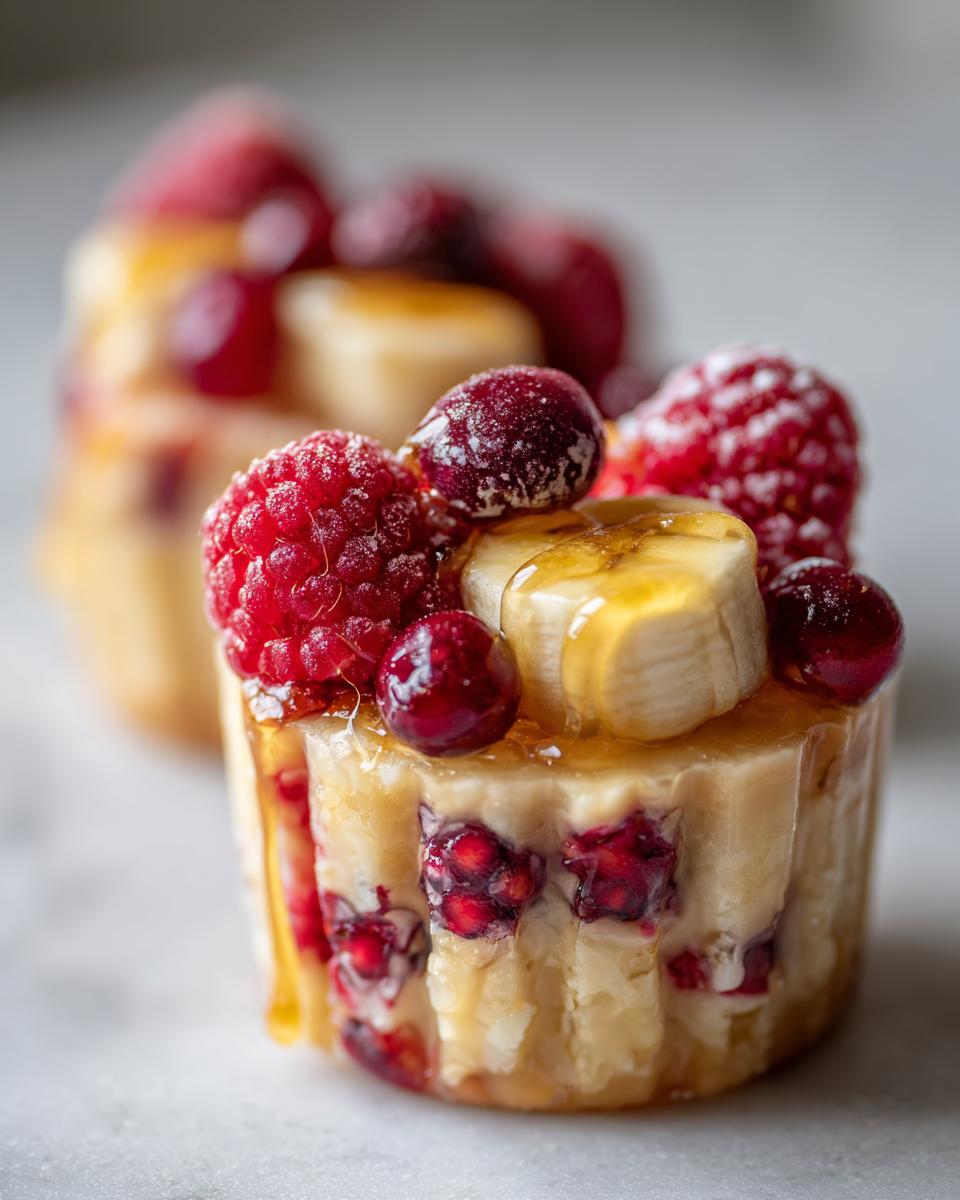
For the inside, we want texture and brightness. Slice up that banana just before you need it so it doesn’t brown. The raspberries just need a quick wash and dry. For the cranberries, you’ll want to soak them for a few minutes in warm water—this plumps them up so they don’t suck the moisture out of your candy shell later. And finally, warm up that beautiful honey just a touch so it drizzles like silk over the finished product.
Step-by-Step Instructions: Crafting Your Handmade candy cup of banana split, raspberries, cranberries, decorated with honey
Now for the fun part—turning simple sugar into these gorgeous edible shells! Remember, when sugar gets hot, things move fast, so once you start step two, don’t wander off. Speed and focus are your best friends here.
Preparing the Workspace and Melting the Candy
First things first: set up your station like a pro chemist! Line that baking sheet with parchment paper and place your silicone molds right on top. You absolutely must have your candy thermometer ready to go. Pop those two cups of hard candy into a saucepan over medium-low heat. We aren’t rushing this part; we want it melted smoothly, not scorched! Stir it gently as it starts to liquefy. Once it’s fully melted, stir in that tablespoon of lemon juice—it keeps everything feeling cooperative.
Forming the Thin, Edible Candy Cups
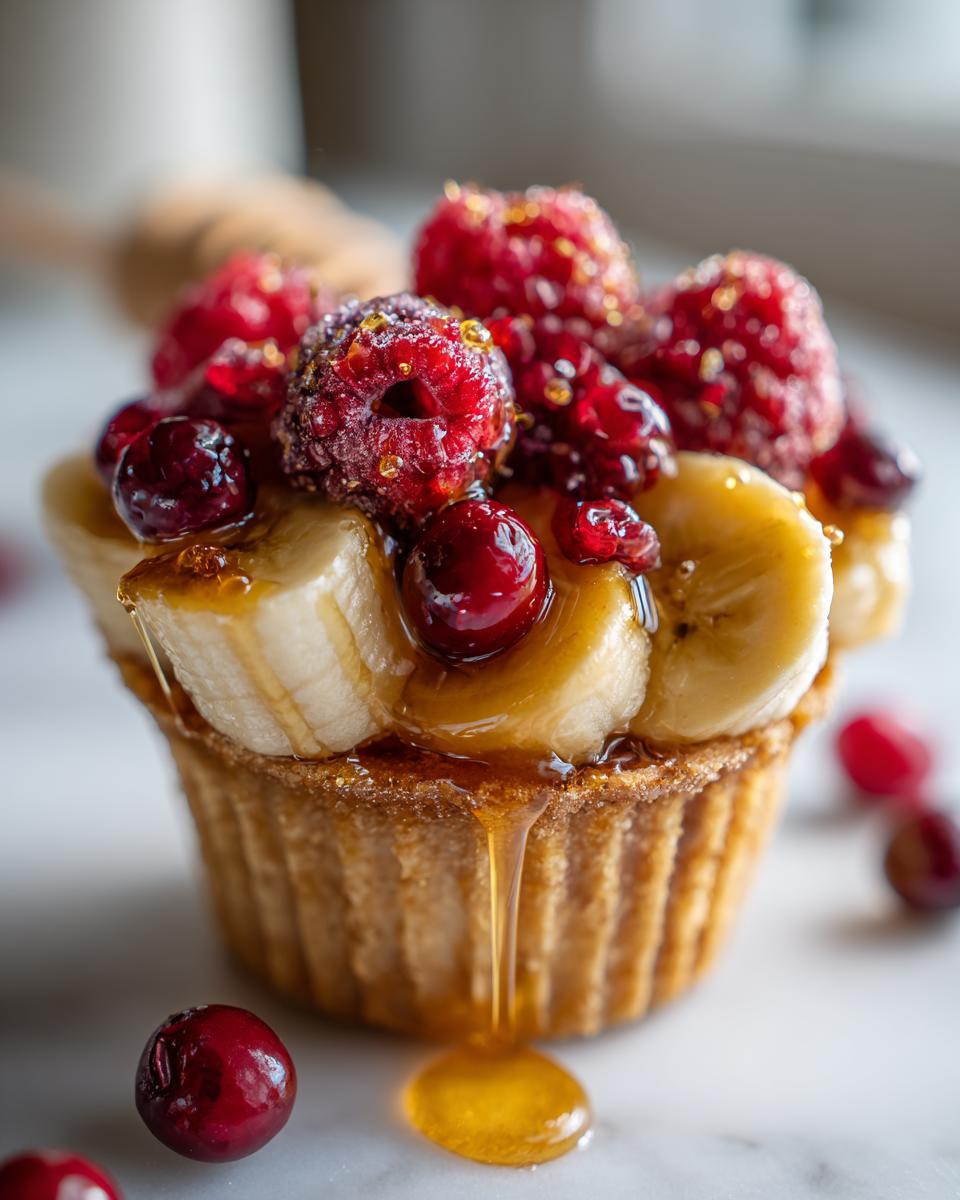
This is where the magic happens. You need to watch that thermometer like a hawk! As soon as the candy hits 300 degrees Fahrenheit—that’s the hard-crack stage—yank that pan right off the heat. Seriously, take it away immediately. Working quickly, spoon just a little bit of the hot syrup into the bottom of each mold. Now, tilt and rotate that mold super fast so the candy coats the sides thinly. You want a delicate shell, not a thick glass bowl!
Before that thin candy layer sets hard, grab the back of a metal spoon and gently press down right in the center of each cup. This deepens the shape and makes sure you have a nice indentation to hold your fruit later. If you wait too long, the candy will be rock hard and you risk cracking it when you press. We want a gentle push, not a fight!
Cooling and Preparing the Fruit Filling
Once you’ve shaped them, leave those molds alone! They need about 20 to 25 minutes to cool completely until they are totally firm and glossy. While they are setting up, get your filling ready. Slice up that banana—try to do this last minute—and give your fresh raspberries a gentle rinse and pat them completely dry. Remember those dried cranberries? Put them in a small bowl with some warm water for about five minutes to plump them up, then drain and pat *those* completely dry too. Dry fruit is key to keeping your candy shells shiny!
Final Assembly of the Handmade candy cup of banana split, raspberries, cranberries, decorated with honey
Once they are cool, carefully peel the silicone away from your candy cups. Go slow; they are surprisingly sturdy but can snap if you tug too hard! Now, layer your fruit inside. I like to put the banana down first, then tuck in the raspberries and the plump cranberries. Finally, take your slightly warmed honey and drizzle it generously over the top. If you decided to use nuts for that extra crunch, sprinkle them on now. They look like tiny jewels sitting on top of the fruit!
Tips for Success with Your Handmade candy cup of banana split, raspberries, cranberries, decorated with honey
Making these edible vessels is really fun, but sugar can be temperamental! If you follow a few small rules, you’ll get those perfect, clear shells every single time. Don’t stress if your first batch isn’t perfect; candy making is all about practice and temperature control. We want these treats to look as amazing as they taste!
Candy Consistency and Mold Release Secrets
The biggest secret to perfect candy cups is hitting that 300-degree mark exactly. If you pull it off the heat too early, the candy stays sticky and won’t release from the mold properly. If you leave it on too long, it gets thick and hard to pour evenly. Also, chilling your molds for about ten minutes before you pour the hot candy in really helps the candy set with a beautiful shine and makes the release smoother. If you notice the candy getting stubborn while you’re pressing the center, dip your spoon in some hot water first—that little bit of warmth will soften it right up.
Fruit Selection and Moisture Control
Listen, this is critical for the longevity of your Handmade candy cup of banana split, raspberries, cranberries, decorated with honey: your fruit must be dry before it goes in! If there is any water clinging to the raspberries or if those cranberries haven’t been patted dry after rehydrating, that moisture will start dissolving your candy shell from the inside out, making it cloudy and sticky. You want that crisp, shiny contrast between the hard candy and the soft fruit, so pat everything down thoroughly! If you are interested in other recipes that focus on fresh fruit, check out my guide on raspberry chia pudding.
Answering Common Questions About This Recipe
I get so many questions whenever I post pictures of these! It’s a little different than regular baking, so I totally understand why you want to double-check things before you start pouring hot sugar. Don’t worry, I’ve gathered the most common things people ask about making these little edible wonders.
Can I substitute the honey in this Handmade candy cup of banana split, raspberries, cranberries, decorated with honey?
That’s a great question if you have dietary needs! The raw, unfiltered honey adds such a lovely floral note, but yes, you can absolutely swap it out. If you are looking for a vegan option, agave nectar works really well as a direct substitute for the drizzle. It’s thinner, so you might want to warm it just a tiny bit less than the honey. If you’re making a sugar-free version using isomalt for the cups, you’ll definitely need a sugar-free syrup substitute for the topping, too.
How long do these edible cups last?
Because we are using fresh fruit inside, these are definitely a “make today, eat today” kind of treat. The moisture from the banana and berries will start to break down the candy shell within about 12 hours, especially if you live somewhere humid. If you absolutely must make them ahead, store the empty candy cups tightly wrapped in plastic in a cool, dry place for up to two days. Fill them right before serving! For other quick dessert ideas, take a look at my desserts section.
What is the ‘hard-crack stage’ for the candy?
Oh, the hard-crack stage! That’s just a fancy candy term for when the sugar is fully cooked and incredibly brittle when dropped in cold water. For us home cooks, it means getting your thermometer to exactly 300 degrees Fahrenheit. If you go under that, the candy won’t harden properly and will stay sticky. If you go way over, it will start to taste burned and be too dark. That 300 mark is the sweet spot for a clear, strong shell! Understanding the science behind cooking sugar is key to great candy making, which is similar to the precision needed for making easy baked salmon sushi cups.
Storing Leftovers of Your Handmade candy cup of banana split, raspberries, cranberries, decorated with honey
I’m going to be honest with you—these are best eaten the day you make them. Once that fresh fruit goes into the candy cup, the clock starts ticking because the moisture starts migrating! If you absolutely have extras, the key is keeping them away from any humidity or warmth. You can’t really store the fully assembled cups for long, maybe just a few hours on the counter if the weather is cool.
If you successfully made extra candy cups, store those empty shells separately. They keep much better! Here’s my quick guide:
| Component | Storage Method | Duration |
|---|---|---|
| Assembled Cups (Fruit & Candy) | Airtight container, cool room temp | Up to 6 hours |
| Empty Candy Cups Only | Airtight container, pantry | Up to 2 days |
Understanding the Estimated Nutrition Data
I always like to give you an idea of what you’re digging into when you make one of my recipes. Remember, since we are using fresh fruit and homemade candy, these numbers are estimates based on the standard amounts listed. They are calculated per single candy cup serving, so keep that in mind when you grab a second one!
Nutritional Breakdown Table
| Nutrient | Amount (Estimated) |
|---|---|
| Calories | 165 kcal |
| Sugar | 32g |
| Fat | 0.2g |
| Carbohydrates | 38g |
| Protein | 0.5g |
| Cholesterol | 0mg |
Share Your Experience Making This Treat
I poured my heart into figuring out the perfect technique for these little gems, and now I need to hear from you! Did the candy come out clear and glossy? Did your family love the bright mix of banana, raspberries, and cranberries? Please leave a comment below and let me know how your **Handmade candy cup of banana split, raspberries, cranberries, decorated with honey** turned out. A star rating helps other bakers know it’s worth the effort!
Print
Divine Handmade candy cup 165 kcal
- Total Time: 45 minutes
- Yield: Variable based on mold size
- Diet: Vegetarian
Description
Create beautiful, edible candy cups filled with fresh banana, raspberries, and cranberries, finished with a drizzle of golden honey. This recipe combines homemade candy craft with fresh fruit indulgence.
Ingredients
- 2 cups high-quality hard candy (clear or lightly colored)
- 1 tablespoon lemon juice
- Non-stick silicone molds (cup or bowl shaped)
- 1 medium ripe banana, sliced
- ½ cup fresh raspberries
- ¼ cup dried cranberries, slightly rehydrated
- 2 tablespoons raw, unfiltered honey
- Optional: 2 tablespoons chopped nuts (walnuts or almonds)
- Optional: ½ teaspoon vanilla extract
Instructions
- Set up your workspace. Line a baking sheet with parchment paper and place silicone molds on top. Calibrate your candy thermometer.
- Place the hard candy in a saucepan over medium-low heat. Stir until melted. Add lemon juice.
- When the candy reaches 300°F (hard-crack stage), remove it from heat immediately.
- Working quickly, pour a small amount into each mold. Rotate the mold to coat the sides evenly, forming a thin cup.
- Before the candy hardens completely, gently press the centers down with the back of a spoon to deepen the cup shape.
- Let the cups cool completely until firm, about 20-25 minutes.
- Prepare the filling. Slice the banana. Wash and dry the raspberries. Rehydrate dried cranberries in warm water for 5 minutes, then pat dry. Warm the honey slightly for easier drizzling.
- Carefully remove the candy cups from the molds.
- Assemble the treats by layering banana slices, raspberries, and cranberries inside each cup.
- Drizzle honey over the fruit. If using, sprinkle chopped nuts over the top for texture.
Notes
- Substitution options include using isomalt for a sugar-free candy cup or agave nectar instead of honey for a vegan option.
- Slightly chilling the molds for 10 minutes before use helps the candy set with a better shine.
- Warming the spoon in hot water before pressing the candy centers helps if the candy becomes too firm.
- Prep Time: 15 minutes
- Cook Time: 10 minutes
- Category: Dessert
- Method: Candy Making and Assembly
- Cuisine: American
Nutrition
- Serving Size: 1 candy cup
- Calories: 165 kcal
- Sugar: 32g
- Sodium: Negligible
- Fat: 0.2g
- Saturated Fat: Negligible
- Unsaturated Fat: Trace
- Trans Fat: 0g
- Carbohydrates: 38g
- Fiber: 3g
- Protein: 0.5g
- Cholesterol: 0mg