Skip to content
If you are tired of desserts that are just ‘okay’ and you’re craving a serious burst of sunshine in your mouth, then you’ve come to the right place! These tangy Lemon Bars are guaranteed to wake up your taste buds and become the star of every potluck you attend. Forget those complicated pastries; we’re keeping things honest and unbelievably flavorful here.
Hi, I’m Anna Kowalska, and here I share tried-and-true homemade recipes that you and your family will love. Everything is made with heart and flavor, just like my grandmother taught me. I believe baking should bring joy, not stress, and these Lemon Bars prove you don’t need fancy techniques to achieve a show-stopping result. They are simple, they are bright, and honestly, they disappear the second they hit the counter. You’re going to love how easy this classic citrus dessert comes together!
Jump to:
Gathering Your Ingredients for Perfect Lemon Bars
When you’re making something this simple, the quality of your components really shines through. We aren’t hiding anything in these Lemon Bars, so make sure your ingredients are ready to go! The crust needs that rich, buttery foundation, and the filling needs that sharp, clean citrus punch. Trust me, skimping on the fresh stuff here makes all the difference between a good bar and a truly great one.
It’s all about balancing that dense shortbread base with the bright, zesty topping. Grab your measuring cups and let’s get everything lined up before we even think about turning on the oven.
Crust Ingredients
For the base, we need one cup of unsalted butter, and it absolutely must be softened—not melted, just soft enough to press easily. Then you’ll measure out two cups of all-purpose flour and a half cup of powdered sugar for that delicate sweetness in the shortbread. This mixture comes together beautifully, making a fantastic foundation.
Tangy Filling Components
Now for the star! You’ll need four large eggs to give the filling structure. Then grab one and a half cups of granulated sugar. The real secret here is the lemon: you must use a quarter cup of fresh lemon juice and the zest of two whole lemons. If you use bottled juice, you’ll lose that vibrant zing that makes these bars famous!
Essential Equipment for Making Lemon Bars
Baking isn’t just about the ingredients; you need the right tools to get that perfect texture, especially with a two-layer bake like this. Don’t worry, you probably have everything already! Having these items ready ahead of time makes the whole process so much smoother. We want to avoid any frantic searching once the oven is hot.
Baking Vessels
You absolutely need a 9×13-inch baking pan for this recipe. I always suggest lining it completely with aluminum foil, making sure there’s an overhang on two sides. That foil sling is your best friend when it comes time to lift the whole thing out later!
Mixing and Measuring Tools
Grab a couple of mixing bowls—one for the crust and one for the filling. You’ll want a sturdy whisk for getting the eggs and sugar perfectly smooth in the filling, and of course, your measuring cups and spoons. A good rubber spatula is also handy for scraping down the sides of the bowl.
Step-by-Step Instructions for Baked Lemon Bars
Okay, now we get to the fun part—putting it all together! These steps are straightforward, but timing is everything when you’re dealing with a hot crust and a cool filling. Follow along closely, and you’ll have perfect, tangy Lemon Bars every single time. I always try to get my filling whisked while the crust is baking so everything moves fast.
Preparing the Shortbread Crust
First things first: get your oven preheated to 350 degrees Fahrenheit, or 175 Celsius if you use the metric system. Remember to line that 9×13 pan with foil, leaving some overhang—this is non-negotiable for easy removal! Now, in your first bowl, mix that softened butter with the two cups of flour and the half cup of powdered sugar. You’re mixing this until it looks crumbly, like coarse, sandy gravel. Don’t overwork it; we want that tender shortbread texture.
Take that crumbly mixture and press it down firmly and evenly into the bottom of your prepared pan. Use the bottom of a dry measuring cup to really compact it. A tight crust means no soggy bottoms later on!
Baking the Crust Base
Slide that crust into the preheated oven. You need to bake this base on its own for about 15 to 20 minutes. You’re looking for it to be just lightly golden around the edges. It doesn’t need to be deeply brown, just set. Keep an eye on it so it doesn’t bake too long, or it will taste dry later.
Creating the Zesty Lemon Filling
While that shortbread is firming up, whisk together your filling ingredients in a separate bowl. You want the four eggs, the granulated sugar, that last quarter cup of flour, the fresh lemon juice, and all that beautiful zest. Whisk this really well until everything is smooth and uniform. You don’t want any streaks of egg white or unincorporated sugar lumps. It should look like liquid sunshine when you’re done.
Assembling and Final Bake of Lemon Bars
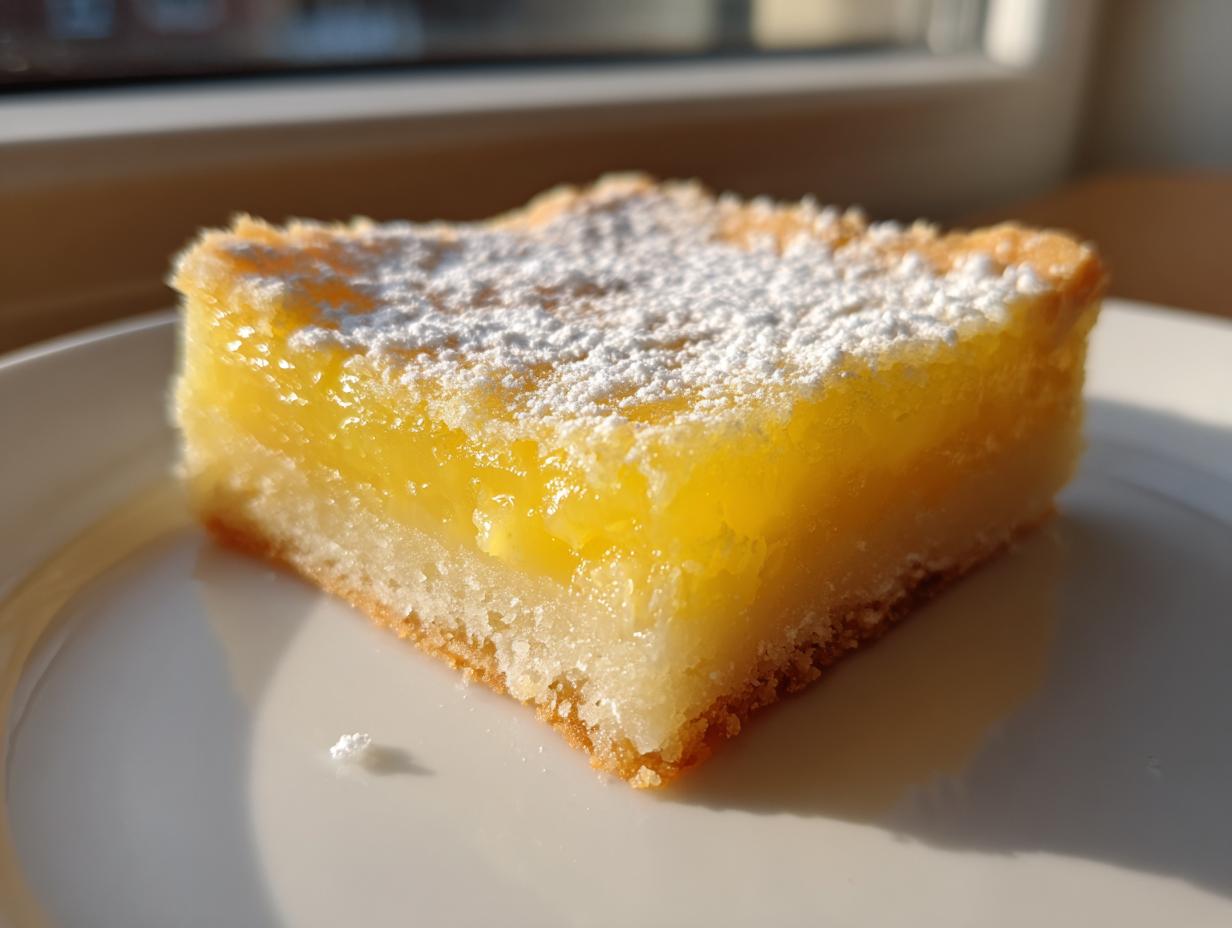
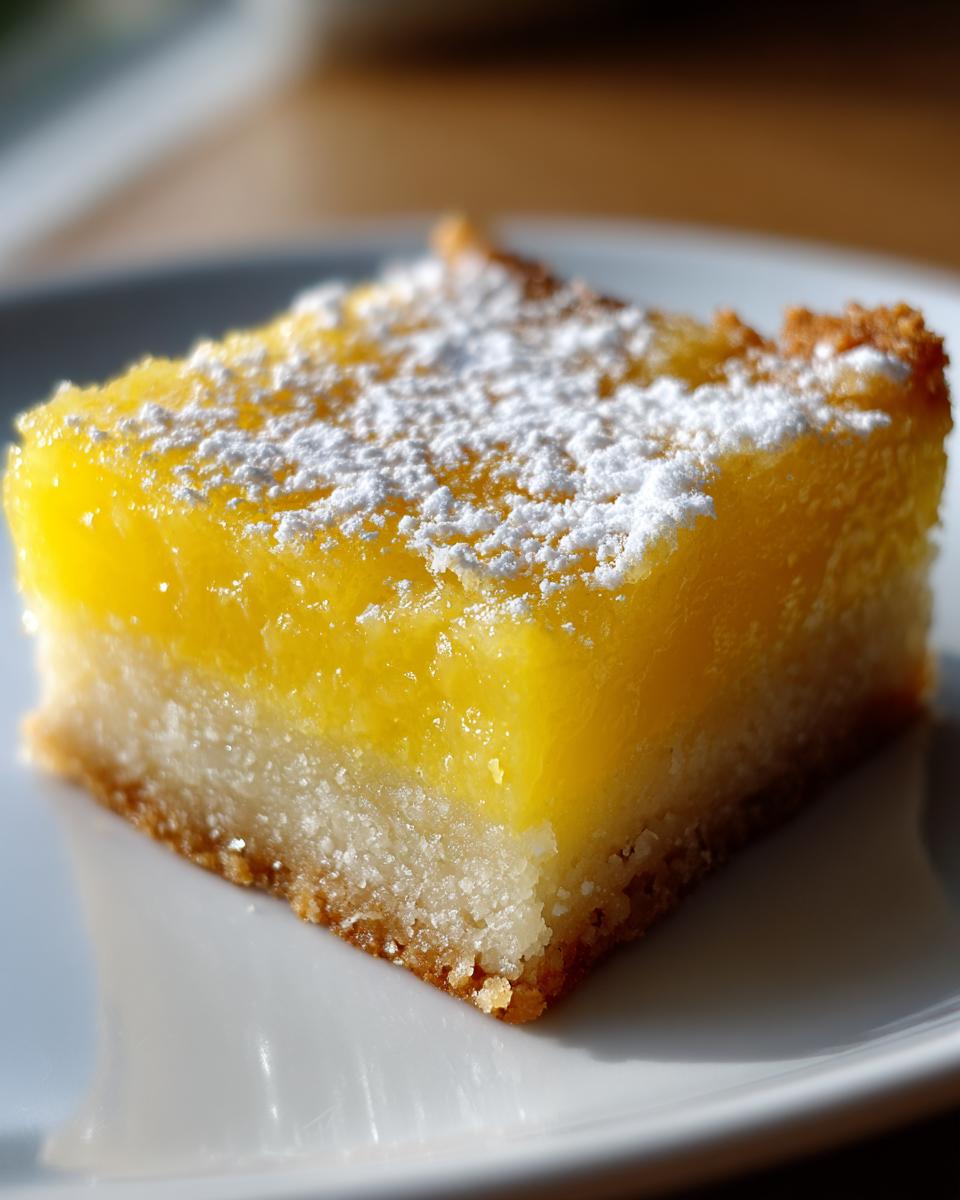
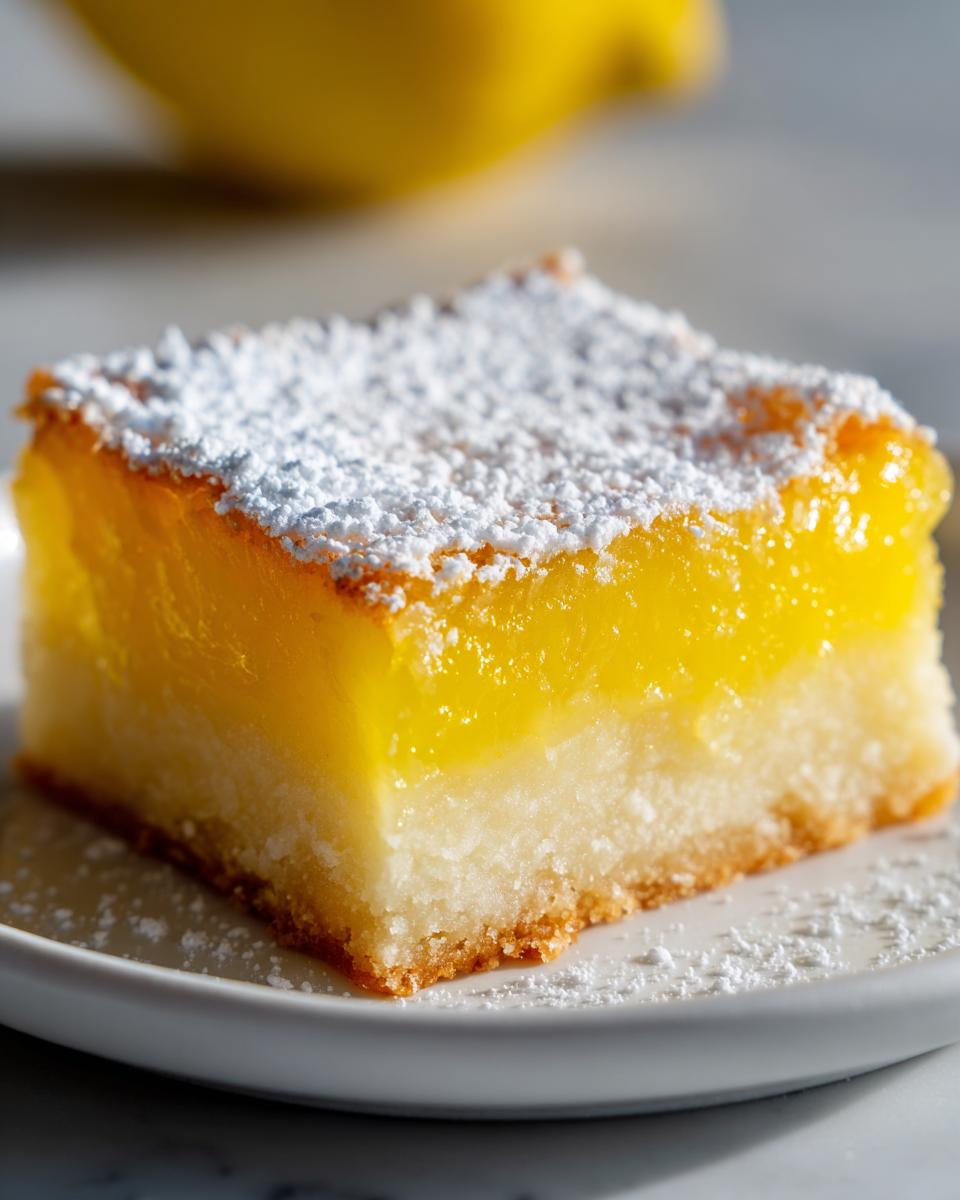
This step is crucial! Once the crust comes out of the oven, you pour that liquid filling right over the hot base—don’t let the crust cool down! Carefully pour it slowly to avoid disturbing the base too much. Then, gently return the whole pan back into the oven. You’ll bake these for another 20 to 25 minutes. The filling is done when it looks set, meaning it’s no longer jiggly in the middle. If you gently shake the pan, the middle should only have a slight wobble. Cool completely, and then dust before cutting those perfect squares!
Tips for Achieving Excellent Lemon Bars Texture
Even when following the recipe exactly, sometimes these beautiful Lemon Bars can give us a little trouble—maybe the crust gets soggy or the filling cracks. Don’t fret! I’ve learned a few tricks over the years that keep mine perfect every single time. The secret to avoiding a soupy bottom layer is making sure that crust is properly baked before the filling ever touches it. A hot base meets cool filling, and it sets up beautifully.
Also, resist the urge to cut them as soon as they come out of the oven! Patience is truly the final, key ingredient here.
Cooling and Cutting Techniques
The biggest rookie mistake I see is trying to slice the bars while they are still warm. The filling will ooze everywhere, and you’ll end up with a mess instead of neat squares. My absolute must-do step—and I insist you do this—is chilling them completely. You should let them cool on the counter until they are just warm, and then pop the whole pan into the refrigerator for at least one full hour. This chilling firms up the filling significantly, allowing you to use a sharp knife to get those clean, beautiful cuts you see in pictures.
Achieving the Perfect Set
When you’re checking for doneness on the final bake, remember that the filling continues to cook slightly as it cools. If you over-bake it to eliminate all jiggle, you risk it cracking or weeping later on. Aim for that slight wobble in the center; it shows the eggs have cooked enough to hold structure but still retain moisture. Also, trust your oven thermometer if you have one! Temperature accuracy is huge when baking custards like this filling.
Frequently Asked Questions About Lemon Bars
I get so many questions about these tangy citrus desserts! It’s great that you all are trying them out. Most issues people run into are usually small tweaks in technique, not big recipe mistakes. Here are the most common things I hear when people are making their first batch of these fantastic Lemon Bars. Don’t worry if you have more questions; just drop them in the comments below!
Can I Make Lemon Bars Without Zest?
You certainly *can*, but I really wouldn’t recommend it if you want that true, bright flavor! The zest holds all the essential oils from the lemon peel, which gives the filling its powerful punch. If you skip the zest, the flavor will be much flatter—it will taste sweet and tart from the juice, but it won’t have that incredible aromatic quality. If you have to skip it, try to use a little extra lemon extract, but fresh zest is always the winner here.
How Long Do These Lemon Bars Last?
These bars are surprisingly sturdy, especially because the filling is set. They generally last well for about four days when stored correctly in the refrigerator. I always keep mine airtight in the pan (or transferred to a sealed container). If you are planning on keeping them longer than that, or if you made a huge batch, you can freeze them! Check out the section below on storage for the full details on freezing.
What is the Best Way to Dust Powdered Sugar?
This is where presentation comes in! You want an even, snowy coating, not clumps. Wait until the bars are completely cool—seriously, cold—before you dust them. Use a fine-mesh sieve, or what I call a sifter, and tap it gently over the entire surface. This breaks up any clumps in the powdered sugar and gives you that professional, light finish. If you dust them while they are warm, the sugar melts right into the filling and disappears!
Storing and Serving Your Homemade Lemon Bars
Once you’ve managed the hard part—not eating them all right away—you need to know how to keep these beauties fresh for later. These Lemon Bars are surprisingly resilient, but they definitely taste best when they keep their texture. Presentation matters too! A simple dusting of powdered sugar makes them look amazing, but you can’t do that until right before serving if you plan to store them for a day or two.
The refrigerator is your best friend for keeping that tangy filling firm and preventing the crust from getting soft too quickly. They are perfect to make ahead of time for a party! If you are looking for other great make-ahead desserts, check out my recipes for Greek Baklava.
Keeping Your Lemon Bars Fresh
The key to keeping your Lemon Bars tasting bright is airtight storage in the fridge. If you leave them uncovered, they can dry out or absorb other fridge smells, which we definitely don’t want! I usually leave mine right in the foil-lined 9×13 pan and cover the whole thing tightly with plastic wrap or foil. If you’ve already cut them, use a sturdy container with a lid and place a sheet of parchment paper between the layers so they don’t stick together.
They hold up really well for a few days this way, but honestly, nothing beats that first day fresh out of the fridge. Here’s a quick look at how I handle leftovers:
- Refrigerator Storage: 4 Days
- Freezer Storage: Up to 2 Months
- Best Container: Airtight Pan or Container
Share Your Delicious Lemon Bars Experience
I put my whole heart into sharing these recipes with you, and I truly hope your family loves these bright, tangy treats as much as mine does! If you whipped up a batch of these wonderful Lemon Bars, please let me know how they turned out for you. Drop a rating or leave a comment below. I love hearing your stories and seeing your successes in the kitchen! If you enjoy citrus desserts, you might also enjoy my recipe for Lemon Raspberry Cookies.
Print
Amazing 1-pan Lemon Bars explode with flavor
- Total Time: 50 minutes
- Yield: 12-16 servings 1x
- Diet: Vegetarian
Description
Tangy Lemon Bars offer a bright, zesty flavor atop a buttery shortbread crust. This classic dessert is simple to make and always a crowd-pleaser.
Ingredients
- 1 cup unsalted butter, softened
- 2 cups all-purpose flour
- 1/2 cup powdered sugar
- 4 large eggs
- 1 1/2 cups granulated sugar
- 1/4 cup all-purpose flour
- 1/4 cup fresh lemon juice
- Zest of 2 lemons
Instructions
- Preheat oven to 350°F (175°C). Line a 9×13-inch pan with foil.
- Mix butter, flour, and powdered sugar until crumbly. Press this mixture firmly into the bottom of the prepared pan to form the crust.
- Bake the crust for 15-20 minutes until it looks lightly golden.
- While the crust bakes, whisk together the eggs, granulated sugar, remaining flour, lemon juice, and lemon zest until well combined.
- Carefully pour the lemon filling over the hot, baked crust.
- Return the pan to the oven and bake for another 20-25 minutes until the filling is set.
- Let the bars cool completely. Dust generously with powdered sugar before cutting into squares.
Notes
- Chill the bars for 1 hour before cutting for cleaner squares.
- Prep Time: 15 minutes
- Cook Time: 35 minutes
- Category: Dessert
- Method: Baking
- Cuisine: American
Nutrition
- Serving Size: 1 bar
- Calories: 250
- Sugar: 20g
- Sodium: 75mg
- Fat: 13g
- Saturated Fat: 8g
- Unsaturated Fat: 5g
- Trans Fat: 0g
- Carbohydrates: 30g
- Fiber: 1g
- Protein: 4g
- Cholesterol: 70mg