Skip to content

Are you dreaming of the beach but stuck inside? I totally get it! Sometimes you just need a little slice of sunshine without turning on the oven, especially when the weather is already hot enough. If you’re looking for a dessert that delivers maximum tropical flavor with minimum effort, stop scrolling right now.
I’m Anna Kowalska, and here I share tried-and-true homemade recipes that you and your family will love. Everything I create is made with heart and flavor. You don’t need complicated steps or fancy equipment to make something truly special, and these bars prove it!
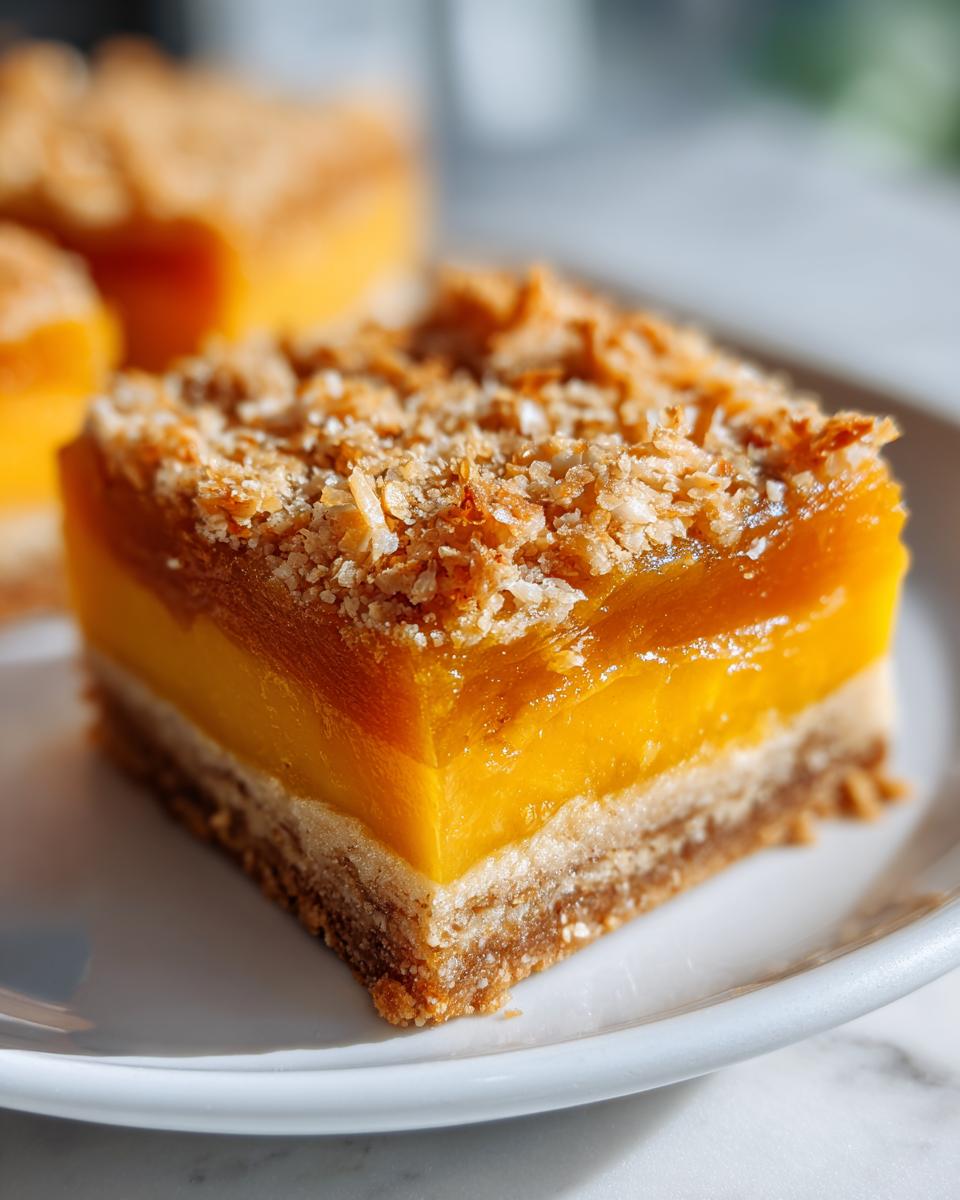
That’s why I’m so excited to share my recipe for the easiest **Mango Coconut Bars** you’ll ever make. They are naturally sweet, incredibly refreshing, and they come together faster than boiling water. Seriously, we’re talking about a few minutes of mixing and then pure freezer magic!
Jump to:
Essential Ingredients for Perfect Mango Coconut Bars
When you’re making a no-bake treat, every single ingredient has to pull its weight, right? There’s no oven baking to hide behind! That’s why the quality and measurement of what goes into these **Mango Coconut Bars** are absolutely crucial. We only have a few players in this tropical game, so we need them to be top-notch. Trust me, using the right amount of coconut oil for the base makes all the difference between a crumbly mess and a solid foundation that holds up beautifully.
Since this recipe is so simple, you can really taste each component. I always make sure my mango is brilliantly sweet—that’s where all the flavor comes from! Gather your simple components, and let’s get this tropical dream assembled.
| Ingredient | Quantity |
|---|---|
| Crushed Digestive Biscuits | 1\u00bd cups |
| Coconut Oil | \u2153 cup |
| Mango Pur\u00e9e | 1 cup |
| Coconut Cream | \u00bd cup |
| Shredded Coconut (for topping) | \u00bd cup |
Preparing the Digestive Biscuit Base
The base is the backbone of these bars, so don’t skimp on pressing it down! You need exactly one and a half cups of those crushed digestive biscuits. I usually put mine in a sturdy zip-top bag and use a rolling pin—it’s therapeutic! The coconut oil has to be melted, but not scorching hot, when you mix it in. You want just enough to bind those crumbs together when you press them firmly into the pan. If it’s too oily, the base gets greasy; too little, and it falls apart when you try to slice it later.
Crafting the Creamy Mango Filling
This is where the real tropical magic happens! You need a full cup of mango purée. If you can make your own from super ripe, sweet mangoes, please do! If you use store-bought, just make sure it’s 100% mango puree—no added sugars or extra water allowed. The coconut cream is essential here; it’s what gives that lovely, dense, almost fudge-like texture when it freezes. Whisk them together until they’re completely smooth. You shouldn’t see any lumps or streaks of white cream once you’re done mixing.
Step-by-Step Instructions for Making Mango Coconut Bars
Okay, now that we have our beautiful, high-quality ingredients ready, let’s get these **Mango Coconut Bars** built! This whole process moves super fast, which I love, but it means you need to have your 8×8 inch pan lined and ready to go before you even start blending the filling. Don’t get caught flat-footed!
First things first: grab that pan. You want parchment paper lining it so it hangs over two opposite sides. This creates little handles so you can lift the entire block out later—a total lifesaver, trust me. Once it’s lined, take your mixed biscuit and oil base. Sprinkle it evenly across the bottom, and then grab a flat-bottomed glass or measuring cup and press. I mean *really* press it. You want a tight, solid layer that won’t shift when we pour the wet stuff on top.
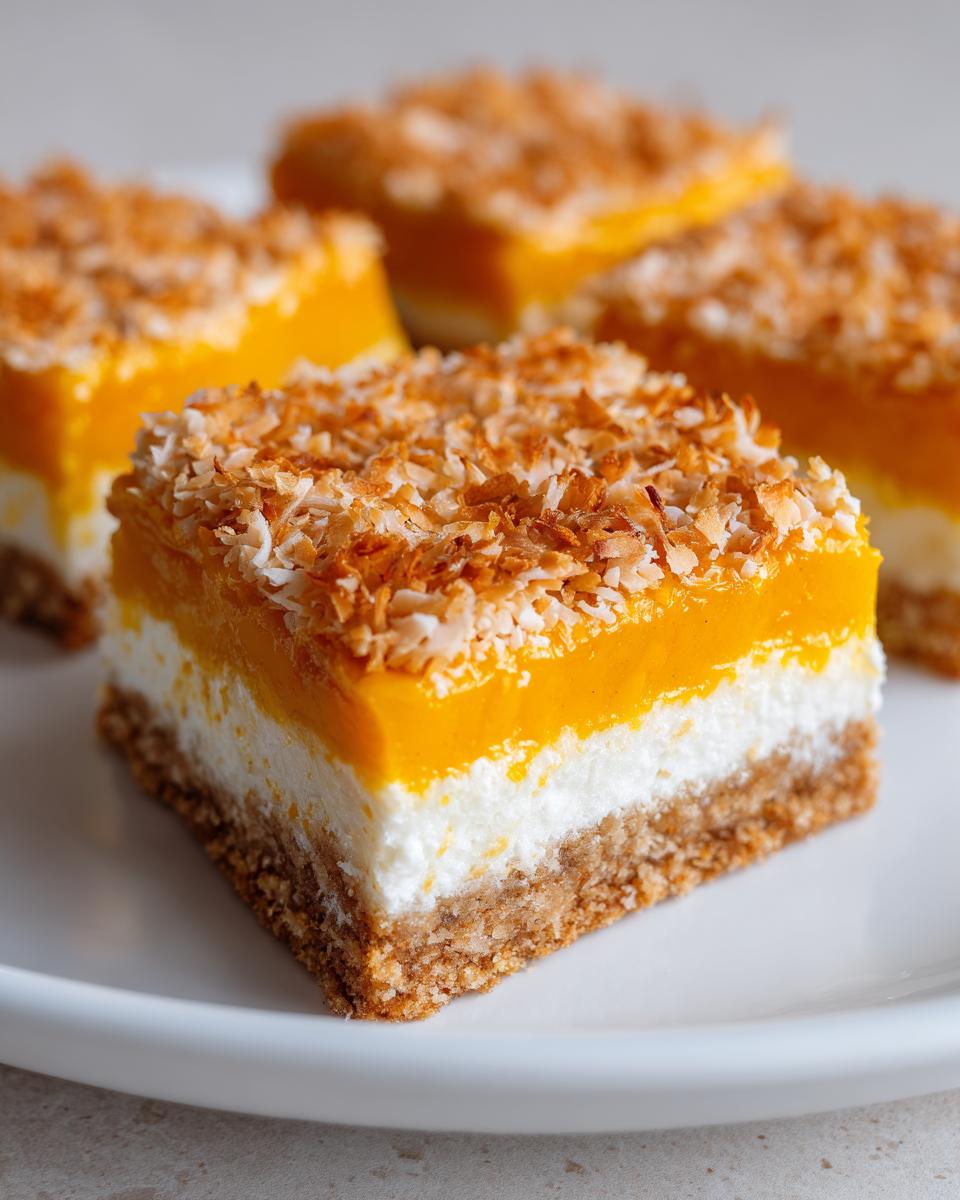
Assembling the Layers of Your Mango Coconut Bars
With your base firmly set, it’s time for the creamy layer. Gently pour that smooth mango purée and coconut cream blend right over the biscuit foundation. Try to pour it toward the center first and let it spread naturally to avoid disturbing the base too much. If you need to nudge it to the edges, use a rubber spatula very carefully. You want an even blanket of tropical sunshine across the whole thing.
Next up is the topping! Take your half-cup of shredded coconut and sprinkle it evenly over the wet mango mixture. Don’t press this layer down at all! It needs to sit lightly on top so it toasts up nicely later, even though we aren’t actually baking it right now. It just adds that perfect texture contrast.
Freezing and Slicing the Mango Coconut Bars
This is the hardest part because it requires patience, but you absolutely must freeze these **Mango Coconut Bars** for a minimum of three hours. I usually pop mine in for four just to be safe! They need to be completely rock solid so they don’t squash when you cut them. If you try to slice them when they are just “mostly firm,” you’ll end up with a soupy, messy disaster.
When the time is up, pull the whole slab out using those parchment paper handles we created. Use a long, sharp knife—a chef’s knife works best—and wipe it clean between every single cut. This keeps your lines sharp and clean, giving you those beautiful squares everyone wants to grab first. Slice them into 9 or 12 pieces, depending on how generous you’re feeling!
Why You Will Love These Mango Coconut Bars
I honestly think these bars will become your go-to dessert for summer gatherings or just when you need a quick sweet fix. They check every box for easy, delicious home baking. Seriously, once you try them, you’ll see why I make a batch every time the weather gets warm!
- Prep time is ridiculously fast—seriously, under 15 minutes of actual work!
- No oven required means you stay cool, and clean-up is a breeze.
- The flavor is pure vacation; that combination of sweet mango and toasted coconut is unbeatable.
- These **Mango Coconut Bars** are perfect for potlucks because they hold their shape beautifully straight from the freezer.
Tips for Success with Your Mango Coconut Bars
I’ve made these **Mango Coconut Bars** more times than I can count, and I’ve learned a couple of little tricks to make sure yours turn out absolutely perfect every time. The biggest area people trip up on is the base firmness. If your base feels too soft after pressing, it means your coconut oil wasn’t quite cold enough when you mixed it, or you didn’t press hard enough. You need to use muscle here!
I remember the first time I tried to serve these immediately after freezing for only two hours. Big mistake! The filling squished everywhere when I tried to slice it, and it looked like a melted tropical puddle on the plate. Now, I always give them that full three-hour freeze, minimum. Resist the temptation to rush the freezing step; it’s non-negotiable for nice, clean squares.
Ingredient Substitutions for Mango Coconut Bars
Even though I love the classic ingredients, I know sometimes you need to make swaps based on what you have! If you don’t have digestive biscuits, graham crackers work just as well for the base—just use the same measurement. If you are out of coconut oil, you could try using melted butter, but be warned, the bar might be slightly softer when frozen since butter doesn’t set up as hard as coconut oil does.
For the mango, if fresh mangoes are in season and you’re blending them yourself, that’s fantastic! Just make sure you reduce the liquid content slightly if your fresh purée seems much thinner than the canned version. You want that thick, creamy texture for the filling so your final **Mango Coconut Bars** hold their shape when sliced.
Serving Suggestions for Tropical Bars
These bars are fantastic all on their own, straight from the freezer, but sometimes a little extra something makes the moment special. Because they are so bright and tropical, you don’t want to weigh them down with heavy accompaniments.
My favorite way to serve them is with a tiny sprig of fresh mint tucked right on top—it adds a lovely pop of color and a fresh scent! For drinks, they pair beautifully with a simple glass of sparkling water infused with lime or a chilled glass of iced black tea. Keep it light and refreshing to match that island vibe!
Storing and Reheating Your Mango Coconut Bars
Since these are no-bake and rely on being frozen solid for structure, storage is super important! You want your **Mango Coconut Bars** to stay firm and taste like they were just made yesterday. The best way to keep them fresh is to make sure they are fully frozen before wrapping them up. I use an airtight container, layering the bars with small squares of parchment paper between each layer so they don’t stick together.
They actually keep really well in the freezer for about a month, which is great for having a tropical treat ready whenever you need one. The best part? You don’t need to reheat them at all! That’s the beauty of a freezer dessert. Just pull out what you want to eat about 10 minutes before serving, and they’ll be perfectly sliceable and wonderfully cold.
| Storage Method | Time Frame | Notes |
|---|---|---|
| Freezer (Airtight Container) | Up to 4 weeks | Use parchment paper between layers to prevent sticking. |
| Refrigerator | Up to 2 days | Will soften considerably; best eaten quickly once thawed. |
Frequently Asked Questions About Mango Coconut Bars
I know when you try a new recipe, especially a no-bake one, you always have a few little questions popping up. I’ve gathered the ones I get asked the most about these amazing **Mango Coconut Bars** so you can get straight to enjoying them! Don’t worry if things seem a little different than a baked dessert; these freezer bars have their own little quirks.
We want everyone to have success making these tropical bars, whether it’s your first time or your tenth. Getting the texture just right is the key to loving this recipe!
Can I use fresh mango instead of puree for the Mango Coconut Bars?
Oh, yes, you absolutely can! If you have beautiful, ripe fresh mangoes, go for it. The only thing you have to watch out for is the liquid content. Freshly blended mango might be thinner than the canned puree we use here. If your fresh blend seems watery, just let it sit in a fine-mesh sieve for about 15 minutes before mixing it with the coconut cream. You want to drain off any excess juice so your mango filling sets up nice and firm. Otherwise, the texture of your final **Mango Coconut Bars** might be a little too soft.
What is the best way to cut the frozen bars neatly?
This is the million-dollar question! Cutting them neatly is all about the tool you use and the temperature. You must use a long, sharp knife—a thin slicing knife or even a serrated bread knife works wonders. Before you make the first cut, run the knife under very hot water for about 30 seconds. Dry it off quickly, and then press down firmly through the frozen bar. Wipe the blade clean and reheat it for every single slice. This little trick melts just enough of the frozen filling on the edge to give you a super clean break, preventing that messy dragging effect!
Estimated Nutritional Data for Mango Coconut Bars
I always like to give a little heads-up on what you’re eating, even with a simple treat like this! Since these bars are naturally sweet from the fruit and rely on coconut fat for that creamy texture, the numbers reflect a rich, satisfying dessert. Remember these are estimates based on the ingredients listed, so your exact portion size might shift things a little bit.
| Nutrient | Amount (Per Bar) |
|---|---|
| Calories | 250 |
| Fat | 16g |
| Carbohydrates | 25g |
| Protein | 3g |
Share Your Experience Making These Mango Coconut Bars
I truly hope these easy mango bars brought a little sunshine into your kitchen! If you made them, I’d love to hear how they turned out for you. Did the base hold up perfectly? Did you use fresh mangoes?
Please leave a rating below and tell me about your experience in the comments. And if you snapped a gorgeous photo of your tropical treat, tag me on social media—I can’t wait to see your beautiful creations!
Print
Divine Mango Coconut Bars: 3 Great Tips
- Total Time: 3 hours 15 minutes
- Yield: 9-12 bars 1x
- Diet: Vegetarian
Description
Make these simple Mango Coconut Bars for a refreshing, tropical treat. This recipe uses a digestive biscuit base, a creamy mango filling, and a toasted coconut topping.
Ingredients
- 1½ cups crushed digestive biscuits
- ⅓ cup coconut oil
- 1 cup mango purée
- ½ cup coconut cream
- ½ cup shredded coconut
Instructions
- Line an 8×8 inch baking pan.
- Mix the crushed digestive biscuits and coconut oil. Press this mixture firmly into the bottom of the prepared pan to form the base layer.
- In a separate bowl, blend the mango purée and coconut cream until smooth.
- Spread the mango mixture evenly over the biscuit base.
- Sprinkle the shredded coconut over the top layer.
- Freeze the bars for 3 hours until firm.
- Remove from the pan and slice into individual bars.
Notes
- Serve cold.
- Prep Time: 15 minutes
- Cook Time: 0 minutes
- Category: Dessert
- Method: No-Bake
- Cuisine: International
Nutrition
- Serving Size: 1 bar
- Calories: 250
- Sugar: 18g
- Sodium: 120mg
- Fat: 16g
- Saturated Fat: 12g
- Unsaturated Fat: 4g
- Trans Fat: 0g
- Carbohydrates: 25g
- Fiber: 2g
- Protein: 3g
- Cholesterol: 0mg