Skip to content
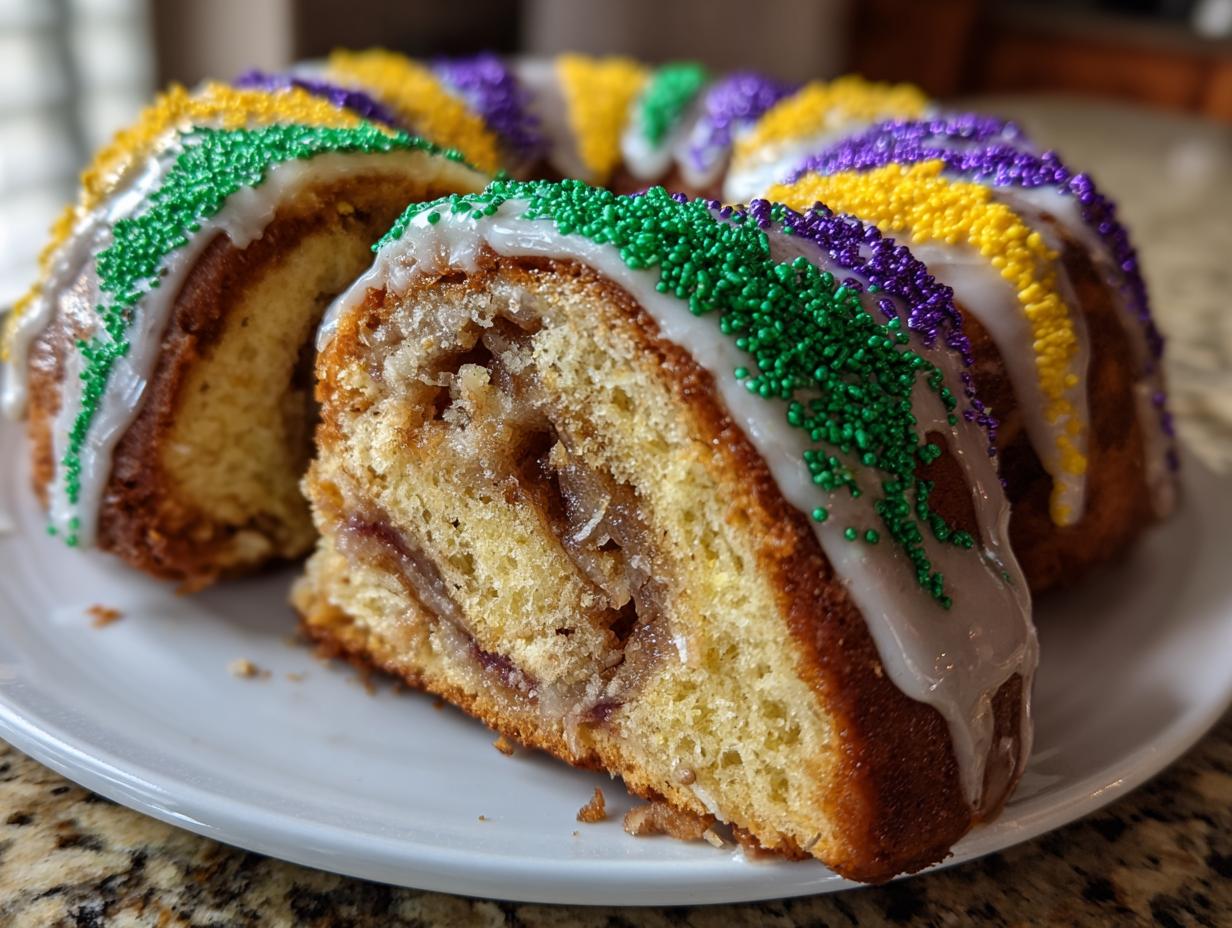
Mardi Gras King Cake season demands a cake that tastes like it came straight from a New Orleans bakery, but I’m here to tell you that making it at home is not only possible but so much more rewarding! Hi, I’m Anna Kowalska, and here I share tried-and-true homemade recipes that you and your family will love. I truly believe everything is made with heart and flavor, and this King Cake is no exception.
Forget those dry, store-bought versions you sometimes see. My recipe uses a soft, enriched dough that braids beautifully before baking into a tender, slightly sweet bread. The secret really is in the rising time and that glorious cinnamon-sugar filling that melts right into the dough. This isn’t just a dessert; it’s a centerpiece for your Carnival celebration, and trust me, you’ll feel like a pro after you pull this beauty out of the oven.
We are going to take this process step-by-step so you don’t miss a thing. It’s easier than you think!
Jump to:
Essential Ingredients for Your Mardi Gras King Cake
Okay, listen up! The secret to a truly fantastic Mardi Gras King Cake isn’t some fancy technique; it’s using ingredients that actually taste like something. We want rich butter, good quality cinnamon, and yeast that’s ready to work hard for us! Don’t try to skimp here; these simple components build that perfect sweet bread texture we’re looking for.
I’ve broken everything down below so you can check your pantry before you start. Trust me, having everything ready makes the whole process smooth as silk.
Dough Components for the Mardi Gras King Cake
This is the foundation, so pay attention to your milk temperature! You need warm milk—not hot—to wake up that yeast packet. We’re using basic pantry staples here: flour, sugar, salt, eggs, and melted butter. It’s the combination that matters, but the quality of your yeast is non-negotiable for a high-rising Mardi Gras King Cake.
Flavorful Filling Ingredients
This is where the magic happens! We need softened butter—and I mean really soft, almost spreadable—mixed with dark brown sugar and cinnamon. That combination creates a sweet, gooey layer when baked. If you’re a nut lover like me, toss in those chopped pecans, but honestly, the cake is incredible even without them.
Simple Glaze and Decoration Materials
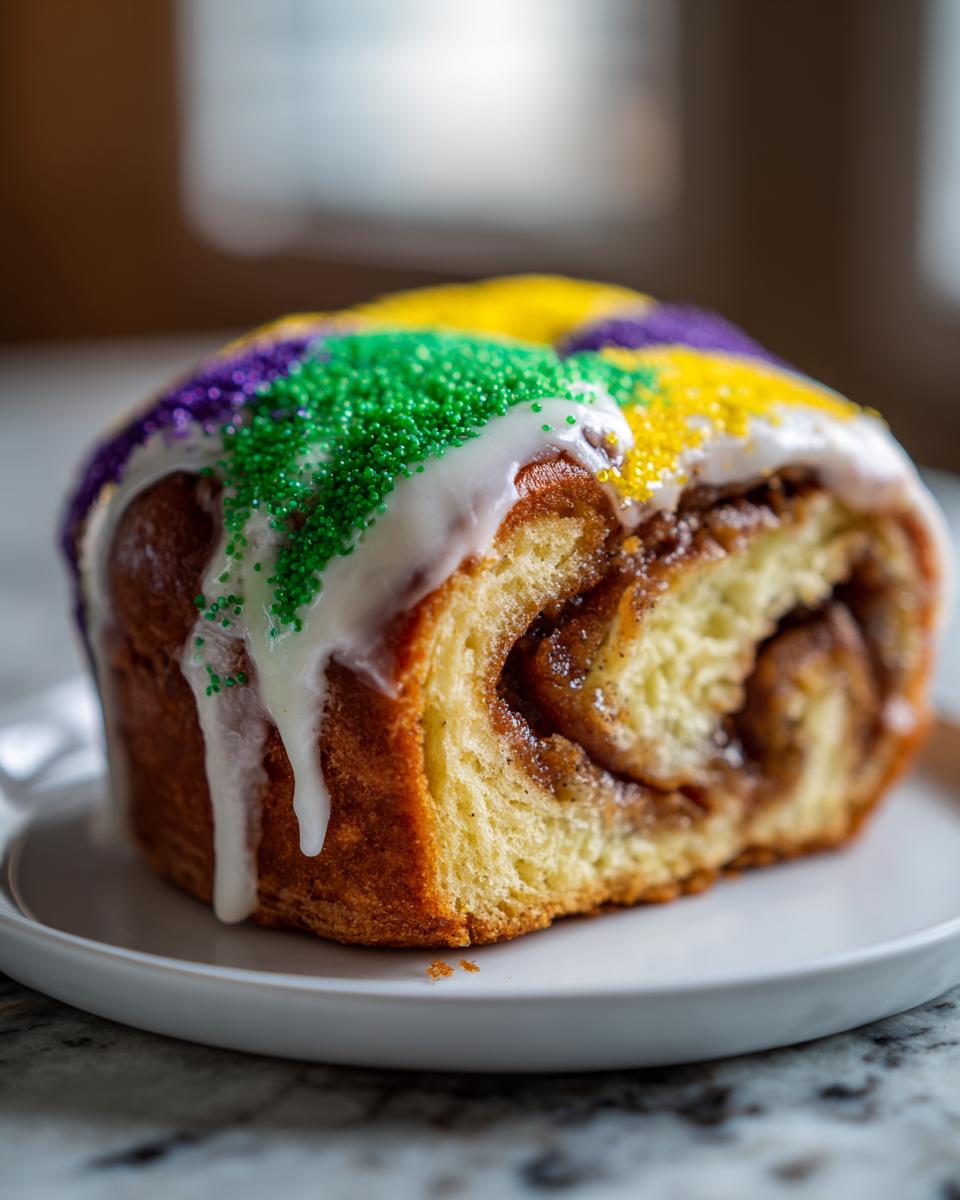
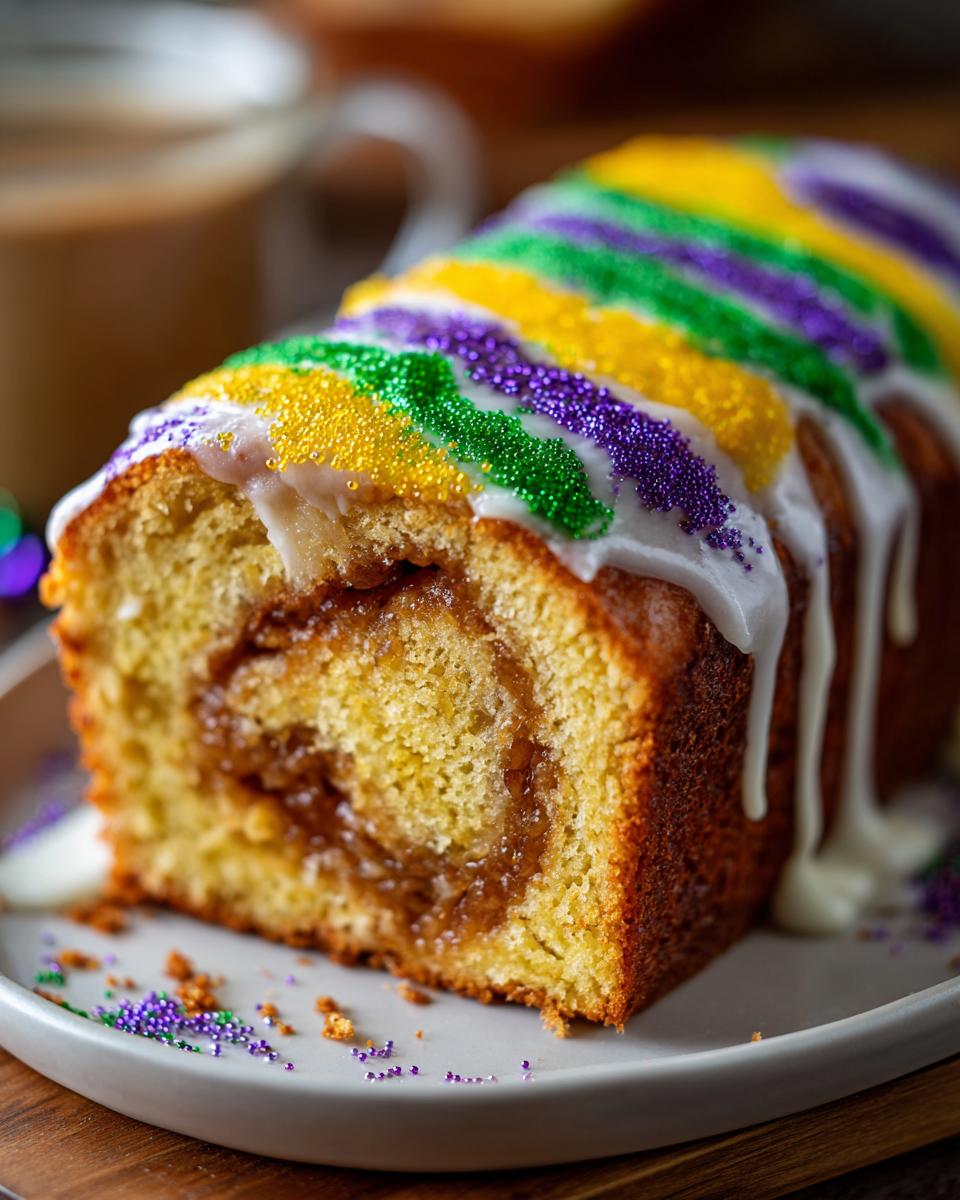
The very last step is dressing up our beautiful cake! The glaze is super simple: just powdered sugar, a splash of milk, and vanilla extract. But the real star for any Mardi Gras King Cake is the sugar! You absolutely must have the traditional colors: green, yellow, and purple sanding sugar. That’s what signals to everyone that the party has officially started!
Equipment Needed for Baking Your King Cake
You don’t need a million fancy gadgets to make this bread, but a few things really help speed things along. I always grab my trusty stand mixer with the dough hook attachment; it saves my arms during the kneading time! You’ll also need a good quality rolling pin to get that dough rectangle thin enough.
Make sure you have a large bowl for the first rise and a parchment-lined baking sheet ready for the final shape. If you are using a Bundt pan, make sure it’s greased really well. That’s about it! Simple tools for a show-stopping result.
Step-by-Step Instructions for the Mardi Gras King Cake
Now we get to the fun part—actually assembling our gorgeous, braided masterpiece! Don’t rush the rising times; that’s where all the airy texture comes from. We’re building a sweet bread here, so patience is key to a perfect Mardi Gras King Cake.
Activating the Yeast and Mixing the Dough
First things first: heat control! Preheat your oven to a very low 200 degrees Fahrenheit, but only to use it as a warm spot later—don’t bake anything yet! We need to wake up that yeast. Take your warm milk—and I mean *warm* to the touch, around 105 to 115 degrees, not scalding hot—and stir in that tablespoon of sugar and the yeast. If it gets too hot, you’ll kill the yeast, and then you’re starting over! Wait about five to ten minutes until it gets foamy on top. That foam tells you it’s alive and ready to go!
Once you see that happy foam, pour that yeast mixture, your room-temperature eggs (I always put mine in warm water for five minutes beforehand to take the chill off), and the melted butter into your stand mixer. Mix that up just until it’s combined. Then, add the rest of your sugar, the salt, and the flour. Mix it slowly at first so the flour doesn’t fly everywhere! Mix it until you see a shaggy dough forming.
Kneading and First Rise for Your Mardi Gras King Cake
This is where we build structure. Turn that dough out onto a lightly floured counter. You need to knead this dough by hand for a solid five to seven minutes. I know, I know, it feels like forever! But kneading develops the gluten, and that’s what keeps your Mardi Gras King Cake from falling apart later. Keep working it until it feels smooth and elastic under your hands.
Next, grab a nice big bowl and rub two tablespoons of olive oil around the inside—this keeps the dough from sticking while it swells. Pop the dough in, cover the bowl tightly with plastic wrap or a clean cloth, and set it somewhere warm for one hour. It should double in size. That first rise is crucial for developing the flavor, so be patient!
Filling, Rolling, and Shaping the Cake Ring
Once that dough has puffed up beautifully, punch it down gently to release all that air. Knead it again for just a minute or two to make it manageable. Now, roll that dough out into a big rectangle, aiming for about 20 inches long. Don’t worry if it’s not perfect, but try to keep it relatively even.
Time for the filling! Brush that softened butter all over the dough surface, edge to edge. Then, sprinkle that brown sugar and cinnamon mixture evenly over the top. If you decided to use pecans, sprinkle those right on top of the sugar layer. Now, roll it up tightly, like a jelly roll, starting from one long edge. You want a nice, tight spiral!
Carefully transfer your long dough log onto a baking sheet lined with parchment paper. Bring the ends together to form a circle or an oval shape—seal those ends really well with a little bit of water or milk so it doesn’t pop open while baking. Cover it again and let it rest in that warm spot for a final 60 minutes. Right before it goes into the oven, brush the top lightly with milk.
Baking and Applying the Signature Glaze
Now we bake! Increase that oven temperature to 375 degrees Fahrenheit. Bake the cake for about 25 to 30 minutes. You’re looking for a lovely golden brown color. When you gently tap the side, it should sound hollow. Let that beauty cool down on the pan for a good 15 to 20 minutes before you even think about glazing it, or the icing will just melt right off.
While it cools, whip up the glaze! Just whisk the powdered sugar, vanilla, and milk together until it’s smooth and thick enough to coat the back of a spoon. Once the cake is cool enough to handle but still slightly warm, drizzle that glaze all over. And the final, most important step for any Mardi Gras King Cake: shower it generously with your purple, green, and yellow sugars!
Tips for Achieving Expert Results with Your King Cake
I’ve learned a few things over the years that really help move this recipe from good to absolutely amazing. First, that warm water bath for the eggs? It’s not just a suggestion; it really helps the yeast activate quickly and evenly. If your yeast doesn’t foam up after ten minutes, toss it and start that step over. A sluggish yeast means a flat cake, and nobody wants that!
Remember that second rise time? Please, don’t skip it! That final 60 minutes lets all that air you kneaded out during the second punch-down get back into the dough. That’s what makes the final bread light and airy instead of dense and bready. It gives you that perfect, soft texture.
When you’re ready to bake, make sure your oven has actually hit 375 degrees before you slide the cake in. Ovens lie sometimes! Also, that plastic baby is super important for tradition, but be super careful when you hide it. I always make a small, shallow slit *after* the cake is baked but *before* the glaze goes on, just to make sure it slides in safely without tearing the structure.
Storing and Serving Your Delicious Mardi Gras King Cake
Once you’ve celebrated and enjoyed your first slices, you’ll want to know how to keep that sweet bread fresh! Honestly, leftovers are my favorite part, but you have to store them right. If you have any Mardi Gras King Cake left, keep it covered tightly at room temperature. Because of the simple glaze, it usually lasts a couple of days just fine.
If you’re saving it longer, wrap individual slices tightly in plastic wrap and then pop them into a freezer bag. It freezes beautifully for up to three months! When you want a treat later, just let it thaw on the counter, or warm it up for about 15 seconds in the microwave—it tastes almost freshly baked.
For serving, I always recommend trying it slightly warm with the glaze, but it’s great eaten cold too. Check the table below for all the quick details on how long things last. If you are looking for other sweet bread recipes, check out my guide on the best zucchini bread recipe.
| Storage Method | Duration |
|---|---|
| Room Temperature (Covered) | 2-3 Days |
| Freezer (Airtight) | Up to 3 Months |
Frequently Asked Questions About the Mardi Gras King Cake
I get so many questions once people start tackling this recipe, and that’s totally normal! It’s a fun tradition, but the bread part can feel a little intimidating at first. I’m happy to clear up any confusion you have about making your first homemade Mardi Gras King Cake.
What is the significance of the colors on the Mardi Gras King Cake?
This is my favorite question! The colors aren’t just pretty; they represent the whole spirit of Carnival. The purple sugar symbolizes justice, which is serious business! Green stands for faith, and the yellow or gold sugar represents power. When you sprinkle those three colors on top of your sweet bread, you’re officially ready to celebrate Mardi Gras! Learn more about the history of Mardi Gras traditions here.
Can I skip the second rise time for this Mardi Gras King Cake recipe?
Oh, please don’t skip it! I know we are always trying to save time, but that second rise is essential for the proper texture of your King Cake. The first rise builds flavor, but the second rise is what makes the dough light, puffy, and airy before it hits the oven. If you skip it, you end up with a dense, heavy bread that just doesn’t feel festive enough. Give it that full hour to puff up!
How do I find the plastic baby after baking?
This is the most important safety tip for any Mardi Gras King Cake! You must warn everyone eating to look out for the tiny plastic baby hidden inside. I always push the baby into the dough right before that final rise, making sure it’s near the seam where the ends are joined. When slicing, be careful, and always remind your guests to check their piece before taking a big bite. It’s tradition, but safety comes first! For more baking safety tips, check out this guide on food safety.
Sharing Your Homemade Dessert Experience
Well, that’s it—you’ve done it! You’ve made a spectacular, authentic Mardi Gras King Cake right in your own kitchen. I really hope this recipe brought some festive joy to your table. I’d absolutely love to hear how it turned out for you! Did the braid look perfect? Let me know in the comments below, and don’t forget to give this recipe a star rating if you loved the results! If you enjoy baking sweet breads, you might also like my recipe for homemade garlic knots.
Print
3 Amazing Mardi Gras King Cake Secrets
- Total Time: 2 hours 45 minutes
- Yield: 1 King Cake 1x
- Diet: Vegetarian
Description
This Mardi Gras King Cake recipe provides simple steps to create a festive, sweet, braided cake perfect for celebrating. You will mix a soft dough, fill it with cinnamon and brown sugar, shape it into a ring, bake it, and top it with a simple glaze and traditional colors.
Ingredients
- 1 cup warm milk
- 1 packet instant rise yeast
- 1/4 cup melted butter
- 1/4 cup granulated sugar + 1 tbsp, separated
- 2 large eggs
- 1/2 tsp salt
- 4 cup all-purpose flour
- 2 tsp olive oil
- Filling: 2/3 cup brown sugar
- Filling: 2 teaspoon cinnamon
- Filling: 6 tablespoons softened unsalted butter
- Filling: 1/2 cup chopped pecans (optional)
- Icing: 1.5 cup powdered sugar
- Icing: 1.5 tablespoons milk
- Icing: 1/2 tsp vanilla
Instructions
- Preheat the oven to 200 degrees Fahrenheit.
- Place eggs in a bowl of warm water for 5 minutes to reach room temperature.
- Add warm milk and 1 tbsp sugar to a bowl. Stir in yeast. Let this sit for 5 to 10 minutes.
- Pour the yeast mixture, eggs, and melted butter into your stand mixer bowl. Mix until combined.
- Add the remaining sugar, salt, and flour. Mix until the dough incorporates well.
- Turn the dough onto a lightly floured surface. Knead for 5 to 7 minutes until smooth.
- Place 2 tbsp olive oil in a large bowl. Put the dough on top. Cover the bowl and let the dough rise in a warm spot for 60 minutes.
- Punch the risen dough down to release the air. Knead the dough again for 1 to 2 minutes on a lightly floured surface.
- Roll the dough into a large rectangle, approximately 20 inches long.
- Brush the entire surface of the dough with softened butter. Sprinkle with brown sugar and cinnamon. Sprinkle pecans over the filling if you choose to use them.
- Roll the dough tightly lengthwise, like a jelly roll.
- Transfer the dough to a parchment-lined baking dish. Shape the dough into a circle or oval by bringing the ends together and sealing them with water or milk.
- Cover the shaped cake and let it rise for an additional 60 minutes. Brush the top with milk before baking.
- Bake in a 375-degree oven for 25 to 30 minutes, or until golden brown.
- Let the cake cool for 15 to 20 minutes.
- To make the glaze, combine powdered sugar, milk, and vanilla in a bowl. Stir until the icing is smooth, thick, and pourable.
- Cut a small slit into the dough, either inside or on the outer side, and slide the plastic baby inside.
- Drizzle or pour the glaze over the King Cake. Sprinkle with green, yellow, and purple sanding sugar.
- Serve the cake.
Notes
- The warm water bath helps activate the yeast quickly.
- Kneading develops the gluten, giving the cake structure.
- The second rise allows the cake to become light and airy before baking.
- The plastic baby inside is traditional; remember to warn eaters!
- Use green, yellow, and purple sanding sugar for authentic Mardi Gras colors.
- Prep Time: 45 minutes
- Cook Time: 30 minutes
- Category: Dessert
- Method: Baking
- Cuisine: American (New Orleans)
Nutrition
- Serving Size: 1 slice
- Calories: Estimate varies based on size and icing amount
- Sugar: Estimate varies
- Sodium: Estimate varies
- Fat: Estimate varies
- Saturated Fat: Estimate varies
- Unsaturated Fat: Estimate varies
- Trans Fat: 0g
- Carbohydrates: Estimate varies
- Fiber: Estimate varies
- Protein: Estimate varies
- Cholesterol: Estimate varies