Skip to content
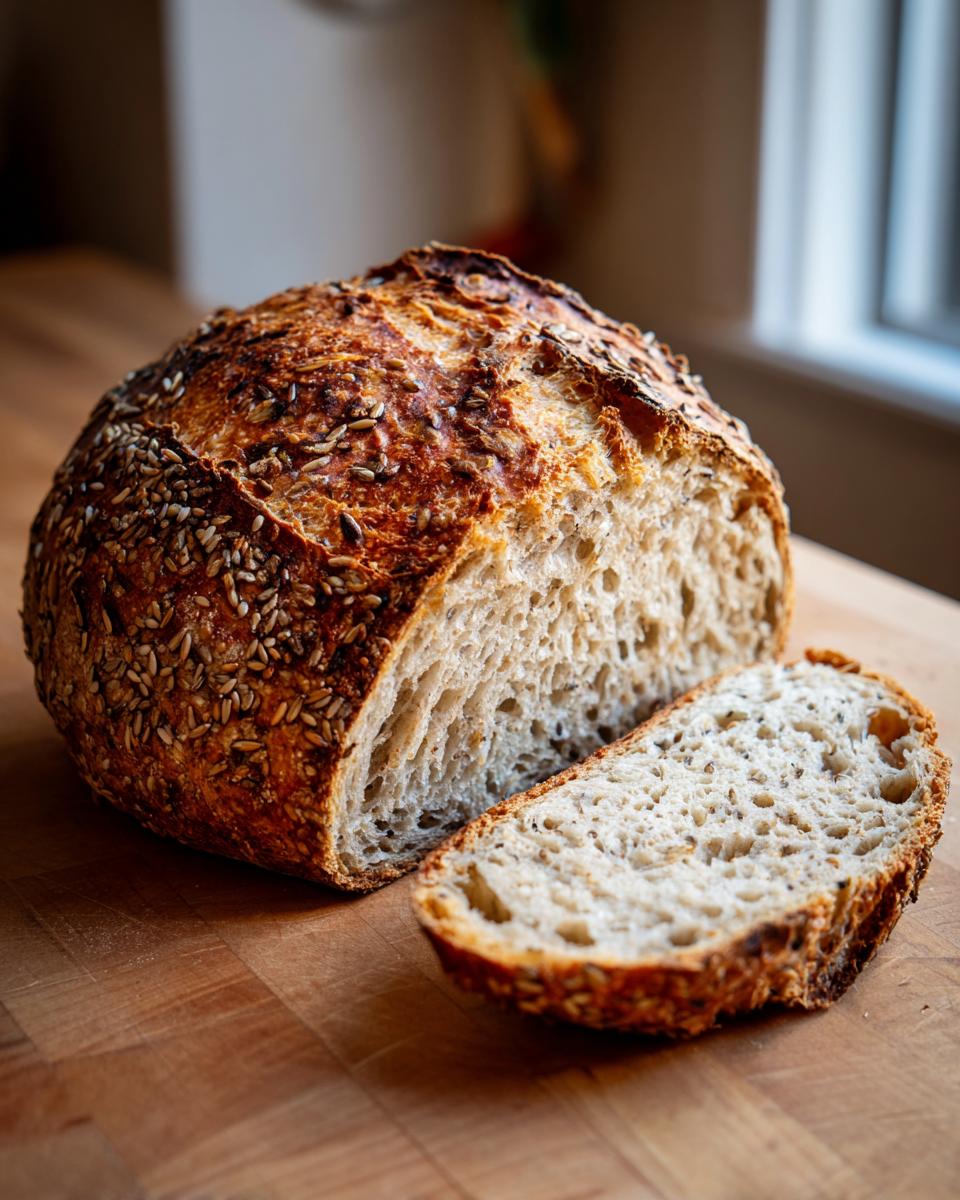
Hello there! I’m Anna Kowalska, and here I share tried-and-true homemade recipes that you and your family will love. Everything I post here is made with heart and flavor, tested until it’s absolutely perfect. If you’ve ever looked at a beautiful, crusty loaf of bread and thought, “I could never make that,” I have news for you: you absolutely can! Especially when we talk about this incredible, hearty **No-Knead Multigrain Bread**.
I grew up watching my aunt bake every Sunday. She believed that the best food came from simple ingredients and a little bit of time, not a lot of fuss. That philosophy is what built this recipe. We’re using whole grains, seeds, and a long, slow rest to develop flavor that store-bought bread just can’t touch. You don’t need fancy equipment or strong arms for this!
Why This No-Knead Multigrain Bread Recipe Works
The secret, truly, is patience. Because we aren’t kneading, we rely on that long, slow proofing time—sometimes up to a full day—to develop the gluten structure naturally. Think of it as letting the dough do all the hard work while you sleep! This process, called long fermentation, is what makes this **No-Knead Multigrain Bread** so flavorful and light, even though it’s packed with whole grains and oatmeal.
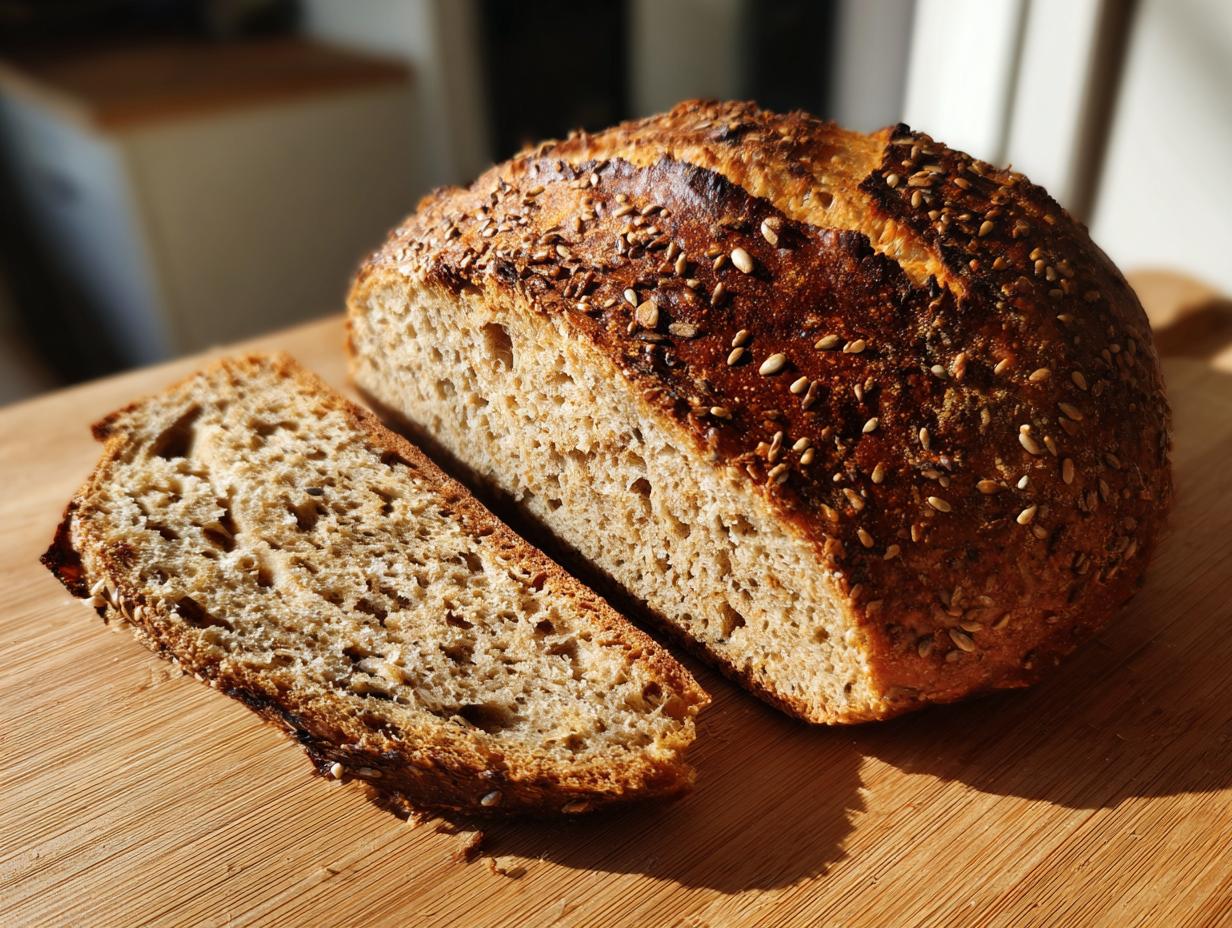
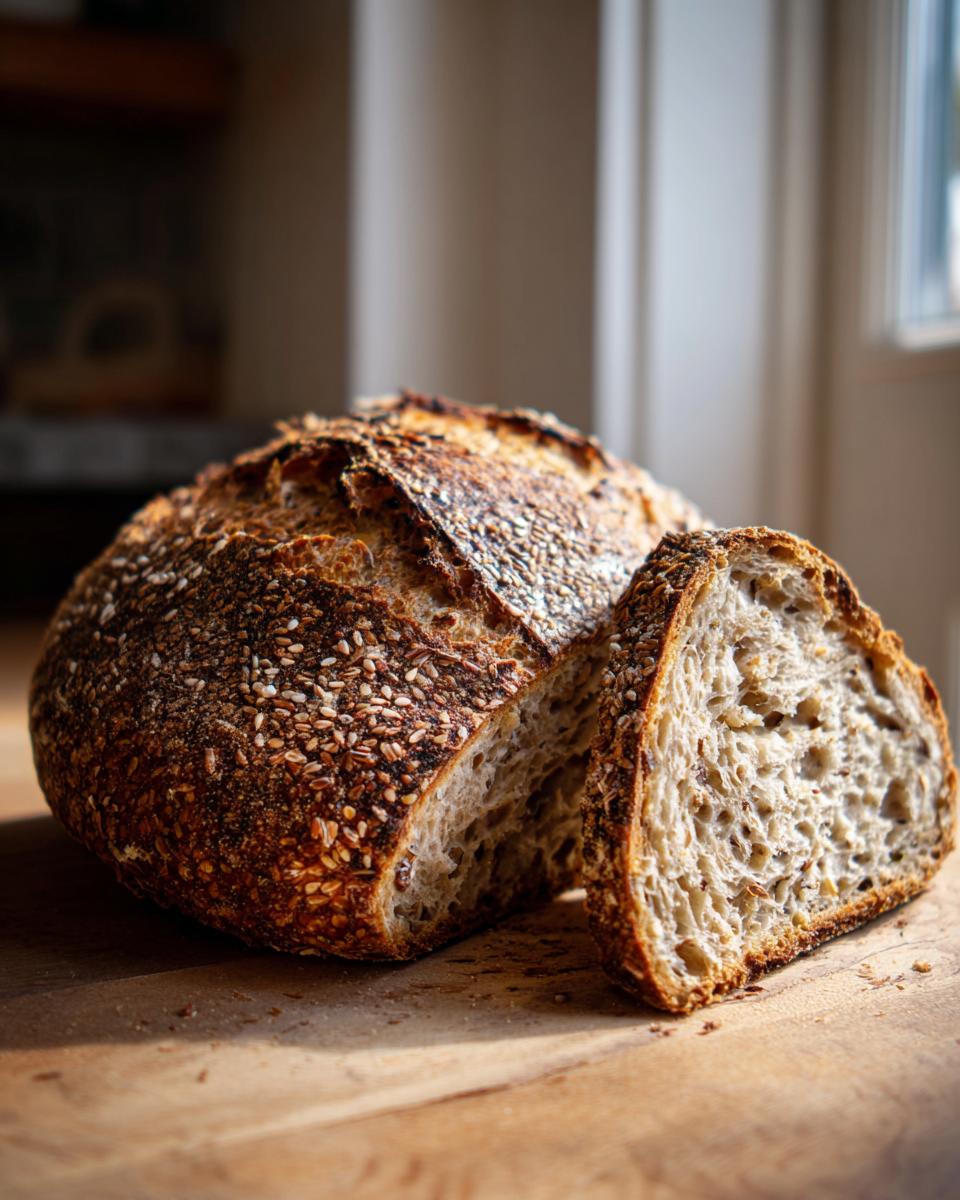
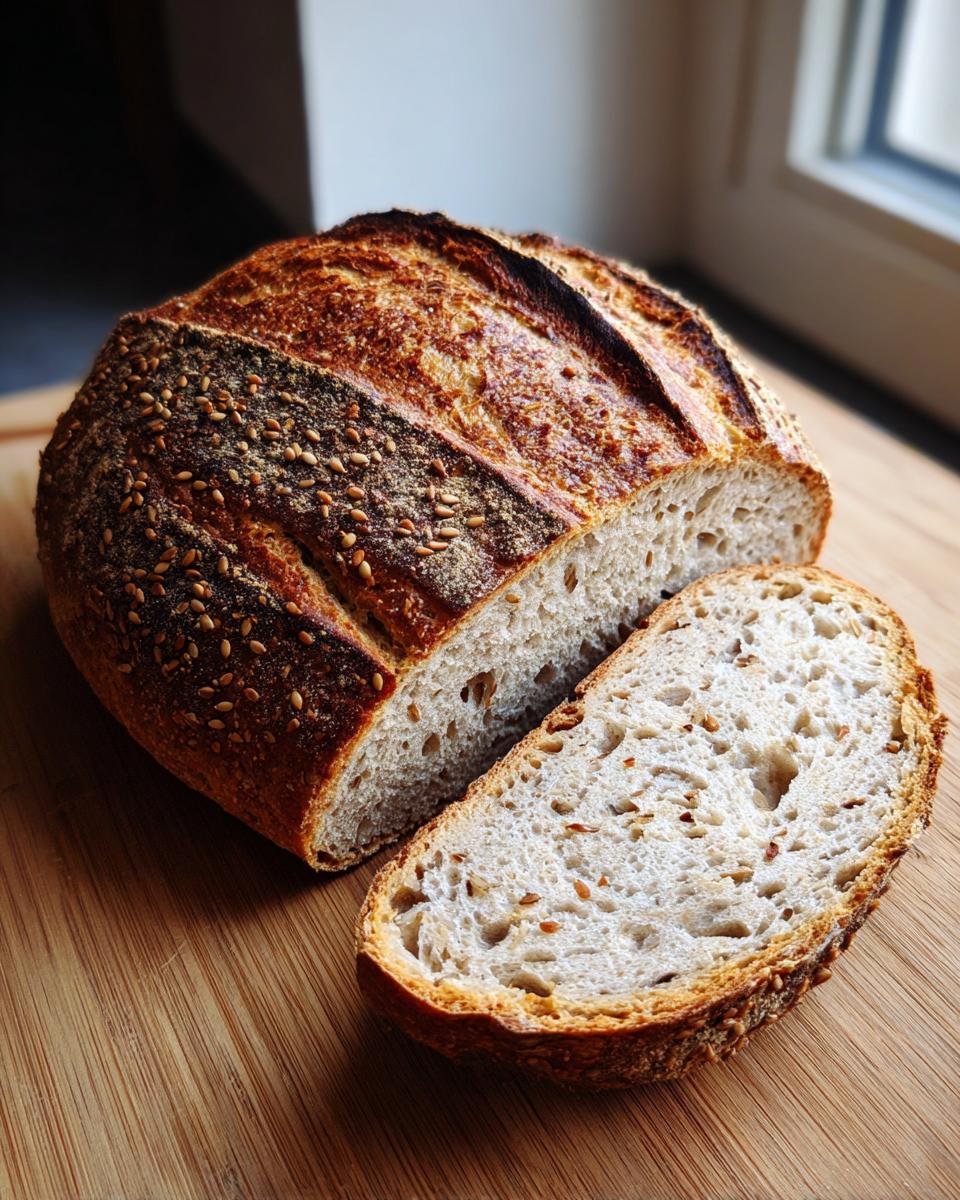
When you finally mix the flours and water, it looks shaggy and strange—trust me, don’t panic! That messy-looking mixture turns into a gorgeous, deeply flavored loaf with that amazing crackly crust we all dream about. It’s the ultimate payoff for minimal effort. You get that rustic, artisan quality right out of your own oven!
Jump to:
Gathering Your No-Knead Multigrain Bread Ingredients
Baking this kind of bread is mostly about mixing, so getting your ingredients ready first is key. We’re using simple things you likely already have, but the balance is important. Remember, since we aren’t kneading, the water content really dictates how the dough behaves during that long rest. Don’t skip the oatmeal or seeds; they give this **No-Knead Multigrain Bread** its wonderful texture and heartiness!
Precision in Measurement for No-Knead Multigrain Bread
Since this is a no-knead method, accuracy matters a lot, especially with the flour and water. Too much flour, and your dough will be stiff and won’t rise well during that long proof. Too much water, and it gets soupy! I always use a kitchen scale if I can, but if you’re spooning flour into your measuring cup, make sure you level it off gently. Getting the ratio right is the secret handshake for successful **No-Knead Multigrain Bread**.
Required Equipment Overview
You don’t need a stand mixer for this, which is the best part! You definitely need a very large bowl—one that can hold the ingredients with plenty of room left over for the dough to expand. Plastic wrap is essential for keeping the moisture in during the long proof. For baking, you have two great routes: either a standard 9×5 loaf pan or a Dutch oven. If you go the loaf pan route, you’ll also need some binder clips for the “poor man’s Dutch oven” trick we’ll talk about later!
Step-by-Step Instructions for Perfect No-Knead Multigrain Bread
Okay, now for the fun part—putting it all together! Honestly, the mixing takes about 15 minutes total, and then the oven does the rest of the heavy lifting. You’ll be amazed at what these simple actions achieve for your **No-Knead Multigrain Bread**.
Initial Mixing and Long Fermentation
Grab your big bowl. First, we handle the wet ingredients. Pour in the 16 ounces of cold tap water. Cold water is important here because it slows down the yeast activity just enough to allow those long fermentation flavors to develop beautifully over many hours. Add your salt and the tiny amount of yeast—yes, just a quarter teaspoon! Give that a quick stir until it dissolves.
Next, toss in all your dry stuff: the bread flour, the wheat flour, the oatmeal, and those seeds (sesame and flax). Now, you need to mix this. Don’t use a fancy mixer! Just use a wooden spoon or a sturdy spatula. Stir everything together really well until there are no dry pockets of flour left. Make sure you scrape the bottom and sides of the bowl so everything is incorporated. It won’t look like traditional dough; it’ll be shaggy, sticky, and wet. That’s exactly right!
Cover that bowl tightly with plastic wrap. Find a spot on your counter—not too hot, not too cold—and leave it alone for 8 to 24 hours. Overnight is perfect. This long, slow proof is where the magic happens for this **No-Knead Multigrain Bread**.
Preparing for the Final Proof and Baking Setup
When you wake up (or 24 hours later!), your dough should have doubled and be bubbly. Gently stir the dough right in the bowl to knock out some of that built-up gas and stretch it out a bit. Don’t punch it down like an old-school dough; we just want to gently rearrange the structure.
If you want to add extra oats or seeds on top for crunch, sprinkle them on now. Now you choose your adventure! If you’re using a loaf pan, spray it well, put the dough in, and then take a second, empty loaf pan and place it right on top. Clamp the two pans together securely with binder clips—that’s our trick to trap the steam! If you’re using a Dutch oven, just spray the bottom and sides lightly and drop the dough right in.
Cover your prepared loaf (either the clipped pans or the Dutch oven) and let it rest again for just 30 to 60 minutes. This is the final little rise before it hits the heat.
Baking Temperatures and Timing for Your Loaf
While that dough is taking its last rest, preheat your oven to 400 degrees Fahrenheit. You need that heat nice and high! Once preheated, put your bread in. Bake it for 40 minutes with the lid on (or the top loaf pan secured). That trapped steam is crucial for a great crust on your **No-Knead Multigrain Bread**.
When the 40 minutes are up, carefully remove the top pan or lift off the Dutch oven lid. Be careful, it’s steamy! Let it bake uncovered for another 15 minutes. This second stage lets the crust brown up perfectly. Once it’s deeply golden brown, pull it out, let it cool on a rack, and enjoy that incredible homemade loaf!
Tips for Achieving Expert-Level No-Knead Multigrain Bread Results
I’ve messed up this recipe more times than I care to admit when I was first learning the long fermentation method! The biggest mistake people make with **No-Knead Multigrain Bread** is worrying that the dough isn’t right. It’s supposed to be sticky and wet after the first mix—don’t add extra flour unless you absolutely have to during the final shaping!
If your dough seems really slack during the final proof, that second 30-minute rest is crucial. Make sure your loaf pan is well-greased, or use that cake goop I swear by for sticky doughs. If you’re using the Dutch oven method, make sure the pot is scorching hot when the dough goes in; a cold pot equals a dough that spreads too much instead of rising up.
Also, don’t peek during the first 40 minutes of baking! That steam is your best friend. If you let it escape too early, you risk deflating your loaf. Trust the process, and you’ll get that beautiful, hearty crust every single time with this **No-Knead Multigrain Bread**.
Understanding the Science Behind Long Fermentation Bread
When I first started baking, I just followed the steps, but now I understand *why* we wait so long for this bread to rise. It’s not just about making the dough rise; it’s about flavor development! Because we use so little yeast and such cold water, the yeast works very slowly over many hours, and that’s a good thing.
This slow, cold fermentation gives enzymes in the flour time to break down starches into simpler sugars. Those sugars are what the yeast eventually feeds on, creating those complex, wonderful flavors you taste in artisan loaves. It’s why this **No-Knead Multigrain Bread** tastes so much richer than a quick-rise loaf.
Plus, that long rest naturally strengthens the gluten network without me having to lift a finger! That slow development means the final structure is strong enough to trap the gasses created during baking, giving you that open, airy texture inside, even with all those heavy grains weighing it down. It’s chemistry, but it tastes like magic!
Storing and Refreshing Your Homemade No-Knead Multigrain Bread
This bread is so good fresh from the oven, but let’s be honest, sometimes you can’t eat the whole thing in one sitting! Because it’s a multigrain loaf, it tends to hold its moisture better than plain white bread, but you still need to treat it right so it doesn’t go stale too fast.
My rule of thumb is: never put good bread in the refrigerator unless you absolutely have to. The cold speeds up the staling process dramatically. For this hearty loaf, we want to keep that lovely crust crisp and the interior soft.
Storage and Reheating Guide
If you plan to eat your **No-Knead Multigrain Bread** within two or three days, keeping it on the counter is the best way to go. Wrap it tightly in a clean kitchen towel or place it cut-side down on a cutting board. This keeps the crust from getting soft while protecting the crumb.
If you know you won’t finish it within three days, slicing it first and freezing what you won’t eat immediately is your best bet. When you pull a slice out of the freezer, you can refresh it right back to that just-baked state!
Here’s my quick guide for keeping this bread perfect:
- Countertop (Room Temp): Best for 2-3 days. Wrap tightly in a plastic bag or cover with a towel.
- Freezer: Best for up to 3 months. Slice the loaf first, then wrap individual slices tightly in plastic wrap, and place those wraps inside a freezer bag.
- Refrigerator: Only for emergency use (if humidity is high or it’s getting too warm). Expect faster staling.
To reheat frozen slices, pop them straight from the freezer into a toaster or toaster oven until they are warm through and the edges are crisp again. It’s almost like baking it fresh!
Frequently Asked Questions About This Recipe
I always get so many questions after people try this recipe for the first time! It’s a different way of thinking about bread making, so it’s natural to have a few doubts along the way. Here are the most common things folks ask me about making this hearty loaf.
Can I reduce the long fermentation time for the No-Knead Multigrain Bread?
You certainly can try, but you’ll miss out on the best part! If you only let it proof for, say, 6 or 8 hours instead of the recommended 12-24 hours, you’ll get a loaf, sure. But it won’t have that deep, complex, slightly tangy flavor that the long rest develops. The flavor is really the trade-off for not kneading! If you’re in a real time crunch, try to keep it at least 12 hours. For the absolute best **No-Knead Multigrain Bread**, though, go for the full 20 hours!
What kind of salt works best in this recipe?
I usually just use standard table salt because it’s what’s always in my pantry, and it dissolves easily into the cold water. If you use kosher salt, you might need to bump the measurement up just a tiny bit because kosher grains are larger and less dense than table salt. Whatever you use, just make sure it’s regular salt, not a specialty finishing salt. The salt is crucial for controlling the yeast, so we need a good amount of it in there!
Can I substitute any of the whole grains?
Yes, you absolutely can play around with the seeds and oatmeal! I love the sesame and flax combo, but feel free to swap those out for sunflower seeds or poppy seeds if that’s what you have on hand. If you want to swap out some of the wheat flour, you can replace up to half a cup with rye flour or whole wheat pastry flour. Just be aware that too much heavy whole grain flour can make your **No-Knead Multigrain Bread** a little denser, so stick close to the original flour amounts for the best rise!
Sharing Your Delicious Homemade Bread Experience
There is honestly nothing more satisfying than pulling a warm, crusty loaf of homemade bread out of your own oven. I hope you had as much fun making this **No-Knead Multigrain Bread** as I did sharing the process with you today. Whether you slathered it with butter while it was still warm or used it to make the best sandwich ever, I want to hear all about it!
If this recipe brought a little bit of that slow-baked goodness into your kitchen, please take a moment to leave a rating below. Five stars tells me you love it, and comments help me know what questions you have or what variations you tried out. Happy baking, friends!
Print
Amazing 1 No-Knead Multigrain Bread Joy
- Total Time: 8 hours 40 minutes
- Yield: 1 loaf 1x
- Diet: Vegetarian
Description
Make delicious No-Knead Multigrain Bread using simple methods. This recipe requires minimal effort and yields a flavorful, hearty loaf perfect for your table.
Ingredients
- 16 oz cold tap water
- 1–1/2 tsp salt
- 1/4 tsp yeast
- 1 tbsp sesame seeds
- 1 tbsp flax seeds
- 1–1/2 cups bread flour
- 2 cups wheat flour
- 1/2 cup whole oatmeal
Instructions
- Add the cold tap water, salt, and yeast to a large bowl. Stir them to combine.
- Add the bread flour, wheat flour, and oatmeal to the bowl.
- Stir well to combine. Scrape the sides and bottom of the bowl.
- Cover the bowl with plastic wrap.
- Let the mixture proof on the counter for 8 to 24 hours. This can be done overnight.
- Spray the bottom and sides of a 9 x 5 loaf pan, or prepare a Dutch oven by lightly spraying it.
- Stir the bread dough to remove gas and stretch it.
- Sprinkle whole oats on the sides and top of the dough, if you wish.
- If using a loaf pan, place the dough inside and put a second loaf pan on top. Secure the top pan with binder clips. If using a Dutch oven, place the dough inside.
- Allow the dough to proof for another 30 to 60 minutes.
- Preheat your oven to 400 degrees Fahrenheit.
- Bake the bread for 40 minutes with the lid or top pan on.
- Remove the top pan or lid. Bake for an additional 15 minutes.
- Enjoy your bread!
Notes
- You can bake this bread using a “poor man’s Dutch oven.” This involves stacking two loaf pans and securing them with binder clips.
- Alternatively, you can bake this bread in a standard Dutch oven.
- Prep Time: 15 minutes
- Cook Time: 55 minutes
- Category: Bread
- Method: No-Knead
- Cuisine: American
Nutrition
- Serving Size: 1 slice
- Calories: Approx. 180
- Sugar: Approx. 1g
- Sodium: Approx. 350mg
- Fat: Approx. 2g
- Saturated Fat: Approx. 0.3g
- Unsaturated Fat: Approx. 1.7g
- Trans Fat: 0g
- Carbohydrates: Approx. 35g
- Fiber: Approx. 3g
- Protein: Approx. 6g
- Cholesterol: 0mg