Skip to content
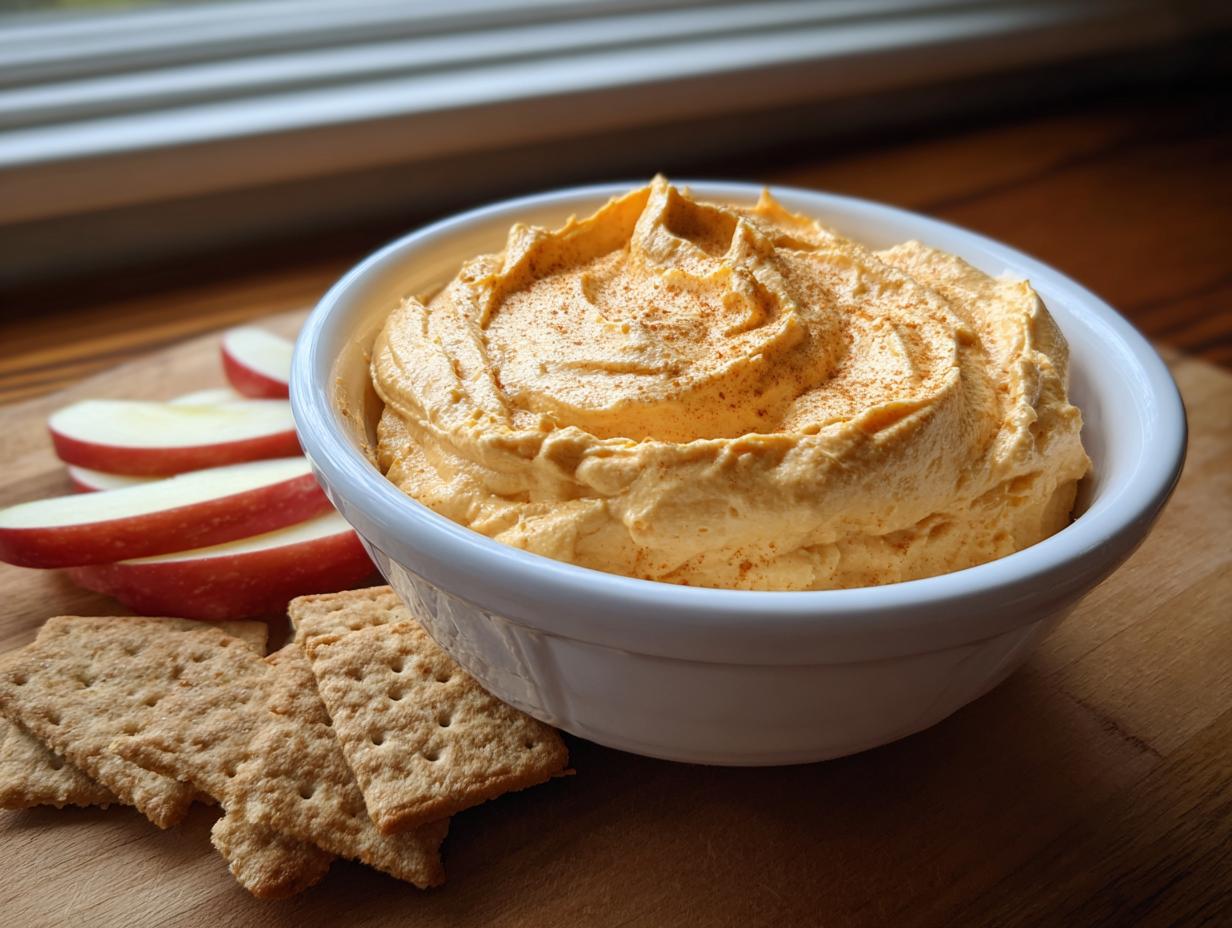
When you need something fast, impressive, and utterly delicious, the Pumpkin Cheesecake Dip is my absolute go-to secret weapon. I’m Anna Kowalska, and here I share tried-and-true homemade recipes that you and your family will love. Everything I post is made with heart and flavor, and trust me, I’ve spent years perfecting recipes that don’t take a whole afternoon to assemble.
It might seem strange to crave pumpkin in March or April, but I always say that good flavors don’t follow the calendar! Think about those sunny spring afternoons—you have guests popping by unexpectedly, or maybe you just need a sweet, creamy fix after a long day. That’s when this dip saves the day.
I’ve learned that the best recipes are the ones you can rely on when time is short. This specific dip comes together in ten minutes flat, and it feels so much more special than the effort you put in. It’s light, it’s spiced just right, and it’s perfect for those early spring gatherings when you want something festive but not heavy!
Jump to:
Why You Will Love This Pumpkin Cheesecake Dip
You absolutely have to make this dip, especially since spring gatherings call for easy entertaining. The best part about this Pumpkin Cheesecake Dip is how fast it comes together. Seriously, ten minutes, max! It’s the perfect no-fuss appetizer or dessert for those busy days in March and April.
It’s not heavy like a traditional baked dessert, either. I love that light, airy texture—it’s creamy but somehow still feels refreshing. That’s what makes it such a popular request at my family get-togethers now. It just hits all the right notes without weighing anyone down.
Quick Preparation and Flavor Balance
Prep time is only ten minutes. Honestly, that’s faster than boiling water! You’re just beating a few things together. The magic is in the ratios. The cream cheese base needs to be perfectly smooth first. Then, you introduce the pumpkin puree and that wonderful pumpkin pie spice.
The spice level is key. Too much, and it tastes like fall. Too little, and you’re missing the point! We want that warm spice singing against the cool, tangy cream cheese. It’s a beautiful, quick balance, and you don’t even need the oven.
Gather Your Ingredients for the Pumpkin Cheesecake Dip
Okay, let’s talk about what you need for this amazing Pumpkin Cheesecake Dip. Since this is a no-bake recipe, we rely completely on the quality of our ingredients to carry the flavor. Don’t stress, though; the list is short and sweet, which is why I love it so much for quick entertaining.
You’ll need the basics to get that signature creamy texture and classic pumpkin spice flavor. Everything should be at room temperature where noted, which helps things mix without lumps. Grab your shopping list and let’s check the pantry!
Essential Components List
- 8 ounces cream cheese, room temperature
- 1/2 cup powdered sugar
- 15 ounces pumpkin puree
- 2 teaspoons pumpkin pie spice
- 8 ounces whipped topping
- Graham crackers (for serving)
- Apple slices (for serving)
Equipment Needed for Your Pumpkin Cheesecake Dip
You don’t need a stand mixer for this one, which is fantastic news for cleanup! For the smoothest possible Pumpkin Cheesecake Dip, the most important tool is a sturdy electric hand mixer. If you don’t have one, grab a strong whisk and prepare for a great arm workout—it’s totally doable!
You’ll also need one large mixing bowl, a spatula for folding, and of course, your favorite serving dish. Keep those tools ready; we’ll be using them for less than fifteen minutes!
Step-by-Step Instructions for the Pumpkin Cheesecake Dip
This is where the magic happens, and I promise you, it’s almost laughably easy. Since this is a no-bake recipe, we are skipping all the oven drama. We are aiming for the lightest, dreamiest texture possible for our Pumpkin Cheesecake Dip. Follow these steps, and you’ll have a beautiful spread ready in minutes, plus a little chill time.
Mixing the Creamy Base
First things first, make sure that cream cheese is soft! If it’s cold, you’ll get lumps, and nobody wants a lumpy dip. Beat the softened cream cheese until it looks perfectly smooth on its own. Then, you’ll add in your powdered sugar, the pumpkin puree, and the pumpkin pie spice.
Use your mixer on medium speed and just beat everything until it’s completely uniform. I mean it—no streaks of white cream cheese should be visible. It should look like thick, spiced pumpkin custard at this point. That’s your flavor foundation, so take a second to make sure it’s perfect.
Integrating the Whipped Topping and Finalizing
Now for the light factor! Take your whipped topping—I use the tub kind, thawed slightly—and you need to fold it in, not beat it in. If you mix it too aggressively, you’ll deflate all those lovely air bubbles we just created. Use a rubber spatula and work gently, cutting down the middle and bringing the mixture up from the bottom until it’s all just combined and fluffy.
Transfer the mixture right away into your serving bowl. Use the back of your spatula to smooth the surface. This makes it look so much nicer when you put it out for guests. It’s ready for its beauty rest!
The Crucial Chilling Time
This is the hardest part: waiting! You have to get this dip into the refrigerator for at least 30 minutes. Trust me, you can’t skip this step when making the Pumpkin Cheesecake Dip. The chilling time isn’t just about making it cold; it lets those spices really bloom and allows the dip to firm up slightly so it holds its shape perfectly on the crackers.
When you take it out, it will be cool, creamy, and ready to serve alongside your favorite dippers. Don’t rush the chill; it’s worth the extra half hour!
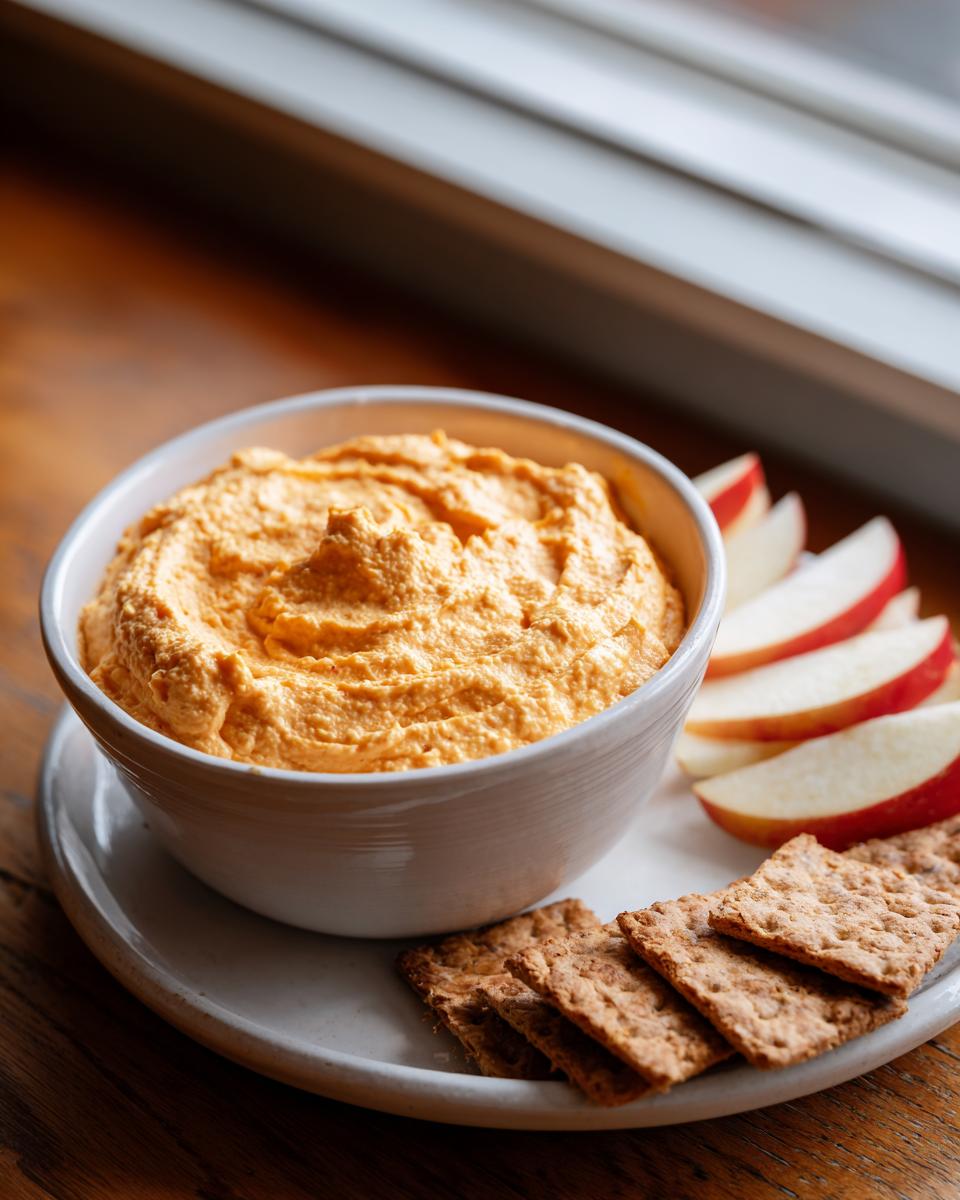
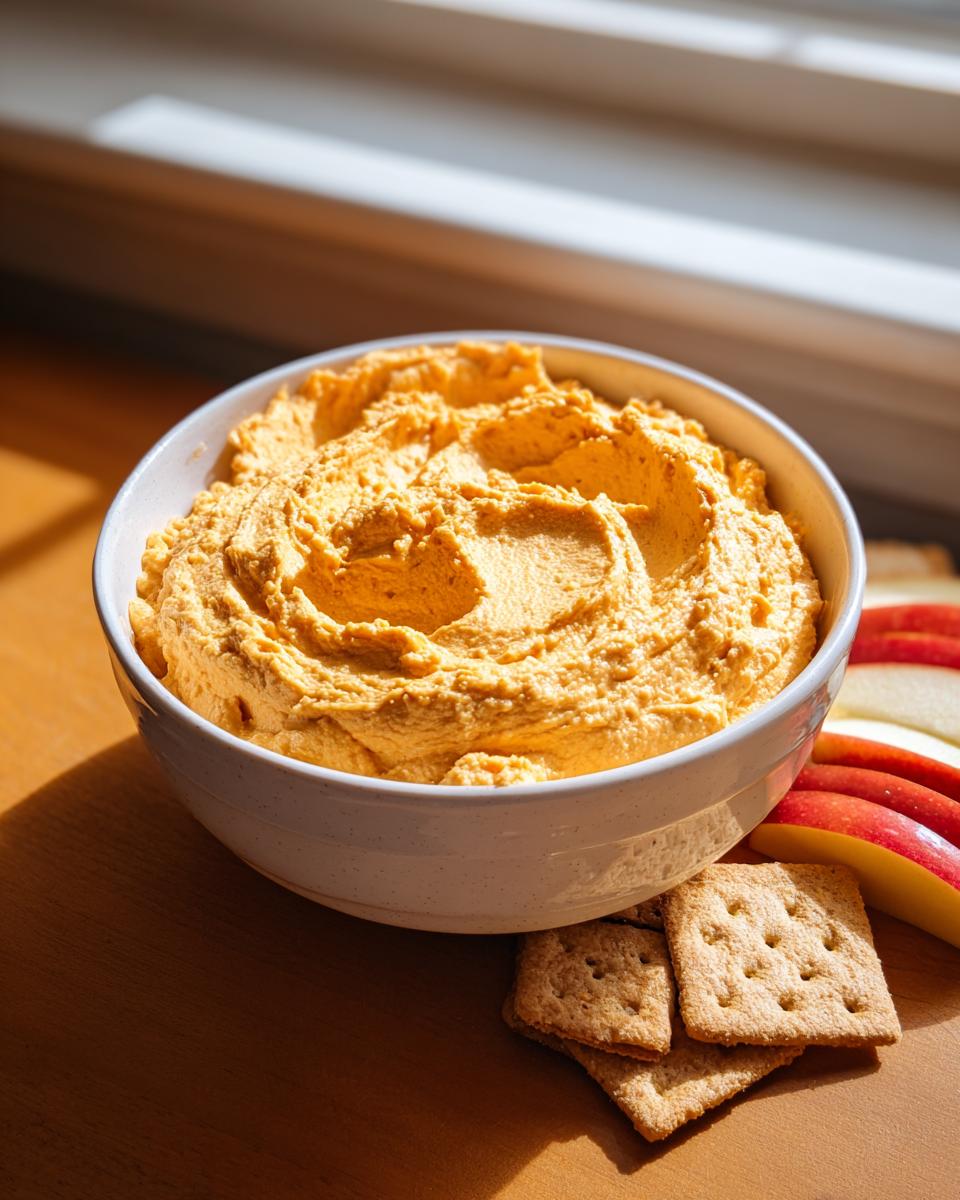
Serving Suggestions for Your Pumpkin Cheesecake Dip
Once that chilling time is up, it’s time to present this beauty! Since this dip is so light, you want dippers that offer a nice crunch or a fresh counterbalance. I always put out a big basket of sturdy graham crackers—they are classic for a reason.
But my favorite pairing, especially as the weather warms up in spring, is fresh apple slices. The tartness of a Granny Smith or Honeycrisp cuts through the sweetness of the pumpkin just perfectly. You can also use vanilla wafers or even pretzel crisps if you like a little salty kick!
Frequently Asked Questions About Pumpkin Cheesecake Dip
I always get so many questions when I share a recipe this quick and easy! It seems too good to be true, but I promise it works every time. Here are a few things folks ask me most often about making this dip perfect for their spring gatherings.
Can I make this Pumpkin Cheesecake Dip ahead of time?
You absolutely can! This is a great make-ahead option. I usually mix it up the night before I plan to serve it. Just cover the serving bowl tightly with plastic wrap—make sure the wrap doesn’t stick to the surface of the dip, or you can press it directly onto the surface for best results. It needs that minimum 30 minutes of chilling anyway, so preparing it a day ahead actually helps the flavors marry even better. It keeps beautifully in the fridge for up to five days.
What is the best way to serve this No-Bake Dip?
Always serve it cold! The texture is just so much better when it’s chilled through. If you leave it out on a buffet table for more than an hour or so, especially if it’s warm outside in April, it might start to soften too much. Make sure you have plenty of crisp apple slices and graham crackers ready to go right when you pull it out of the fridge. It makes a wonderful light dessert or appetizer.
Is this recipe truly vegetarian?
Yes, it is! Since this is a no-bake recipe, we aren’t dealing with any gelatin or animal-derived thickeners. The structure comes from the cream cheese and the whipped topping. As long as you use a vegetarian-friendly whipped topping brand, you are all set for a lovely vegetarian spring dessert!
Storing and Keeping Your Pumpkin Cheesecake Dip Fresh
Don’t worry if you have leftovers, because this Pumpkin Cheesecake Dip keeps really well! Since it’s so creamy and packed with goodness, you want to treat it right. Store any extra dip in a truly airtight container right in the refrigerator. I’ve kept mine fresh for nearly five days, and it still tastes amazing, though the texture might be slightly denser.
It’s always best when it’s fresh, but this recipe is incredibly reliable for leftovers. Just cover it well and pop it back in the cold!
Storage Table Reference
| Item | Duration | Container Type |
|---|---|---|
| Pumpkin Cheesecake Dip | Up to 5 days | Airtight Container |
Share Your Experience with This Pumpkin Cheesecake Dip
I truly hope you loved making this easy dip as much as I love sharing it with you! Did you serve it at an Easter brunch or just for a quiet Tuesday night snack? I’m always looking to hear how my recipes turn out for your families.
Please leave me a rating below and tell me in the comments what you served it with. Your feedback helps me keep sharing the best, heart-filled recipes!
Print
Amazing 10-Min Pumpkin Cheesecake Dip Secret
- Total Time: 40 minutes
- Yield: 8 servings 1x
- Diet: Vegetarian
Description
Enjoy this light, creamy pumpkin cheesecake dip. It is quick to prepare, ready in just 10 minutes, and perfect for serving with crackers or fresh apple slices during the spring months of March and April.
Ingredients
- 8 ounces cream cheese, room temperature
- 1/2 cup powdered sugar
- 15 ounces pumpkin puree
- 2 teaspoons pumpkin pie spice
- 8 ounces whipped topping
- Graham crackers (for serving)
- Apple slices (for serving)
Instructions
- Beat the cream cheese, pumpkin puree, powdered sugar, and pumpkin pie spice in a large mixing bowl until the mixture is smooth and creamy.
- Gently fold in the whipped topping until you achieve an even color and the mixture is fully combined.
- Transfer the dip to a serving bowl and use a spatula to smooth the top surface.
- Chill the dip in the refrigerator for a minimum of 30 minutes before you serve it. This allows the flavors to fully develop.
- Serve the dip cold alongside graham crackers or apple slices.
- Store any remaining dip in an airtight container in the refrigerator for up to 5 days.
Notes
- This dip has a light and fluffy texture, making it a great choice for spring events.
- Prep Time: 10 minutes
- Cook Time: 0 minutes
- Category: Dessert/Appetizer
- Method: No-Bake
- Cuisine: American
Nutrition
- Serving Size: 1 serving
- Calories: 212
- Sugar: Unknown
- Sodium: Unknown
- Fat: 14g
- Saturated Fat: Unknown
- Unsaturated Fat: Unknown
- Trans Fat: Unknown
- Carbohydrates: 20g
- Fiber: Unknown
- Protein: 3g
- Cholesterol: Unknown