Skip to content
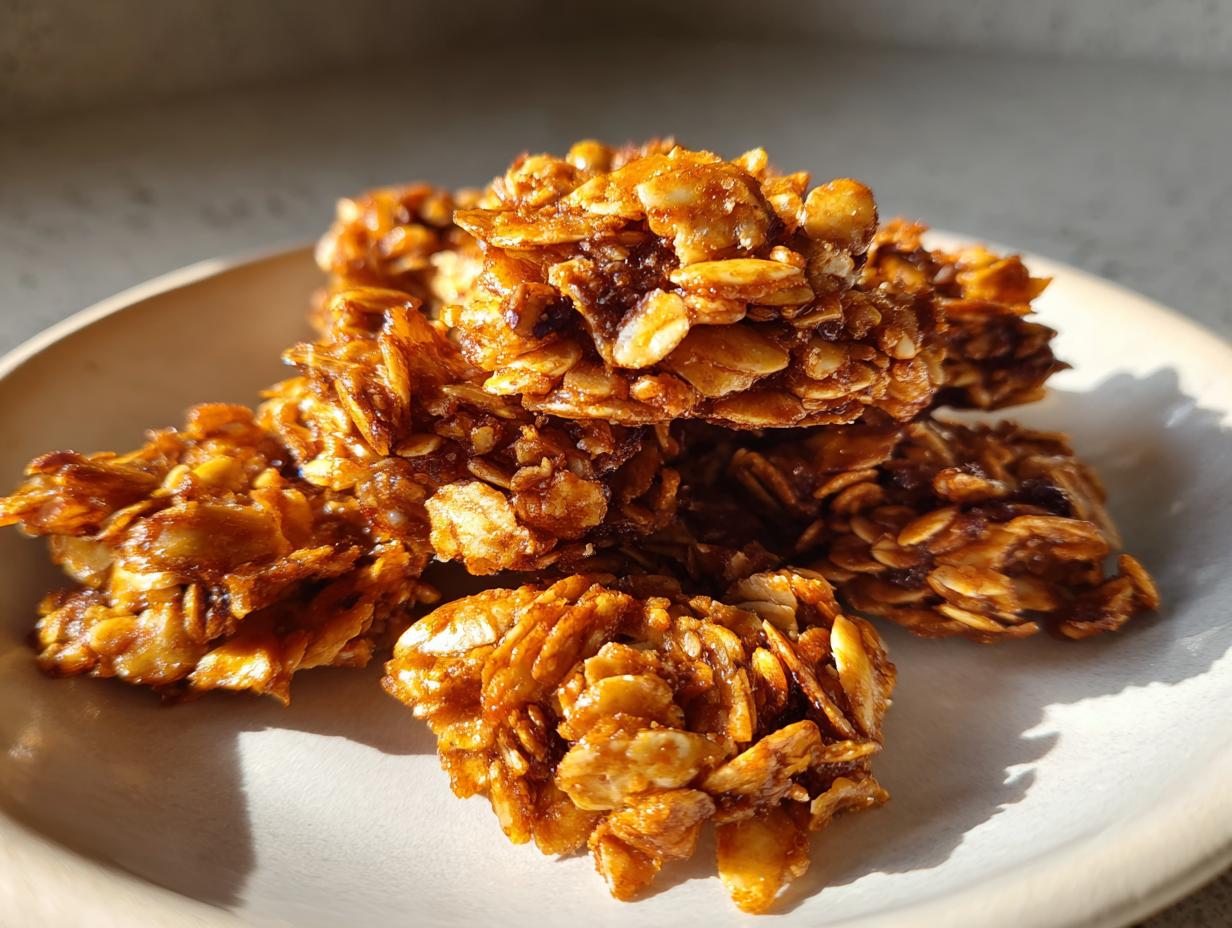
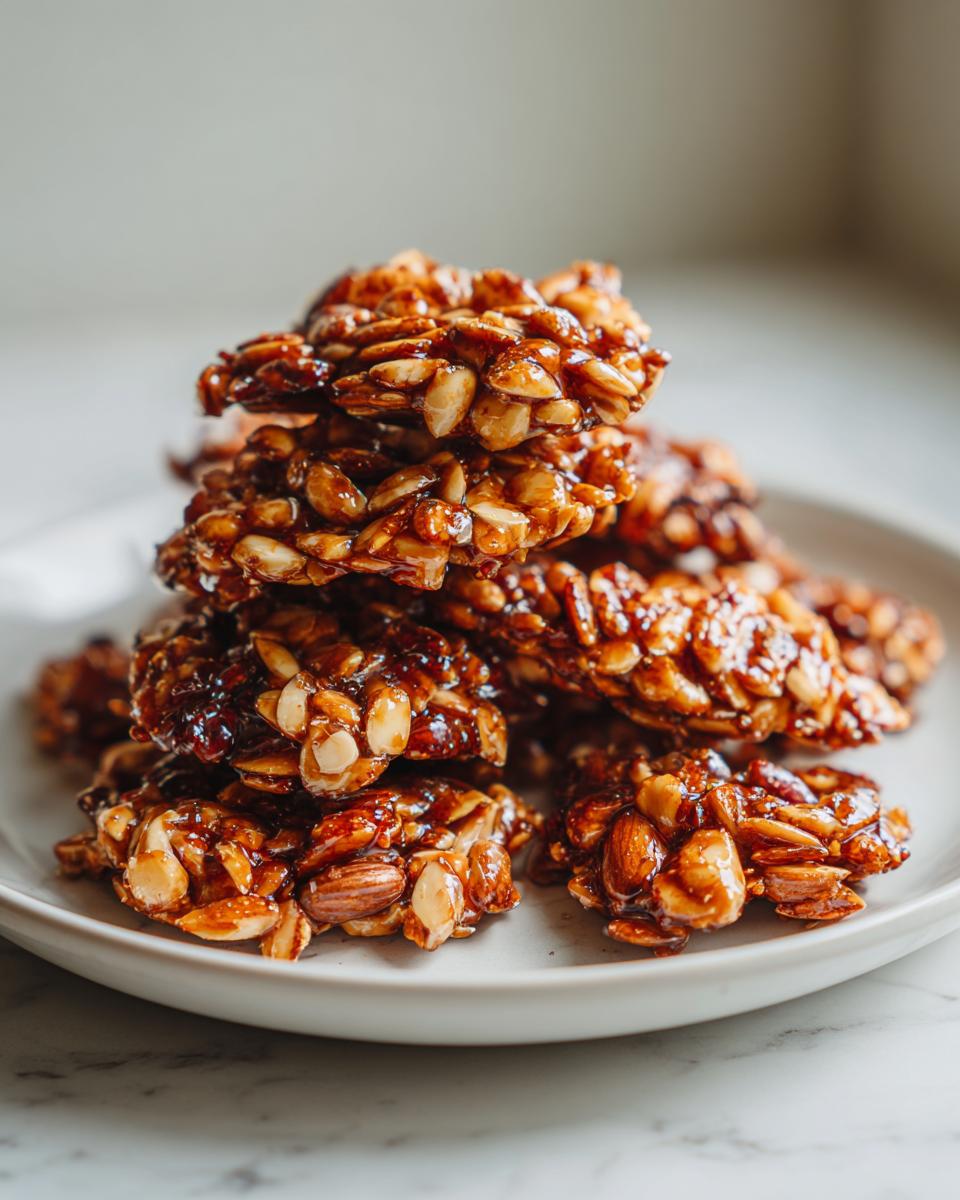
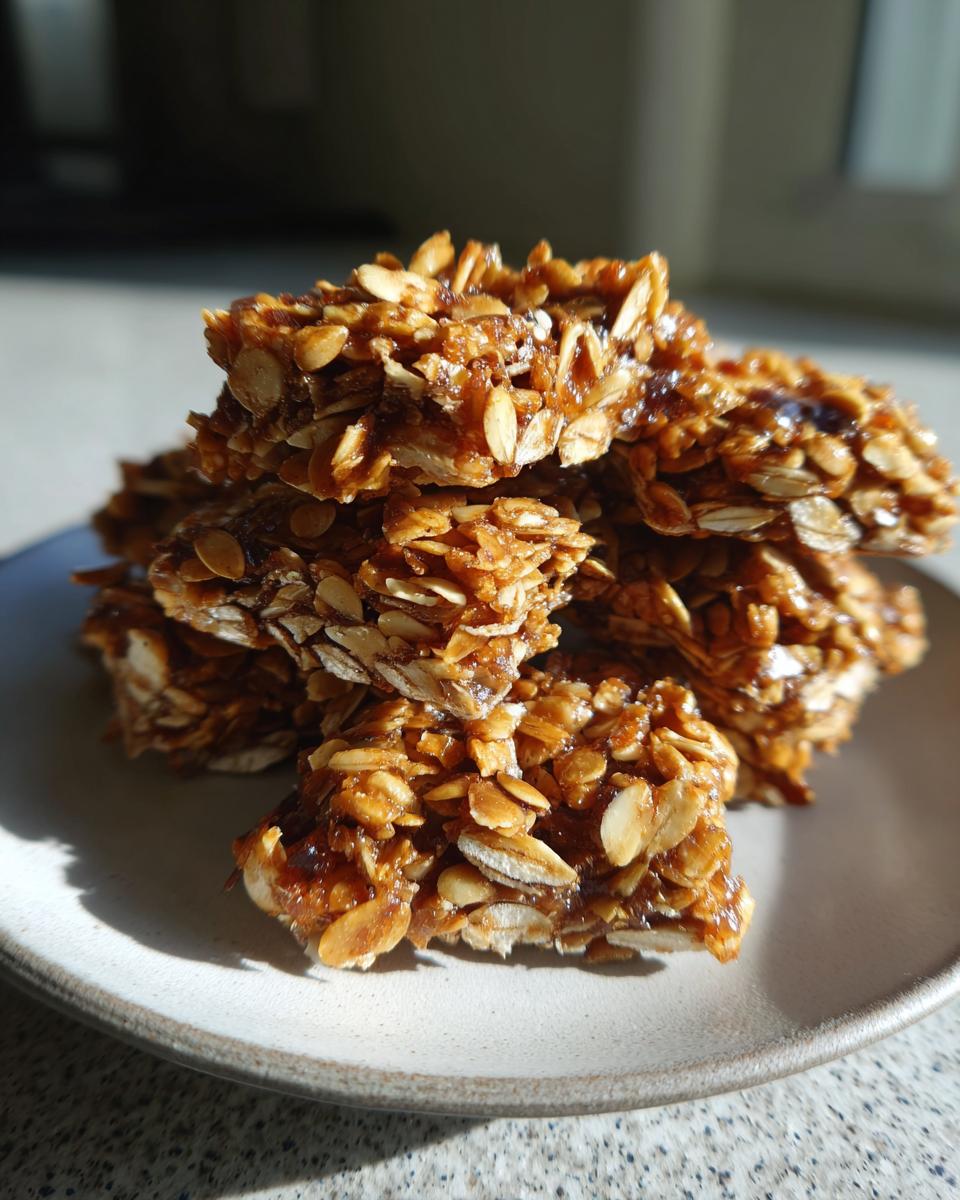
When you need that perfect little crunch to get you through the afternoon slump, nothing beats homemade Pumpkin Seed Clusters. Honestly, I’m Anna Kowalska, and here I share tried-and-true homemade recipes that you and your family will love. Everything I put out here is made with heart and flavor, the kind of food that makes you want to sit down and stay awhile. I’ve always believed that the best snacks aren’t complicated; they just need a little love and the right balance of good stuff. These clusters are the absolute definition of fast, flavorful satisfaction. They come together quicker than you can brew a pot of coffee, and trust me, once you smell those nuts toasting, you’ll be hooked. They are simply the best little baked snack I’ve ever thrown together.
No heading needs to be written for the introduction.
Jump to:
Why You Will Love These Homemade Pumpkin Seed Clusters
These little nuggets of joy are my go-to when I need something tasty fast. Seriously, they are almost embarrassingly easy to make, which is why I often have a batch ready for unexpected guests. They taste way more complex than the effort required, which is always a win in my book!
- They bake up in just 20 minutes—it’s hardly any time at all!
- The combination of coconut, almonds, and those gorgeous pumpkin seeds gives you the perfect crunch.
- Maple syrup makes them naturally sweet, and they aren’t overly sugary.
- They are fantastic right out of the oven (once cooled, of course!) or sprinkled over yogurt the next morning.
Quick Preparation for Perfect Pumpkin Seed Clusters
If you’ve only got five minutes to spare before you need to run out the door, this recipe is your answer. We aren’t doing any complicated tempering or whisking here. You just toss the dry stuff in a bowl, pour the syrup over, stir until everything is sticky, and slide it onto a tray. That’s it for the assembly! It’s so simple that my nephew, who is only eight, can manage the mixing part with supervision.
Essential Ingredients for Your Pumpkin Seed Clusters
When we talk about making the best Pumpkin Seed Clusters, it all comes down to using simple, high-quality mix-ins. You don’t need a pantry full of specialty items for this one. It’s about balancing the crunch of the seeds and nuts with the sweetness of the maple syrup. I always buy my pumpkin seeds raw, as they toast up so much better in the oven than the pre-roasted kind. The coconut flakes are important too—make sure you grab the dried kind, not the fresh, moist stuff, or your clusters might not set right.
The beauty of this recipe is that it highlights texture. We are building layers of nutty, sweet crunch that hold together perfectly thanks to that little bit of maple syrup. Remember, everything gets coated evenly, so try to give it a really good stir before it heads into the oven.
Ingredient Clarity for Pumpkin Seed Clusters
Here is exactly what you’ll need. I like to have everything measured out before I even turn the oven on; it makes the mixing process fly by.
- Pumpkin Seeds: Half a cup is what we need for that signature crunch.
- Coconut Flakes: Use dried coconut flakes—they crisp up beautifully.
- Flaked Almonds: These add a softer texture contrast to the seeds.
- Chia Seeds: These tiny seeds help bind everything together as it bakes.
- Maple Syrup: This is our natural sweetener and glue!
- Salt: Just a tiny sprinkle to make all those nutty and sweet flavors really pop.
Equipment Needed for Baking Pumpkin Seed Clusters
You don’t need any fancy gadgets to make these amazing Pumpkin Seed Clusters, which is part of why I love them so much! Just grab the basics you probably already have sitting in your kitchen drawers. Having these items ready means you can whip up a batch anytime the craving hits.
- A medium mixing bowl.
- Parchment paper (this is non-negotiable for easy cleanup!).
- A sturdy baking tray—nothing deep, just a standard flat sheet.
- A spatula or spoon for mixing and spreading.
Step-by-Step Instructions for Perfect Pumpkin Seed Clusters
Okay, let’s get baking! These instructions are so straightforward, you’ll wonder why you didn’t make these Pumpkin Seed Clusters ages ago. Remember, the secret here is thorough mixing and then total patience once they come out of the oven. Don’t rush the cooling part; that’s where the magic happens!
Preparing the Mixture and Initial Bake
First things first, get that oven preheated to 340 degrees Fahrenheit, or 170 Celsius if you use the metric side like I do. While it warms up, line a baking sheet—and I mean really line it—with parchment paper. This prevents sticking, which is a nightmare with syrupy snacks.
Now, grab your bowl. Toss in all your dry goodies first: the pumpkin seeds, the coconut, the almonds, and the chia seeds, plus that little sprinkle of salt. Next comes the sticky part: drizzle in your maple syrup. You need to stir this until every single piece looks glistening and coated. I mean it—you shouldn’t see any dry spots at the bottom of the bowl. If it looks too dry, they won’t stick together later!
Once everything is beautifully coated, spread that sticky mess onto your prepared tray. It needs to be a thin, single layer—aim for about half a centimeter thick. Make sure there aren’t any big clumps or empty spaces. Pop it onto the bottom rack and let it bake for 20 minutes. Keep an eye on it after the 15-minute mark because those edges brown fast!
Cooling and Breaking Your Pumpkin Seed Clusters
This step is the hardest, trust me! When those 20 minutes are up, pull the tray out, but here is the absolute most important rule for perfect Pumpkin Seed Clusters: Do not touch it. Seriously, walk away. Don’t prod it, don’t try to nudge the edges, nothing.
The mixture is super soft right now, almost like hot caramel. It needs to cool down completely on the tray to harden into one big, beautiful slab. This usually takes about 30 minutes, depending on how warm your kitchen is. Once it’s totally cool, you can carefully lift the whole slab off the parchment paper. Then, using your hands, gently break it apart into clusters of whatever size you prefer. Be gentle; they can be a little delicate, but honestly, the little broken bits make the best toppings for my morning yogurt!
Tips for Success with Your Baked Pumpkin Seed Clusters
Folks, making these Pumpkin Seed Clusters is easy, but there are two little things that can trip you up if you aren’t paying attention. The first is making sure everything gets coated in that sticky maple syrup—if you have dry spots, those bits will just fall off later. Trust me, you want every single seed and flake glued nicely in place.
The second, and this is huge, is watching the clock near the end. Nuts and coconut like to go from golden brown to burnt black in about two seconds flat. It’s a real baking tragedy when you ruin a batch right at the finish line. A little color is good; black bits are not!
Avoiding Over-Browning in Pumpkin Seed Clusters
I always stand right by the oven door for the last five minutes of baking. Your recipe calls for 20 minutes total, but that final stretch is critical. If you see the edges of your Pumpkin Seed Clusters starting to look too dark, pull the tray out immediately. The residual heat will keep cooking them while they sit there cooling. If you notice one corner is browning faster than the other, you can carefully slide the tray around a bit, but honestly, just pulling them out when they look perfectly golden is the safest bet. Better to pull them out slightly underdone than risk that bitter, burnt flavor.
Storing and Enjoying Your Pumpkin Seed Clusters
Once you’ve broken your beautiful slab into individual Pumpkin Seed Clusters, the next big question is how to keep them tasting fresh and crisp. Nobody likes a chewy cluster when they are expecting that satisfying snap! The key here is keeping moisture out.
The best way to store these is in an airtight container. I use glass jars with tight-fitting lids, but any decent container will work. Keep them somewhere cool and dry, like your pantry, away from the stove where steam might escape. If your kitchen is super humid, you might even want to add a tiny silica gel packet—the kind you find in new shoe boxes—but make sure everyone knows not to eat it, of course! Desserts are always better when stored correctly.
I find they stay perfectly crisp for about a week, maybe a little longer if your storage conditions are perfect. If you notice they’ve softened even a little bit, don’t toss them! Just spread them back out on a baking sheet and pop them into a cool oven (maybe 300F/150C) for about five minutes. Let them cool completely again, and they’ll usually crisp right back up. It’s like magic!
They are wonderful straight out of the jar, but I also love crumbling them up. They make an amazing topping for plain Greek yogurt, or you can sprinkle them over a scoop of vanilla ice cream. They add such a lovely, earthy crunch to everything! For other great snack ideas, check out my recipe for sweet and spicy nuts.
| Condition | Recommendation |
|---|---|
| Container Type | Airtight glass jar or sealed plastic container |
| Location | Cool, dark pantry away from heat sources |
| Longevity | Up to 7 days for maximum crispness |
| Revival Tip | Re-bake briefly if they lose their crunch |
Frequently Asked Questions About Pumpkin Seed Clusters
I get so many questions about these little baked snacks because everyone wants their Pumpkin Seed Clusters to turn out just right! It’s usually about substitutions or getting that perfect snap when you bite into them. Don’t worry if you’re tweaking things; that’s what home cooking is all about! I’ve gathered the most common queries here to help you get the best results every time you bake a batch.
We want that beautiful balance of crunchy almonds, sweet coconut, and earthy seeds held together with just the right amount of binder. These answers should get you going! If you are interested in other ways to use pumpkin seeds, you might enjoy learning about the nutritional benefits of seeds in general, such as pumpkin spice mac and cheese.
Can I Substitute the Maple Syrup in These Pumpkin Seed Clusters
Maple syrup is fantastic because it has a specific flavor profile that works so well with the toasted nuts, but yes, you can swap it out if you need to. Honey works beautifully as a direct substitute for the maple syrup in these Pumpkin Seed Clusters. It acts just like the syrup, binding everything together. Just remember that honey has a slightly different flavor, so your final snack will taste a little different, but still delicious!
How Long Do Homemade Pumpkin Seed Clusters Last
If you store your Pumpkin Seed Clusters properly in an airtight container away from humidity, they should stay nicely crisp for about a week. I’ve pushed it to ten days, but honestly, they are best when they are fresh. If you notice they’ve gotten a little soft, a quick five minutes in a warm oven will bring that crunch right back!
Estimated Nutritional Data for Pumpkin Seed Clusters
When I share my recipes made with heart and flavor, I always like to give you a rough idea of what you’re eating. Now, remember, since these Pumpkin Seed Clusters are broken up uniquely every time, these numbers are just an estimate per serving. I used the standard yield size when calculating this out, so your actual numbers might vary slightly depending on how big you break them!
| Nutrient | Amount |
|---|---|
| Calories | 64kcal |
| Total Fat | 5g |
| Protein | 2g |
| Carbohydrates | 5g |
This is just an estimate offered as a courtesy for those keeping track. Enjoy them guilt-free! For more quick snack ideas, check out my quick and easy recipes collection.
Share Your Homemade Pumpkin Seed Clusters
I truly love hearing from you when you try one of my recipes made with heart and flavor! Did these Pumpkin Seed Clusters turn out perfectly crunchy for you? Don’t be shy—tell me how you enjoyed them in the comments below. If you snapped a picture of your beautiful slab before you broke it apart, please share it on social media and tag me so I can see your success!
Print
Divine 20-Minute Pumpkin Seed Clusters Snack
- Total Time: 25 minutes
- Yield: Varies based on cluster size
- Diet: Vegetarian
Description
Pumpkin Seed Clusters. Anna Kowalska shares homemade recipes made with heart and flavor that you and your family will love. These clusters offer a simple, satisfying crunch.
Ingredients
- ½ cup pumpkin seeds
- ¼ cup coconut flakes (dried coconut not fresh)
- ¼ cup flaked almonds
- 1 tablespoon chia seeds
- 2 tablespoon maple syrup
- sprinkle salt
Instructions
- Preheat your oven to 170C / 340F. Line a baking tray with parchment paper.
- Add the seeds, nuts, coconut flakes, and salt to a bowl. Drizzle the maple syrup over the ingredients. Stir thoroughly until the maple syrup coats everything.
- Spread the mixture onto the parchment paper in a thin layer, about 0.5cm thick, with no gaps. Bake on the bottom rack for 20 minutes. Watch closely for browning in the final minutes.
- Remove from the oven and do not touch the mixture. It solidifies as it cools and sticks together.
- Once completely cool, carefully break the slab into clusters of your preferred size. Handle gently as the clusters are delicate.
- Serve right away or store in a sealed container.
Notes
- Stir very thoroughly so the maple syrup coats all the nuts and seeds.
- Watch the oven near the end of cooking time; the clusters burn easily.
- Allow the mixture to cool before handling or breaking it. Handle carefully, but broken pieces make great toppings for other treats.
- Nutritional information is an auto-generated estimate offered as a courtesy.
- Prep Time: 5 minutes
- Cook Time: 20 minutes
- Category: Snack
- Method: Baking
- Cuisine: Global
Nutrition
- Serving Size: Varies
- Calories: 64kcal
- Sugar: 3g
- Sodium: 2mg
- Fat: 5g
- Saturated Fat: 2g
- Unsaturated Fat: 2g
- Trans Fat: 0.004g
- Carbohydrates: 5g
- Fiber: 1g
- Protein: 2g
- Cholesterol: 0mg