Skip to content
If you’re anything like me, you’re constantly hunting for a meal that checks every box: quick to make, packed with goodness, and something you actually *want* to eat for lunch the next day. Well, stop looking, because the Quinoa Buddha Bowl is about to become your new best friend! I’m Anna Kowalska, and here I share tried-and-true homemade recipes that you and your family will love. Everything I make is done with heart and flavor, and this bowl is no exception.
I developed this particular recipe out of necessity. My work schedule got crazy last year, and I needed something I could whip up on Sunday that wouldn’t leave me reaching for takeout by Wednesday. This bowl—with its perfectly roasted veggies, creamy dressing, and satisfying quinoa base—is my secret weapon for staying healthy during busy weeks. It’s the definition of healthy lunch goals, and honestly, it tastes way too good to be this good for you!
Jump to:
Gathering What You Need for the Quinoa Buddha Bowl
Alright, let’s get our ducks in a row before we start chopping! A great Buddha Bowl is all about having your components ready to go so assembly is a breeze. Since this recipe relies on a few fresh elements, make sure your vegetables are looking bright and your tahini is fresh. Trust me, using good quality ingredients really makes a difference when you’re keeping things simple.
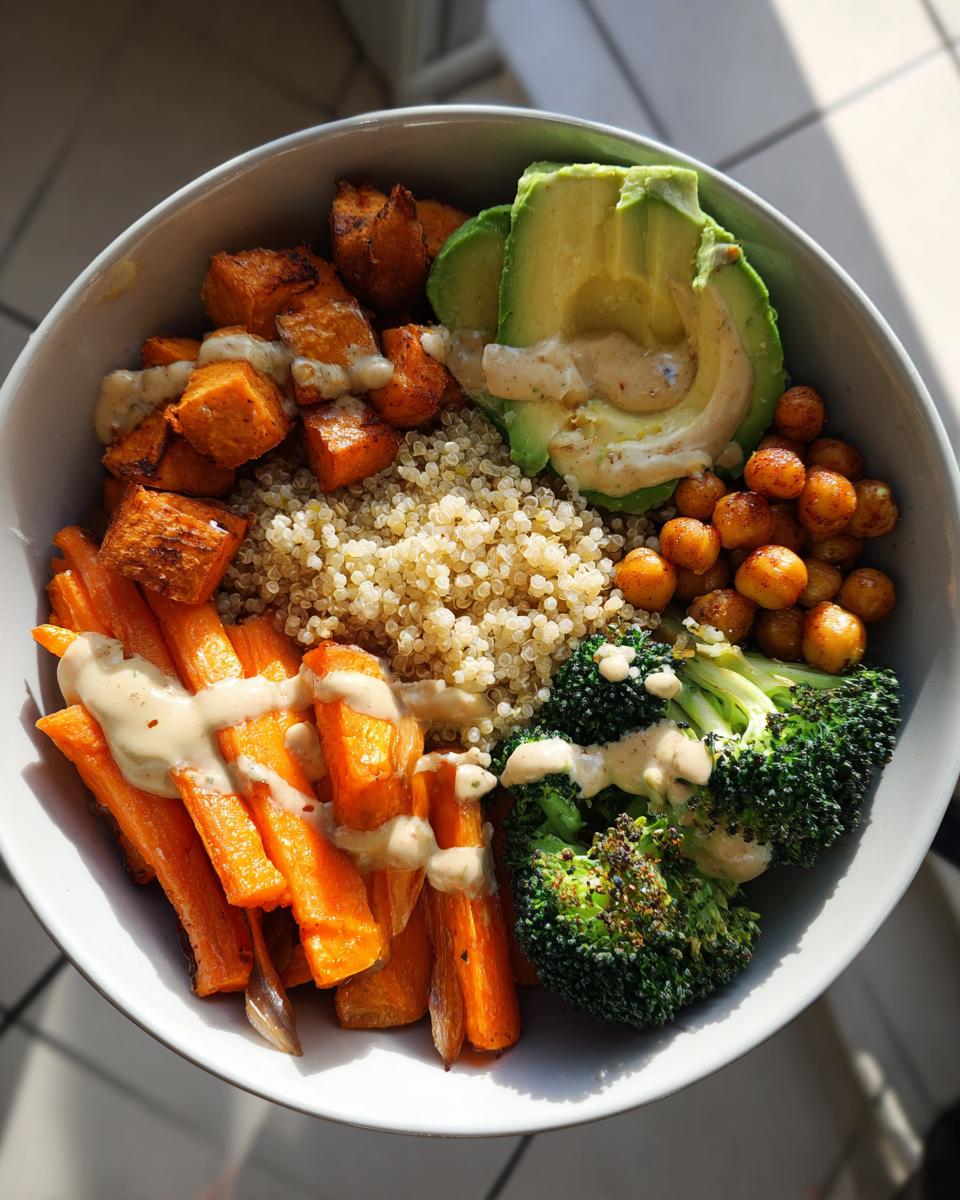
Essential Ingredients for Your Quinoa Buddha Bowl
I’ve laid everything out below. Notice how I specified the prep for the quinoa and the chickpea seasoning—those little details really ramp up the flavor!
| Ingredient | Specifics |
|---|---|
| Carrots | 1 cup diced |
| Broccoli | 1 cup florets |
| Sweet Potato | 1 cup cubed |
| Dry Quinoa | ¾ cup |
| Canned Chickpeas | ½ cup, drained and rinsed |
| Tahini | 2 tablespoons |
| Avocado | ½, sliced |
| Seasonings | Smoked paprika, cumin, chili powder, salt, pepper, lemon juice |
Necessary Equipment for This Quinoa Buddha Bowl Recipe
You won’t need a million fancy gadgets for this, which is why I love it for a quick weeknight meal! You’ll definitely want a sturdy sheet pan for roasting those veggies—make sure it’s big enough so they aren’t piled on top of each other. A small saucepan is needed for the quinoa, and a little skillet will crisp up those chickpeas perfectly. Then just grab a small bowl and a whisk for the dressing!
Step-by-Step Guide to Creating the Perfect Quinoa Buddha Bowl
Okay, time to get cooking! Since a few things happen at once here—roasting, simmering, and sautéing—it’s best to start with the longest step first. That’s definitely the vegetables. Get your oven cranked up now so everything finishes around the same time. Don’t rush the steps; they all build flavor on top of each other!
Roasting the Seasonal Vegetables for Your Quinoa Buddha Bowl
First things first: crank your oven up to 425°F. While that’s heating, grab your diced carrots, broccoli florets, and cubed sweet potato. Toss them all together right on your sheet pan—less cleanup that way! Add your olive oil, salt, pepper, and that little bit of smoked paprika. That paprika really wakes up the sweet potato, trust me. Spread them out so they have space to actually roast, not steam. They need about 25 to 30 minutes in there. Halfway through, give them a good flip so they get those nice caramelized edges.
Cooking the Quinoa Base for Your Quinoa Buddha Bowl
While the veggies are happily roasting, let’s tackle the quinoa. Always rinse your quinoa first; nobody wants that natural bitter coating! In a small pot, combine the ¾ cup of dry quinoa with 1 ½ cups of water and a tiny pinch of salt. Bring that up to a rolling boil, then immediately drop the heat down low, cover it tight, and let it simmer for 15 minutes. Once the time is up, pull it right off the heat—don’t lift the lid! Let it sit covered for another five minutes to steam itself perfectly. Then, just fluff it up with a fork.
Preparing the Savory Spiced Chickpeas
Now for the chickpeas! Heat a teaspoon of olive oil in a skillet over medium heat. Toss in your drained and rinsed chickpeas, cumin, and chili powder. You want these to get a little happy sizzle going on. Sauté them for about 5 to 7 minutes. We want them lightly crispy on the outside because that contrast with the soft quinoa is just fantastic. Remember, even though they are technically cooked from the can, we are heating them through and adding texture here.
Making the Creamy Tahini Dressing for Your Quinoa Buddha Bowl
This dressing is what ties the whole bowl together. It’s so simple, but it tastes gourmet! In a tiny bowl, just whisk together your tahini and lemon juice. It will seize up and look thick—that’s normal! Now, start adding water, just a teaspoon at a time, whisking constantly until it smooths out into a beautiful, thick, pourable consistency. If you want it thinner, just keep adding drops of water. It should drizzle nicely off the whisk.
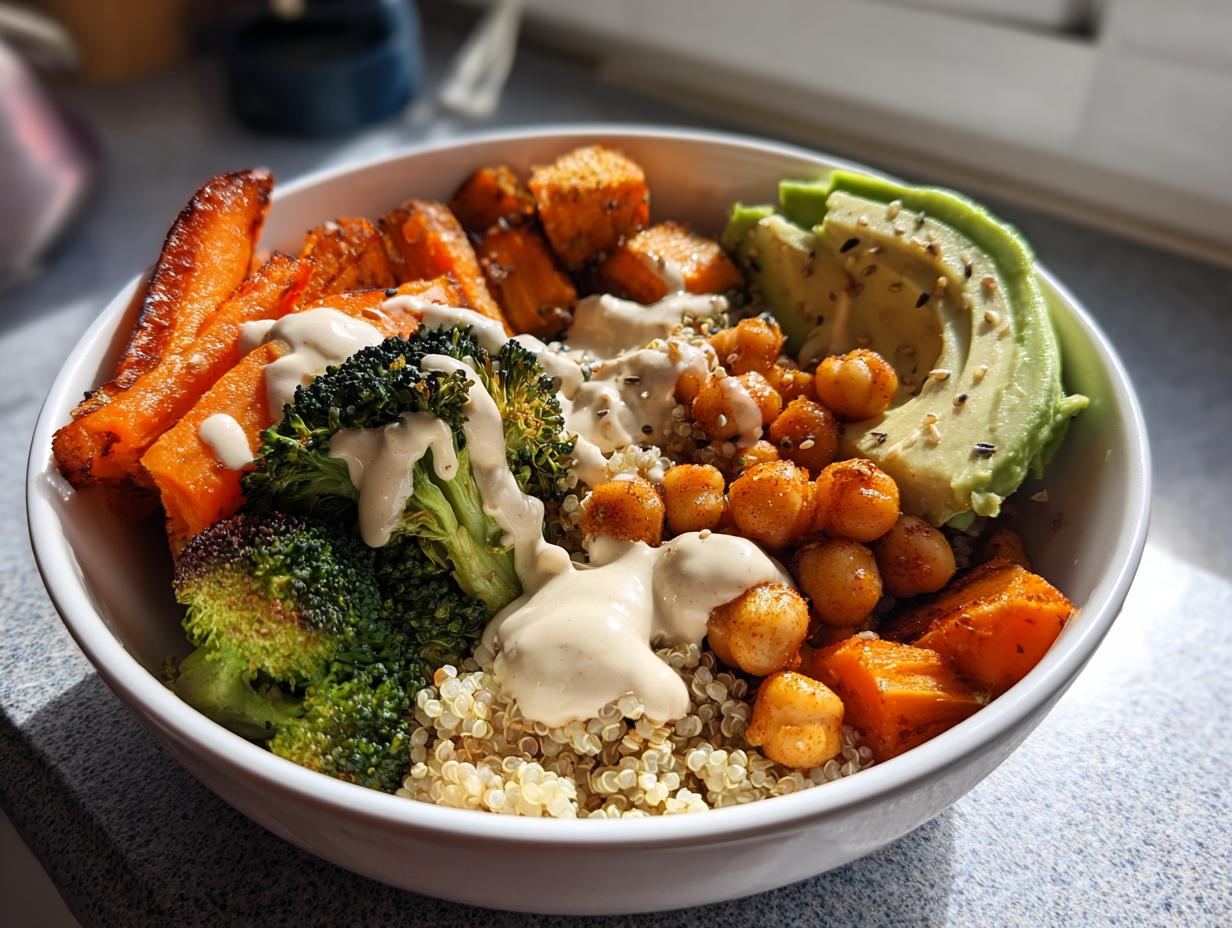
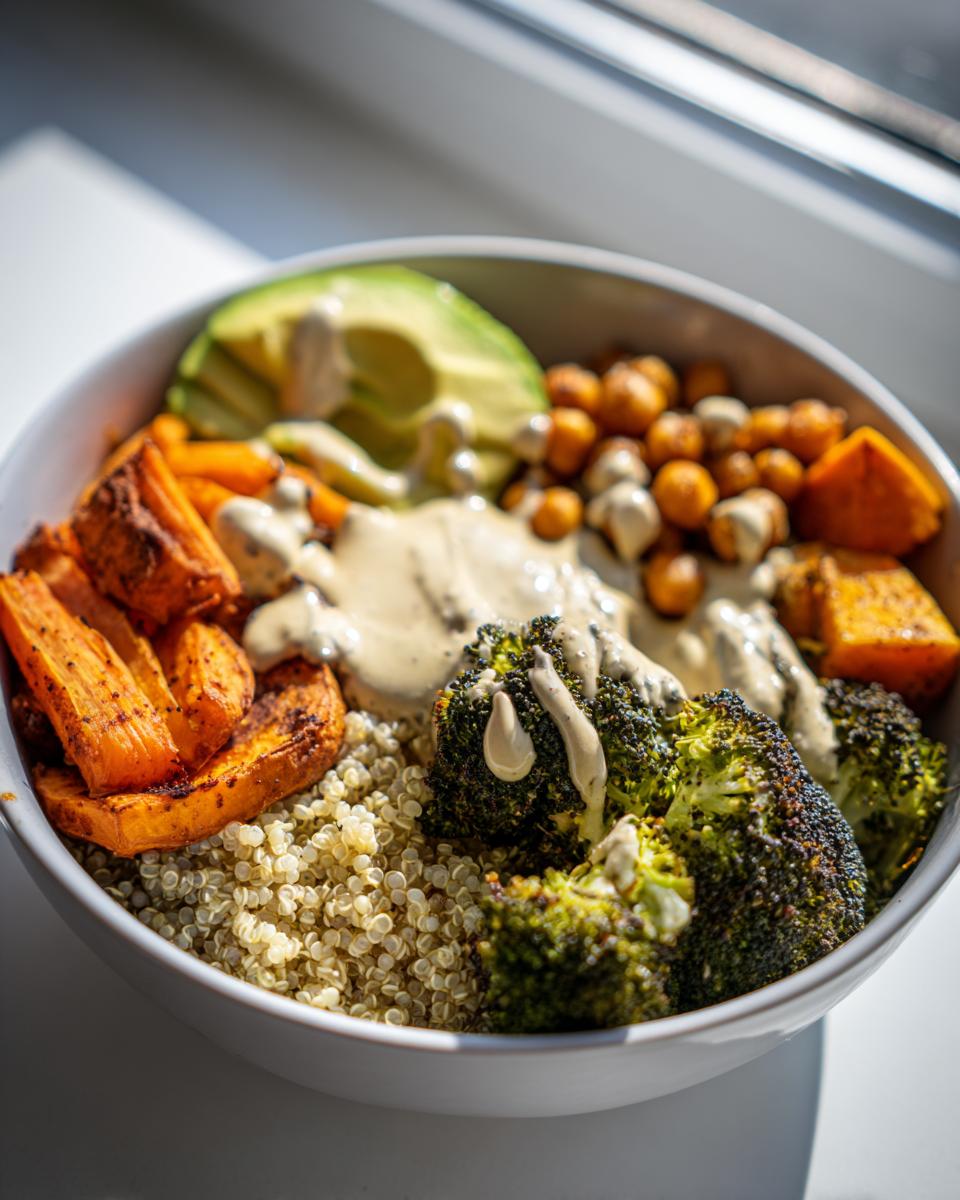
Assembling and Finishing Your Quinoa Buddha Bowl
Time to build! Divide your fluffy quinoa between your two serving bowls first. Then, artfully arrange your roasted vegetables and those warm, spiced chickpeas on top. Nestle those creamy avocado slices right in there. Finally, take your tahini dressing and drizzle it generously over everything. If you feel like getting fancy, sprinkle on a few sesame seeds or some fresh parsley for color. That’s it! Dinner is served in under 40 minutes.
Tips for Achieving Quinoa Buddha Bowl Perfection
Even though this is a straightforward recipe, there are a few little secrets I’ve learned over the months of making this for my weekly lunches. Getting these details right takes your Quinoa Buddha Bowl from good to absolutely amazing.
- Don’t Crowd the Pan: When you roast your vegetables, this is my biggest tip! If you pile them too high on the sheet pan, they will steam instead of roast. That means soggy veggies, and we want that lovely caramelization. If you’re doubling the recipe, use two pans!
- Rinse, Then Rest the Quinoa: I mentioned rinsing is mandatory, but letting the quinoa rest *after* cooking is just as important. Don’t lift that lid until the 15 minutes are up and then let it sit for five more off the heat. That steaming period is what makes it light and fluffy, not gummy.
- Tahini Consistency Check: When making the dressing, go slow with the water. Tahini can go from rock solid to soup in about three seconds flat. Whisk patiently, adding water drop by drop until it coats the back of a spoon nicely. It should be thick enough to hold its shape a bit before melting into the bowl.
- Crisp Up Those Chickpeas: Make sure your skillet is hot enough before adding the chickpeas. If the oil is barely warm, they’ll just soak up oil and get mushy. We want that little bit of sizzle to get them textured!
Simple Variations for Your Quinoa Buddha Bowl
One of the best things about a Buddha Bowl is that it’s totally flexible! It’s designed to use what you have, so don’t feel locked into just carrots and sweet potatoes. If you’re making this in the fall, swap those veggies out for roasted butternut squash and maybe some Brussels sprouts tossed with a little sage instead of paprika.
For a different flavor profile in the chickpea department, try swapping the cumin and chili powder for a teaspoon of curry powder—it gives the whole bowl a warmer, earthier taste. And if you’re not feeling the tahini dressing one week, a simple homemade vinaigrette made with olive oil, apple cider vinegar, and a touch of maple syrup is fantastic.
If you want to change up the base grain completely, this recipe works beautifully with brown rice or even farro if you have it on hand. Just remember that farro takes a little longer to cook than quinoa. This flexibility is why this style of bowl makes such a great staple meal!
Storing and Reheating Your Quinoa Buddha Bowl Meal Prep
The beauty of this Quinoa Buddha Bowl is how well it holds up for meal prepping. I usually store mine with the dressing completely separate because you never want soggy avocado or watery quinoa! If you’re packing them for the week, put the quinoa base and the roasted veggies/chickpeas together in your container.
When it comes time to eat, reheat only the quinoa and vegetable mix gently—I prefer the microwave for just 60 to 90 seconds until warm. Then, top it with your fresh avocado slices and drizzle that creamy tahini dressing right before you dig in. Keep everything chilled, and it should be perfect for a few days!
| Component | Storage Longevity (Refrigerated) |
|---|---|
| Quinoa/Veggies/Chickpeas (Combined) | 3–4 Days |
| Tahini Dressing | Up to 1 Week |
| Avocado Slices | Best Fresh (Add just before eating) |
Common Questions About the Quinoa Buddha Bowl
I get asked about this bowl all the time, especially when people are trying to figure out healthy lunch solutions that actually taste good. Here are the few things that come up most often when folks are trying this recipe for the first time!
Can I make the Quinoa Buddha Bowl ahead of time for the week?
Absolutely! That’s the real secret weapon of this dish. This is built for meal prep. You can cook the quinoa, roast the vegetables, and make the dressing all on Sunday. Store the dressing in a separate small, airtight jar. When you pack your bowls, keep the avocado separate too, or slice it right before you eat. If you combine everything but the avocado and dressing, it holds up beautifully for about four days for your grab-and-go healthy lunch!
What are good grain substitutes if I skip the quinoa in this Quinoa Buddha Bowl?
If quinoa isn’t your favorite, don’t worry! You have lots of great options that will still make this a powerhouse meal. Brown rice works perfectly and has a similar cook time. If you want something with a bit more chew and texture, try using farro—it’s hearty and stands up really well to the dressing. Just be mindful that farro usually takes closer to 30 minutes to simmer, so plan your timing accordingly!
How do I ensure my roasted vegetables are crispy?
This is where people often go wrong! The number one mistake is overcrowding the sheet pan. If your carrots, broccoli, and sweet potato are touching or piled up, they steam, and you get mushy veggies, not crispy ones. Make sure they are in a single, relatively even layer. Also, don’t be afraid of high heat—425°F is necessary to get those edges nice and browned. If they still look pale after 25 minutes, run the broiler for just 60 seconds, but watch them like a hawk!
Understanding the Nutrition in This Quinoa Buddha Bowl
I always get asked if something this delicious can actually be good for you, and the answer is a resounding yes! This Quinoa Buddha Bowl is packed with fiber from the vegetables and that wonderful plant-based protein from the quinoa and chickpeas. Remember, these numbers are based on the two servings the recipe yields, so if you’re dividing it differently, you’ll need to adjust your counts.
I calculated these estimates based on the standard ingredients listed, but since we’re using fresh seasonal vegetables, the exact nutrient profile can shift a little bit week to week. I try to keep things balanced with healthy fats from the avocado and tahini, which is why you see a good amount of fat listed, but it’s the good kind! Nutritional data sources can vary, so always check labels if you have strict dietary needs.
| Nutrient | Per Serving (Estimate) |
|---|---|
| Calories | 420 |
| Total Fat | 18g |
| Carbohydrates | 55g |
| Protein | 14g |
Please keep in mind that these values are just my estimates based on the ingredients I used today. Things like the exact fat content in your avocado or the brand of tahini you buy can change the final counts slightly. Still, it gives you a fantastic baseline for what a powerhouse healthy lunch this is!
Share Your Homemade Quinoa Buddha Bowl Experience
I truly hope this Quinoa Buddha Bowl becomes a staple in your kitchen just like it is in mine! I put my heart into making sure these recipes work perfectly for you. Once you’ve tried it—especially with that creamy tahini dressing—come right back here and let me know what you thought! Drop a rating below or share a photo of your creation on social media. I love seeing how you put your own spin on my tried-and-true meals!
Print
Awesome 2-Step Quinoa Buddha Bowl Power Lunch
- Total Time: 40 minutes
- Yield: 2 servings 1x
- Diet: Vegetarian
Description
This Quinoa Buddha Bowl features roasted seasonal vegetables, chickpeas, avocado, and a creamy tahini dressing. It is a healthy option perfect for quick lunches or light dinners and great for meal prepping.
Ingredients
- 1 cup diced carrots
- 1 cup broccoli florets
- 1 cup cubed sweet potato
- 1 tbsp olive oil
- ½ tsp salt
- ¼ tsp black pepper
- ½ tsp smoked paprika
- ¾ cup dry quinoa
- 1 ½ cups water
- ¼ tsp salt
- ½ cup canned chickpeas, drained and rinsed
- ½ tsp cumin
- ¼ tsp chili powder
- 1 tsp olive oil
- ½ avocado, sliced
- 2 tbsp tahini
- 1 tsp lemon juice
- 1 tsp water (to thin dressing if needed)
- Optional: sesame seeds, fresh parsley
Instructions
- Preheat oven to 425°F.
- Toss carrots, broccoli, and sweet potato with olive oil, salt, pepper, and smoked paprika. Spread on a sheet pan and roast 25–30 minutes until tender, flipping halfway through cooking.
- While vegetables roast, rinse quinoa. Combine quinoa with water and salt in a small pot. Bring to a boil, then reduce heat and simmer covered for 15 minutes until water absorbs. Remove from heat and fluff with a fork.
- Heat olive oil in a skillet over medium heat. Add chickpeas, cumin, and chili powder. Sauté 5–7 minutes until lightly crispy.
- Prepare tahini dressing by whisking tahini, lemon juice, and water until smooth. Add more water if needed to adjust thickness.
- Divide quinoa into bowls. Top with roasted vegetables, sautéed chickpeas, and avocado slices.
- Drizzle tahini dressing over the top. Sprinkle with sesame seeds or parsley if you like.
Notes
- Chickpeas are pre-cooked but should be heated to steaming for best texture.
- This recipe uses seasonal vegetables suitable for March-April in the USA.
- Prep Time: 10 minutes
- Cook Time: 30 minutes
- Category: Main Dish
- Method: Roasting and Sautéing
- Cuisine: American
Nutrition
- Serving Size: 1 serving
- Calories: 420
- Sugar: Unknown
- Sodium: Unknown
- Fat: 18g
- Saturated Fat: Unknown
- Unsaturated Fat: Unknown
- Trans Fat: Unknown
- Carbohydrates: 55g
- Fiber: Unknown
- Protein: 14g
- Cholesterol: Unknown