Skip to content
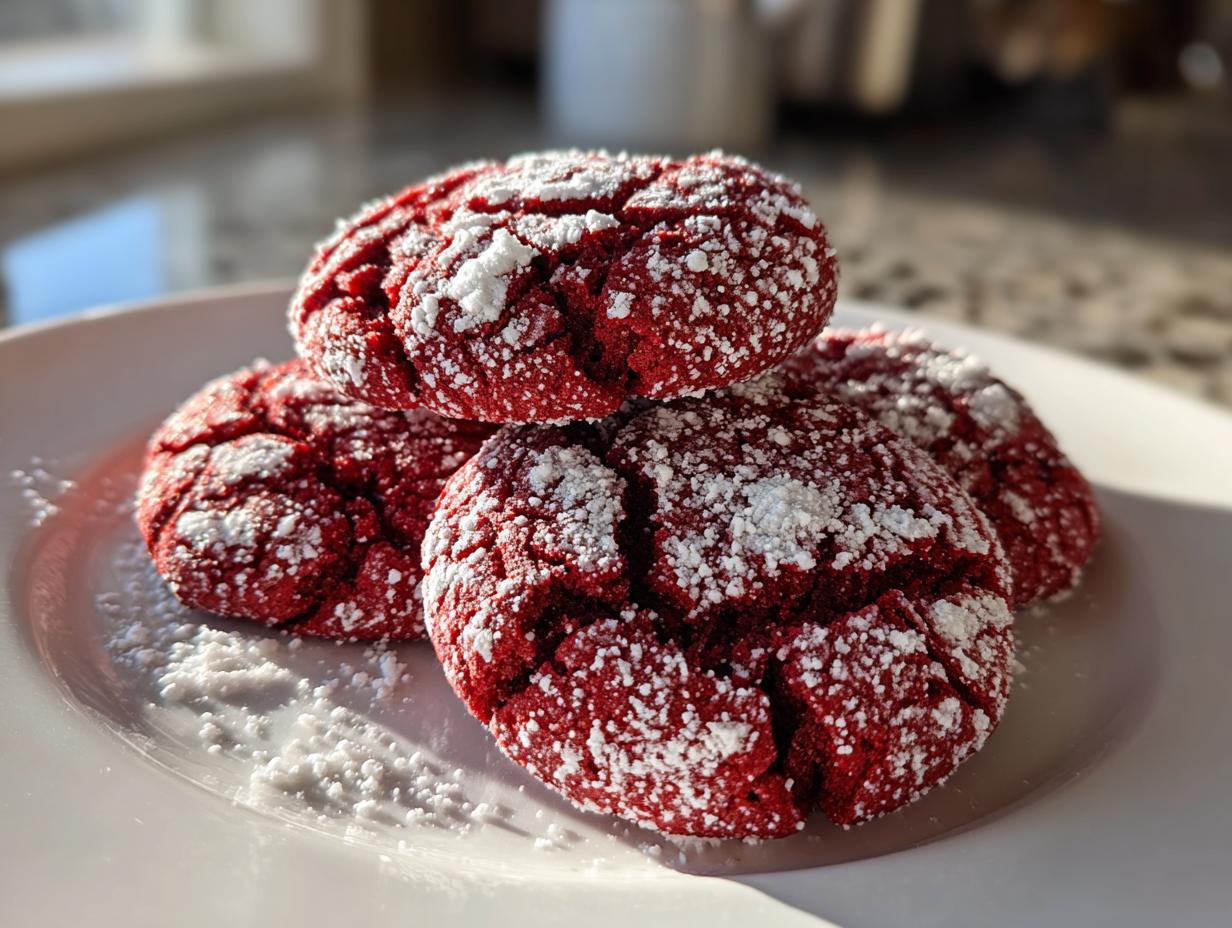
Red Velvet Crinkle Cookie: A Sweet Bite of Comfort. Hi there! I’m Anna Kowalska, and here I share tried-and-true homemade recipes that you and your family will love. Everything I post is made with heart and flavor, the kind of baking that makes your whole house smell amazing. If you’re looking for that perfect dessert that tastes like a cozy hug but looks absolutely stunning on a platter, you’ve landed in the right spot!
Forget those dry, crumbly cookies of the past. I developed this recipe because I needed a holiday cookie that delivered maximum visual impact without being fussy. These Red Velvet Crinkle Cookies are total showstoppers. They’re deeply chocolatey, wonderfully soft in the middle, and that snowy white crackle on top? It just screams celebration!
Seriously, waiting for these to cool is the hardest part. The deep red velvet flavor, balanced perfectly with a hint of cocoa, makes them irresistible. You’re going to want to hide these from everyone else in the house, trust me.
Jump to:
Essential Ingredients for Your Red Velvet Crinkle Cookie
Getting the right ingredients is half the battle, especially when you are aiming for that signature look. These Red Velvet Crinkle Cookies rely on a few key players to get the texture and color just right. Don’t try to sneak in substitutes here; trust me, the results depend on these specific items!
Dry Components for the Red Velvet Crinkle Cookie
We are keeping the dry team simple but precise. You need your all-purpose flour, of course, but pay attention to how you measure it! Spoon the flour into your measuring cup and level it off—don’t scoop straight from the bag or you’ll add too much. We need that 1/2 cup of unsweetened cocoa powder for the chocolate backbone and the baking powder to give us just a little lift. A tiny pinch of salt is crucial to wake up all those flavors.
Wet Ingredients and Flavor Base for the Red Velvet Crinkle Cookie
This is where the magic happens! Make sure your butter is truly softened—not melted, just soft enough to press a finger indent into it easily. That granulated sugar needs to be beaten well with the butter to incorporate air. For the color, I insist you use gel food coloring if you have it, not the liquid drops. Gel gives you that intense, deep red velvet hue without adding extra liquid that could mess up the dough structure for your Red Velvet Crinkle Cookie batch.
Preparing the Dough for Perfect Red Velvet Crinkle Cookie Results
Making the dough for these cookies is straightforward, but you have to respect the order of operations if you want those beautiful cracks. We aren’t just mixing ingredients here; we are building structure for the best Red Velvet Crinkle Cookie you’ve ever had. Take your time, especially during the creaming stage, and you’ll be rewarded!

Combining Dry and Wet Mixtures
First things first, you need that butter and sugar beaten until they look pale and fluffy—it should take a good two or three minutes with an electric mixer. This step gets air into the dough, which helps keep the final cookie soft. Add your eggs one at a time, making sure each one is fully incorporated before adding the next. Then, stir in your vanilla and that vibrant red coloring until the whole mixture looks like bright red velvet fabric. Now, add those dry ingredients you whisked together, but do it gradually! Mix just until you see the last streak of flour disappear. Stop mixing right there; overmixing develops gluten and we want tender cookies, not tough ones.
The Critical Step: Chilling the Red Velvet Crinkle Cookie Dough
This is the part where people get impatient, but you absolutely cannot skip it. You must cover the bowl and chill the dough for at least 30 minutes, as noted in my tips! If you try to roll this soft, rich dough right away, it spreads out into flat, sad little discs in the oven. Chilling firms up the fats, which controls that spreading. More importantly, the firm dough holds that thick layer of powdered sugar coating much better, which is exactly what guarantees those stunning, snowy crinkles on your finished Red Velvet Crinkle Cookie.
Baking the Iconic Red Velvet Crinkle Cookie
Okay, the dough is chilled and ready to go! Now we turn it into the beautiful, cracked cookies we dream about. Baking these correctly ensures you get that signature soft center while keeping the outside perfectly coated. Remember, the oven needs to be preheated to 350\u00b0F (175\u00b0C) before anything goes in. We are aiming for cookies that look professionally baked, but trust me, they are so easy! Follow these steps precisely, and your Red Velvet Crinkle Cookie batch will be a huge success.
Rolling and Coating Technique
This is the secret to the crinkle! Grab a tablespoon and scoop out your dough. You want 1-inch balls, no bigger. Roll them between your palms until they are nice and round. Now, don’t be shy with the powdered sugar! You need to roll each ball generously until it is completely covered—I mean absolutely buried in white sugar. This thick coating is what separates when the cookie bakes, creating those gorgeous fractures. If you skimp here, you won’t get the crinkle effect on your Red Velvet Crinkle Cookie.

Timing and Temperature for Soft Centers
Place those sugar-coated balls onto your parchment-lined baking sheets, leaving about 2 inches between them so they have room to breathe and spread just a little. They only need 10 to 12 minutes in the oven. Seriously, don’t overbake them! You want the edges to look set, but when you gently tap the center, it should still feel soft. Pull them out when you think they might be slightly underdone, because they continue baking on that hot sheet for a few minutes after you remove them. That’s the trick for a chewy Red Velvet Crinkle Cookie.
Tips for Achieving Expert Red Velvet Crinkle Cookie Texture
I’ve made this recipe so many times I could probably do it in my sleep, and I’ve definitely learned a few things the hard way! If you find your cookies are spreading too much or the color isn’t popping right, I have a couple of fixes that work every time for a perfect Red Velvet Crinkle Cookie.
First, let’s talk about that color again. If you are using standard liquid food coloring, you might find your cookies look more pink than vibrant red. Liquid coloring adds too much water, which weakens the dough structure and encourages spreading. Always opt for the gel coloring. You use less product, but you get a much deeper, richer color that truly screams ‘red velvet’! For more information on the science behind food coloring in baking, you can check out resources on food science principles.
The absolute biggest mistake people make that ruins the crinkle is skipping or rushing the chill time. If your dough is too warm, the butter melts too fast in the oven before the structure sets, and you end up with one giant, flat, slightly reddish chocolate cookie instead of individual, cracked beauties. If you are in a rush, try putting the dough balls, already rolled in sugar, onto the tray and popping that tray into the freezer for 15 minutes instead of 30 minutes in the fridge. That blast of cold helps lock in shape so you get those beautiful fissures on your Red Velvet Crinkle Cookie!
Also, when you pull them out of the oven, resist the urge to touch them immediately. They are incredibly delicate right out of the heat. Letting them sit on that hot baking sheet for those 3 to 5 minutes allows the edges to firm up just enough so they don’t fall apart when you move them to the cooling rack. Patience pays off for the best Red Velvet Crinkle Cookie texture! If you are interested in learning more about proper cookie cooling techniques, reputable baking guides often cover this in detail, such as those found on King Arthur Baking.
Storage and Reheating Instructions for Your Red Velvet Crinkle Cookie
Once you’ve managed to save a few of these beauties from immediate consumption, you’ll want to know the best way to keep them tasting fresh. Honestly, they are best the day they are baked, but these tips will keep your Red Velvet Crinkle Cookie tasting fantastic for days to come!
I’ve put together a quick reference chart based on how long you need to keep them around. Storing homemade cookies properly makes such a difference!
| Storage Method | Duration | Notes |
|---|---|---|
| Airtight Container (Room Temp) | Up to 4 days | Keeps the soft center intact. |
| Freezer (Airtight) | Up to 2 months | Great for making ahead for holidays! |
Keeping Baked Red Velvet Crinkle Cookies Fresh
For short-term storage, keeping your Red Velvet Crinkle Cookie fresh is all about locking in that moisture. Make sure they are completely cool before storing—warm cookies create condensation inside the container, which leads to sogginess, and we absolutely don’t want that!
Pop them into a good quality, airtight container. If you find that they start to lose a little softness after day three, you can try this trick: place half a slice of fresh white bread in the container with the cookies. The cookies will absorb moisture from the bread, bringing them right back to that soft, just-baked texture. Just remember to toss the bread after a day or two!
Frequently Asked Questions About This Red Velvet Crinkle Cookie Recipe
I get so many messages about this recipe, which just tells me how much everyone loves these cookies! Here are a few things that pop up most often when people are baking their first batch of Red Velvet Crinkle Cookies.
Can I Reduce the Food Coloring in the Red Velvet Crinkle Cookie?
You certainly can, but you risk losing that classic visual identity! The whole charm of the Red Velvet Crinkle Cookie is the dramatic contrast between that deep red interior and the bright white powdered sugar shell. If you cut the coloring way down, you end up with something that tastes like a chocolate cookie but doesn’t look like red velvet. If you absolutely must reduce it, try using slightly less gel coloring, but I wouldn’t recommend more than a 25% reduction if you want that signature look.
Why Did My Red Velvet Crinkle Cookies Not Crinkle?
Oh, this is the most common heartache! Usually, it comes down to one of two things, and neither has anything to do with the actual baking time. First, were your dough balls thoroughly chilled? If the dough is too warm, it spreads before the sugar coat can set and crack. Second, did you roll them generously enough? You need a thick, heavy blanket of powdered sugar on those balls so that when the cookie bakes and spreads, the sugar layer splits open. If you are looking for perfect powdered sugar cookies, the chilling and the sugar roll are non-negotiable steps! If you want to see other great cookie recipes, check out my desserts section.
Can I substitute the cocoa powder for something else in these chocolate cookies?
No, you really can’t substitute the cocoa powder here. The red velvet flavor profile relies on that specific, slightly bitter note from the cocoa powder to balance the sweetness of the sugar and the coloring. If you leave it out, you are essentially making a very sweet, red sugar cookie, which defeats the purpose entirely. For the best Red Velvet Crinkle Cookie, stick to the unsweetened cocoa powder listed!
Estimated Nutritional Information for One Red Velvet Crinkle Cookie
I always include these numbers just so everyone has a good idea of what they are enjoying! Please remember that these figures are estimates based on the standard ingredients listed above and typical measuring practices. If you use extra sugar for rolling or different brands of butter, the counts might shift slightly. But this gives you a great baseline for one delicious Red Velvet Crinkle Cookie!
| Nutrient | Amount (Per Cookie) |
|---|---|
| Calories | 180 |
| Sugar | 18g |
| Fat | 9g |
| Protein | 2g |
| Carbohydrates | 24g |
See? Totally worth every bite! Enjoy responsibly, my friends!
Share Your Red Velvet Crinkle Cookie Creations
I genuinely hope you loved making these as much as I love sharing them with you. Baking is always better when we can share the results, isn’t it? Once you’ve let these beauties cool completely, I really want to see what you come up with!
Did you manage to get that perfect, deep red color? Are your cracks looking snowy and dramatic? Don’t keep that deliciousness a secret!
Please take a moment to leave a rating down below—even just a quick five stars helps other bakers know this recipe is a winner. And if you snapped a picture of your gorgeous Red Velvet Crinkle Cookie spread, tag me on social media! Seeing your family enjoying these sweet, comforting little bites is the absolute best reward for me. Happy baking, everyone!
Print
Amazing Red Velvet Crinkle Cookie: 10 Tips
- Total Time: 52 minutes
- Yield: About 2 dozen cookies 1x
- Diet: Vegetarian
Description
Red Velvet Crinkle Cookie: A Sweet Bite of Comfort. These cookies feature a rich red velvet flavor, a soft, chewy center, and a beautiful crackled powdered sugar coating.
Ingredients
- 1 1/2 cups all-purpose flour
- 1/2 cup unsweetened cocoa powder
- 1 tsp baking powder
- 1/4 tsp salt
- 1/2 cup unsalted butter, softened
- 1 cup granulated sugar
- 2 large eggs
- 1 tsp vanilla extract
- 1 tbsp red food coloring
- 1/2 cup powdered sugar, for rolling
Instructions
- Set the oven to 350°F (175°C) and line two baking sheets with parchment paper.
- Whisk together the flour, cocoa powder, baking powder, and salt in a medium bowl.
- Beat the softened butter and granulated sugar in a large bowl until light and fluffy, about 2 to 3 minutes.
- Add the eggs one at a time, beating well after each addition. Stir in the vanilla extract and red food coloring until the batter is evenly tinted.
- Gradually add the dry ingredients to the wet mixture, stirring just until no flour streaks remain.
- Cover the bowl and refrigerate the dough for at least 30 minutes to firm it up.
- Scoop tablespoon-sized portions of the chilled dough and roll them into 1-inch balls. Roll each ball generously in powdered sugar until fully coated.
- Place the coated dough balls on the prepared baking sheets, spacing them about 2 inches apart.
- Bake for 10 to 12 minutes, until the edges are set but the center remains soft.
- Let the cookies rest on the baking sheets for 3 to 5 minutes, then move them to a wire rack to cool completely.
Notes
- Use gel food coloring for a deeper red color.
- Chilling the dough is necessary for the signature crinkle effect and controls spreading.
- Store baked cookies in an airtight container at room temperature for up to 4 days.
- Freeze baked cookies for up to 2 months for longer storage.
- Prep Time: 20 minutes
- Cook Time: 12 minutes
- Category: Dessert
- Method: Baking
- Cuisine: American
Nutrition
- Serving Size: 1 cookie
- Calories: 180
- Sugar: 18g
- Sodium: 50mg
- Fat: 9g
- Saturated Fat: 5g
- Unsaturated Fat: 4g
- Trans Fat: 0g
- Carbohydrates: 24g
- Fiber: 1g
- Protein: 2g
- Cholesterol: 35mg