Skip to content
Are you tired of cookies that promise richness but deliver a dry, cakey disappointment? I hear you! If you’re craving that deep, intense, crackly-topped, perfectly fudgy center of a premium brownie, but you want it in easy, handheld cookie form, then stop scrolling right now. You’ve found the holy grail. I’m Anna Kowalska, and here I share tried-and-true homemade recipes that you and your family will love; everything is made with heart and flavor, and these Salted Brownie Cookies are the absolute proof of that philosophy.
Forget complicated melting techniques or hours in the oven. These cookies come together so fast you’ll be shocked they taste this decadent. They are designed for maximum payoff with minimal fuss. We’re talking about achieving that classic brownie texture—dense, chewy, and deeply chocolatey—all wrapped up in a cookie that’s ready in under 30 minutes total. Trust me, once you bake these, you won’t go back to regular chocolate cookies again.
Jump to:
Gathering What You Need for Salted Brownie Cookies
Before we dive into the magic of melting chocolate and creating that perfect fudgy middle, we need to make sure your kitchen is set up. The beauty of these Salted Brownie Cookies is that they move fast, so having everything measured and ready to go is half the battle won! Seriously, measure everything out first, just like I do. It keeps the process smooth, and you don’t risk over-mixing later when things get exciting.
Also, remember to have your eggs sitting out a bit so they come up to room temperature. That little detail really helps everything emulsify beautifully later on. Once you’ve got your mise en place sorted, we can move right into the ingredients list below.
Essential Ingredients for Fudgy Cookies
Here is exactly what you need to pull off these incredible brownie cookies. Make sure you grab those flaky sea salt crystals for the topping—they really make the difference!
| Amount | Ingredient | Notes |
|---|---|---|
| 1 cup | All-Purpose Flour | |
| 1 tsp | Baking Powder | |
| 1/8 tsp | Salt | For the dry mix |
| 2 large | Eggs | Must be room temperature |
| 1 large | Egg Yolk | Must be room temperature |
| 1 cup | Granulated Sugar | |
| 1 tbsp | Vegetable Oil | |
| 1 tsp | Vanilla Extract | |
| 6 tbsp | Unsalted Butter | |
| 1 cup + extra | Semi-Sweet Chocolate Chips | Plus extra for topping |
| 1/4 cup | Unsweetened Cocoa Powder | |
| 1 tsp | Espresso Powder | Optional, but I highly recommend it! |
| To taste | Sea Salt Flakes | For garnishing the tops |
Achieving the Perfect Salted Brownie Cookies Texture
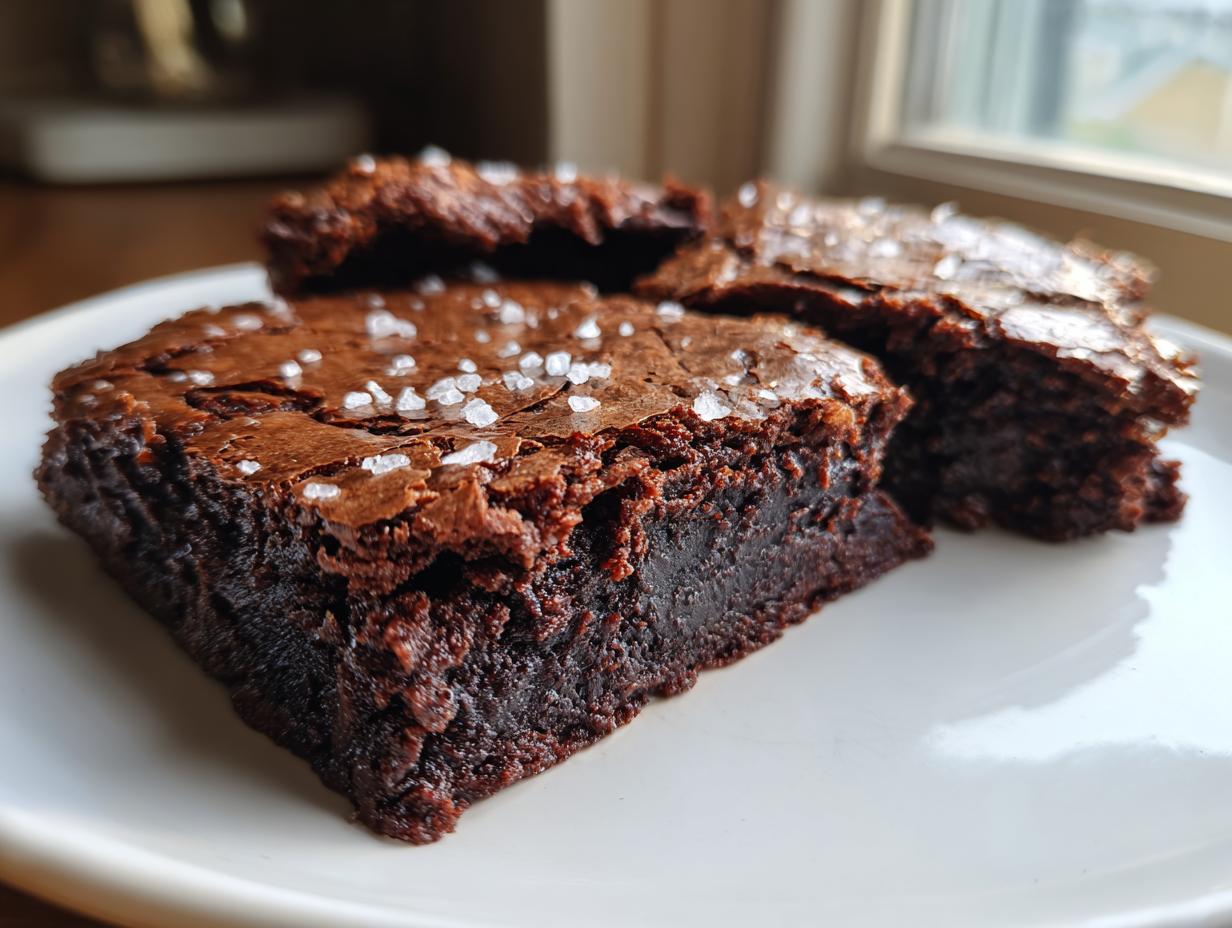
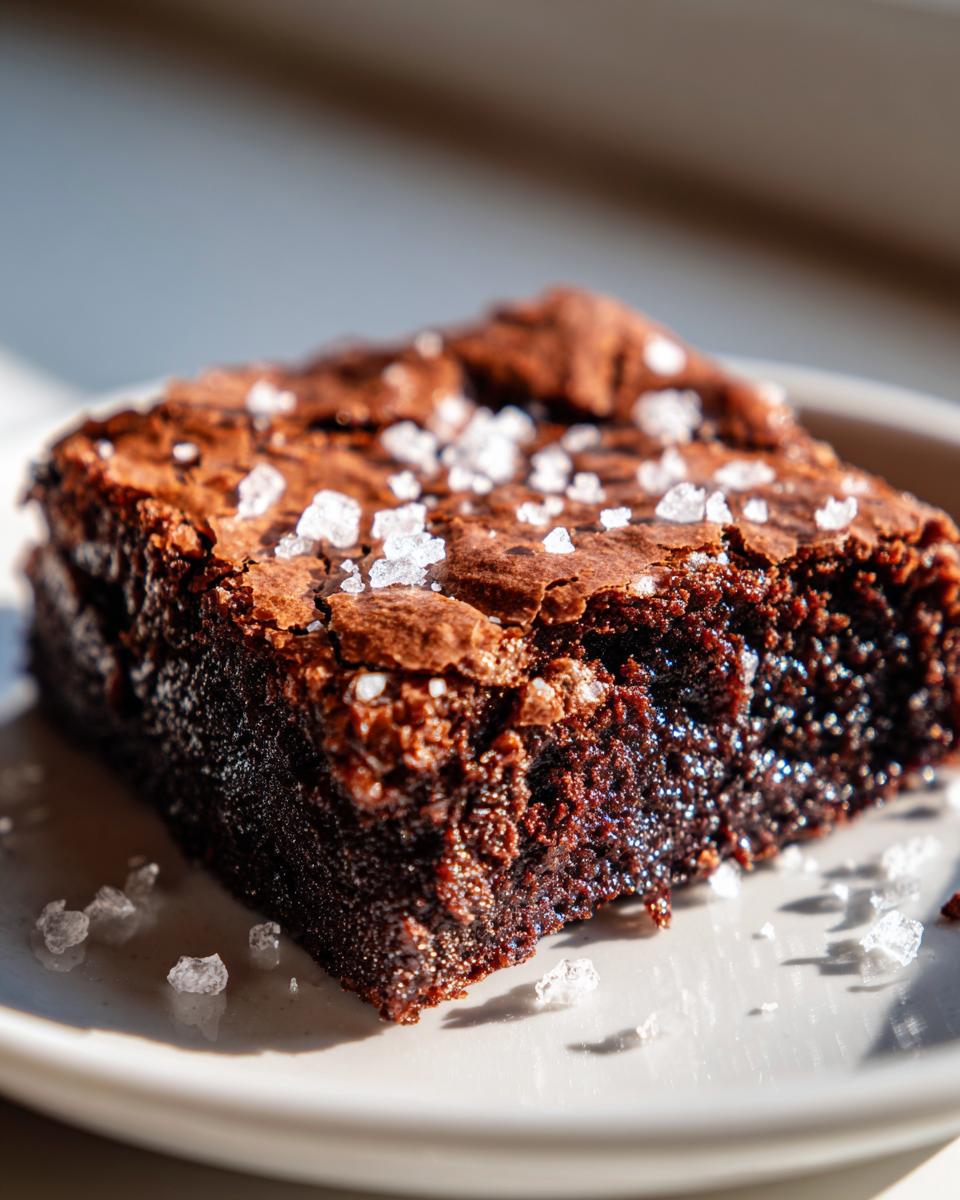
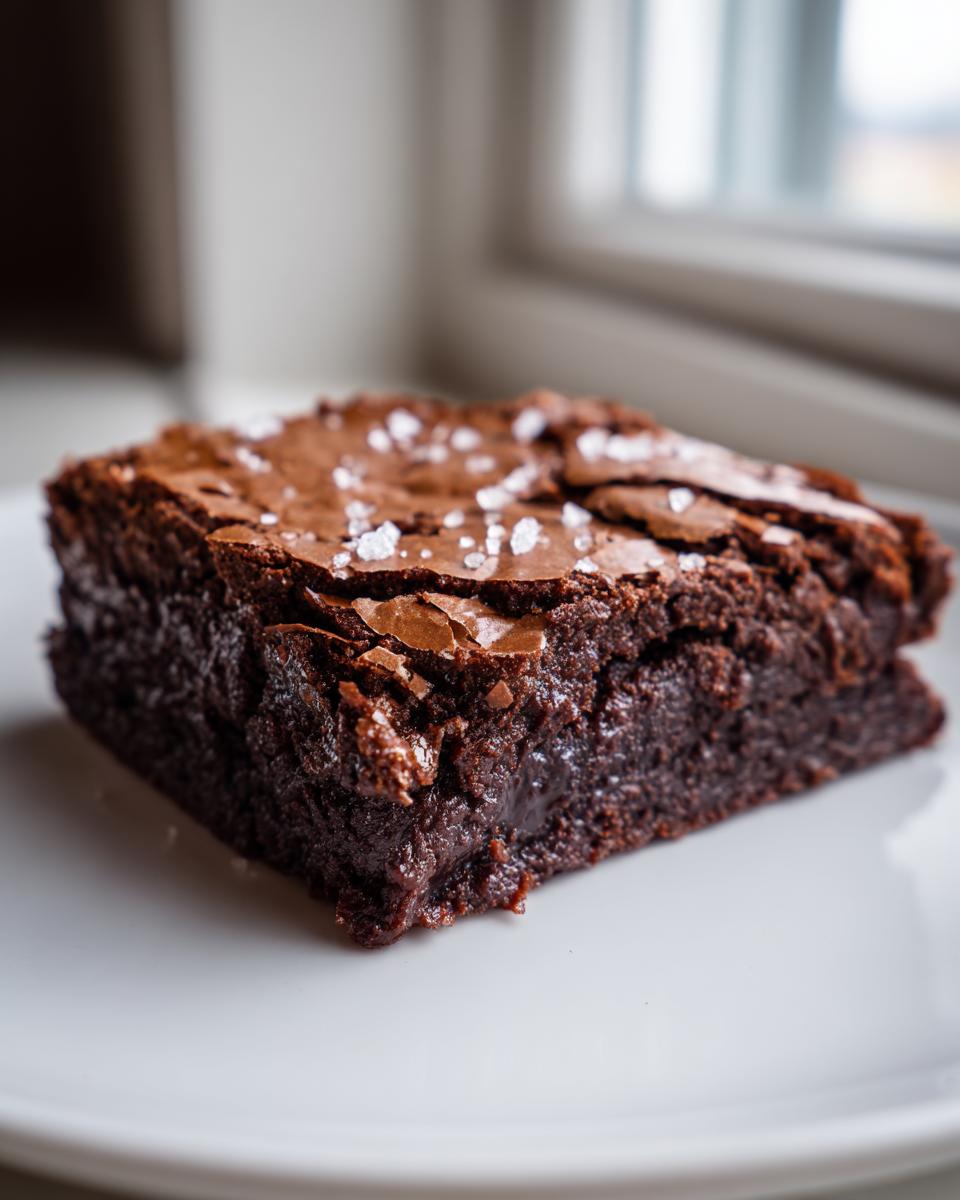
When I developed this recipe for Salted Brownie Cookies, my main goal was capturing that perfect brownie bite—you know, the shiny, crackly top that gives way to a wonderfully dense, fudgy interior. It’s all about how you treat those ingredients, especially the chocolate base. We aren’t creaming butter and sugar here; we are melting the fats and incorporating the cocoa right away, which keeps these cookies from ever turning cakey.
The final look is your biggest clue. If the tops are shiny and have those beautiful little fissures, you’ve nailed it! That famous crackle happens because the sugar and egg mixture whips up nicely, and the immediate addition of hot chocolate mixture sets that structure fast. Don’t worry about the batter looking thin; that’s exactly what we want for ultimate fudginess.
Equipment Required for Baking
You don’t need a ton of fancy gear, but these tools make the process much smoother and guarantee those professional-looking results. Having them ready means you can move quickly once the chocolate is melted.
- Hand mixer or stand mixer with the paddle attachment
- Medium bowl for dry ingredients
- Small saucepan for melting butter and chips
- Two sturdy baking sheets
- Parchment paper or silicone baking mats (These are non-negotiable for easy cleanup!)
- 1 1/2 tablespoon cookie scoop (or two spoons)
Mastering the Dough Consistency
The transition from wet ingredients to dry is where you need to pay attention. After you mix the frothy eggs and sugar with the rich, warm chocolate base, you’ll add in your flour mixture. Here’s the crucial part: mix only until you see no more streaks of flour. I mean it! Overmixing develops gluten, and we are making a brownie, not bread.
The batter will look much thinner than a typical drop cookie dough—almost like a thick batter you might pour. That’s perfectly normal for these Salted Brownie Cookies. It should hold its shape enough to be scooped, but it will definitely slump a bit on the sheet. That thin, glossy look is your promise of a fudgy center!
Step-by-Step Instructions for Salted Brownie Cookies
Alright, let’s get baking! If you’ve measured everything out like I told you to, this process moves lightning fast. We want to keep the momentum going to ensure those perfect textures in our Salted Brownie Cookies. Don’t walk away from the stove once the chocolate starts melting!
Preparing the Oven and Dry Mix
First things first: get that oven ready. Adjust your rack to the second level—that’s just above the center—and set your oven to preheat to 350ºF. While it’s heating up, line two baking sheets with parchment paper or silicone mats. Trust me, you don’t want to skip this prep work!
In a medium bowl, take your time whisking together the flour, baking powder, and your small amount of salt. Whisk it well so everything is distributed evenly. Once that’s done, set that bowl aside for a minute while we work on the wet ingredients.
Combining Wet Ingredients and Chocolate Base
Grab your mixer now. You need to beat those room temperature eggs, the extra egg yolk, the granulated sugar, vegetable oil, and vanilla extract. Whip them on medium-high speed until the mixture is fully combined and looks a little frothy. This takes a couple of minutes, but it’s important for structure!
Now for the chocolate part. In a small saucepan over medium heat, melt the butter and the cup of semi-sweet chocolate chips together. Keep stirring until it’s totally smooth—no lumps allowed. Immediately remove that saucepan from the heat. You must work fast here: whisk in the unsweetened cocoa powder and the optional espresso powder right away. The heat from the melted mixture helps bloom those flavors beautifully.
Final Mixing and Scooping Technique
Take that warm, rich chocolate mixture and carefully pour it into your whipped egg mixture. Mix it just until everything comes together. Remember what I said about overmixing? Now is the time to be gentle! Add your pre-whisked dry ingredients and mix on the lowest speed, or better yet, fold them in gently with a spatula. Stop mixing the second you see the last bit of flour disappear. The resulting batter will look thin—almost pourable—but it should still be thick enough to scoop, which is exactly what we want for that fudgy texture.
Baking, Topping, and Shaping
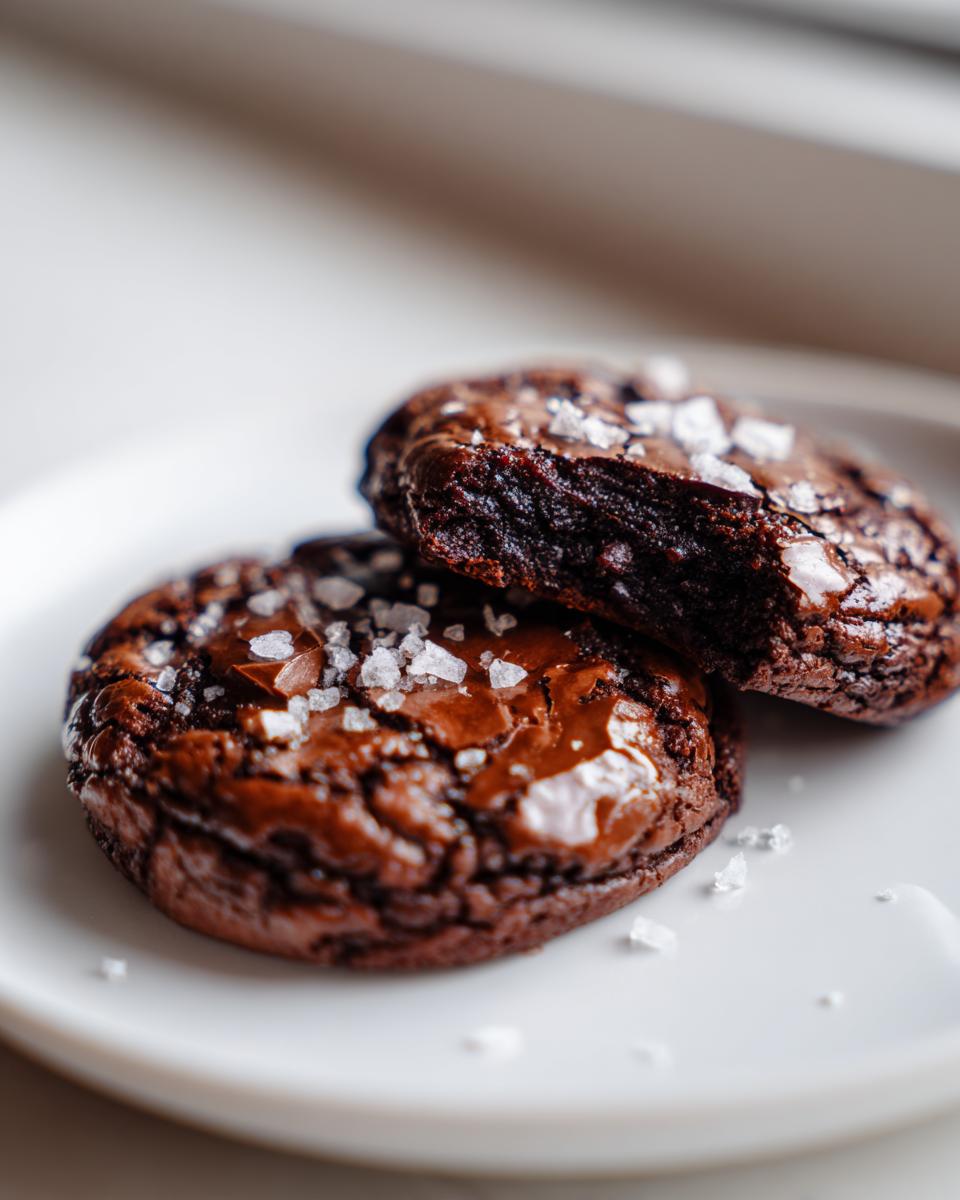
Time to scoop! Use a 1 1/2 tablespoon-sized cookie scoop—this is key for consistent baking—and drop the dough onto your prepared sheets, leaving about an inch and a half between each one because they will spread a little. Immediately sprinkle those flaky sea salt crystals over the top of every single dough ball.
Bake these beauties for exactly 8 to 10 minutes at 350ºF. You are looking for a shiny, crackly top. As soon as they come out of the oven, if you want that extra chocolate punch, press 3 or 4 extra chocolate chips right onto the hot tops. If you want perfectly round cookies, take a round cookie cutter—slightly larger than the cookie—and immediately use it to gently push the edges inward while the cookies are still soft on the pan. Let them rest on the baking sheet for about 5 minutes before carefully moving them to a cooling rack.
Tips for Perfect Salted Brownie Cookies Every Time
We’ve covered the baking, but I want to share a few insider secrets so your Salted Brownie Cookies turn out exactly like mine every single time. These little tricks come straight from my testing, and they make all the difference between a good cookie and a truly spectacular, fudgy experience. Don’t skip these notes; they are what separate the amateurs from the pros!
Remember that the speed at which you work is part of the recipe itself. If you let things cool down or sit too long, the batter structure changes, and you lose that perfect melt. Keep your eye on the clock and the oven!
Temperature and Timing Secrets
I cannot stress this enough: room temperature eggs are essential! They whip up much better with the sugar and oil, creating the necessary air pockets that contribute to the crackly top. Also, be ready to move fast once the chocolate is melted. You need to incorporate the cocoa powder and espresso powder immediately while the mixture is hot.
Also, work quickly when scooping and baking. The faster you get that thin batter into the hot oven, the better the structure sets up. This recipe isn’t designed to wait around! If you have two sheets, keep one ready to go into the oven the second the first one comes out.
Troubleshooting the Fudgy Interior
The visual cue for success in these Salted Brownie Cookies is that shiny, crackly top. If the top looks matte or dull when they come out, they baked a little too long, and the interior might be just a touch drier than the ultimate fudgy center we are aiming for. Next time, pull them out at the 8-minute mark to check.
If your cookies spread way too much and look like thin pancakes, it usually means your butter and chocolate mixture was too hot when added to the eggs, or you skipped whipping the eggs and sugar enough. If they spread just a bit too much, you can use that cookie cutter trick right out of the oven, but for a flatter cookie next time, make sure your butter isn’t actually hot—just fully melted!
Frequently Asked Questions About Sea Salt Chocolate Cookies
I get so many questions about baking these treats, and that’s wonderful! People always want to know how to get that perfect brownie texture in a cookie format. If you’re wondering about ingredient swaps or how long these amazing Salted Brownie Cookies will last, I’ve gathered the most common queries right here to help you out.
It’s my goal that every batch you bake is a success, so let’s tackle any worries you have about getting those perfect Sea Salt Chocolate Cookies!
Can I substitute the chocolate chips in these Salted Brownie Cookies?
You absolutely can experiment with the chocolate, but remember that the melting properties of the chips affect the final texture. I use semi-sweet because it balances the sugar perfectly. If you use dark chocolate (say, 60% or higher), you might need to add an extra tablespoon of sugar because the bitterness will be stronger. Milk chocolate chips often contain too much cocoa butter, which can cause the cookies to spread too much, so I’d stick to semi-sweet or bittersweet for the best fudgy results.
How long do these Brownie Bites last?
Honestly, they taste best the day you make them, but they hold up surprisingly well! Because of the high fat and sugar content, these Brownie Bites stay soft. You can keep them in an airtight container at room temperature for up to two days. After that, they might start to firm up just a tiny bit, but they are still delicious!
Why are my cookies flat?
Flat cookies are usually a sign that the chocolate and butter mixture was too hot when it hit the eggs, which essentially started cooking the eggs right away and broke the emulsion. Another reason is under-whipping the initial egg and sugar mixture—you need that frothiness! If they spread too much, make sure you are chilling your dough for at least 20 minutes next time, even though this recipe is faster than most.
Storing and Serving Your Homemade Salted Brownie Cookies
Once you manage to pull yourself away from eating all of them right off the rack, you’ll need to know the best way to store these amazing Salted Brownie Cookies to keep that fudgy texture intact. They are so rich that a little bit goes a long way, so storing them properly ensures you have a decadent treat ready for later!
These aren’t meant to last forever, but with the right care, they’ll be perfect for sharing (or hiding from the family)!
Storage and Shelf Life Guidelines
The key to keeping these cookies soft is minimizing air exposure. You must store the cooled cookies in a sealed food container. I’ve found that placing a paper towel loosely in the bottom of the container can sometimes help absorb any extra moisture, though usually, they are fine on their own. They are best enjoyed within two days when kept at room temperature. Don’t try freezing them; the texture changes too much when thawed.
Serving Suggestions for Chocolate Lovers
These cookies are seriously intense, so they pair beautifully with something cold and creamy to cut through that richness. My absolute favorite way to enjoy a Salted Brownie Cookie is straight from the counter with a tall, icy glass of cold milk. If you’re having them after dinner, a strong cup of black coffee or a dark roast espresso makes the chocolate flavor really pop.
Share Your Experience Making Salted Brownie Cookies
I put my heart into every recipe I share, and nothing makes me happier than hearing from you! Have you finally made a batch of these incredible Salted Brownie Cookies? I truly hope they brought some fudgy joy to your kitchen. Please leave a rating below and tell me what you thought—did you try the espresso powder? I love seeing your results!
Print
5 Amazing Salted Brownie Cookies Secrets
- Total Time: 25 minutes
- Yield: 24 cookies 1x
- Diet: Vegetarian
Description
Salted Brownie Cookies. Anna Kowalska shares tried-and-true homemade recipes that you and your family will love, everything made with heart and flavor. This recipe delivers a rich, fudgy brownie center in a cookie form, topped with flaky sea salt for a perfect sweet and salty bite.
Ingredients
- 1 cup All-Purpose Flour
- 1 tsp Baking Powder
- 1/8 tsp Salt
- 2 Large Eggs, room temperature
- 1 Large Egg Yolk, room temperature
- 1 cup Granulated Sugar
- 1 tbsp Vegetable Oil
- 1 tsp Vanilla Extract
- 6 tbsp Unsalted Butter
- 1 cup Semi-Sweet Chocolate Chips, plus some for topping cookies
- 1/4 cup Unsweetened Cocoa Powder
- 1 tsp Espresso Powder, optional
- Sea Salt Flakes, for topping cookies (optional garnish)
Instructions
- Adjust the oven rack to the 2nd level mark (just above center) and preheat your oven to 350ºF. Line two baking sheets with parchment paper or silicone mats. Set to the side.
- Whisk together the all-purpose flour, baking powder, and salt in a medium bowl. Set to the side.
- Using a hand mixer or stand mixer fitted with the paddle attachment, beat the eggs, egg yolk, granulated sugar, vegetable oil, and vanilla extract together on medium-high speed until fully combined and frothy.
- Heat the semi-sweet chocolate chips and unsalted butter together in a small saucepan over medium heat until fully melted and smooth. Remove from heat.
- Immediately whisk or stir the unsweetened cocoa powder and espresso powder into the melted chocolate mixture.
- Carefully pour the melted chocolate mixture into the wet ingredients and mix until the chocolate is just combined.
- Add in the whisked dry ingredients and mix on low speed until just combined, or fold in using a spatula. The batter will be thin but still scoopable.
- Using a 1 1/2 tablespoon-size cookie scoop or 2 spoons, scoop the cookie dough onto the baking sheets, leaving about 1 1/2 inches of space between them.
- Sprinkle some sea salt flakes over the top of each cookie. Bake for 8-10 minutes at 350ºF until the tops have a shiny, crackly top.
- Remove from the oven and immediately top with a few additional chocolate chips (optional). If you want perfectly round cookies, use a round cookie cutter immediately while the cookies are soft.
- Let the cookies cool on the baking sheets for about 5 minutes before transferring them gently with a spatula to a cooling rack to cool almost completely.
- Keep cookies in a sealed food container at room temperature for up to 2 days.
Notes
- Measure all ingredients first. Preheat the oven and line baking sheets before mixing the batter.
- Melt the chocolate chips and butter while you mix the wet ingredients.
- Stir the cocoa powder and espresso powder into the melted chocolate immediately after removing it from the heat.
- Add the melted chocolate mixture to the wet ingredients right away; cooling is not necessary.
- Fold dry ingredients with a spatula to avoid overmixing.
- The faster you prepare and bake these cookies, the better they will turn out.
- A 1 ½ tablespoon cookie scoop yielded 24 cookies.
- The cookie tops should look shiny and crackly with a fudgy interior.
- Place 3-4 extra chocolate chips on top immediately after removing the cookies from the oven for extra chocolate flavor.
- Use a round cookie cutter right away for perfectly shaped cookies.
- Prep Time: 15 minutes
- Cook Time: 10 minutes
- Category: Dessert
- Method: Baking
- Cuisine: American
Nutrition
- Serving Size: 1 cookie
- Calories: Approx. 180
- Sugar: Approx. 18g
- Sodium: Approx. 50mg
- Fat: Approx. 10g
- Saturated Fat: Approx. 6g
- Unsaturated Fat: Approx. 4g
- Trans Fat: 0g
- Carbohydrates: Approx. 22g
- Fiber: Approx. 1g
- Protein: Approx. 2g
- Cholesterol: Approx. 40mg