Skip to content
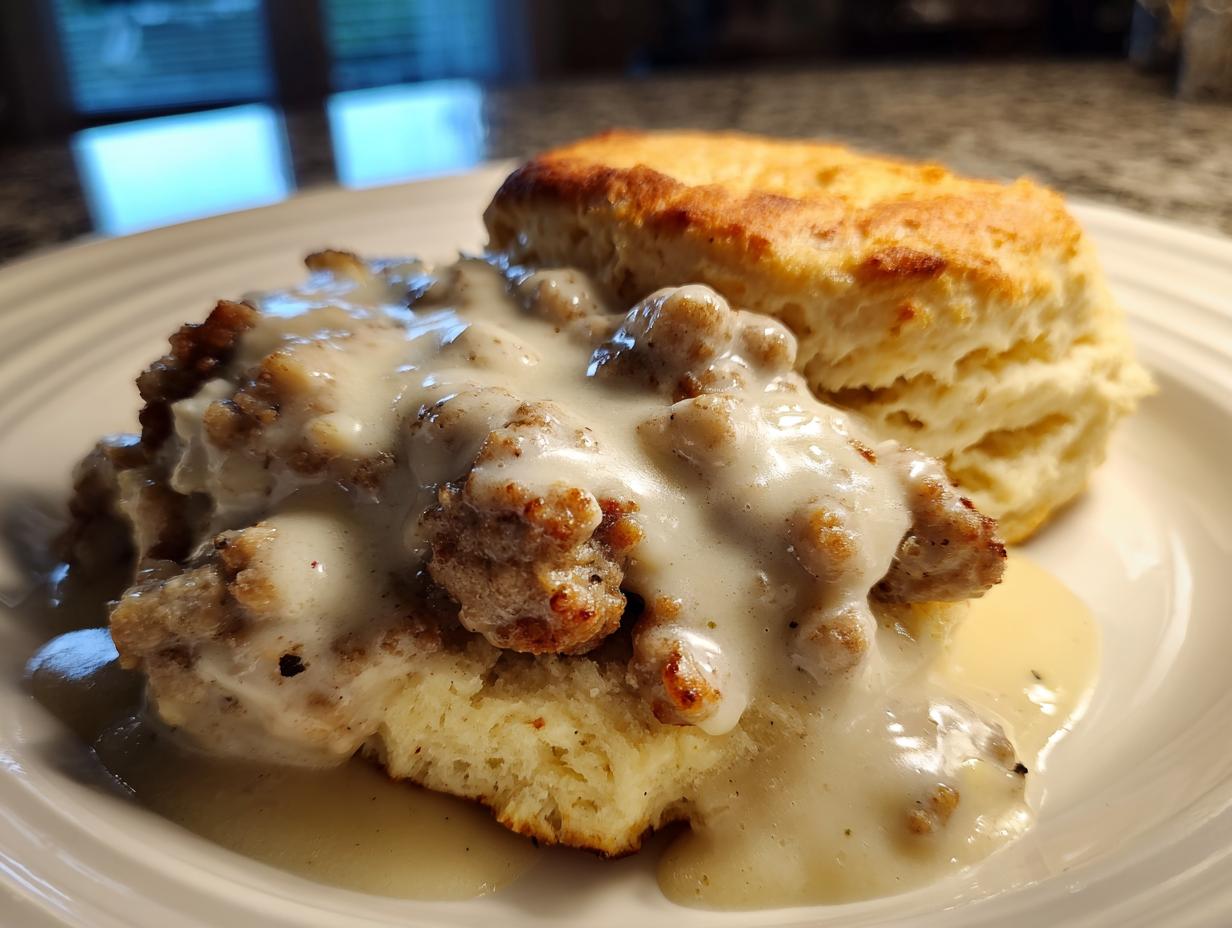
There’s just something about a cold morning that demands comfort food, right? For me, that means a steaming plate of biscuits smothered in the richest, creamiest sausage gravy you’ve ever tasted. We’re talking about that thick, savory sauce that perfectly soaks into every crevice of a warm, fluffy biscuit. It’s the ultimate hug in a bowl!
Hi there, I’m Anna Kowalska, and here I share tried-and-true homemade recipes that you and your family will love. Everything I post here is made with heart and flavor, tested over and over until it’s exactly how it should be. That’s why you can trust these methods—they’ve stood the test of time!
This recipe for sausage gravy isn’t fancy, but it’s foundational. It’s the blueprint for every good country breakfast. Forget those thin, disappointing sauces; we are making the real deal today. Get your skillet ready, because we’re about to elevate your breakfast game!
Jump to:
Gathering Your Components for Perfect Sausage Gravy
Before we even think about turning on the heat, we need to make sure all our components are lined up perfectly. I always lay everything out on the counter first—it saves so much frantic searching later when the sausage is sizzling! Remember, making fantastic sausage gravy starts with having the right things ready to go.
Since we’re using turkey sausage this time, we need to be mindful of the fat we render out, as that’s the base of our roux flavor. Don’t skimp on measuring the flour; too much and you get paste, too little and you get soup! Let’s look at exactly what you need to pull together this classic breakfast staple.
Ingredient List for Classic Sausage Gravy
Here is what you need for a hearty batch of eight servings. Make sure your milk is cold—that helps prevent lumps when we add it in!
| Component | Amount/Detail |
|---|---|
| Mild Turkey Sausage | 1 pound (broken into small pieces) |
| All-Purpose Flour | 1/3 cup (measured exactly!) |
| Whole Milk | 3 cups (cold is best) |
| Seasoned Salt | 1/2 teaspoon |
| Black Pepper | 1/2 teaspoon |
| Refrigerated Biscuits | 8 count (for serving) |
Equipment Needed for Your Sausage Gravy
You don’t need a fancy setup for this, honestly. A good, sturdy medium-to-large skillet is essential so you have room to move the sausage around. Make sure you have your measuring cups and spoons handy, and definitely grab a whisk or a sturdy wooden spoon for stirring!
Step-by-Step Guide to Making Sausage Gravy
Alright, now for the fun part! Don’t rush this process; good gravy takes a little patience, but I promise, the payoff is worth every second. We are going to build flavor layer by layer, starting with that beautiful sausage fat. This is where all the flavor lives, so pay attention!
Preparing the Sausage Base
First things first: get your biscuits baking! They take about 10 to 12 minutes, and you want them piping hot the second the gravy is done. Follow the package directions exactly for the best rise. While those are going, set your skillet over medium heat. Add your pound of mild turkey sausage. You need to break it up as it cooks—I use a spatula and just chop it into small, bite-sized crumbles. Cook it until it’s nicely browned, which usually takes about 7 or 8 minutes.
The most crucial thing here is *not* to drain the fat! That rendered fat is the foundation of our flavor. Once the sausage is browned, turn the heat way down to low. We don’t want anything burning when we add the flour.
Creating the Roux: The Secret to Creamy Sausage Gravy
This step is non-negotiable if you want that luxurious texture. With the heat on low, gradually sprinkle in your 1/3 cup of flour right over the cooked sausage and fat. You need to stir constantly, almost religiously, for about a minute or two. You’re creating what we call a roux. If you stop stirring, the flour clumps up, and then you’ve got lumps in your finished sausage gravy—and nobody wants that!
Keep stirring until that flour is completely coated with the fat and it smells a little nutty, almost like toast. This step cooks out that raw flour taste that ruins so many homemade gravies. It’s the secret weapon for smooth, creamy results, every single time.
Achieving the Right Consistency for Your Sausage Gravy
Once the roux is perfect, it’s time for the milk. Take your 3 cups of whole milk and start pouring *slowly*. I mean a thin stream while you whisk like crazy. If you dump it all in at once, you’ll shock the roux and get lumps again. So, pour a little, whisk until smooth, pour a little more, whisk again. Keep stirring until all the milk is incorporated.
Now, bring the heat up just slightly to low-medium. Let this mixture simmer gently, stirring every minute or so, for about 8 to 10 minutes. You’ll watch your thin liquid transform into a thick, beautiful coating sauce. This simmering time is key to developing the body of the sausage gravy. If it seems too thin after 8 minutes, just give it another minute or two on the heat.

Final Seasoning and Assembly
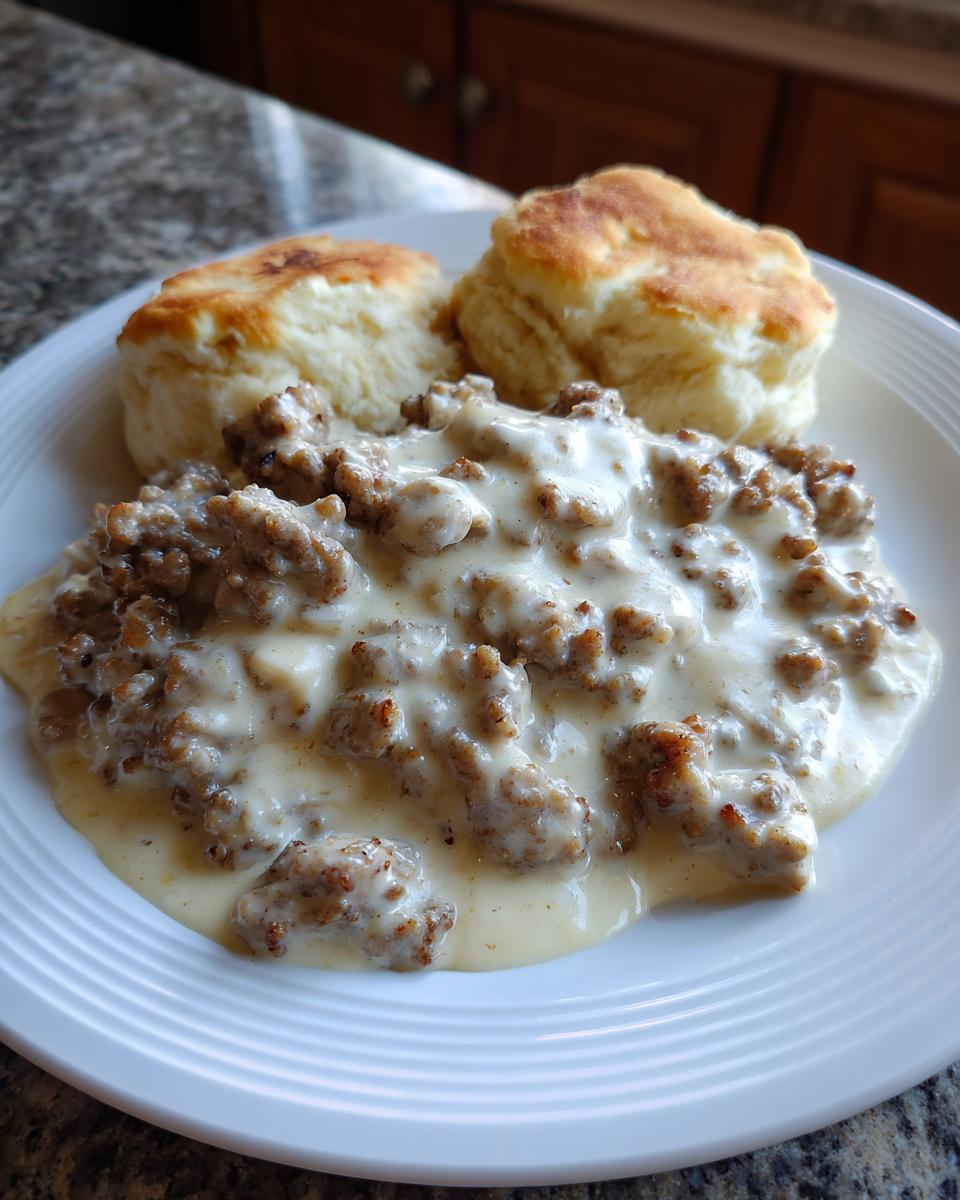
Once you’re happy with how thick your sausage gravy is, kill the heat. Now we season! Stir in your 1/2 teaspoon of seasoned salt and 1/2 teaspoon of black pepper. Give it a really good stir to make sure those flavors are distributed evenly throughout the whole pan. Taste it! You might need a tiny bit more pepper, depending on how peppery you like things.
Your biscuits should be done now. Pull them out and slice them open right away. Don’t wait! Spoon that hot, savory gravy generously over every biscuit. Serve it immediately while it’s steaming hot. This is the best part of the whole morning!
Tips for Making the Best Sausage Gravy Every Time
Listen, even the most seasoned cooks mess up gravy sometimes—it happens to the best of us! That’s why I rely on these tried-and-true fixes. Having a backup plan means you never have to throw out a batch of potentially great sausage gravy. My goal is always to pass on advice that guarantees success, just like my mom taught me.
These little tweaks are what separate a decent breakfast from an absolutely legendary one. We want that perfect, scoopable texture that clings to the biscuit, not one that slides right off!
Adjusting Thickness in Your Sausage Gravy
If you followed the simmer time and your gravy is just way too thin—maybe you got distracted chatting—don’t panic! Just turn the heat back up to low-medium and let it simmer uncovered for a few more minutes. The moisture needs time to evaporate, making the sauce thicker. If it gets too thick, though—we’ve all been there, resulting in something closer to paste—just whisk in a splash of cold milk, a tablespoon at a time, until it loosens up to that perfect, dreamy consistency. It’s that easy!
Ingredient Substitutions for Sausage Gravy
While I love this turkey sausage recipe, sometimes you need to swap things out. If you only have regular pork breakfast sausage on hand, use that! It will give you a bit more fat, which is great for flavor, but you might need to scoop out a tablespoon or two of the rendered fat before adding the flour, just so you don’t end up with too much grease. For the milk, whole milk is best for richness, but if you only have 2% or even unsweetened almond milk, you can use it. Just know that using anything less than whole milk will result in a slightly less rich final sausage gravy.
Serving Suggestions for Your Sausage Gravy
Once you have that beautiful, steaming bowl of sausage gravy ready to go, you’ve got the centerpiece of a fantastic meal! While biscuits are the absolute classic pairing—and honestly, my favorite way to eat it—sometimes you need to mix things up or make it a full spread.
For a truly hearty brunch, try spooning this over crispy hash browns instead of biscuits. The gravy soaks right into the potatoes! Another great option is using it instead of Hollandaise sauce on eggs Benedict, maybe even skipping the hollandaise because this gravy is so rich. And if you happen to have leftover gravy, it’s wonderful dolloped onto scrambled eggs or even used as a savory topping for leftover fried chicken. It just makes everything taste better!
Storing and Reheating Leftover Sausage Gravy
It’s rare that we have leftovers because everyone usually goes back for seconds, but when we do, I hate seeing that rich gravy go to waste! This hearty sausage gravy stores beautifully if you handle it right. You want to cool it down quickly before putting it away. Never leave it sitting on the counter for more than two hours—food safety first, always!
When you reheat it, you have to remember that gravy tends to thicken up a lot as it cools down in the fridge. It will look almost solid the next day, but don’t worry, we can bring it right back to life. Here is my quick guide for keeping your leftovers safe and delicious:
| Storage Method | Duration | Reheating Tip |
|---|---|---|
| Airtight Container (Fridge) | 3 to 4 days | Reheat slowly on the stovetop, adding milk or water to thin. |
| Freezer-Safe Bag/Container | Up to 2 months | Thaw overnight in the fridge first, then reheat gently. |
When reheating on the stove, use low heat and stir constantly. If you microwave it, use short bursts and stir in between each burst to prevent hot spots and ensure even heating. That beautiful, creamy sausage gravy will be ready in no time!
Frequently Asked Questions About Sausage Gravy
I get so many questions about this breakfast classic! People always want to know how to tweak it or fix little mistakes, and that’s totally fair. This recipe is meant to be your reliable go-to, so let’s clear up the most common things I hear about making perfect sausage gravy.
Trust me, once you master a few little tricks, you’ll never look at store-bought gravy again. These simple tips ensure that every batch you make is rich, flavorful, and exactly what a hearty breakfast deserves!
Can I use a different type of milk in this Sausage Gravy?
You absolutely can try, but whole milk is the gold standard here because that extra fat content really contributes to the richness of the final texture. If you use 2% milk, your gravy will be slightly thinner. If you try to use skim milk, it might taste a little watery. For non-dairy options, I’ve had success with plain, unsweetened cashew milk—it has a nice creaminess. Avoid coconut milk unless you want a strange coconut undertone!
How long does homemade Sausage Gravy last in the refrigerator?
If you store it properly in an airtight container after cooling it down, your homemade sausage gravy should be good in the refrigerator for about three to four days. Just make sure it doesn’t sit out at room temperature for too long before refrigerating. When you reheat it, remember to stir in a splash of milk or water to bring back that original, pourable consistency.
What makes this Sausage Gravy recipe so creamy?
The creaminess comes from two main things working together! First is the roux—that mixture of flour cooked in the sausage fat. Cooking the flour properly removes the raw taste and creates a smooth thickening agent. Second is using whole milk and simmering it long enough. The combination of fat (from the sausage and milk) and the starch (from the flour) emulsifies perfectly during that 8-to-10-minute simmer time, giving you that signature velvety texture in your sausage gravy.
Understanding the Nutritional Estimate for Sausage Gravy
I always like to give a general idea of what you’re getting into when you sit down to a plate of this deliciousness. Keep in mind these numbers are estimates based on the ingredients I listed, especially using turkey sausage and whole milk. When you’re cooking from scratch, the exact nutrition can shift a little depending on how much fat renders out or how thick you make it!
Here is a quick snapshot of the estimates per serving. Don’t forget, this is hearty food designed to keep you full until lunch!
| Nutrient | Estimated Value |
|---|---|
| Calories | 330 |
| Fat | 24g |
| Protein | 16g |
| Carbohydrates | 12g |

3 Secrets for Glorious Sausage Gravy
- Total Time: 20 minutes
- Yield: 8 servings 1x
- Diet: Vegetarian
Description
Enjoy a rich, creamy sausage gravy over warm biscuits with this easy recipe perfect for breakfast or brunch. This comforting sausage gravy recipe is a classic, hearty start to the day for families.
Ingredients
- 1 pound mild turkey sausage
- 1/3 cup all-purpose flour
- 3 cups whole milk
- 1/2 teaspoon seasoned salt
- 1/2 teaspoon black pepper
- 8 refrigerated biscuits
Instructions
- Preheat the oven and bake biscuits following package instructions.
- Place sausage in a medium-large skillet over medium heat. Break the sausage into small pieces and cook until browned, about 7 to 8 minutes. Keep the fat in the pan.
- Reduce heat to low and gradually sprinkle in flour, stirring constantly to coat the sausage evenly.
- Slowly pour in milk, stirring to combine.
- Increase heat to low-medium and cook, stirring occasionally, until the gravy thickens, about 8 to 10 minutes.
- Season with seasoned salt and black pepper, stirring well.
- Remove biscuits from the oven and cut them open.
- Spoon warm sausage gravy generously over each biscuit.
- Serve immediately while hot.
Notes
- For thicker gravy, simmer longer.
- For thinner gravy, reduce the cooking time slightly.
- Prep Time: 5 minutes
- Cook Time: 15 minutes
- Category: Breakfast
- Method: Stovetop
- Cuisine: American
Nutrition
- Serving Size: 1 serving
- Calories: 330
- Sugar: Unknown
- Sodium: Unknown
- Fat: 24g
- Saturated Fat: Unknown
- Unsaturated Fat: Unknown
- Trans Fat: Unknown
- Carbohydrates: 12g
- Fiber: Unknown
- Protein: 16g
- Cholesterol: Unknown