Skip to content
If you’re anything like me, when game day rolls around or a last-minute party pops up, you need an appetizer that’s guaranteed to disappear fast. Forget fussy hors d’oeuvres! I’m Anna Kowalska, and here I share tried-and-true homemade recipes that you and your family will love—everything is made with heart and flavor. This Seven-Layer Dip isn’t just a recipe; it’s my secret weapon for potlucks. It’s so satisfyingly rich and colorful, and honestly, it makes me look like a culinary genius with almost zero effort!
I developed my love for these big, bold dips back when I was hosting huge family cookouts every summer. I needed something that tasted incredible, could sit out for a bit, and didn’t require me to stand over the stove. This classic Tex-Mex dip checks every single box. It’s got that perfect combination of creamy, savory, and fresh textures that keeps everyone reaching for more chips. Trust me, once you see how easy it is to build these beautiful layers, this recipe will become your staple, too.
Jump to:
Sourcing Ingredients for the Perfect Seven‑Layer Dip
When you’re making a dip where every single layer is visible, ingredient quality really matters, doesn’t it? Since this Seven-Layer Dip relies on fresh flavors sitting right next to each other, you can’t just grab the cheapest thing off the shelf for every component. I’ve learned through years of trial and error that using good quality refried beans makes a huge difference in the final texture. You want them smooth, not watery!
Also, think about your sour cream. If it’s too thin, your seasoned layer will bleed into the guacamole, and suddenly you have a five-layer mess instead of a seven-layer showstopper. I always look for a thicker, full-fat sour cream. That way, when you mix in the taco seasoning, it holds its shape beautifully. We want clear, distinct layers, and that starts with smart shopping!
Assembling Your Seven‑Layer Dip Ingredient List
I keep my ingredient list super straightforward because the magic is in the layering, not in some obscure spice mix. I’ve listed out the exact items and amounts you’ll need for the perfect presentation below in the recipe card. But for a quick run-through, remember you need a good foundation of beans, a creamy middle, and then your fresh toppings. Don’t stress too much about exact quantities right now; just make sure you have all seven components ready to go for your Seven-Layer Dip assembly!
Ingredient Notes and Preparation Tips for Your Seven‑Layer Dip
People always ask me about substitutions, especially for the guacamole. Look, I love a good homemade guac, but if you’re in a rush, buy the best tubbed version you can find. Just make sure it tastes bright and fresh—no brown spots allowed! Also, when it comes to the olives and tomatoes, dice them small. If your tomato chunks are too big, they just slide off the seasoned sour cream layer when you try to scoop. We are building a sturdy dip here! For the best flavor in your Seven-Layer Dip, always drain your salsa really well before using it as a layer, or you’ll end up with soup instead of dip.
Essential Equipment for Layered Appetizer Assembly
When it comes to building this amazing appetizer, you don’t need a fancy gadget collection. Honestly, this is one of the easiest dips to put together because the tools are so basic. You probably have everything sitting in your kitchen drawers right now!
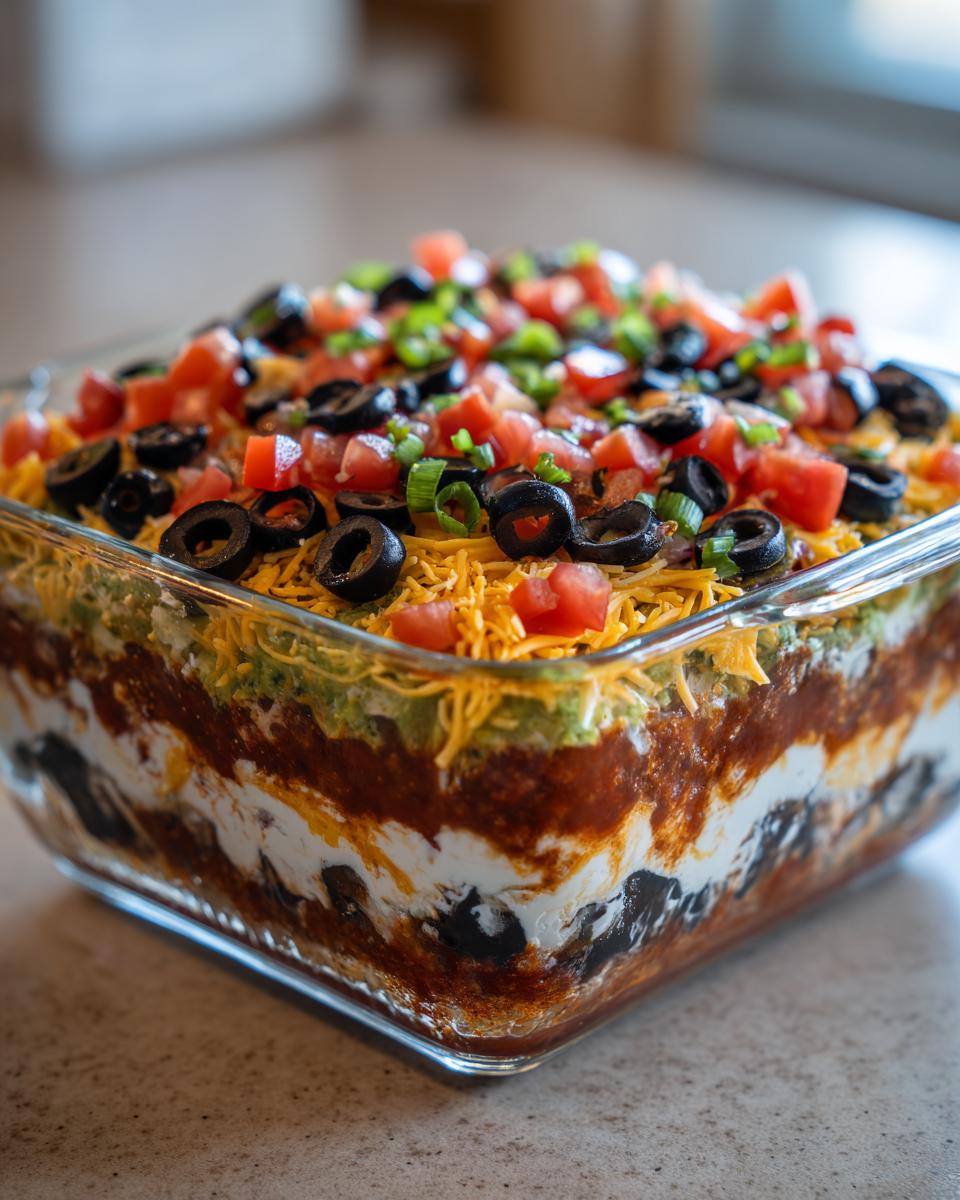
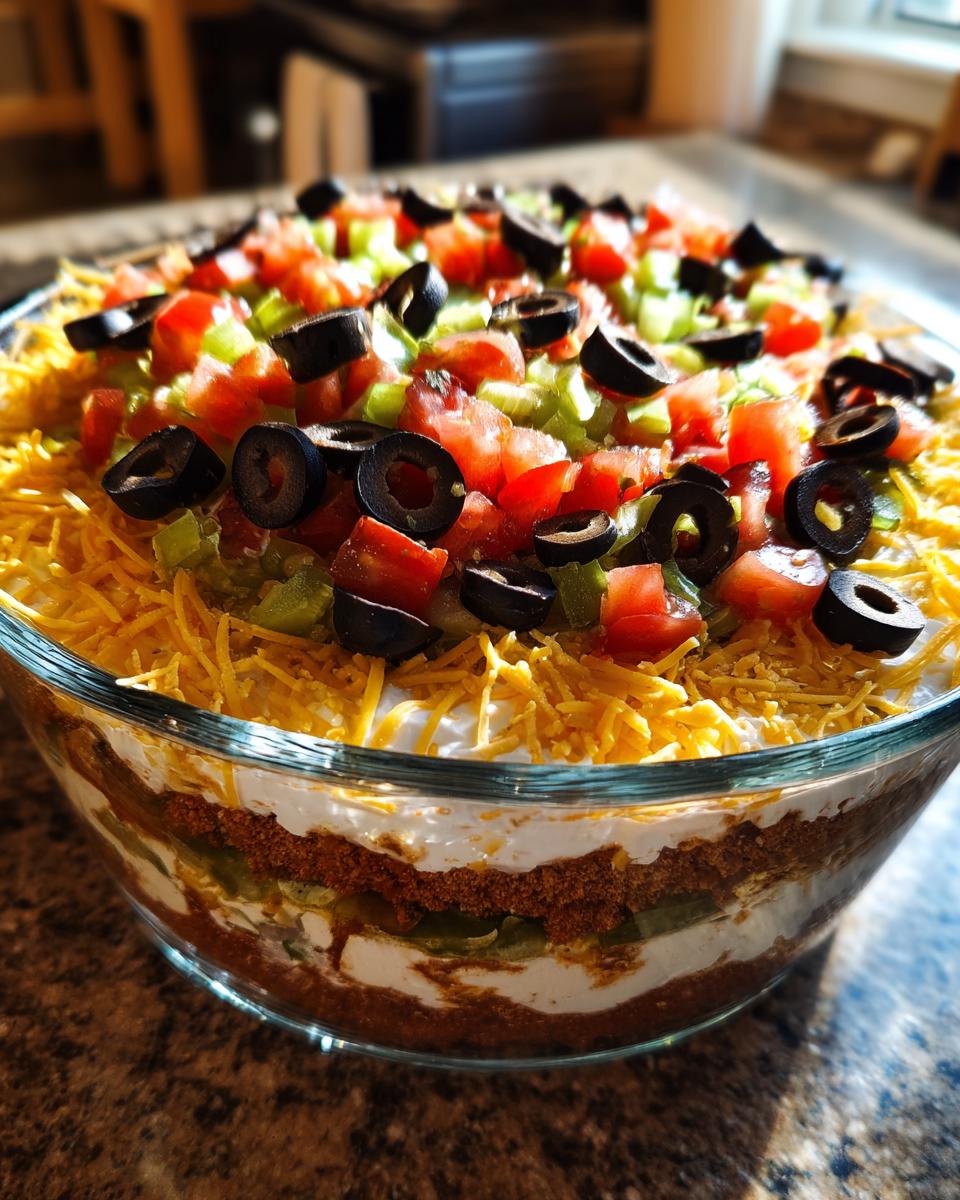
First up, you absolutely must have a serving platter. I prefer a large, shallow glass dish—like a 9×13 inch casserole dish—because seeing those beautiful, distinct layers is half the fun! You need to see the rainbow of flavors you’ve created.
Next, you’ll need a couple of mixing bowls for preparing your seasoned sour cream and maybe mashing up your guacamole if you aren’t buying it pre-made. A sturdy spatula or offset spatula is a lifesaver for gently spreading each layer so you don’t accidentally dig down into the one beneath it. Keep it simple, keep it clean, and you’ll be scooping chips in no time!
Step-by-Step Instructions for Making Seven‑Layer Dip
Okay, now for the fun part—the actual assembly! This is where you turn a pile of ingredients into the star of the party. Remember, we are working from the bottom up, and patience is key here. Rushing this step means you end up with a muddy mess, and we certainly don’t want that for our gorgeous Seven-Layer Dip!
Before you even grab your serving dish, make sure all your components are ready. The sour cream needs to be mixed and seasoned, the salsa needs to be drained, and your cheese and olives should be ready to scatter. Having everything prepped makes this assembly process fly by—it only takes about 20 minutes total!
Creating the Flavor Base Layers for Your Seven‑Layer Dip
Start with your refried beans. You want a nice, even layer covering the entire bottom of your platter or dish. Use the back of a spoon or your spatula to spread them out gently. Don’t press too hard because we need this base to be sturdy enough to hold everything else up! If you press too hard, the beans will climb up the sides of the dish, which isn’t the look we are going for.
Next comes the guacamole. This is where things get a little trickier because guac can be soft. Place spoonfuls of the guacamole over the beans, trying to keep the dollops separate at first. Then, using very light pressure—and I mean *light*—gently swirl or spread the guacamole until it covers the beans. You want to avoid dragging the beans up into the green layer. Once that’s set, carefully spread your seasoned sour cream over the top. This layer acts like delicious cement, holding the fresh toppings in place for your perfect Seven-Layer Dip.
Finishing and Setting the Seven‑Layer Dip
Once the sour cream is spread, the rest is easy peasy! Now we add the ingredients that give the dip its color and fresh pop. Spoon your drained salsa over the sour cream layer. Again, be gentle! Don’t dump it right in the middle; try to distribute it evenly around the surface. This is the key to an aesthetically pleasing Seven-Layer Dip.
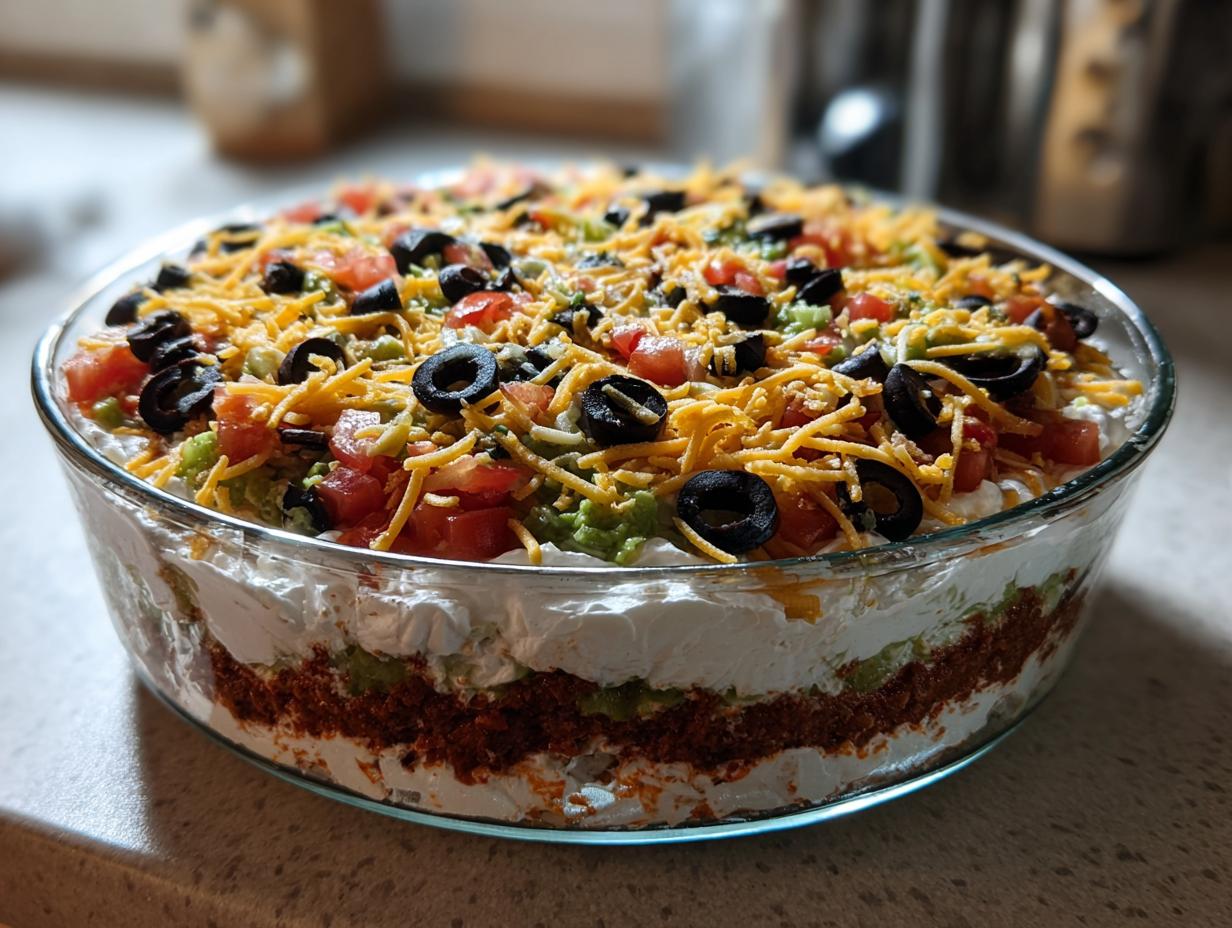
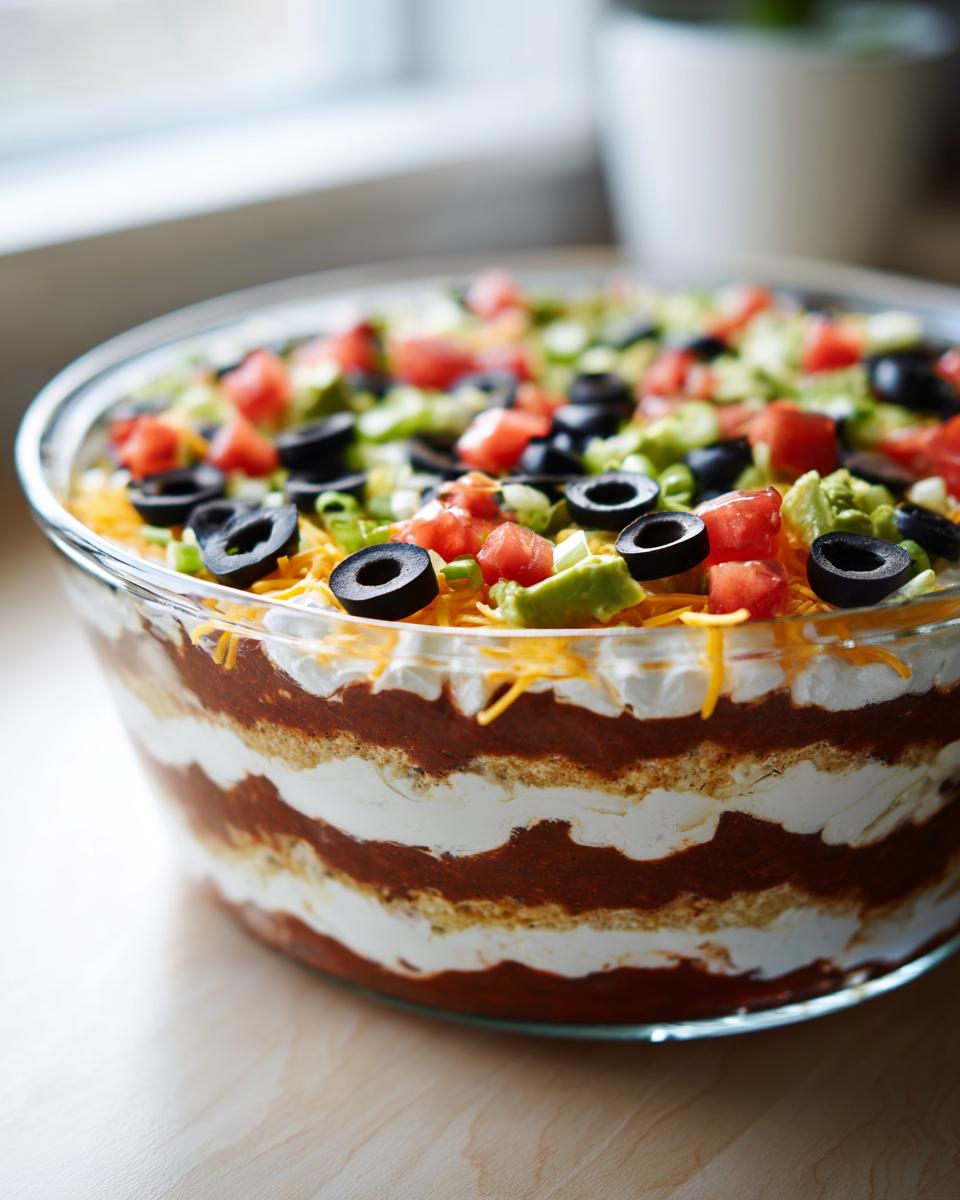
After the salsa, sprinkle your shredded cheese evenly across the top. Then, scatter the sliced black olives and finally, top it all off with your diced tomatoes. These top three layers are all about color contrast! Once everything is layered, you absolutely must chill it. Wrap that platter tightly with plastic wrap and pop it into the fridge for at least an hour, but honestly, two hours is better. This chilling time allows the flavors to meld together beautifully and firms up those lower layers so the dip doesn’t slide apart when people start digging in.
Why This Seven‑Layer Dip Recipe Works Every Time
I’ve made this appetizer for every major event for the last decade, and it never fails to impress or disappear first. It’s truly the perfect party dish because it solves so many hosting problems at once. When you need something spectacular that requires zero actual cooking time, this is your answer!
- Speed Factor: Total hands-on time is under 20 minutes. You can whip this up right before guests arrive and still have time to relax.
- Flavor Balance: The combination of savory beans, cool sour cream, bright tomatoes, and tangy salsa hits every taste bud perfectly. It’s addictive!
- Visual Appeal: Seeing those distinct, colorful layers on a clear platter makes it look so much more impressive than a simple bowl of hummus.
- Crowd Pleaser: Seriously, who doesn’t love this dip? It appeals to vegetarians and meat-eaters alike, making party planning easier.
Troubleshooting Common Seven‑Layer Dip Questions
Don’t panic if your dip looks a little wonky after you’ve assembled it! Sometimes, even with the best intentions, things slide around or layers get mixed up. That’s why I wanted to gather some of the most common issues people run into when making this classic appetizer. We want beautiful layers, not a casserole!
The secret to avoiding most issues is temperature control and gentle spreading, but let’s talk specifics. If you follow these tips, your dip will be structurally sound and delicious!
How long should I chill the Seven‑Layer Dip before serving?
This is probably the number one thing people mess up! If you serve your Seven-Layer Dip immediately, the layers will slide around the second someone takes a chip full. You need time for those creamy layers to firm up and bond together. I always insist on at least one hour in the fridge, but honestly, two to four hours is ideal. That chilling time sets everything perfectly so you get that satisfying scoop that shows off all seven layers without collapsing.
Can I make components of this layered appetizer ahead of time?
Oh, absolutely! That’s one of the biggest advantages of this recipe. You can totally prep components ahead of time for quicker assembly later. I usually mix my seasoned sour cream the day before and keep it covered in the fridge. You can even drain your salsa the morning of the party. Just make sure that once you start layering the Seven-Layer Dip, you keep it chilled until about 15 minutes before serving. Don’t assemble it more than 24 hours in advance, though, especially because of the fresh tomatoes on top!
What chips pair best with this Tex-Mex dip?
Since the lower three layers are quite soft and creamy, you need a chip that can handle the weight! Thin, delicate chips will snap instantly and leave you heartbroken. I always grab sturdy, thick tortilla chips—the ones that look a little rough-cut are often the best because they have great scoop potential. If you use corn chips, make sure they are the sturdy kind, not the flimsy taco-style chips. A good, strong chip is essential for conquering this dip!
Storing and Reheating Your Leftover Seven‑Layer Dip
I know, I know—it’s hard to believe you’d have leftovers, but sometimes the crowd is small! If you do end up with some amazing Seven-Layer Dip left over, storage is crucial to keep those layers looking good. The biggest issue is moisture migration, especially where the salsa meets the cheese.
First thing: cover it tightly. Use plastic wrap pressed right down onto the surface of the dip, especially if you have any exposed toppings like tomatoes. This prevents the top layers from drying out or absorbing fridge smells. You can safely store it in the refrigerator for up to three days. Because this dip is served cold, you don’t need to worry about reheating at all! Just pull it out about 20 minutes before you plan to eat it again so it loses that hard chill. Check the handy storage table below for quick reference on how long everything lasts!
Share Your Experience with This Seven‑Layer Dip
I truly hope this recipe brings as much joy and easy entertaining to your home as it does to mine. I absolutely love hearing how your parties went!
Tell me below—what was the first layer your family went after? Did you stick to the classic seven, or did you sneak in an extra layer of your own? Drop a comment and let the conversation flow!
Print
Seven-Layer Dip: 1 Amazing Party Secret
- Total Time: 20 minutes
- Yield: About 8 servings
- Diet: Vegetarian
Description
This Seven-Layer Dip offers a classic, crowd-pleasing appetizer perfect for any gathering. You layer creamy, savory ingredients for a flavorful dip experience.
Ingredients
- Refried beans
- Guacamole
- Sour cream mixed with taco seasoning
- Salsa
- Shredded cheese
- Black olives
- Diced tomatoes
Instructions
- Spread refried beans in a layer on a serving platter.
- Layer guacamole over the beans.
- Spread seasoned sour cream over the guacamole layer.
- Add salsa, shredded cheese, olives, and tomatoes as the remaining layers.
- Serve this dip chilled with your favorite chips.
Notes
- Prepare components ahead of time for quicker assembly.
- Use your favorite brand for each component to customize flavor.
- Prep Time: 20 minutes
- Cook Time: 0 minutes
- Category: Appetizer
- Method: Layering
- Cuisine: Tex-Mex
Nutrition
- Serving Size: 1/8 of recipe
- Calories: 250
- Sugar: 5g
- Sodium: 550mg
- Fat: 18g
- Saturated Fat: 7g
- Unsaturated Fat: 11g
- Trans Fat: 0.5g
- Carbohydrates: 15g
- Fiber: 3g
- Protein: 8g
- Cholesterol: 30mg